
Проигрыватель винила Pro-Ject Debut Carbon EVO имеет тяжелое и прочное шасси из MDF с 9 различными вариантами внешней отделки, новый опорный диск, улучшенное демпфирование двигателя, электронное переключение скорости вращения пластинки и регулируемые по высоте опоры. Pro-Ject Debut Carbon EVO устанавливает новую планку качества для доступного по цене проигрывателя винила.
В модели Debut Carbon EVO используется электронное переключение скорости вращения пластинки. Помимо возможности простого переключения скорости вращения пластинки одним нажатием кнопки, эта же электронная схема служит для точной стабилизации скорости ее вращения. Благодаря наличию в комплекте круглого пассика для скорости 78 об/мин вы также сможете слушать вашу коллекцию пластинок из шеллака.
Металлический опорный диск демпфирован с помощью TPE (термопластичный эластомер), что позволило полностью погасить нежелательные резонансы. Также дополнительное демпфирование диска увеличило его вес до 1,7 кг, что положительно сказалось на стабильности вращения.
Усовершенствованная подвеска двигателя позволила практически полностью устранить механические вибрации, способные ухудшить звучание проигрывателя. Это техническое решение было позаимствовано у моделей Pro-Ject класса High End, которое уже не раз доказало свою эффективность.
В Pro-Ject Debut Carbon EVO установлен фирменный карбоновый тонарм длиной 8,6 дюйма, изготовленный с высокой точностью. Цельная конструкция тонарма с интегрированным шеллом предотвращает нежелательные резонансы и обеспечивает надежный механический контакт со звукоснимателем. На тонарм установлен отличный звукосниматель Ortofon 2M Red (производство: Дания), что упрощает настройку проигрывателя.
В отличие от проигрывателей серии Debut прежних лет, модель Pro-Ject Debut Carbon EVO оснащена тремя металлическими опорами, регулируемыми по высоте. Это обеспечивает возможность идеально выровнять положение проигрывателя, что является необходимым условием для получения действительно качественного звука.
Проигрыватель собран вручную на фирменной фабрике Pro-Ject, расположенной в Европе.
Характеристики Pro-Ject Debut Carbon EVO
- Скорость: 33, 45 об/мин (электронное переключение), 78 об/мин
- Привод: пассиковый
- Точность скорости: +/-0,5%
- Нестабильность скорости: 0,17%
- Опорный диск: 300 мм, сталь, демпфирование TPE, вес 1,7 кг
- Подшипник: нержавеющая сталь, бронза
- Соотношение сигнал/шум: 68 дБ
- Длина тонарма: 8,6 дюйма
- Материал тонарма: углеволокно (карбон)
- Эффективная длина тонарма: 218,5 мм
- Заход: 18,5 мм
- Phono: RCA
- Тип картриджа: ММ
- Выходное напряжение: 5,5 мВ
- Тип иглы: эллиптическая
- Рекомендуемое сопротивление нагрузки: 47 кОм
- Рекомендуемая емкость нагрузки: 150–300 пФ
- Частотная характеристика: 20 – 20,000 Гц
- В комплекте: Соединительный фоно-кабель RCA-RCA, пылезащитная крышка
- Потребляемая мощность: 4 Вт Габариты (Ш х В х Г): 415 х 113 х 320 мм
- Вес: 6 кг
Table of Contents
- Pro-Ject Debut Carbon EVO
- Safety instructions
- Set-up
- Cartridge downforce adjustment
- **Anti-skating force adjustment
- Connection to the amplifier
- Mains power connection
- Fitting the lid
- Switching on and off, changing replay speed
- Useful tips
- Adjusting the azimuth
- **Fitting and connecting the cartridge
- Maintenance and cleaning
- Service
- Warranty
- References
- Read User Manual Online (PDF format)
- Download This Manual (PDF format)
INSTRUCTIONS FOR USE
Debut Carbon EVO


Pro-Ject Debut Carbon EVO
Controls, features and connections
| (1) Motor with TPE damped flange | (12) Hinge fasteners |
|---|---|
| (2) Stepped drive pulley | (13) Phono output sockets and earth connection |
| (3) Drive belt | (14) Power supply socket |
| (4) Sub-platter | (15) Anti-skating weight |
| (5) Platter TPE damping and felt mat | (16) Anti-skating weight support hoop |
| (6) Tonearm counterweight 6a Downforce scale | (17) Anti-skating weight |
adjustment scale
(7) Tonearm lift lever| (18) Height adjustable feet with TPE damping
(8) Tonearm rest and removable transport lock| (19) Speed selector
(9) Tonearm tube 9a Tonearm base| (20) Headshell with finger lift and
fitted Ortofon 2M RED or Sumiko Rainier cartridge
(10) Lid| (21) Single adapter
(11) Lid hinges|
Dear music lover,
Thank you for purchasing a Pro-Ject Audio record player. In order to achieve
maximum performance and reliability with this record player you should study
these instructions for use carefully.
Warning of a hazard for the user, the unit or possible misuse.
Important notice.
The following instructions for adjusting the cartridge are provided in case
the cartridge is replaced by a different model at a later date. During
assembly and adjustment of the deck small parts could be lost if not carefully
placed in a suitable receptacle. Before starting to assemble, get familiar
with the parts listed above and correspondingly numbered in the technical
drawings above.
Safety instructions
The power supply is used to connect and disconnect the unit from the mains.
Make sure that the plug is easily accessible at all times. Hold the plug when
unplugging the power cord. Never handle the power cord while your hands are
wet or damp.
Avoid letting liquids enter the device. Never place any item containing
liquid, like a flower vase, on or near the device. Never spill any liquid on
the device. Never place any naked flame sources, like lighted candles, on or
near the device. The product shall not be used in damp or wet locations, next
to a bathtub, sink, swimming pool or any other similar conditions.
Keep plastic bags away from children to prevent any risk of suffocation.
Set-up
The deck is supplied partially disassembled and carefully packaged for safe
transport. Carefully remove all parts from the transport packaging.
Make sure the surface you wish to use the turntable on is level (use a spirit
level) before placing the turntable on it. Remove the transport lock (8) from
the tonearm. Store it in the original packaging so it is available for any
future transportation.
Fit the drive belt (3) around the hub (4) and the smaller diameter part of the
motor pulley (2). Avoid getting sweat or grease on the belt as these will
deteriorate the performance and reduce the belt’s lifespan. Use absorbent
kitchen paper to remove any oil or grease from the outer edge of the hub and
the belt. Fit the platter (5) and felt mat over the spindle of the hub (4).
Cartridge downforce adjustment
The counterweight (6) supplied is suitable for cartridges weighing between 5
8.5g ( Ortofon 2M Red, Sumiko Rainier – weight no. 08). Pushing carefully,
turn the counterweight (6) onto the rear end of the tonearm tube (9), so that
the downforce scale (6a) shows towards the front of the player. Lower the
armlift and position the cartridge in the space between the armrest and
platter. Carefully rotate the counterweight (6) until the arm tube balances
out. The arm should return to the balanced position if it is moved up or down.
This adjustment must be done carefully. Do not forget to remove the cartridge
protection cap if fitted.
Once the arm is correctly balanced return it to the rest. Hold the
counterweight (6) without moving it, and gently revolve the downforce scale
ring (6a) until the zero is in line with the anti-skating prong (17). Check
whether the arm still balances out.
Rotate the counterweight counterclockwise (seen from the front) to adjust the
downforce according to the cartridge manufacturer’s recommendations. One mark
on the scale represents 1 mN (= 0.1g / 0.1 Pond) of downforce.
Please note: Adjust the downforce prior to installing the anti-skating weight.
The recommended downforce for the Ortofon 2M RED cartridge is 17.5mN. The
recommended downforce for the Sumiko Rainier cartridge is 20mN.
**Anti-skating force adjustment
**
The anti-skating force must be adjusted corresponding to the downforce as
follows:
| Downforce | Groove in the stub (17) |
|---|---|
| 10 – 14mN | 1 st from bearing rings |
| 15 – 19mN | 2nd ” ” “ |
| 20mN and bigger | 3rd ” ” “ |
Slip the loop of the anti-skating weight’s thread over the second groove of
the stub to set the correct anti-skating force for the factory-fitted
cartridge. Feed the thread through the loop of the wire support (15).
Connection to the amplifier
The record player has gold-plated female RCA Phono sockets (13) so you can
substitute the interconnect cables supplied with higher quality cables such as
the Pro-Ject Connect IT C, CC or Si interconnect cables for connection to
the amplifier if you wish.
Use the Phono input (sometimes labeled gram, disc or RIAA) on your amplifier.
Make sure that the phono input offers correct matching and amplification for
the type of cartridge used. Line inputs (such as CD, Tuner, Tape or Video) are
not suitable.
Take care to connect the left and right channels correctly. The right channel
is usually marked red, the left channel black or white. Check the manual
supplied with your amplifier for relevant information. The earthing wire of
the tonearm lead should be connected to the earth terminal on your amplifier
(if provided). If your amplifier does not have an input suitable for phono
cartridges you will require a separate phono amplifier stage for MM or MC
cartridges which is then connected between the record player and a free line-
level input of the amplifier.
For detailed product information regarding Pro-Ject Audio interconnect cables
and phono amplifiers please refer to the Pro-Ject website www.project-
audio.com.
The recommended load impedance for the factory fitted cartridges is: 47kohms
/MM-input
Mains power connection
The turntable is supplied with the universal power supply with 3 exchangeable
sockets adapters suitable for all countries. Select the correct adapter for
your country and insert the adapter to the exchangeable part of the power
supply.
Connect the low voltage plug from the power supply to the socket (14) on the
rear of the record player before connecting the power supply to the mains.
Fitting the lid
Fit the lid (dust cover 10) carefully over the hinge prongs and adjust the
screws (12) until the lid stays open where you want it to without being too
stiff to open or close.
Switching on and off, changing replay speed
The turntable is equipped with a three-position switch for ON/OFF and
electronic speed change. To play records at 33 r.p.m. press this switch (19)
to the left side. To play records at 45 r.p.m. press this switch (19) to the
right side. To be able to play 78 r.p.m. the flat drive belt has to be removed
and the round drive belt has to be fitted around the sub-platter (4) and the
larger diameter part of the motor pulley (2). To do so, the platter (5) has to
be removed.
After the round drive belt, has been fitted, pressing the ON/OFF switch to the
right selects 78 r.p.m.

Useful tips
The record player should be positioned on a low-resonance surface such as wood
or multiple layer ply board to avoid structural vibrations disturbing replay.
Adjusting the azimuth
** The cartridge needle must be vertical in the record groove in order to
trace the groove wall modulations correctly.
A small screw at the bearing end of the arm allows incorrect azimuth to be
corrected if your needle is not mounted exactly perpendicular to the cartridge
body (which is often the case). Slacken off the screw just enough to be able
to revolve the arm tube without applying force. Please note: do not remove the
screw completely!
With the aid of a good magnifying glass adjust the needle until it is vertical
in the groove (i.e. perpendicular to the record’s surface). Ideally this
should correspond to the top surface of the cartridge body being parallel to
the record surface.
When you are satisfied that the needle is vertical retighten the screw
carefully.

Please note: Under no circumstances should the arm tube be adjusted with the
needle still in the record groove! Irreparable damage may be caused to the
cantilever suspension! The arm must be lifted to make each adjustment and
lowered afterward to check it.
**Fitting and connecting the cartridge
**
** All cartridges with half inch mounting holes can be fitted. Leaving the
needle’s protection cover on, fit the cartridge to the headshell using the
screws supplied with the cartridge bypassing one screw through each slot in
the headshell (20). Do not tighten the nuts yet.
Connect the tonearm wires to the cartridge pins as follows:
| white | left channel positive (L+) |
|---|---|
| red | right channel pos. (R+) |
| green | right channel return (R -) |
| blue | left channel return (L -) |
The full sound quality of the record player can only be achieved if the
cartridge is correctly adjusted. Particular tools like the Pro-Ject alignment
tool are required to accomplish this job properly.
If you are not well acquainted with the adjustment of cartridges you are
advised to call upon the willing help of your Pro-Ject dealer to accomplish
this task for you.
Please note: Adjusting a cartridge and tonearm calls for the greatest care in
order to avoid damaging the cartridge or tonearm bearings. Leave this work to
your dealer if you are in any way unsure of the necessary steps and
precautions to be taken.
Maintenance and cleaning
Your record player requires little or no regular maintenance. Remove dust with
a slightly moistened antistatic cloth. Never use a dry cloth because this will
create static electricity which attract more dust! Antistatic cleaning fluids
are available at specialist stores but must be applied sparingly to avoid
damage to rubber parts. It is recommended to fit the needle cover before
cleaning or maintenance is carried out to avoid damage. If the player is not
used over a long period of time the drive belt can be removed to prevent
unequal stretching.
Always disconnect the record player from the mains power supply as a
precaution before maintenance!
Technical specifications Pro-Ject Debut Carbon EVO/ Pro-Ject 8.6cc
Nominal speeds| 33/45 r.p.m.| * 78 r.p.m. optional
Speed variance| 33: ±0.50%| 45: ±0.60%
Wow and flutter| 33: ±0.17%| 45: ±0.15%
Signal to noise| 68dB
Effective tonearm mass| 6g
Effective tonearm length| 8.6 ” (218.5mm)
Overhang| 18,5mm
Power consumption| 4W/0W in Stand-By
Outboard power supply| 15V / 0 – 0.8mA DC (set at 0.5mA), universal power
supply
Dimensions (W x H x D)| 415 x 118 x 320mm, dust cover open 415 x 365 x 405mm
Weight| 5,6kg
Dimensions packaging (W x H x D)| 488 x 235 x 393mm
Weight incl. packaging| 8.0kg
Technical specifications MM-Sumiko Rainier
Frequency range| 12-25.000Hz
Channel separation| 25dB/1kHz
Output voltage| 5mV
Recommended load impedance| 47kohms/amplifier connection – MM-input
Compliance/stylus type| 10µm/mN – elliptical
Recommended tracking force| 20mN
Weight| 6.5g
Technical specifications MM-Cartridge Ortofon 2M Red**
Frequency range| 20-22.000Hz
Channel separation| 22dB/1kHz
Output voltage| 5.5mV
Recommended load impedance| 47kohms/amplifier connection – MM-input
Compliance/stylus type| 20µm/mN – elliptical
Recommended tracking force| 17.5mN
Weight| 7.2g
Potential incorrect use and fault conditions
Pro-Ject turntables are manufactured to the highest standards and undergo
strict quality controls before leaving the factory. Faults that may possibly
occur are not necessarily due to material or production faults but can
sometimes be caused by incorrect use or unfortunate circumstances. Therefore,
the following list of common fault symptoms is included.
The platter doesn’t turn although the unit is switched on:
The unit is not connected to the mains power supply.
No mains at the socket.
Drive belt is not fitted or has slipped off.
No signal through one or other channel or both channels:
No signal contact from the cartridge to the internal tonearm wiring or from
that to the arm lead or from that to the phono box or between that and the
amplifier. This could be due to a faulty plug, broken wire or solder joint or
simply loose plug/socket connection. Phono input not selected at amplifier.
Amplifier not switched on. Amplifier or speakers defective or muted. No
connection to the loudspeakers.
Strong hum on phono input:
No earth connection from cartridge or arm or arm cable to amplifier, or earth
loop.
Distorted or inconsistent sound from one or both channels:
Record player is connected to wrong input of amplifier, or MM/MC switch
incorrectly set. Needle or cantilever damaged. Wrong r.p.m., drive belt
overstretched or dirty, platter bearing without oil, dirty or damaged.
Service
Should you encounter a problem which you are not able to alleviate or identify
despite the above information, please contact your dealer for further advice.
Only when the problem cannot be resolved there should the unit be sent to the
responsible distributor in your country.
Guarantee repairs will only be effected if the unit is returned correctly
packaged. For this reason we recommend keeping the original packaging.
Never return a record player without making sure that is it safely
disassembled and correctly packaged in the original packaging according to the
diagrams on the last page of this user guide. Please remove these parts and
pack them separately: lid (10), counterweight (6), anti-skating weight (15)
platter (5) and belt (3). Fit the cartridge protection cap. Insert the
transport lock for the tonearm (8) prior to carefully packaging the record
player.
Warranty
The manufacturer accepts no responsibility for damage caused by not adhering
to these instructions for use and/or by transportation without the original
packaging. Modification or change to any part of the product by unauthorized
persons release the manufacturer from any liability over and above the lawful
rights of the customer.
PRO-JECT is a Registered Trademark of H. Lichtenegger. This guide was produced
by: Pro-Ject Audio Systems changes to the technical specification without
prior
The information was correct at the time of going to press. The manufacturer
reserves the right to make changes to the technical specification without
prior notice as deemed necessary to uphold the ongoing process of technical
development.

© Pro-Ject Audio Systems · Pro-Ject Debut Carbon EVO · Revision 2020.08.05
References
- Pro-Ject Audio Systems – Turntables and hifi stereo components since 1991 | Handmade in Europe
- Pro-Ject Audio Systems – Turntables and hifi stereo components since 1991 | Handmade in Europe
- Find A Dealer – Pro-Ject Audio Systems
- Debut Carbon EVO – Pro-Ject Audio Systems
Read User Manual Online (PDF format)
Read User Manual Online (PDF format) >>
Download This Manual (PDF format)
Download this manual >>
ИНСТРУКЦИЯ ПО ПРИМЕНЕНИЮ
Дебют Carbon EVO


Pro-Ject Дебют Карбон EVO
Элементы управления, функции и подключения
| (1) Двигатель с TPE dampED фланец | (12) Петли застежки |
| (2) Ступенчатый ведущий шкив | (13) Выходные разъемы Phono и заземление |
| (3) Приводной ремень | (14) Гнездо питания |
| (4) Дополнительная пластина | (15) Вес антискейтинга. |
| (5) Пластина TPE dampковрик и войлочный коврик | (16) Обруч для противоскольжения |
| (6) Противовес тонарма 6a Шкала прижимной силы | (17) Шкала регулировки веса антискейтинга |
| (7) Рычаг подъема тонарма | (18) Регулируемые по высоте ножки с TPE dampИНГ |
| (8) Опора тонарма и съемный транспортный фиксатор | (19) Переключатель скорости |
| (9) Трубка тонарма 9a Основание тонарма | (20) Хэдсэд с подъемником пальца и установленным картриджем Ortofon 2M RED или Sumiko Rainier. |
| (10) Крышка | (21) Одиночный адаптер |
| (11) Петли крышки |
Уважаемый меломан,
Благодарим вас за покупку проигрывателя Pro-Ject Audio. Чтобы добиться максимальной производительности и надежности с этим проигрывателем, вам следует внимательно изучить эти инструкции по эксплуатации.
Предупреждение об опасности для пользователя, устройства или возможном неправильном использовании.
Важное замечание.
Следующие инструкции по регулировке картриджа предоставляются на тот случай, если картридж будет заменен другой моделью в более позднее время. Во время сборки и регулировки деки мелкие детали могут быть потеряны, если они не будут аккуратно помещены в подходящую емкость. Перед началом сборки ознакомьтесь с деталями, перечисленными выше и пронумерованными на технических чертежах выше.
Инструкции по технике безопасности
Блок питания используется для подключения и отключения агрегата от сети. Убедитесь, что вилка всегда легко доступна. Вынимая шнур питания из розетки, держитесь за вилку. Никогда не беритесь за шнур питания мокрыми руками или damp.
Избегайте попадания жидкостей в устройство. Никогда не ставьте на устройство или рядом с ним какие-либо предметы, содержащие жидкость, например вазу для цветов. Никогда не проливайте жидкость на устройство. Никогда не ставьте на устройство или рядом с ним какие-либо источники открытого огня, например зажженные свечи. Продукт не должен использоваться в damp или в сырых местах, рядом с ванной, раковиной, бассейном или в любых других подобных условиях.
Держите пластиковые пакеты в недоступном для детей месте, чтобы не задохнуться.
Настроить
Палуба поставляется в частично разобранном виде и тщательно упакована для безопасной транспортировки. Осторожно извлеките все детали из транспортной упаковки.
Убедитесь, что поверхность, на которой вы хотите использовать поворотный стол, является ровной (используйте спиртовой уровень), прежде чем ставить на него поворотный стол. Снимите транспортный фиксатор (8) с тонарма. Храните его в оригинальной упаковке, чтобы его можно было транспортировать в будущем.
Установите приводной ремень (3) на ступицу (4) и часть шкива двигателя (2) меньшего диаметра. Избегайте попадания пота или жира на ремень, так как это ухудшит его характеристики и сократит срок службы ремня. Используйте впитывающую кухонную бумагу, чтобы удалить масло или жир с внешнего края ступицы и ремня. Установите диск (5) и войлочный коврик на шпиндель ступицы (4).
Регулировка прижимной силы картриджа
Поставляемый противовес (6) подходит для картриджей весом от 5 до 8.5 г (Ортофон 2М Красный, Сумико Ренье — вес нет. 08). Осторожно надавив, поверните противовес (6) на задний конец трубки тонарма (9) так, чтобы шкала прижимной силы (6a) была обращена к передней части проигрывателя. Опустите армлифт и поместите картридж в пространство между подлокотником и опорным диском. Осторожно поверните противовес (6), пока трубка рычага не уравновесится. Рука должна вернуться в сбалансированное положение, если она перемещается вверх или вниз. Эту настройку нужно делать осторожно. Не забудьте снять защитный колпачок картриджа, если он есть.
Как только рука будет правильно сбалансирована, верните ее в исходное положение. Удерживая противовес (6), не перемещая его, осторожно поверните кольцо шкалы прижимной силы (6a), пока ноль не совпадет с выступом антискейтинга (17). Убедитесь, что рука все еще балансирует.
Поверните противовес против часовой стрелки (если смотреть спереди), чтобы отрегулировать прижимную силу в соответствии с рекомендациями производителя картриджа. Одна отметка на шкале соответствует 1 мН (= 0.1 г / 0.1 пруд) прижимной силы.
Обратите внимание: отрегулируйте прижимную силу перед установкой антискейтингового груза.
Рекомендуемая прижимная сила для картриджа Ortofon 2M RED составляет 17.5 мН. Рекомендуемая прижимная сила для картриджа Sumiko Rainier составляет 20 мН.
Регулировка силы антискейтинга
Сила антискейтинга должна быть отрегулирована в соответствии с прижимной силой следующим образом:
| Прижимная | Паз в заглушке (17) |
| 10 — 14 мН | 1-й от колец подшипника |
| 15 — 19 мН | 2nd ”” “ |
| 20 мН и больше | 3rd ”” “ |
Проденьте петлю нити антискейтинга через вторую канавку на заглушке, чтобы установить правильную силу антискейтинга для установленного на заводе картриджа. Пропустите нить через петлю опоры для проволоки (15).
Подключение к ampпожизненнее
Проигрыватель имеет позолоченные гнезда RCA Phono (13), поэтому вы можете заменить соединительные кабели, входящие в комплект поставки, на кабели более высокого качества, такие как Pro-Ject Connect IT C, CC или Si соединительные кабели для подключения к ampпожизненнее, если хотите.
Используйте вход Phono (иногда обозначаемый грамм, диск или RIAA) на вашем ampпожизненнее. Убедитесь, что вход фонокорректора обеспечивает правильное соответствие и ampУточнение типа используемого картриджа. Линейные входы (например, CD, тюнер, кассета или видео) не подходят.
Позаботьтесь о правильном подключении левого и правого каналов. Правый канал обычно отмечается красным, левый — черным или белым. Ознакомьтесь с руководством, прилагаемым к вашему ampпожизненное получение соответствующей информации. Заземляющий провод тонарма должен быть подключен к клемме заземления на вашем ampпожизненнее (если предусмотрено). Если твой ampLifier не имеет входа, подходящего для фонокорректоров, вам потребуется отдельный фонокорректор. ampпожизненныйtage для картриджей MM или MC, который затем подключается между проигрывателем и свободным линейным входом ampпожизненнее.
Для получения подробной информации о соединительных кабелях Pro-Ject Audio и фонокорректорах ampлифтеры, пожалуйста, обратитесь к Pro-Ject webсайт www.project-audio.com.
Рекомендуемое сопротивление нагрузки для картриджей, установленных на заводе, составляет: 47кОм / MM-вход
Подключение к электросети
Поворотный стол поставляется с универсальным блоком питания с 3 сменными адаптерами для розеток, подходящими для всех стран. Выберите адаптер, подходящий для вашей страны, и вставьте адаптер в сменную часть источника питания.
Подключите низкий уровень громкостиtagПодключите блок питания к розетке (14) на задней панели проигрывателя грампластинок перед подключением блока питания к сети.
Установка крышки
Осторожно установите крышку (пылезащитный колпачок 10) на выступы шарнира и отрегулируйте винты (12) так, чтобы крышка оставалась открытой в нужном месте, не будучи слишком жесткой для открытия или закрытия.
Включение и выключение, изменение скорости воспроизведения
Поворотный стол оборудован трехпозиционным переключателем для включения / выключения и электронного изменения скорости. Для воспроизведения пластинок со скоростью 33 об / мин нажмите этот переключатель (19) влево. Для воспроизведения пластинок со скоростью 45 об / мин нажмите этот переключатель (19) вправо. Чтобы иметь возможность работать со скоростью 78 об / мин, плоский приводной ремень должен быть удален, а круглый приводной ремень должен быть установлен вокруг вспомогательного диска (4) и части шкива двигателя (2) большего диаметра. Для этого необходимо снять опорный диск (5).
После установки круглого приводного ремня нажатие переключателя ВКЛ / ВЫКЛ вправо выбирает 78 об / мин.

Полезные советы
Проигрыватель пластинок следует располагать на поверхности с низким резонансом, такой как дерево или многослойная плита, чтобы избежать вибраций конструкции, мешающих воспроизведению.
Регулировка азимута
** Игла картриджа должна располагаться вертикально в канавке для записи, чтобы правильно проследить модуляцию стенки канавки.
Небольшой винт на несущем конце рычага позволяет исправить неправильный азимут, если ваша игла не установлена точно перпендикулярно корпусу картриджа (что часто бывает). Ослабьте винт ровно настолько, чтобы можно было вращать трубку рычага без приложения силы. Обратите внимание: не выкручивайте винт полностью!
С помощью хорошей лупы отрегулируйте иглу до вертикального положения в канавке (т. Е. Перпендикулярно поверхности пластинки). В идеале это должно соответствовать тому, чтобы верхняя поверхность корпуса картриджа была параллельна поверхности записи.
Убедившись, что игла стоит вертикально, снова осторожно затяните винт.

Обратите внимание: ни при каких обстоятельствах нельзя регулировать трубку тонарма, если игла все еще находится в канавке для записи! Консольная подвеска может быть повреждена непоправимо! Рычаг необходимо поднимать для каждой регулировки, а затем опускать для проверки.
Установка и подключение картриджа
** Могут быть установлены все картриджи с монтажными отверстиями в половину дюйма. Не снимая защитную крышку иглы, прикрепите картридж к головке с помощью винтов, поставляемых вместе с картриджем, пропуская по одному винту через каждую прорезь в головке головки (20). Пока не затягивайте гайки.
Подсоедините провода тонарма к контактам картриджа следующим образом:
| белый | левый канал положительный (L +) |
| красный | правый канал поз. (R +) |
| зеленый | возврат правого канала (R -) |
| синий | возврат левого канала (L -) |
Полное качество звука проигрывателя пластинок может быть достигнуто только при правильной настройке картриджа. Для правильного выполнения этой работы требуются специальные инструменты, такие как инструмент для центровки Pro-Ject.
Если вы плохо знакомы с регулировкой картриджей, вам рекомендуется обратиться за помощью к вашему дилеру Pro-Ject, чтобы выполнить эту задачу за вас.
Обратите внимание: регулировка картриджа и тонарма требует особой осторожности, чтобы не повредить картридж или подшипники тонарма. Доверьте эту работу своему дилеру, если вы каким-либо образом не уверены в необходимых шагах и мерах предосторожности.
Обслуживание и чистка
Ваш проигрыватель не требует регулярного обслуживания или почти не требует его. Удалите пыль слегка смоченной антистатической тканью. Никогда не используйте сухую ткань, так как это создаст статическое электричество, которое будет притягивать больше пыли! Антистатические чистящие жидкости доступны в специализированных магазинах, но их следует наносить с осторожностью, чтобы не повредить резиновые детали. Перед очисткой или техническим обслуживанием рекомендуется установить колпачок иглы, чтобы избежать повреждений. Если проигрыватель не используется в течение длительного периода времени, приводной ремень можно снять, чтобы предотвратить неравномерное растяжение.
Перед обслуживанием всегда отключайте проигрыватель от электросети в качестве меры предосторожности!
| Технические характеристики Pro-Ject Debut Carbon EVO / Pro-Ject 8.6cc | ||
| Номинальные скорости | 33/45 об / мин | *** 78 об / мин опционально |
| Дисперсия скорости | 33: ± 0.50% | 45: ± 0.60% |
| Вау и трепыхаться | 33: ± 0.17% | 45: ± 0.15% |
| Сигнал-шум | 68dB | |
| Эффективная масса тонарма | 6g | |
| Эффективная длина тонарма | 8.6 дюйма (218.5 мм) | |
| свес | 18,5мм | |
| Потребляемая мощность | 4 Вт / 0 Вт в режиме ожидания | |
| Подвесной блок питания | 15 В / 0 — 0.8 мА постоянного тока (установлен на 0.5 мА), универсальный источник питания | |
| Размеры (Ш х В х Г) | 415 x 118 x 320 мм, открытая пылезащитная крышка 415 x 365 x 405 мм | |
| Вес | 5,6кг | |
| Размеры упаковки (Ш x В x Г) | 488 х 235 х 393mm | |
| Вес вкл. упаковка | 8.0кг | |
| Технические характеристики MM-Sumiko Rainier | ||
| Диапазон частот | 12-25.000Hz | |
| Разделение каналов | 25 дБ / 1 кГц | |
| Выходная громкостьtage | 5mV | |
| Рекомендуемое сопротивление нагрузки | 47кОм /ampлифтовое соединение — ММ-вход | |
| Соответствие / тип иглы | 10 мкм / мН — эллиптическая | |
| Рекомендуемая прижимная сила | 20 мН | |
| Вес | 6.5g | |
| Технические характеристики MM-картридж Ortofon 2M Red | ||
| Диапазон частот | 20-22.000Hz | |
| Разделение каналов | 22 дБ / 1 кГц | |
| Выходная громкостьtage | 5.5mV | |
| Рекомендуемое сопротивление нагрузки | 47кОм /ampлифтовое соединение — ММ-вход | |
| Соответствие / тип иглы | 20 мкм / мН — эллиптическая | |
| Рекомендуемая прижимная сила | 17.5 мН | |
| Вес | 7.2g |
Возможное неправильное использование и неисправности
Проигрыватели Pro-Ject производятся в соответствии с высочайшими стандартами и перед отправкой с завода проходят строгий контроль качества. Неисправности, которые могут возникнуть, не обязательно связаны с дефектами материала или производством, но иногда могут быть вызваны неправильным использованием или неблагоприятными обстоятельствами. Поэтому включен следующий список общих симптомов неисправности.
Блюдо не вращается, хотя аппарат включен:
Устройство не подключено к электросети.
В розетке нет сети.
Ремень привода не установлен или соскользнул.
Нет сигнала по тому или иному каналу или по обоим каналам:
Отсутствует сигнальный контакт от картриджа к внутренней проводке тонарма, или от этого к проводу тонарма, или от этого к фонокорректору, или между ним и проводом тонарма. ampпожизненнее. Это может быть связано с неисправной вилкой, обрывом провода или паяным соединением или просто с ослабленным соединением вилки / розетки. Вход Phono не выбран на ampпожизненнее. AmpLifier не включен. Ampлифт или динамики неисправны или отключены. Нет подключения к динамикам.
Сильный гул на входе фонокорректора:
Отсутствие заземления от картриджа, рычага или кабеля рычага к ampлифтер, или заземляющая петля.
Искаженный или несогласованный звук на одном или обоих каналах:
Плеер подключен к неправильному входу ampлифтер, или переключатель MM / MC установлен неправильно. Повреждена игла или кантилевер. Неправильная частота вращения, приводной ремень чрезмерно растянут или загрязнен, опорный подшипник без масла, загрязнен или поврежден.
Сервис
Если вы столкнетесь с проблемой, которую вы не можете устранить или определить, несмотря на приведенную выше информацию, обратитесь к своему дилеру за дальнейшими советами. Только если проблема не может быть решена, устройство следует отправить ответственному дистрибьютору в вашей стране.
Гарантийный ремонт будет осуществлен только в том случае, если устройство будет возвращено правильно упакованным. По этой причине мы рекомендуем сохранить оригинальную упаковку.
Никогда не возвращайте проигрыватель, не убедившись, что он безопасно разобран и правильно упакован в оригинальную упаковку в соответствии со схемами на последней странице данного руководства пользователя. Снимите эти детали и упакуйте их отдельно: крышка (10), противовес (6), противовес (15), опорный диск (5) и ремень (3). Установите защитный колпачок картриджа. Вставьте транспортный фиксатор тонарма (8) перед аккуратной упаковкой проигрывателя.
Гарантия
Производитель не несет ответственности за ущерб, вызванный несоблюдением данных инструкций по эксплуатации и / или транспортировкой без оригинальной упаковки. Модификация или изменение любой части продукта неуполномоченными лицами освобождает производителя от любой ответственности сверх законных прав покупателя.
PRO-JECT — зарегистрированная торговая марка H. Lichtenegger. Настоящее руководство подготовлено: Pro-Ject Audio Systems вносит изменения в технические характеристики без предварительного
Информация была верной на момент публикации в печати. Производитель оставляет за собой право вносить изменения в технические характеристики без предварительного уведомления, если это будет сочтено необходимым для поддержания текущего процесса технического развития.

© Pro-Ject Audio Systems · Pro-Ject Debut Carbon EVO · Редакция 2020.08.05
Документы / Ресурсы
Рекомендации
Смотреть руководство для Pro-Ject Debut Carbon EVO ниже. Все руководства на ManualsCat.com могут просматриваться абсолютно бесплатно. Нажав кнопку «Выбор языка» вы можете изменить язык руководства, которое хотите просмотреть.
MANUALSCAT | RU
Вопросы и ответы
У вас есть вопрос о Pro-Ject Debut Carbon EVO, но вы не можете найти ответ в пользовательском руководстве? Возможно, пользователи ManualsCat.com смогут помочь вам и ответят на ваш вопрос. Заполните форму ниже — и ваш вопрос будет отображаться под руководством для Pro-Ject Debut Carbon EVO. Пожалуйста, убедитесь, что вы опишите свои трудности с Pro-Ject Debut Carbon EVO как можно более детально. Чем более детальным является ваш вопрос, тем более высоки шансы, что другой пользователь быстро ответит на него. Вам будет автоматически отправлено электронное письмо, чтобы проинформировать вас, когда кто-то из пользователей ответит на ваш вопрос.
Задать вопрос о Pro-Ject Debut Carbon EVO
- Бренд:
- Pro-Ject
- Продукт:
- Проигрыватели
- Модель/название:
- Debut Carbon EVO
- Тип файла:
- Доступные языки:
- английский
Сопутствующие товары Pro-Ject Debut Carbon EVO
Debut Carbon EVO
Setup Guide
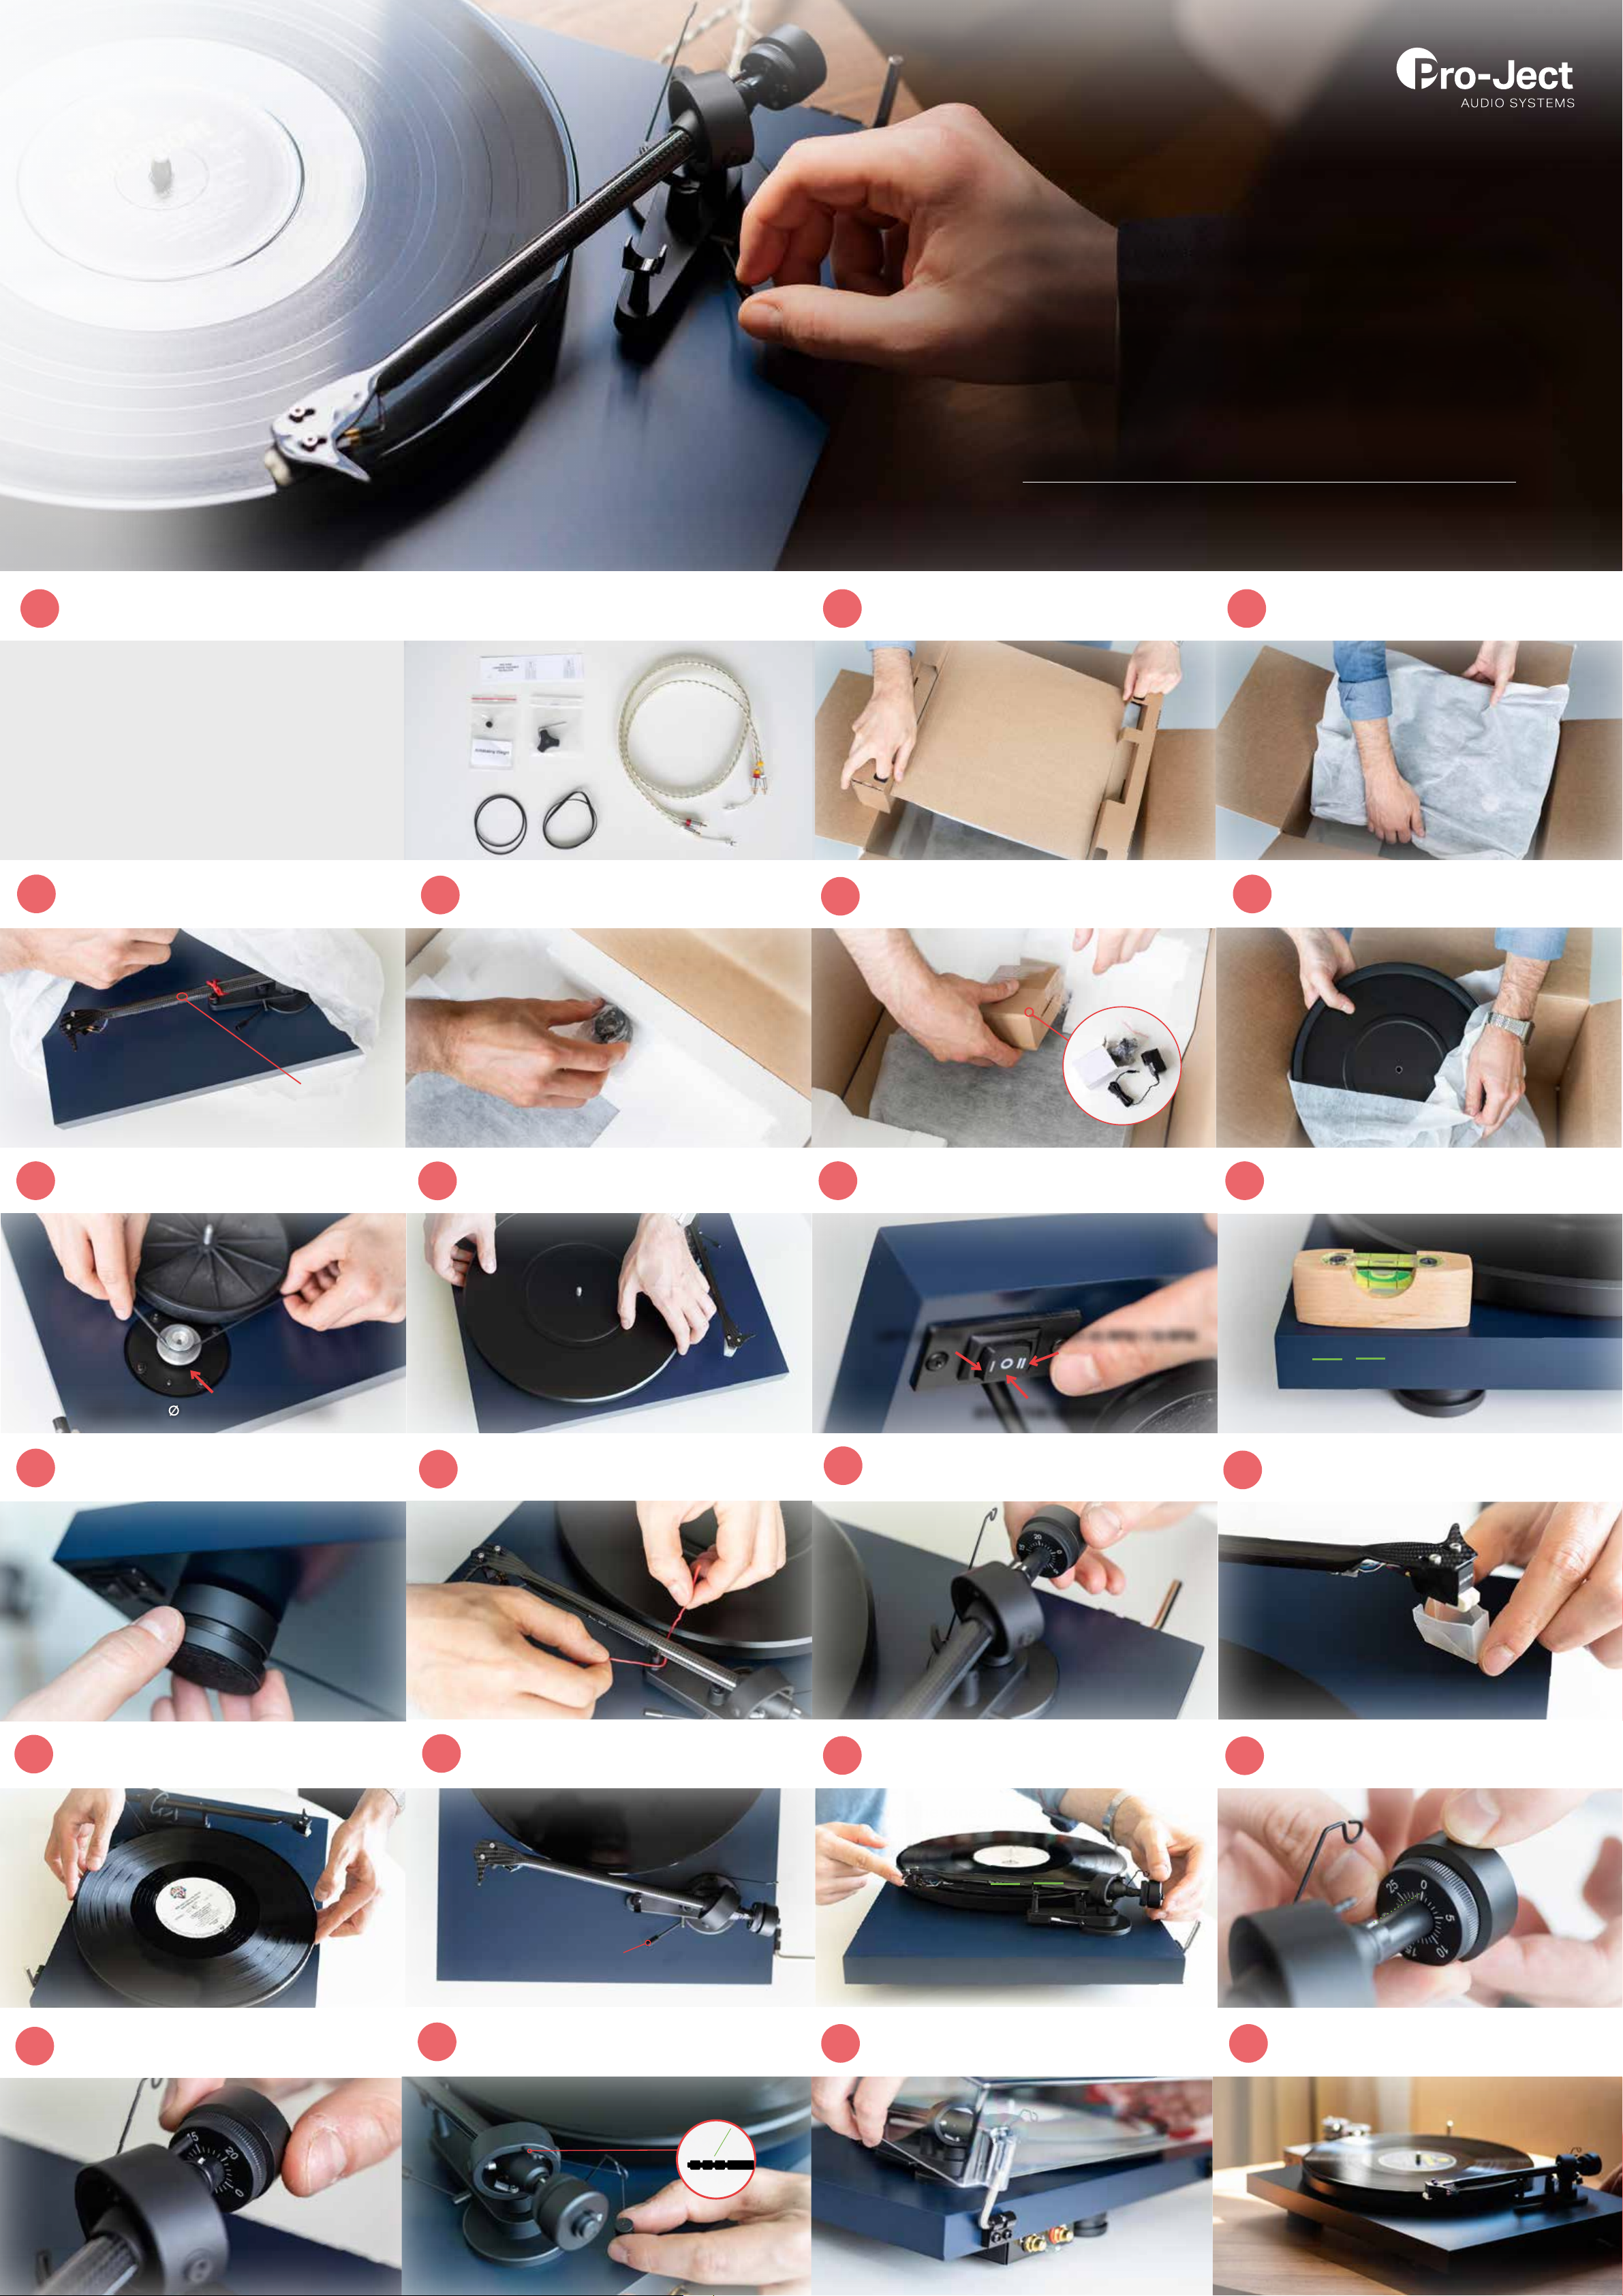
Getting started:
• Make sure to have enough space to unpack your turntable.
• Always unpack and setup in a clean enviroment.
• Please Do NOT throw away the packaging! If you need a
service or want to return your product, please send them in
the original packaging including all inserts. In case of any
damage in another packaging your dealer cannot guarantee a full refund.
Unpack all items from accessory bag.
1 32
a) Anti Skating Weight
b) Adapter for 7“ singles
c) Connect it E RCA cable
d) Round belt for 78 RPM
e) Standard at belt for 33/45 RPM
a) b) c)
d)
e)
• complete manual:
www.project-audio.com/en/product/debut-carbon-evo
Remove dust cover carton from the box.
Lift the wrapped turntable out of the box.
Carefully remove the protection covering.
4
Tonearm is fragile!
Put the drive belt on the pulley
8 10 11
and sub-platter.
Unpack the counterweight.
5
Put the platter on the turntable.
9
Unpack the power supply.
6
Use the rocker switch to select the
playback speed.
7
Unpack the platter.
The turntable should always be placed on
a at surface. Check with a spirit level.
12
Large pulley for round belt (78 RPM)
If necessary, level the turntable by
adjusting the feet.
13
Remove tonearm twist tie.
14
LEFT: 33 RPM RIGHT: 45 RPM / 78 RPM
STOPS THE MOTOR
Put the counterweight in place.
15
0°
Remove the needle protection cover.
16
20
Put a record on the platter.
Turn the whole counterweight counterclockwise until the scale reads 18 — 20.
17
21
Place the tonearm between platter
and armrest.
Lower the tonearm with the lift.
Put the loop of the Anti Skating Weight in
the second groove on the tonearm post.
Balance the tonearm so it stays level by
18
22
turning the counterweight forwards and
backwards on the rod.
Balance the tonearm so it stays level by
turning the counterweight forwards and
backwards on the rod.
0°
Unpack Dust Cover and put it on the
turntable.
19
23
Turn the front dial of the counterweight
(not the whole weight) so the ‘0’ is in line
with marker at the back of the tonearm.
Connect to your hi-system and enjoy
your music!
>
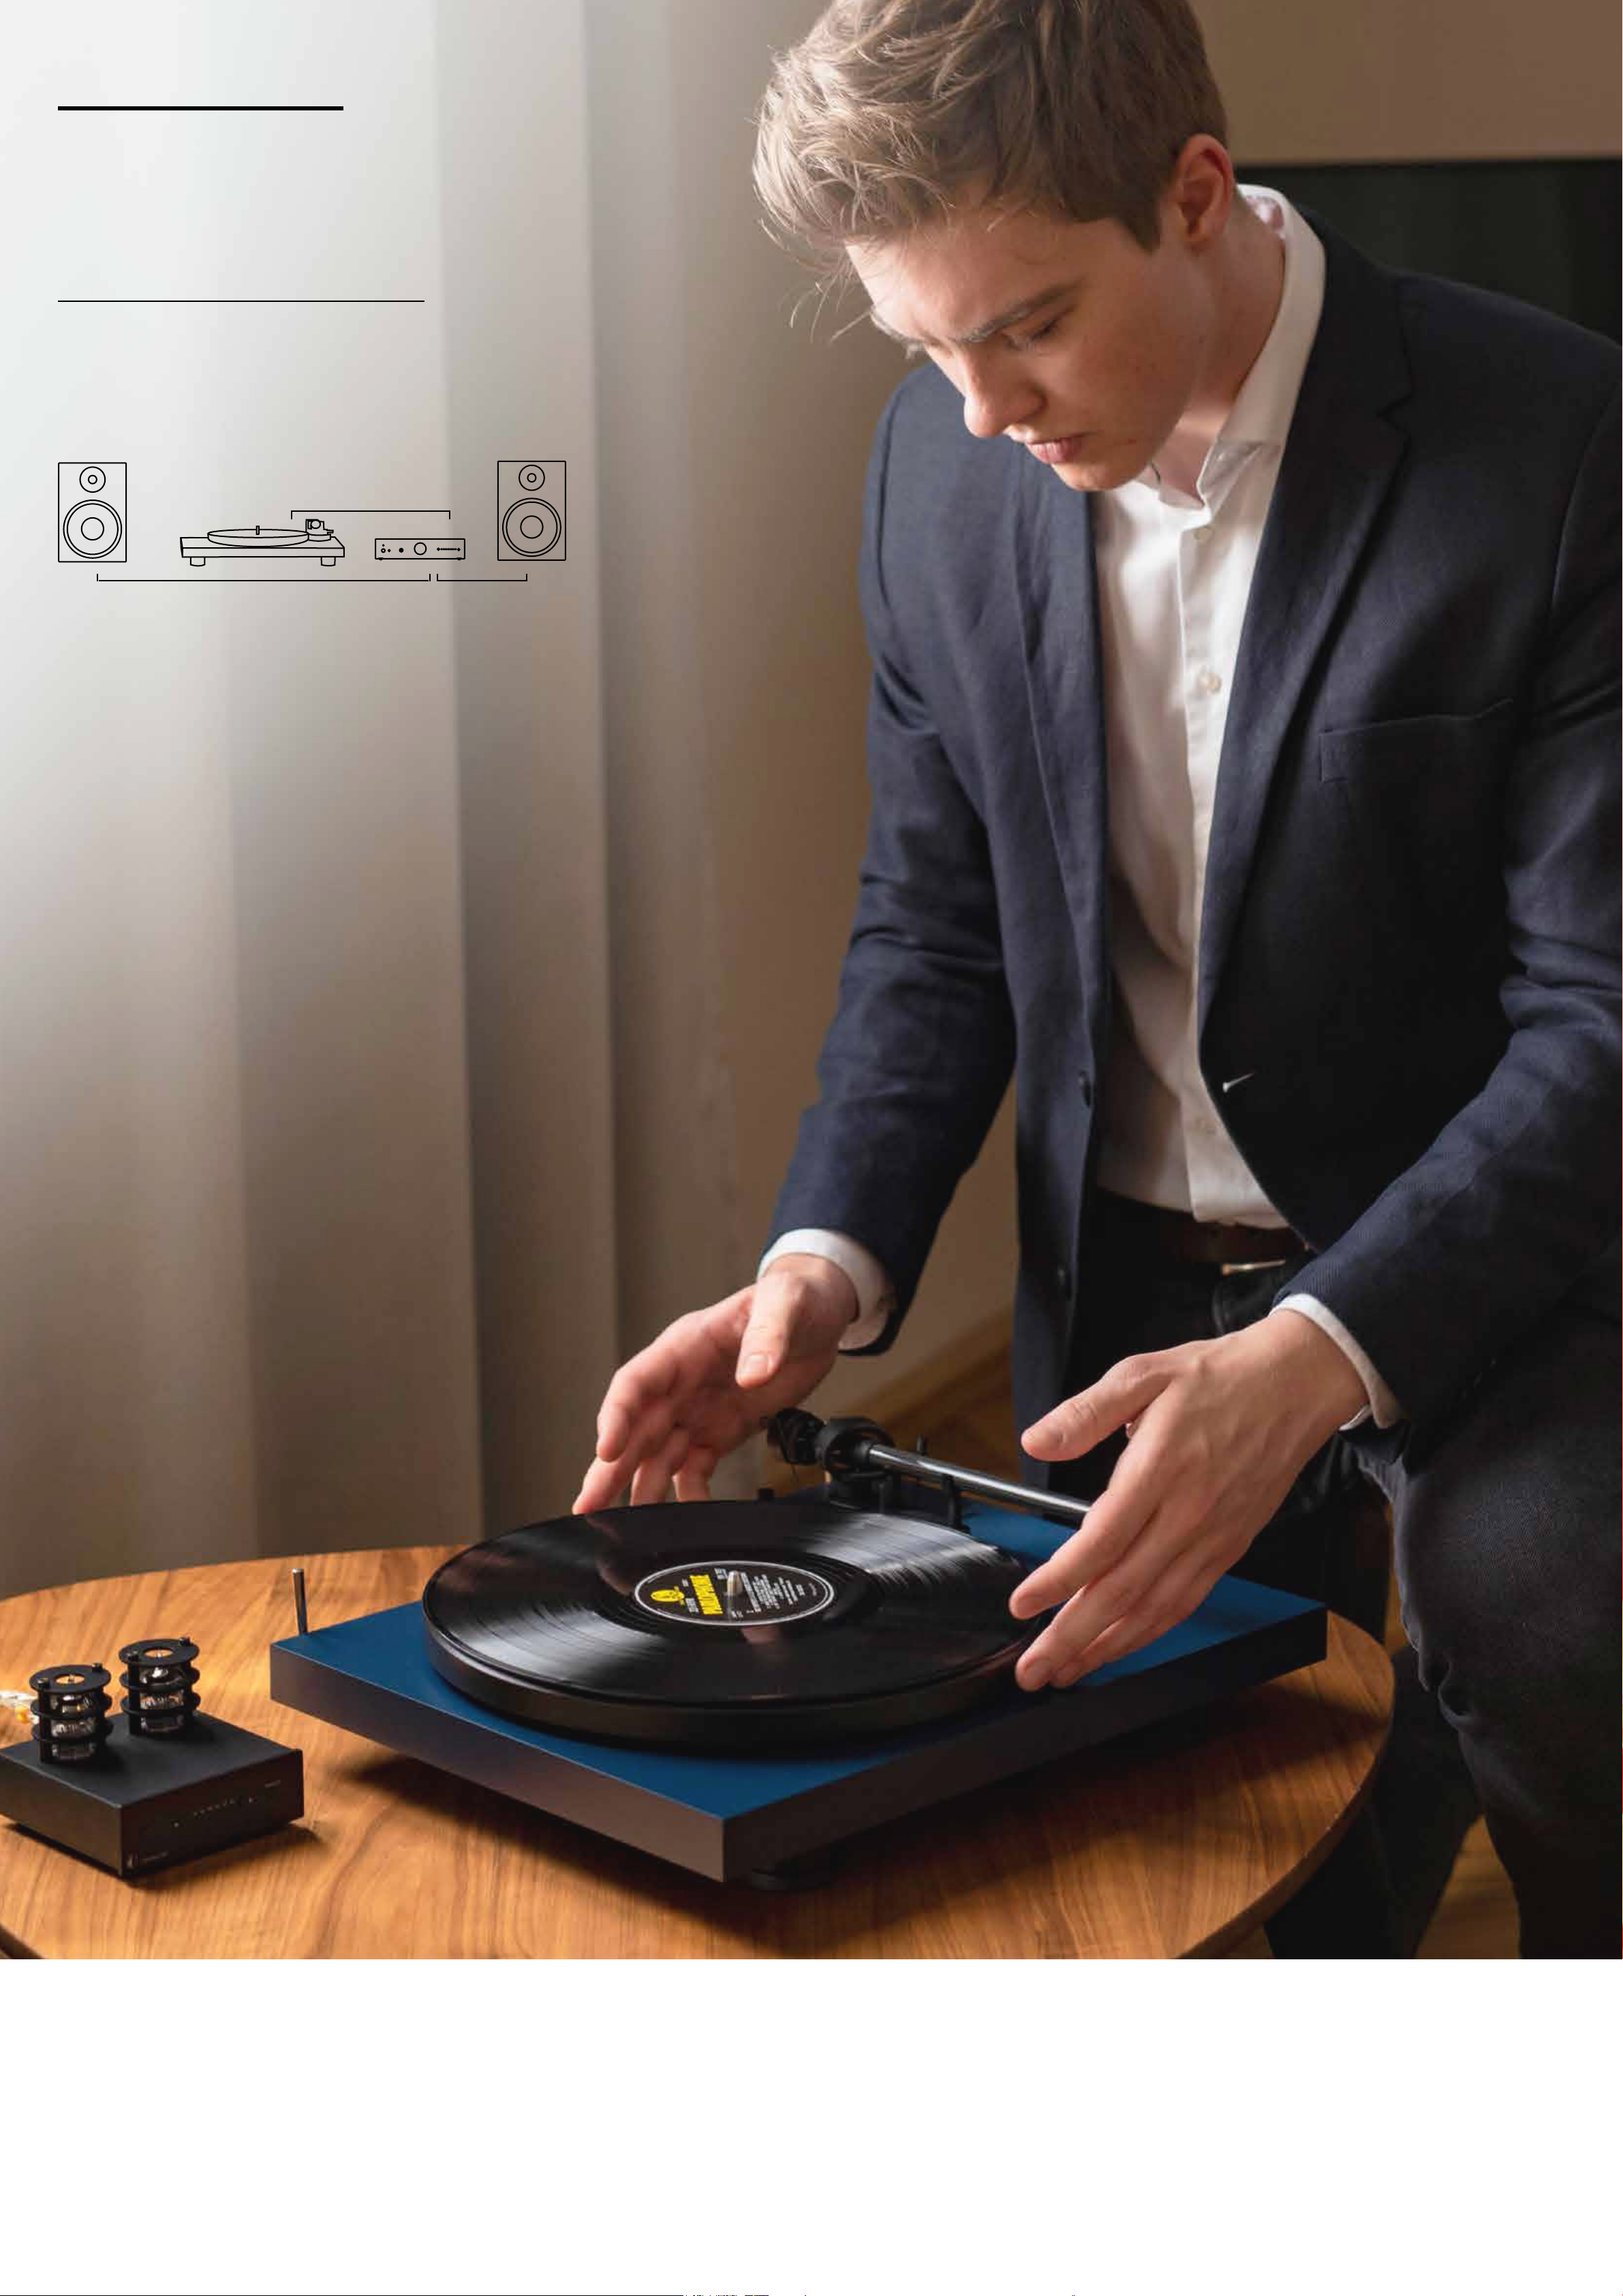
Debut Carbon EVO
Connect to any amp with integrated phono amplier or
use an external phono preamp like our Tube Box S2.
Need help?
Feel free to contact us. We have experienced partners
all over the world. Find your dealer here:
www.project-audio.com/en/nd-a-dealer/
Possible Setup:
Pro-Ject Speaker Box 5 S2 (bookshelf speaker)
and Pro-Ject MaiA S2 (stereo integrated amplier).
Speaker cable
Connect it E (RCA Cable)
Speaker cable
Service
Should you encounter a problem which you are not able to alleviate or identify despite the above information, please contact your dealer for further
advice. Only when the problem cannot be resolved there should the unit be sent to the responsible distributor in your country.
Warranty repairs will only be aected if the unit is returned correctly packaged. For this reason we recommend keeping the original packaging.
Never return a record player without making sure that is it safely disassembled and correctly packaged in the original packaging according to the
diagrams on the last page of this user guide. Please remove these parts and pack them separately: lid, counterweight, anti-skating weight and belt.
Fit the cartridge protection cap and the transport lock for the tonearm tube, prior to carefully packaging the record player.
Warranty
The manufacturer accepts no responsibility for damage caused by not adhering to these instructions for use and/or by transportation without the
original packaging. Modication or change to any part of the product by unauthorized persons, release the manufacturer from any liability over and
above the lawful rights of the customer.
Warranty: Terms and Conditions
• A warranty is valid only for products purchased from an authorized Pro-Ject Audio Systems retailer or dealer.
• This warranty oer is limited to the repair of the equipment (which could be a repair or replacement at our discretion, neither of which aects
your original warranty).
• Neither transportation or any other costs, nor any risk for removal, transportation and installation of products is covered by this warranty.
• A warranty is only valid for the original owner. It is not transferable.
• To validate your warranty, you will need to provide the original sales invoice or other proof of ownership and date of purchase.
• Warranty must be claimed within two years of purchase from an authorized dealer. After this period of time, the warranty will expire.
• The legal warranty obligation exists in addition to this warranty and is not limited by this warranty.
A Pro-Ject Audio Systems warranty relates to claims of defects in materials and/or workmanship at the time of purchase. It does not cover:
• Deterioration of component parts, the nature of which is to become worn or depleted with use, such as batteries and headphone ear pads,
drive belts and cartridges.
• Damages caused by incorrect installation, connection or packing.
• Damages caused by any use other than the correct use described in the user manual, negligence, modications, or use of parts that are not
made or authorized by Pro-Ject Audio Systems.
• Damages caused by faulty or unsuitable ancillary equipment.
• Damages caused by accidents, lightning, water, re heat, war, public disturbances or any other cause beyond the reasonable control of
Pro-Ject Audio Systems and its appointed distributors.
• Products where the serial number has been altered, deleted, removed or made illegible.
• Repairs or modications that have been executed by an unauthorized person.
Commercial Use
Faults caused due to using domestic products in commercial environments or on commercial scales are not covered by warranty. This turntable is
intended for domestic use only. Using them for business applications are done so at your own risk.
Pro-Ject Audio Systems is a Registered Trademark of H. Lichtenegger.
This guide was produced by: Pro-Ject Audio Systems
Copyright © 2020. All rights reserved.
The information was correct at the time of going to press. The manufacturer reserves the right to make changes to the technical specication without prior notice as deemed necessary to uphold the ongoing process of technical development.
User manual
View the manual for the Pro-Ject Debut Carbon EVO here, for free. This manual comes under the category turntables and has been rated by 1 people with an average of a 9.6. This manual is available in the following languages: English. Do you have a question about the Pro-Ject Debut Carbon EVO or do you need help?
Ask your question here
Pro-Ject Debut Carbon EVO specifications
Below you will find the product specifications and the manual specifications of the Pro-Ject Debut Carbon EVO.
The Pro-Ject Debut Carbon EVO is a semi-automatic turntable that operates with a drive disk and ribbed belt system. It offers nominal speeds of 33, 45, and 78 RPM, making it versatile for various vinyl records. The power supply type is DC, with a typical power consumption of 4 watts and standby power consumption of 0 watts.
With dimensions of 415 millimeters in width, 320 millimeters in depth, and 118 millimeters in height, the Pro-Ject Debut Carbon EVO weighs 5600 grams. When open, the product measures 415 x 405 x 365 millimeters, and when closed, it measures 415 x 320 x 118 millimeters.
The turntable features an improved motor suspension, providing better vibration reduction, and stands on three height-adjustable damped aluminium feet for stability. A thermoplastic elastomer (TPE) ring on the inside of the platter ensures a quieter operation with less wow and flutter.
The Debut Carbon EVO has a high precision motor control with a rocker switch at the bottom for easy speed adjustments. It is built with attention to detail, expert craftsmanship, and is handmade in the EU. The redesigned motor suspension incorporates advanced damping techniques for a more refined sound. The Pro-Ject Debut Carbon EVO is designed to last a lifetime and ensures a level stand at all times.
Type
Belt-drive audio turntable
Frequency range
20 — 22000 Hz
General
| Brand | Pro-Ject |
| Model | Debut Carbon EVO | DEBUT CARBON EVO, WALNUT |
| Product | turntable |
| EAN | 9120097825964 |
| Language | English |
| Filetype | User manual (PDF), Installation Guide (PDF), Datasheet (PDF) |
Features
| Type | Belt-drive audio turntable |
| Product colour | Walnut |
| Operation | Semi Automatic |
| Drive system | Drive disk / Ribbed belt |
| Nominal speeds | 33, 45, 78 RPM |
| Plug and Play | Yes |
| Stylus type | mm |
| Output voltage | 5.5 mV |
| Compliance | 20 mkm |
| On/off switch | Yes |
Loudspeakers
| Frequency range | 20 — 22000 Hz |
Power
| Power supply type | DC |
| Power consumption (typical) | 4 W |
| Power consumption (standby) | 0 W |
Weight & dimensions
| Width | 415 mm |
| Depth | 320 mm |
| Height | 118 mm |
| Weight | 5600 g |
| Product dimensions when open (WxDxH) | 415 x 405 x 365 mm |
| Product dimensions when closed (WxDxH) | 415 x 320 x 118 mm |
Packaging data
| Package weight | 8000 g |
| Package width | 488 mm |
| Package depth | 393 mm |
| Package height | 235 mm |
Packaging content
Tonearm
| Arm length | 218.5 mm |
| Overhang | 18.5 mm |
Ports & interfaces
show more
Frequently Asked Questions
Can’t find the answer to your question in the manual? You may find the answer to your question in the FAQs about the Pro-Ject Debut Carbon EVO below.
What is the weight of the Pro-Ject Debut Carbon EVO?
The Pro-Ject Debut Carbon EVO has a weight of 5600 g.
What is the height of the Pro-Ject Debut Carbon EVO?
The Pro-Ject Debut Carbon EVO has a height of 118 mm.
What is the width of the Pro-Ject Debut Carbon EVO?
The Pro-Ject Debut Carbon EVO has a width of 415 mm.
What is the depth of the Pro-Ject Debut Carbon EVO?
The Pro-Ject Debut Carbon EVO has a depth of 320 mm.
How can I best clean my turntable?
A slightly damp cleaning cloth or soft, dust-free cloth works best to remove fingerprints. Dust in hard-to-reach places is best removed with compressed air.
Is the manual of the Pro-Ject Debut Carbon EVO available in English?
Yes, the manual of the Pro-Ject Debut Carbon EVO is available in English .
Is your question not listed? Ask your question here