
Подкастеры использовали Adobe Audition для монтажа, но компания Adobe остановила продажу своих продуктов в России. Возможно, самое время освоить новые инструменты. Студия подкастов «Заварили» делится инструкцией, как работать в Reaper.
Устанавливаем Reaper на Mac
- Скачайте с официального сайта. Если у вас Catalina/Big Sur, скачивайте соответствующую версию.
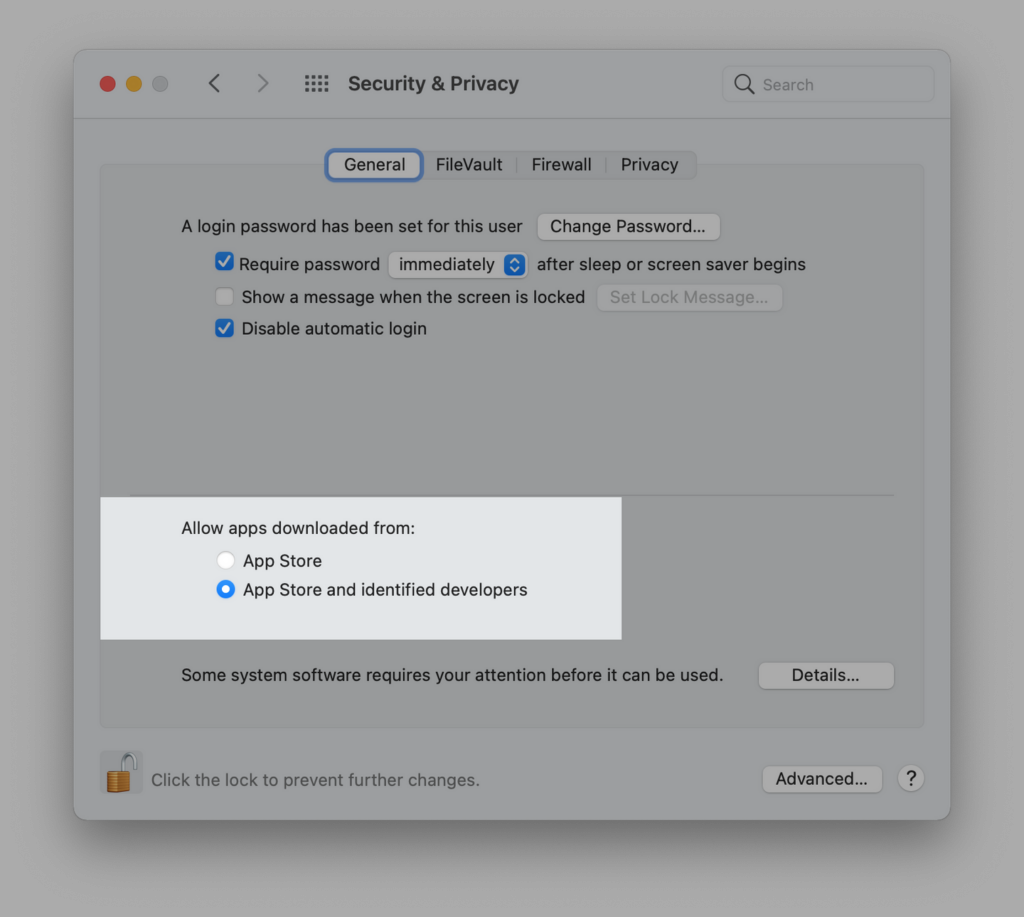
- Разрешите установку приложений не из App Store: System Preferences → Security & Privacy → нажать на замок → ввести пароль → переключить на App Store and identified developers.
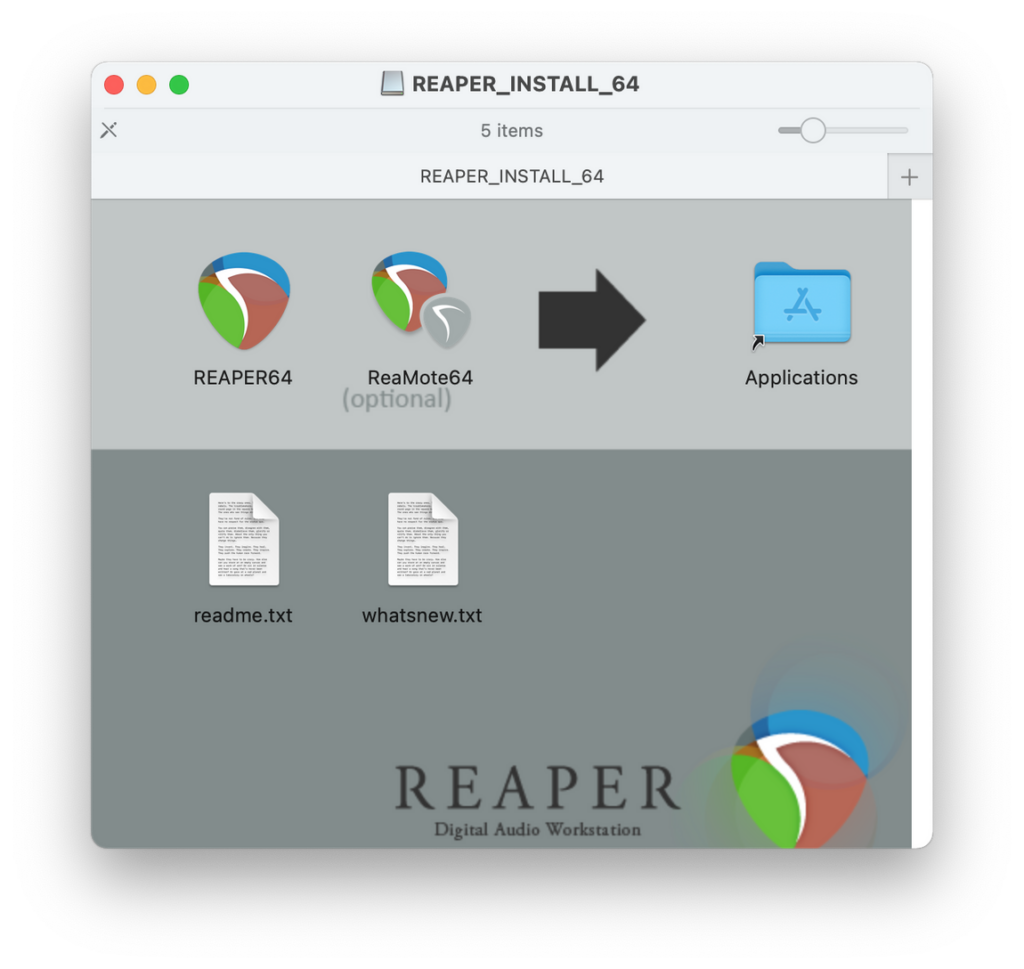
- Перетащите оба файла в папку Applications. Дождитесь, когда приложение установится.
- Найдите приложение в списке, зажмите Shift и кликните правой кнопкой по приложению (двумя пальцами на тачпаде). В меню выберите Open. Это нужно делать только при первом запуске. Дальше приложение будет открываться как обычно.
Настраиваем интерфейс и горячие клавиши
- Скачайте файл с настройками.
- Откройте Reaper.
- Зайдите в Reaper → Preferences (⌘ ,) → General.
- Нажмите Import Configuration. Выберите файл с настройками, который вы скачали.
- Перезагрузите Reaper.
Основные горячие клавиши:
S — разрезать дорожку в том месте, где установлен ползунок.
Shift + S — разрезать дорожку с двух сторон от выбранного фрагмента.
Delete — удалить выбранный фрагмент.
⌘ + Z — отменить действие.
⌘ + Shift + Z — повторить отменённое действие.
Shift + R — создать регион в выделенном фрагменте.
M — поставить маркер в том месте, где стоит ползунок.
Shift + M — поставить маркер в том месте, где стоит ползунок и надписать этот маркер.
Alt + R — переключить режим Ripple Editing.
G — сгруппировать выбранные фрагменты.
U — разгруппировать выбранные фрагменты.
R — включить зацикливание выделенного фрагмента.
⌘ + T — создать новую дорожку.
⌘ + N — создать новый проект.
Как записывать голос
Об этом подробно рассказал сооснователь студии «Заварили», Артур Белостоцкий, в своей видео-инструкции:
Как превратить стерео в моно
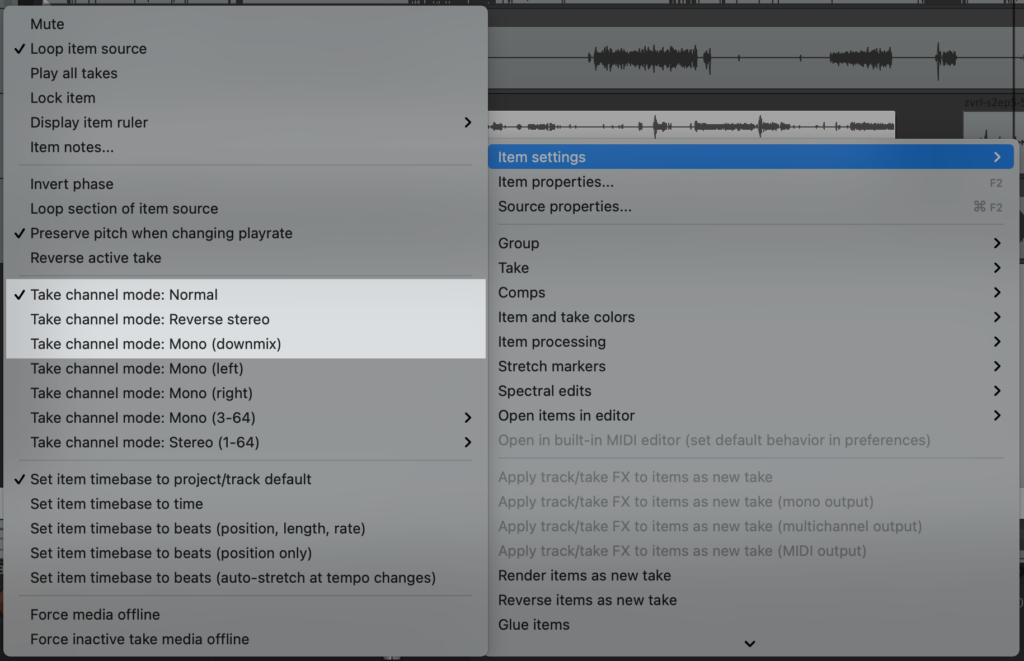
- Кликнуть на дорожку правой кнопкой.
- Зайти в Item Settings.
- Выбрать Take channel mode: Mono (downmix).
Как выгрузить отдельные дорожки
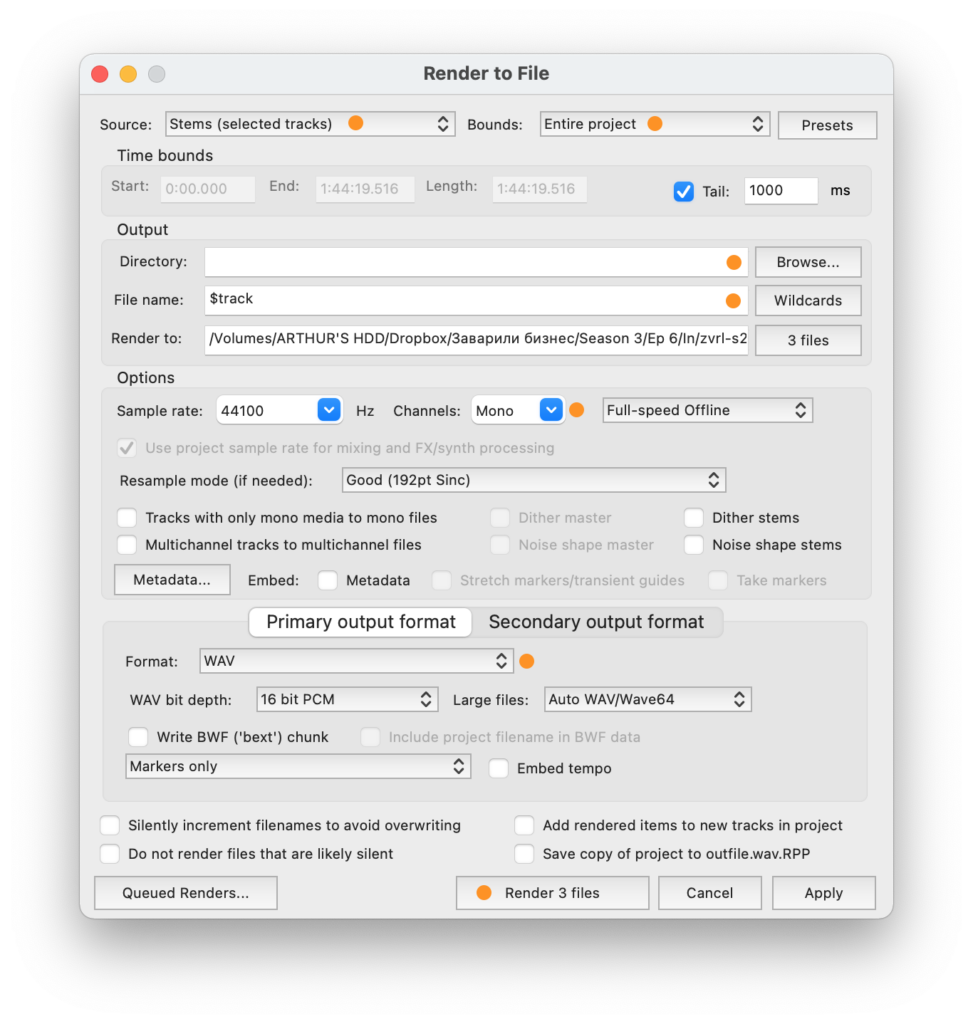
- Выбрать дорожки: зажимаем ⌘ и тыкаем в названия дорожек.
- Заходим в File → Render (⌘ ⌥ R).
- Выставляем настройки:
Source: Stems
Bounds: Entire project.
File name: $track (перед этим убедитесь, что у дорожек правильные названия).
Directory: указываем папку проекта.
Channels: Mono (если в проекте нет стереодорожек).
Format: WAV.
- Нажимаем Render.
Как редактировать
Обратите внимание на кроссфейд, фейд-ин и фейд-аут. Об этом Артур говорит в самом конце ролика и не очень подробно, но это важно.
Если вырежете из дорожки фрагмент, то на месте разреза айтомы по умолчанию встанут встык или ещё хуже — с интервалом.
На слух такая склейка будет звучать рублено и неестественно, потому что в живой речи мы никогда не замолкаем резко — одна фраза всегда плавно переходит в другую. Поэтому редакторы делают кросс-фейд: кладут дороги немножечко внахлёст.
Внахлёст — отлично: один фрагмент плавно затухает, а второй в это время плавно нарастает. Это звучит, как естественная речь.
Если монтируете выход на врезку, то создавайте тот же эффект плавности, но фейд-аутом и фейд-ином: предваряющий трек сводите на нет фейд-аутом, а врезку начинайте фейд-ином. То есть делайте так, чтобы один трек плавно сходил на нет, а другой — так же плавно начинался:
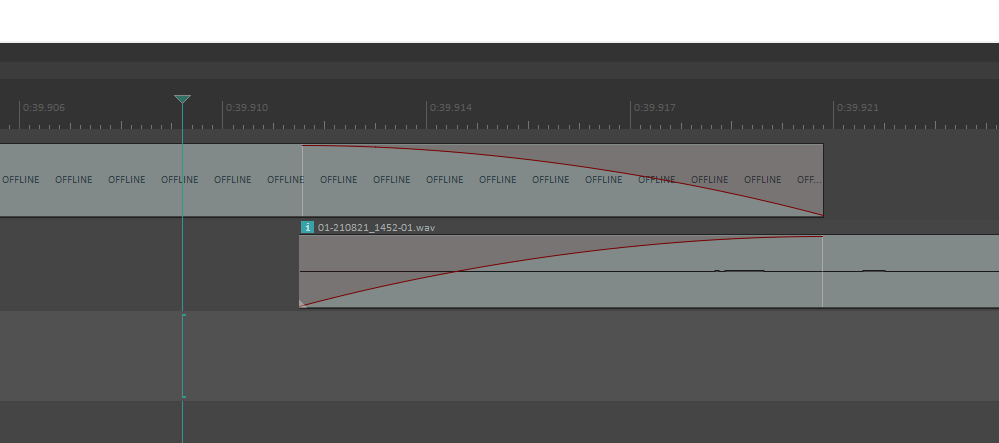
Если сомневаетесь, хорошо ли звучат ваши кросс-фейды, фейд-ины и фейд-ауты, то просто на срезе оставляйте для звукорежиссёра припуск, чтобы он сам мог сделать годные фейды.
7 болезненных ошибок редактора
Когда новый редактор впервые открывает Reaper, он тратит многие часы, чтобы собрать свой первый проект. Редактор мечтает, что это будет отличный выпуск — содержательный, благозвучный. Но после десятков часов работы он вдруг теряет результат всех трудов из-за нелепой ошибки. И это случается со всеми: у нас в команде нет ни одного редактора, который бы через это не прошёл.
Чтобы этого не случилось с вами, мы собрали список из семи нелепых ошибок, которые губят проекты новичков в рипере.
Свёл дорожки — начинай сначала
Лена и Карина сидят рядом в студии и пишутся каждая в свой микрофон. На выходе получается две дорожки — по одной на каждый микрофон. Эти дорожки нужно синхронизировать, чтобы диалог звучал естественно. Для этого их нужно положить бутербродом друг на друга так, чтобы при воспроизведении реплики героинь совпадали. Синхронизируем вручную, ориентируясь на хлопок в начале трека.
Но «синхронизировать» — не то же самое, что «свести воедино». Если дорожки синхронизированы, то они лежат друг на друге бутербродом. Если сведены — то две дорожки сливаются в один трек. Этого делать не надо: если дорожки свести в один трек, то с ними больше не сможет работать ни редактор, ни звукорежиссёр.
Собрал шахматкой — начинай сначала
Лена и Карина сидят рядом в студии и пишутся каждая в свой микрофон. На выходе получается две дорожки — по одной на каждый микрофон. Иногда редактор думает: окей, значит, надо собрать их шахматкой: когда говорит Лена — звучит только её дорожка, когда Карина — её.
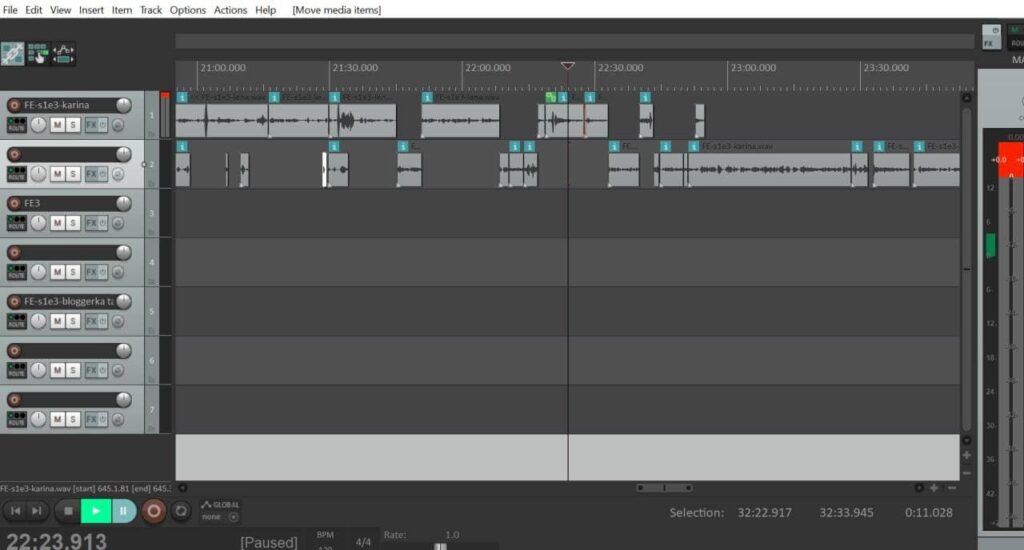
Но это ошибка.
Если собрать выпуск шахматкой, то мы не будем слышать реакции Лены на реплики Карины — все эти бесценные ахи и хихики. Но что ещё хуже — мы вообще перестанем понимать, сколько людей сидят в комнате.
Чтобы такого не случалось, режем всегда бутербродиком.
Бутербродиком — правильно:
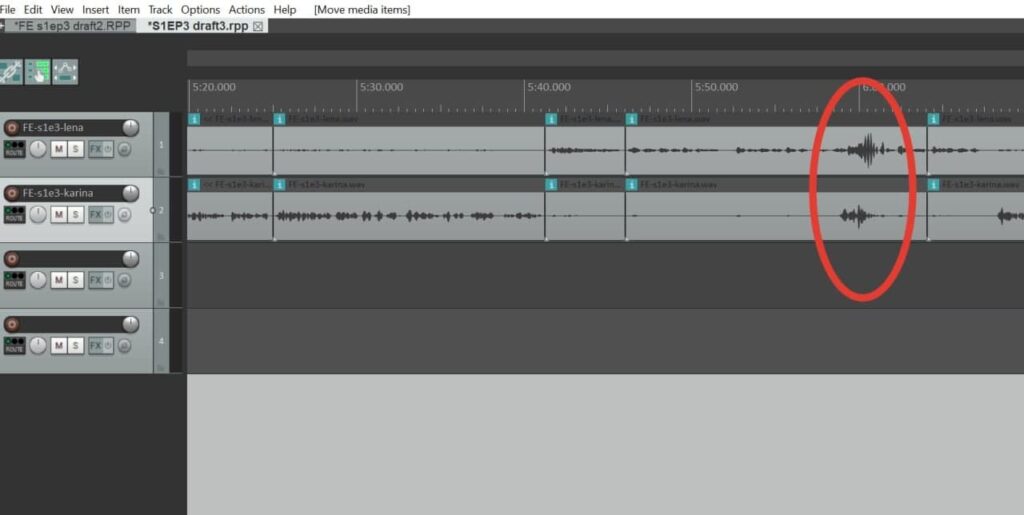
Даже когда человек молчит, его дорожка не исчезает — на ней остаются ахи-вдохи и эхо слов собеседника. Так и должно быть. Иногда собеседники будут говорить одновременно, и будет сложно разобрать, что говорит каждый из них. Но даже в этом случае не нужно отрезать одну из дорожек: оставь, как есть — звукорежиссёр знает, как всё исправить.
Если помимо разговора двух людей есть другие вставки, они добавляются отдельными дорожками:
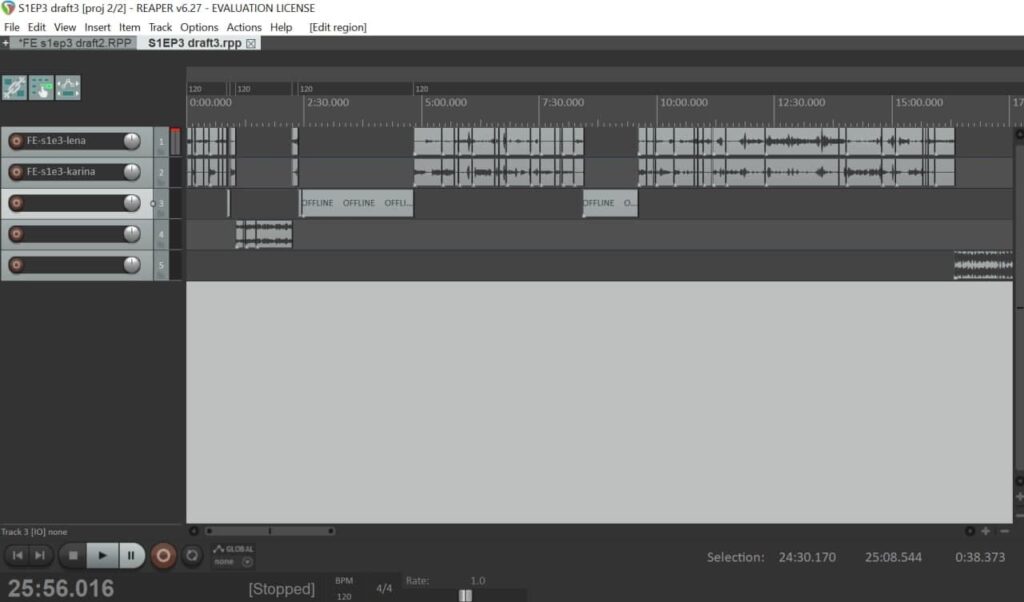
Да, в этом случае мы как будто собираем шахматкой, но на самом деле нет. В тех фрагментах, где в разговоре участвуют 2 человека, дорожки остаются бутербродиком; а на врезке говорит один — дорожка остаётся одна.
Не сохранился — начинай сначала
Каждый наш новый редактор совершает одну и ту же ошибку: ноут разряжается или что-то ещё идёт не так — и он теряет всю проделанную работу.
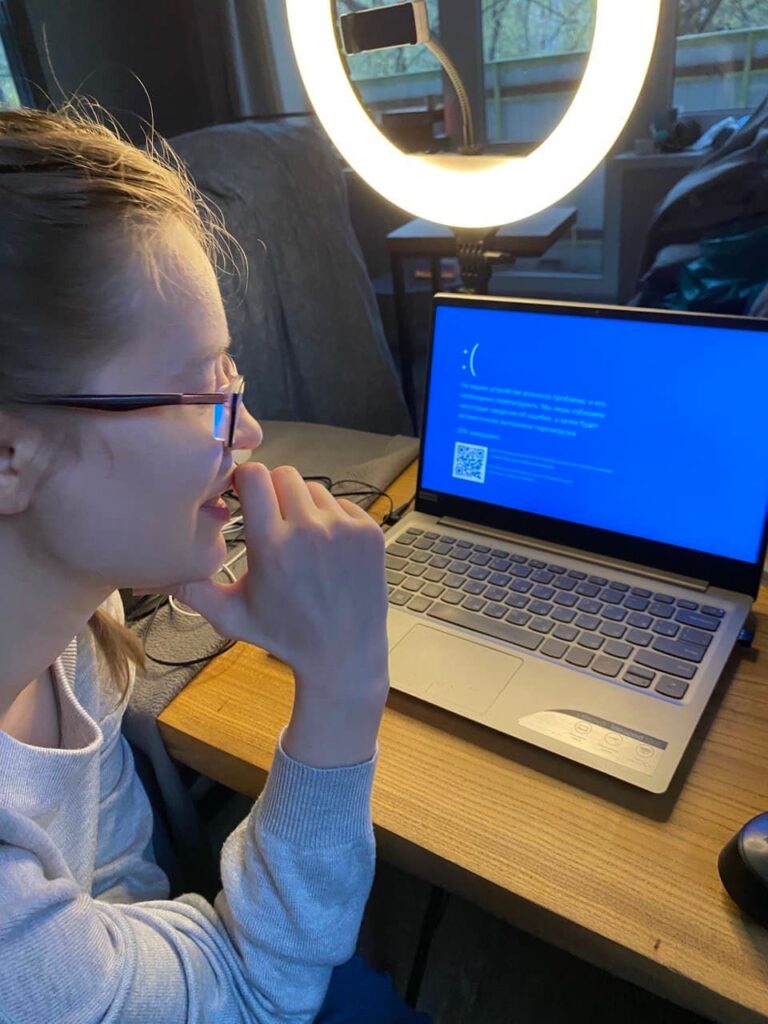
Вот так выглядит редактор, который потерял результат двух дней плотной работы. Чтобы с тобой такого не случилось, нажимай ctrl-s или в меню «Сохранить проект».
Не поменял режим — начинай сначала
В Reaper существуют разные режимы — Ripple Editing, они переключаются с помощью Alt + R или иконкой слева вверху. То, в каком режиме редактирования вы находитесь, видно на этой иконке.
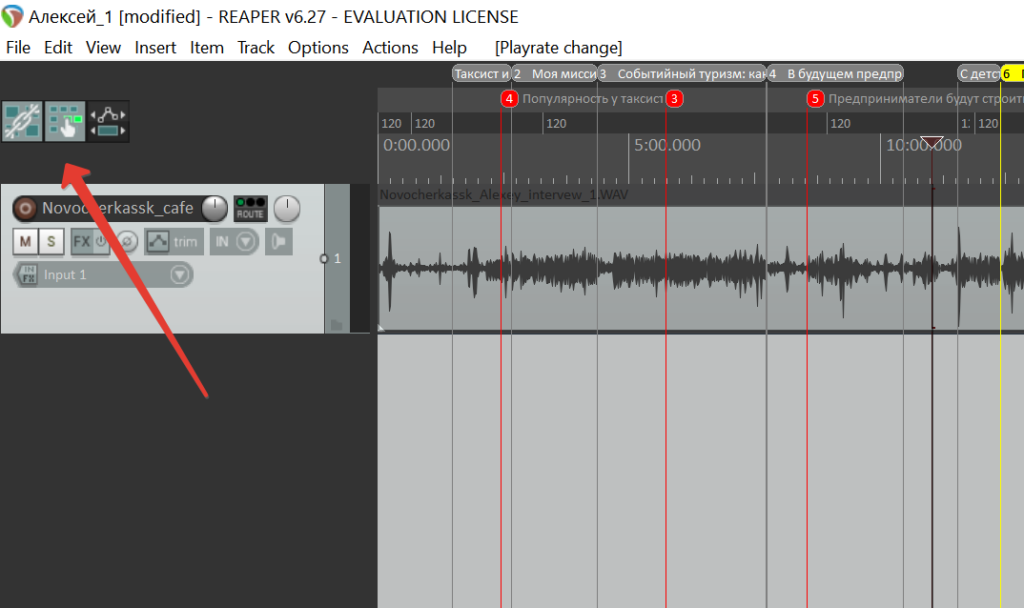
В разных режимах редактура идёт по-разному: в одном удаление куска сдвигает в бок все дорожки разом (и можно случайно потерять фрагмент на сторонней дорожке), в другом — сдвигает только одну (и это может испортить синхронизацию дорожек), в третьем — фрагмент убирается, но дорожки не двигаются (и появляются дыры). Так ты можешь испортить свою сборку и заметить это только спустя много часов работы.
Понадобится какое-то время, чтобы перестать путать режимы и начать пользоваться ими с кайфом. Просто положи 2−3 дорожки, понажимай и посмотри, что получится.
Послушал на х2 — начинай сначала
В рипере есть как минимум два способа увеличить скорость воспроизведения: Rate и ВРМ — редакторы пользуются ими, чтобы быстрее отслушивать дорожки. Rate безобидный: он просто заставляет бегунок двигаться быстрее, но к тому же меняет тембр голоса. С Rate 2 все участники подкаста пищат, как Чип и Дейл.
Чтобы слушать в быстром темпе, но с нормальным тембром, редакторы использую ВРМ. Но у этого есть побочные эффекты.
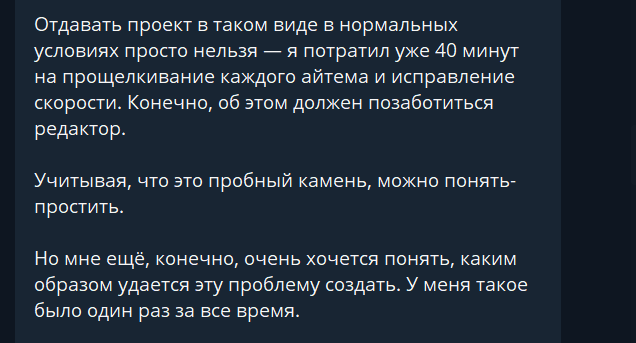
Чтобы не создавать такую проблему, не пользуйтесь ВРМ. Но если вам интересно, откуда она берётся, то вникайте.
Если слушаешь фрагменты на ВРМ 240 (это ускорение в 2 раза), то ты не просто ускоряешь бегунок. В проекте создаётся тайм-флажок, и все треки после этого флажка получают особое свойство — они становятся в 2 раза быстрее. И это свойство наследуется: теперь если взять фрагмент из этой зоны и перенести в другое место, он перенесётся таким, какой есть, ускоренным. А если поставить в проекте несколько тайм-флажков и двигать по нему фрагменты туда-сюда, произойдёт лютая дичь: фрагменты будут менять свои скорости, и вы получите проект, где у каждого маленького кусочка появляется собственный показатель скорости.
Вот как это выглядит:
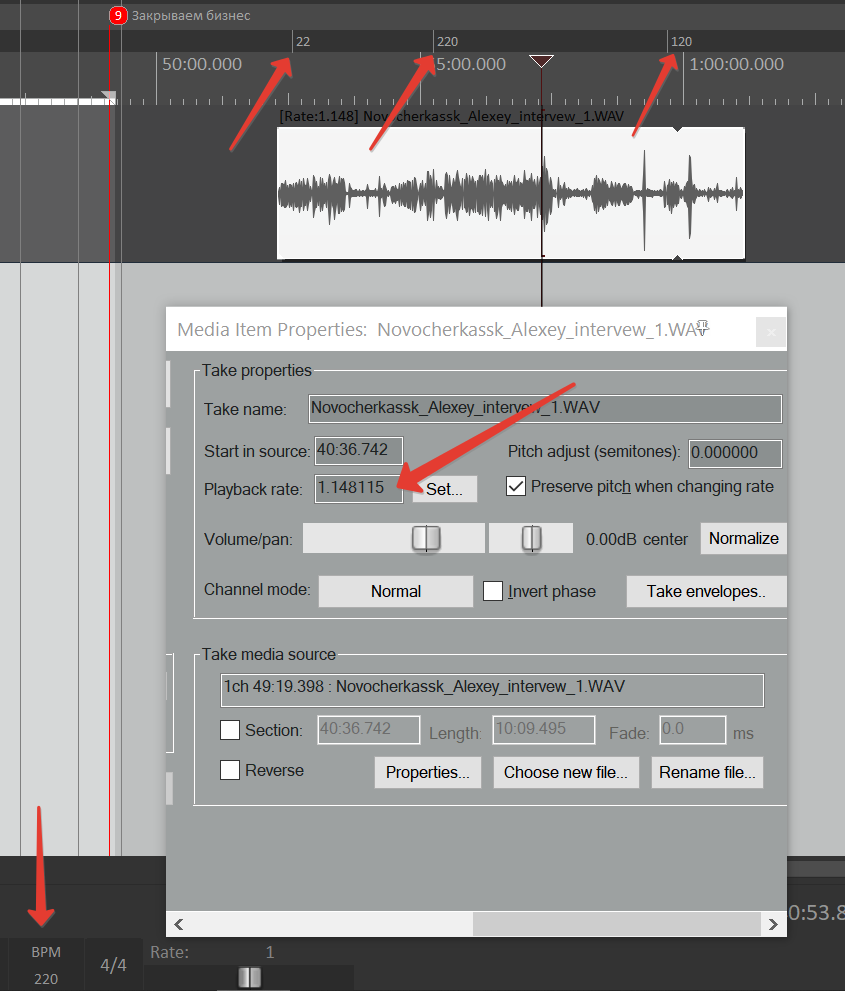
Так, здесь редактор трижды менял ВРМ: сначала на 22, 220 и обратно в нормальные 120. Но это лишь создало три тайм-региона, и в каждом теперь действуют свои правила: один делает айтомы медленными, другой быстрыми, а третий оставляет в норме. Фрагмент записи, который попал на все три тайм-региона, стал неравномерным по скорости и получил битый playback rate: 1.148 115 вместо нормального 1.
Пока не очень страшно, да? Ведь можно просто выделить все фрагменты проекта, залезть в настройки item properties и выставить нормальный playback rate — 1. После этого фрагменты и правда вернутся в нормальную скорость, но размер каждого фрагмента останется прежним. Если в ускоренном виде в сантиметровый фрагмент помещалась целая реплика, то теперь, с нормальным playback rate кусочек не станет длиннее, просто в него теперь поместится только половина реплики. Это значит, всю вашу сборку можно начинать сначала.
Поэтому лучше использовать ВРМ только во время отслушки и разметки: ставить флажок в самом начале трека — и слушать на высокой скорости и размечать регионами. Когда закончили, убирайте флажок, и трек вернется в нормальную скорость.
Не настроил синхронизацию — работа встала
Проекты в Reaper со всеми исходниками весят очень много. Стоит сохранять их в отдельную папку на компе и при первой возможности сносить — иначе память быстро забьётся. Если вам не повезёт, то память забьётся в самый неподходящий момент: как раз когда вы захотите сохранить результат многочасового труда и передать в работу главреду.
Лучшее решение — хранить файлы в Dropbox с умной синхронизацией.
Не скопировал исходники — работа встала
Дело в том, что проект в Reaper — это лишь оболочка, которая ссылается на сторонние аудио-файлы. Если ты сохранил проект, а файлы не скопировал, то другой человек увидит схему нарезки, но сами дорожки будут с пометкой «оффлайн» — и их будет невозможно воспроизвести.
Чтобы этого не случилось, всегда храни рипер-файлы в той же папке, где лежат все исходники к нему. Это значит, что:
- если вы работаете над одним проектом, то не надо внутри его папки создавать ещё какие-то подпапки для новых версий рипер-проекта. Им просто не смогут воспользоваться, если он будет лежать изолированно от корневой папки, где лежат исходники.
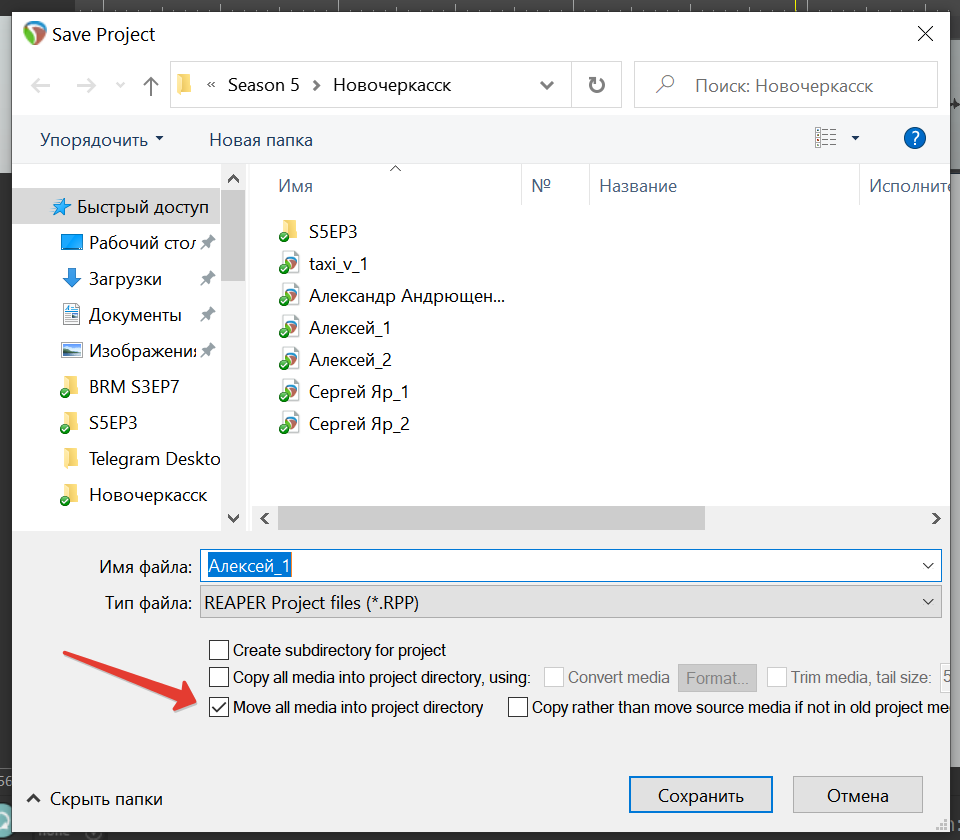
- во время сохранения проекта пользуйся галкой copy all media…, чтобы все аудио-файлы, использованные в проекте, скопировались в папку, где ты его сохраняешь.
- пользуйся галкой move all media…, чтобы не копить бесконечные копии исходников. Если только ты не боишься, что исходники переместятся из папок, в которых они тоже нужны для работы над какими-то другими рипер-файлами.
Несколько моих друзей решили поэкспериментировать со звукозаписью и я решил набросать небольшое описание базовых возможностей программы, которой пользуюсь сам. Ну хотя бы чтоб не повторяться.
Много слайдов чтоб не заблудиться в трёх соснах и не очень много текста: я не собираюсь описывать как сделать клёвый звук, просто рассказать где что лежит
Часть 0: Why Reaper?
REAPER — относительно молодая (по меркам консервативной аудио-индустрии 10 лет уже не детство, но ещё не зрелость) DAW(цифровая аудио станция), то есть программа для комплексной обработки звука.
В своё время меня в ней привлекли две вещи:
Во-первых — цена. Заинтересовался я рипером ещё когда он был бесплатным официально (до версии 1.0), но и сейчас, несмотря на сравнимую с Cubase ценой в 60 американских президентов, им можно пользоваться бесплатно.Он, как WinRar, «умеет ждать»: несмотря на официальный тестовый период в 60 дней даже через год просьба покормить разработчика(«Buy me») за 5 секунд сменяется милостивым «Still evaluating»(если таймер не тикает — пощёлкайте закладками).

Во-вторых — наглядность. Или, даже можно сказать, интуитивность. По крайней мере для меня.
Абсолютное большинство вещей лежат там, где их ожидаешь найти. При этом ненужные вотпрямщас вещи легко прячутся за парой кнопок, а будучи нужны — легко вытаскиваются.
Часть 1: Клик-клик. Установка и базовая настройка.
Благодаря «вечному пробному режиму», мы можем совершенно спокойно скачать программу с официального сайта http://www.reaper.fm/download.php Для 64-битной windows вполне можно брать 64-битную версию, прослойки для совместимсости со старыми плагинами в комплекте. Установка не задумываясь прощёлкивается методом «Далее»-«Далее»-«Готово».
При первом запуске, даже до окна-попрошайки программа предложит настроить звуковую карту.

Не стоит с ней спорить

Сначала выбирается режим работы (Audio system): если звуковая карта поддерживает режим ASIO лучше воспользоваться им (не забываем указать с какого по какой каналы использовать); если нет — начиная с Висты сделали довольно приличную подсистему WASAPI, которую можно переключить в ASIO-подобный Exclusive mode.
Можно заметить что настройка звуковой карты — часть общего меню настроек, тем не менее большинство остальных опций настроено вполне разумно и не стоят беспокойства при первом запуске. Сюда можно вернутся при необходимости через меню Options — Preferences.
Часть 2: Трень-трень и ля-ля. Запись.
Создать новый проект можно прямо из меню «Пуск»(там есть соответствующий ярлычок), можно просто через File — New Project. Да и просто если все проекты позакрывать — новый будет создан автоматически, программа не может быть запущена без проекта(то же касается и самого первого запуска).
Слева у нас список дорожек. Щелчком правой клавиши мышки можно вызвать меню добавления дорожки. Первый пункт — самый востребованный: просто создать дорожку. Например чтобы туда писать.

Нажав на маленький красный кружочек на свежесозданной дорожке можно назначить её на запись. При этом справа появится индикатор уровня(громкости) входного сигнала. Внизу можно выбрать вход звуковой карты (на картинке выбран Input 1), если выбора входа не видно можно увеличить вертикальный размер дорожки, «потянув» за нижнюю грань. Справа от красной кнопки можно впечатать название дорожки.

Сразу после первых настроек проект лучше сохранить. Не столько ради ценности пустой дорожки, сколько чтобы обозначить где будут сохраняться файлы записи. Ради порядка же можно сразу всё сложить в отдельную папочку (Create subdirectory for project).

ToDo:
Часть 3: Уиу-уиу и жж-жж. Обработка.
Часть 4: Бум-туц, та-та-та. Виртуальные инструменты.
Часть 5: Отрендери меня полностью. Получаем результат.
Thinking about using Reaper as your DAW of choice?
You’ve landed in the right place.
There’s a ridiculous number of options when it comes to digital audio workstations.
So to help you figure out if Reaper is a good fit for you, this guide will take you through the basics. From getting set up to recording and editing your first track.
A Quick Introduction to Reaper
Reaper is a DAW that lets you do pretty much anything the big guys can do. Except Reaper is free or affordable.
It supports VST, VST3, AU, DX, and JS plugins.
It comes with plenty of built-in plugins and effects. I use the stock EQ, compression, reverb, and delay to mix my music with great results.
If you want to download Reaper, you can get the full version for free, no strings attached.
After the trial period, you’ll still have access to the full version. But you will get a reminder to buy a license every time you open the program.
Fortunately, Reaper is just $60 if you’re using it
- for personal use
- commercially but your annual gross revenue is $20,000 or less
- for an educational or nonprofit organization
Otherwise, a license is $225, which is still very affordable.
When you buy a Reaper license, you get unlimited updates through version 7.99. And updates happen once every few weeks.
Even after you update, your preferences and settings stay how they were.
What You Need to Get Started
Before we dive into the nitty-gritty of using Reaper, you’ll need a few essential pieces of equipment.
The Right Operating System and Computer
You’ll need to make sure your computer and operating system are up to the task.
Honestly, running Reaper doesn’t require anything very different. But it’s best to be safe.
Here’s what Reaper supports:
- Mac OS X 10.5-10.13 (32-bit / 18MB)
- Mac OS X 10.5-10.14 (64-bit / 20MB)
- Mac OS X 10.15 Catalina (20MB)
- Windows XP/Vista/7/8/10 (32-bit / 12MB)
- Windows XP/Vista/7/8/10 x64 (64-bit / 13MB)
You can also use Linux OS, but those builds are “experimental and unsupported,” says Reaper.
Audio Interface
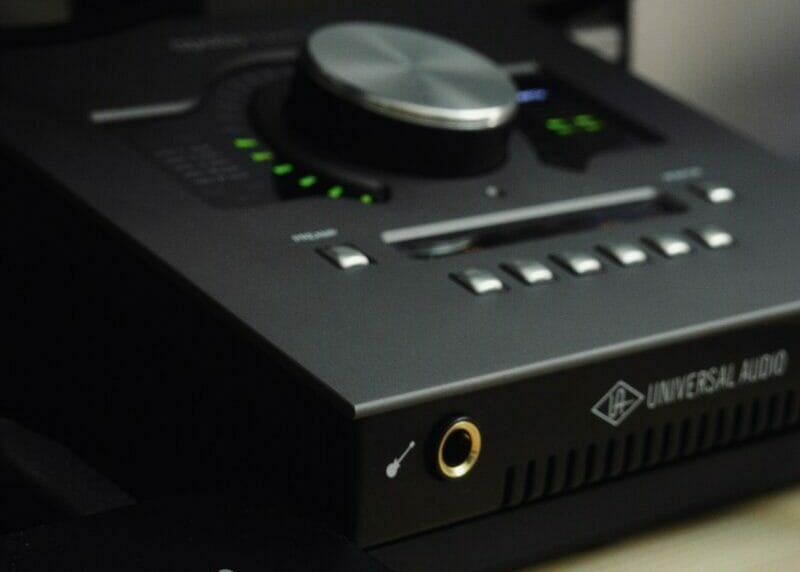
When you get an audio interface, make sure it works with one of Reaper’s supported audio systems.
On Windows, Reaper supports ASIO, WASAPI, Kernel Streaming, and waveOut/DirectSound. And it supports the macOS Core Audio.
Here are a few audio interfaces I’d recommend checking out, especially if you’re new:
- Focusrite Scarlett 2i2
- PreSonus AudioBox USB 96
- Behringer U-Phoria UMC404HD
Headphones
The reason you need headphones instead of monitors is that you don’t want mic bleed.
If you record vocals while hearing the playback through your speakers, your mic will pick up that sound.
It’s best to get a pair of closed-back headphones. They minimize the amount of sound escaping the ear cups and reduce the chance of mic bleed.
Microphone
If you’re recording all electronic music, maybe you don’t need a microphone. But with any other type of music, you’ll definitely need one.
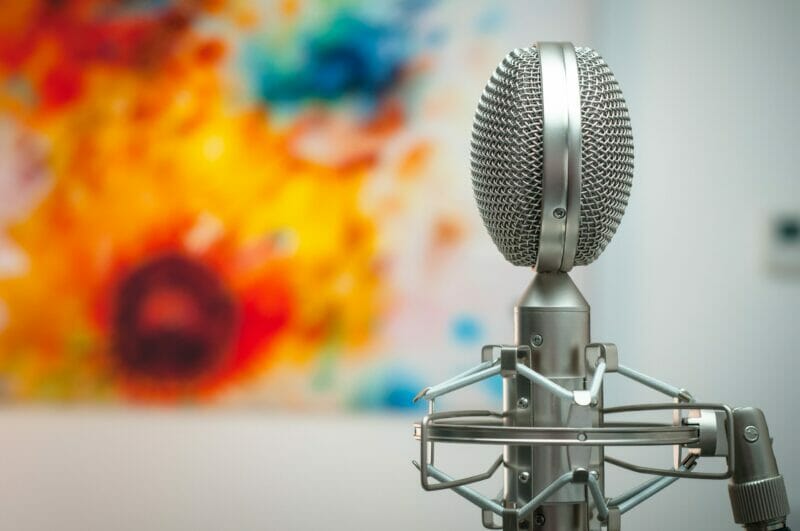
Just pay attention to whether or not the microphone is phantom powered.
If it does require 48v phantom power, your interface has to support that. (Most do nowadays.)
A Step-by-Step Guide for Getting Started with Reaper
Now for the fun part. This is where you learn how to use this very intuitive program.
Setting up the Drivers
The audio interface you decide to use will have instructions for installing its software and drivers.
Once installed, go to Options → Preferences to choose your audio device settings.
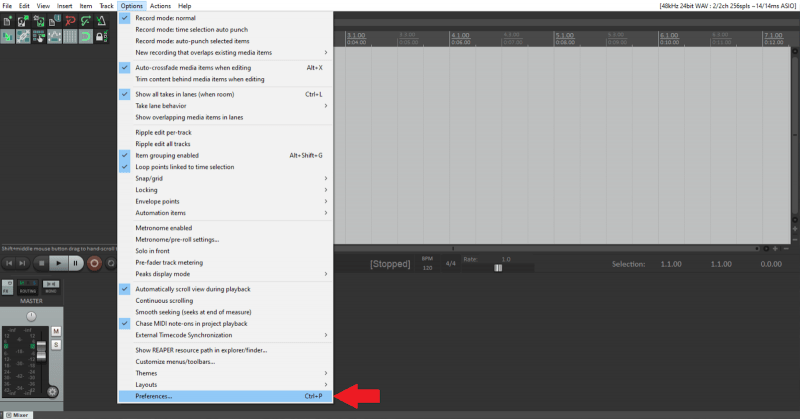
For this tutorial, I’m using a Focusrite Scarlett 2i2 interface. So I’ll choose ASIO.
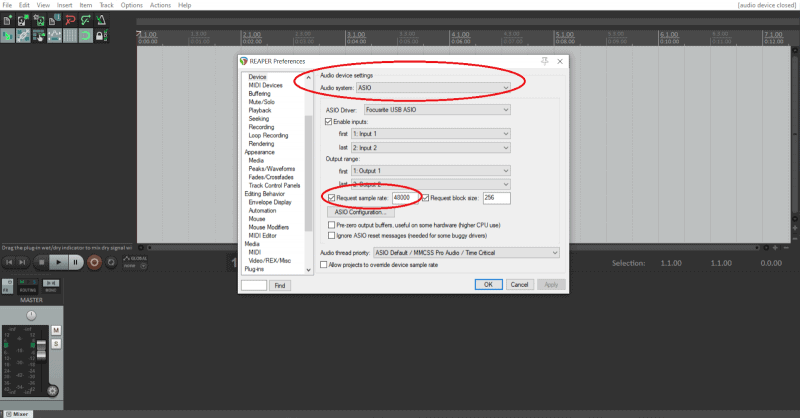
The standard sample rate is 44.1 kHz, but you can change it to 48 kHz. The former is perfectly fine to use, while the latter is better if your music will be synced with video.
You can learn more about sample rates and bit depths here.
Preparing Your First Track
Now you’re ready to create your first track.
To do this, go to Track from the main menu (top-left corner). Then insert the type of track you want.
You can also hit Ctrl+T on a Windows computer or Command+T on a Mac.
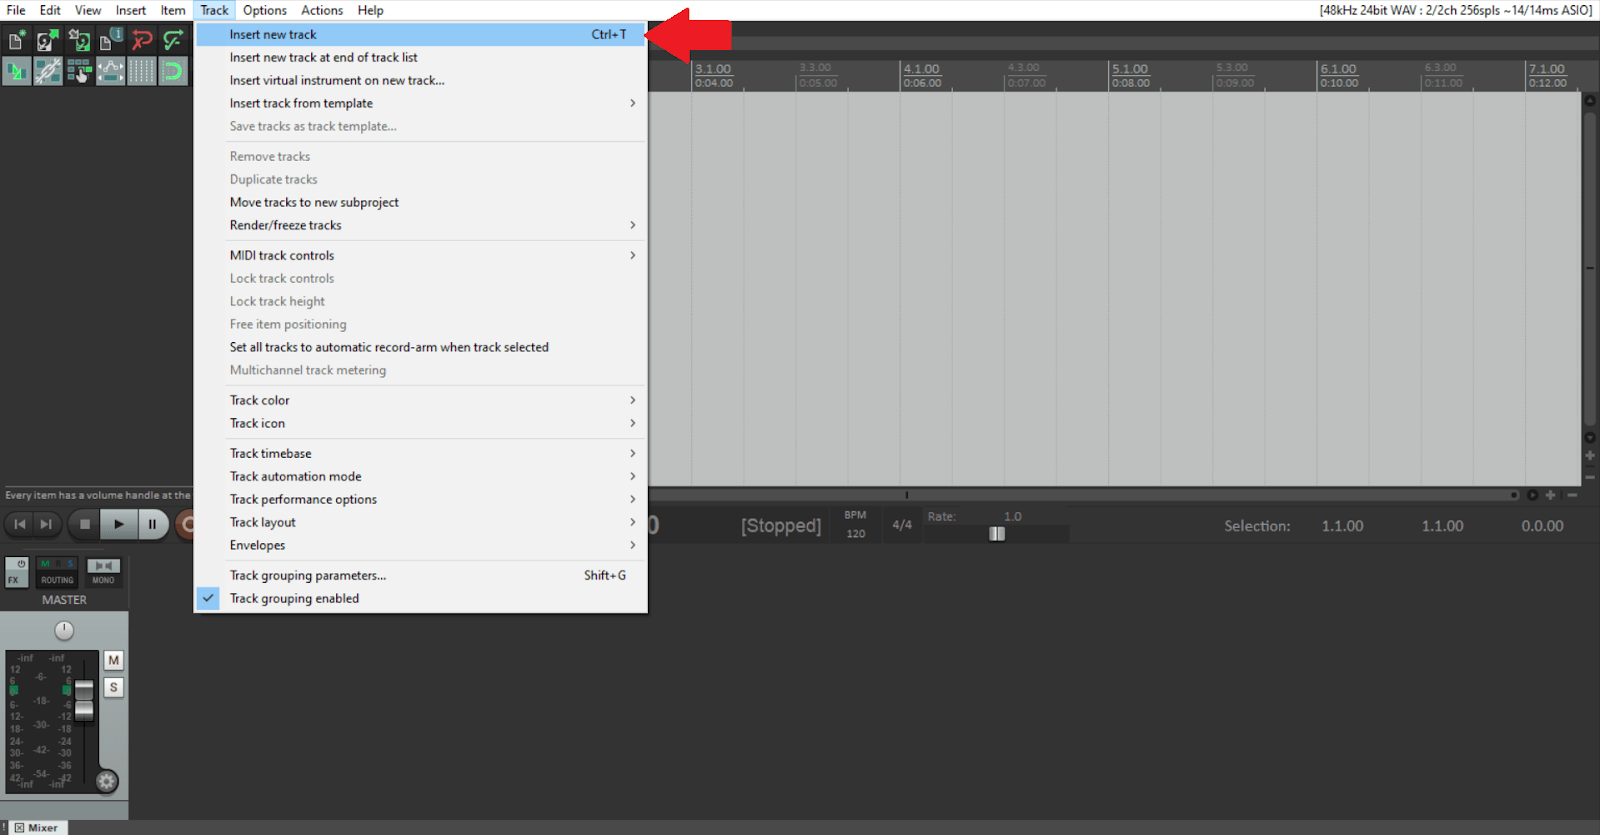
“Insert new track” will add an audio track that you can record guitar or vocals on. “Insert virtual instrument on new track” will add a MIDI-enabled track.
Next, you’ll want to make sure the input settings are correct.
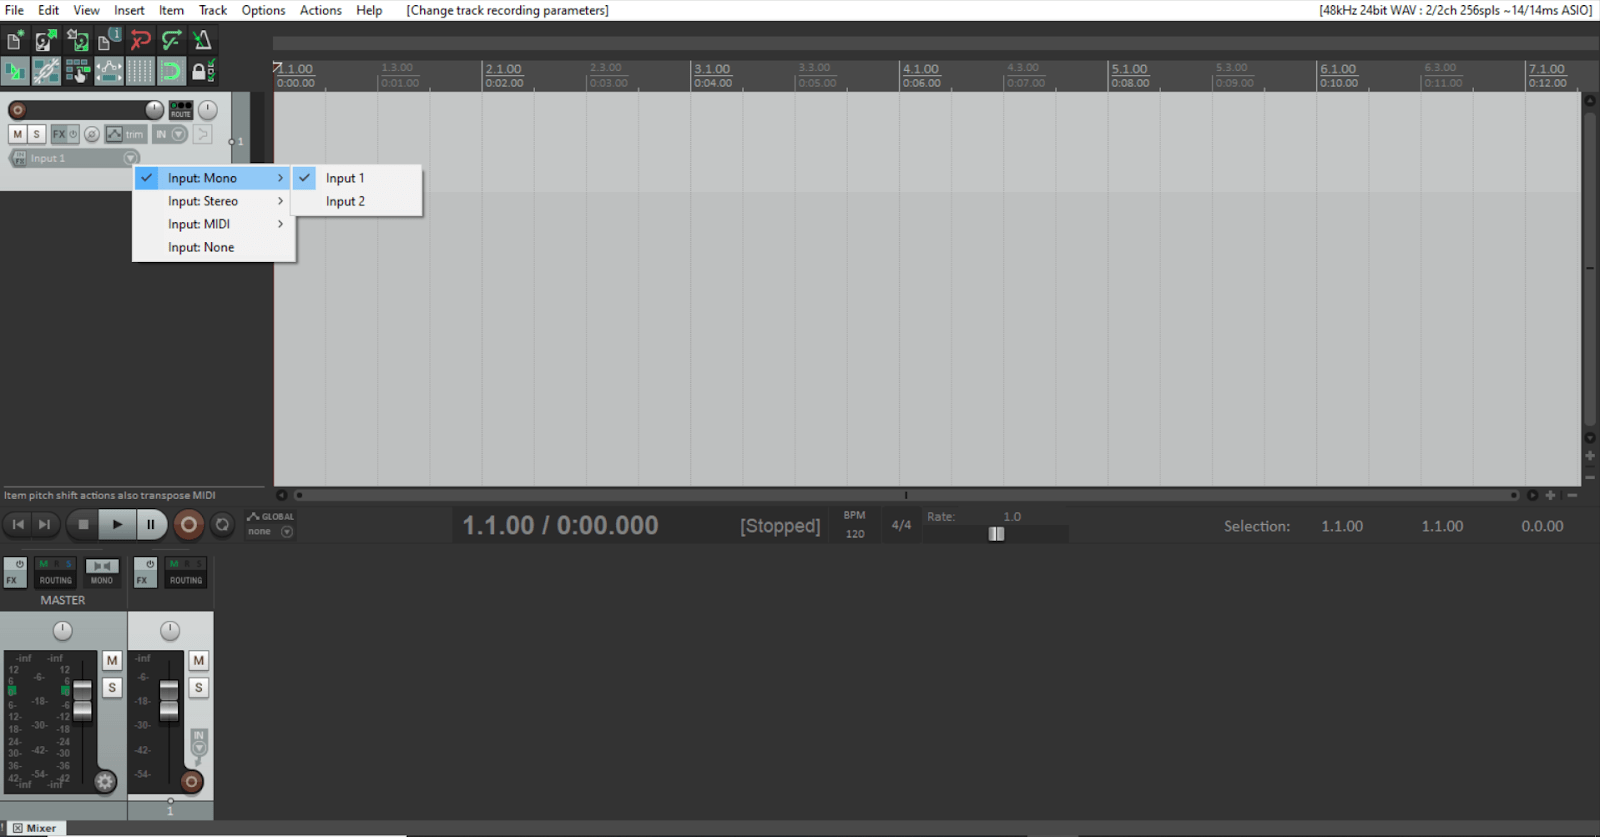
On the track, you’ll see a dropdown box that says “Input 1.” (If you don’t see it, expand the track by dragging the bottom edge downward).
From here, you can choose your input. You’ll see these options:
- Mono: records one channel at a time
- Stereo: records two channels at a time
- MIDI: records your MIDI instrument (like a keyboard)
- None: records nothing
Recording
You’re almost ready to record.
First, you’ll want to set the BPM and time signature, which you can do at the top of the mixer.
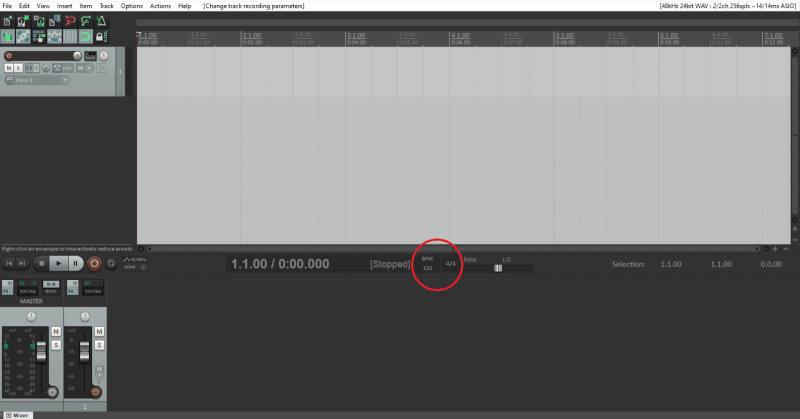
Hover over the letters “BPM” and it will say “Tap.” This lets you tap the BPM by clicking twice at your preferred speed.
You can also click on the “120” in the BPM box to type in the tempo.
Next to that, you’ll see the time signature of 4/4. Just click on that to change it.
Now you can enable your track for recording.
Go to your track and hit the dark red circle on the left side. It will turn bright red, indicating it’s armed for recording.
You’ll need to hear what you’re recording as you record it.
So click the little megaphone icon on the right side of the track settings. This enables record monitoring.
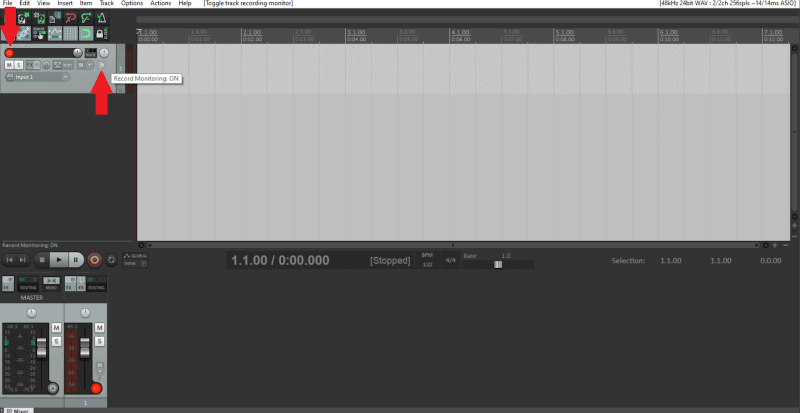
You’ll also see an M and an S underneath the bright red circle. These are the mute and solo buttons.
Sometimes, you may need to loop a section.
This could be useful for doing multiple takes without having to push any buttons. Or you can use it during the mixing stage.
To loop a section, do the following:
- Left-click in the area above the tracks that shows the time and measures
- Drag your mouse left or right
- Select the timeframe you want looped
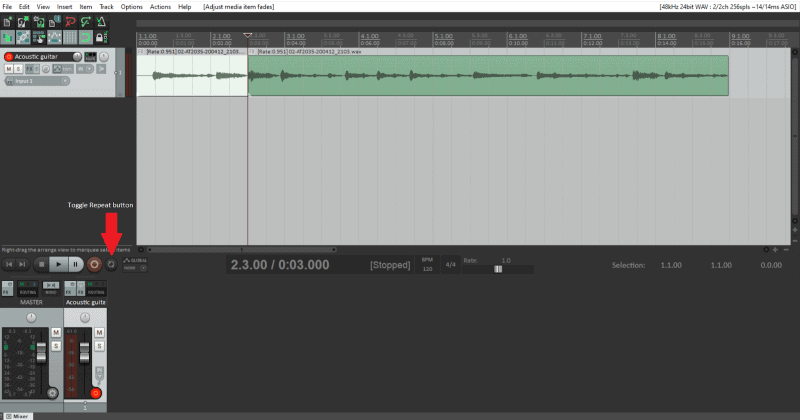
- Hit the Toggle Repeat button or hit R
When you record or play your track, it will loop that section continuously. When recording with looping, it will automatically record a new take with each loop.
Editing
Now that you’ve recorded your first take on your first track, let’s talk about editing.
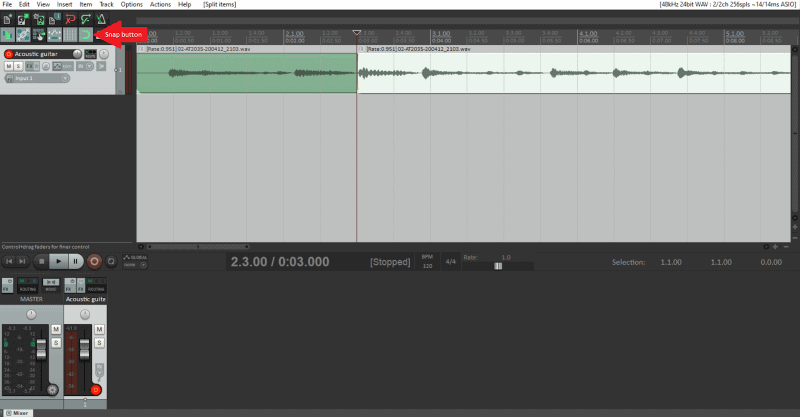
To cut or split an item, simply click on the item at the place where you want to make the split.
By default, the cursor will snap to the grid.
To turn this off, click the Snap button underneath the main menu in the top-left corner. You can also hit Alt+S to turn snap on and off.
Then to make the split, just hit S (you can also right-click and choose “Split items at cursor”).
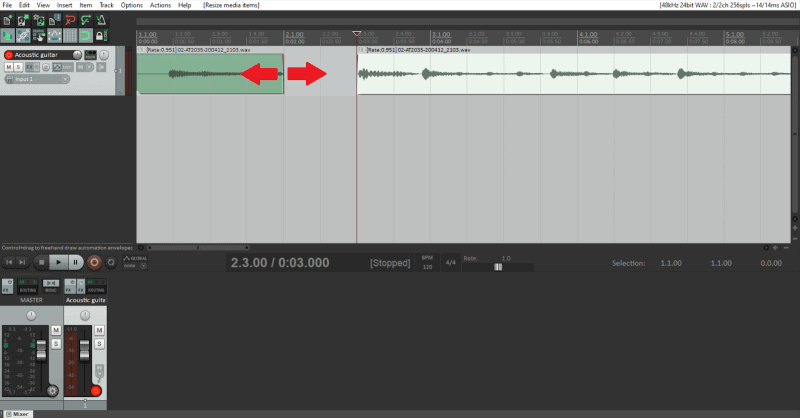
If you’d rather, you can drag the edge of an item forward or backward, which removes that part of the item.
But you don’t actually lose what you’ve removed with this method. It’s still there.
You can drag the edge once more to get that part of the item back.
You can also stretch an item, which speeds up or slows down the audio.
Hover over the edge of an item, press and hold Alt, and click and drag the edge. (You’ll notice this drastically diminishes the sound quality of the audio.)
Nudging is another useful feature Reaper offers. This is great for shifting items to be lined up exactly where you want them to be.
Just click on an item, hold Shift, and press the left or right arrows on your keyboard. It will nudge the item ever so slightly.
When nudging, it may be easier to zoom in so you can get more precise.
To do this, make sure your mouse is hovering somewhere in the track field (where the actual recordings are shown). Then scroll up (zoom in) or scroll down (zoom out).
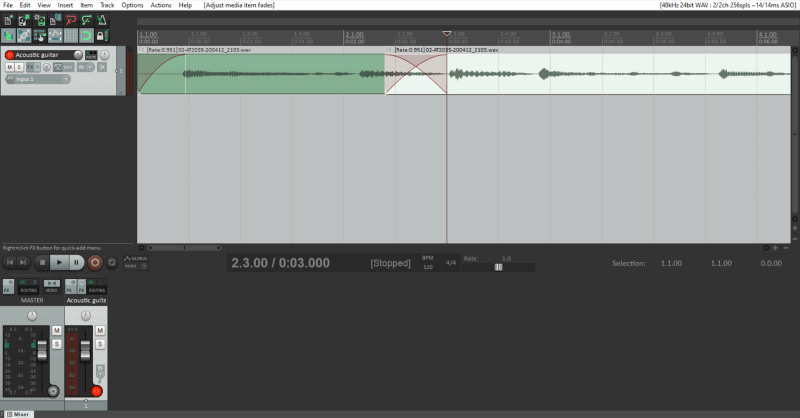
One more basic feature you’ll need is crossfading.
When you drag an item over another item, it will automatically apply crossfade. But you can manually adjust the crossfade as well.
Hover over the top corner of the item that’s overlapping another item. Click and drag to change the length of the crossfade.
This is also how you can fade an item in or out.
You can also highlight multiple items across multiple tracks. Here are a few ways to do that:
- Right-click and drag your mouse across all items you want to select
- Use Ctrl/Shift and click on the items you want to select
- Left-click and drag your mouse in the section above the tracks that shows the time and measures
- Hit Ctrl+Shift+C (to copy) or Ctrl+Shift+X (to cut)
These features allow you to split, shorten, and move items or sections of items around your project.
What about gain levels and panning? You can access those either on the left side where you’ll see your list of tracks or in the mixer at the bottom.
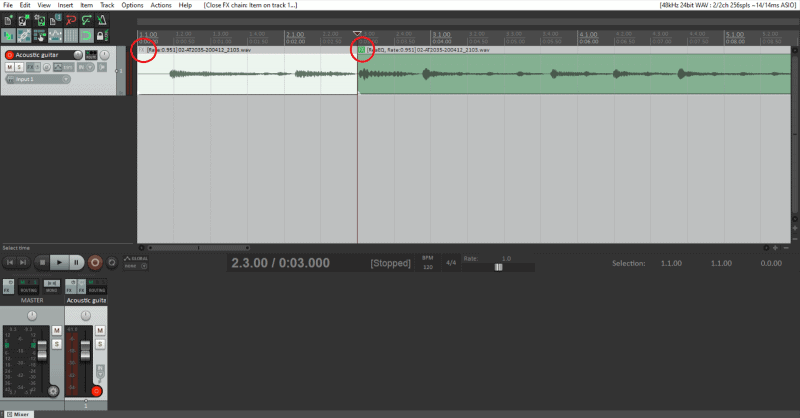
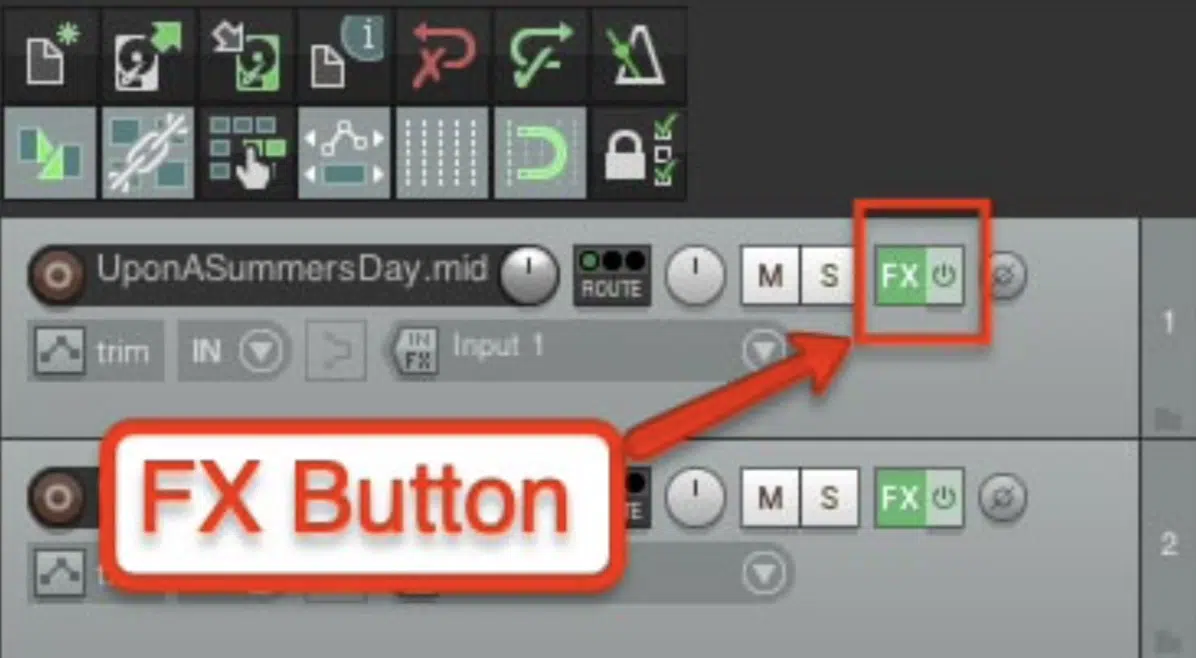
To add effects, hit the FX button on the track in question (on the left side or in the mixer). A new window will pop up, showing you all your plugins and effects.
You can also apply FX to specific sections rather than the entire track.
You’ll see a little FX icon at the top-right corner of each item. Clicking it brings up your plugins and effects.
All these features have shortcuts. You can also set up custom shortcuts.
Go to Actions → Show action list, then choose the action you want to give a shortcut to. Click “Add…,” type in the shortcut key or combination of keys you want, then hit OK.
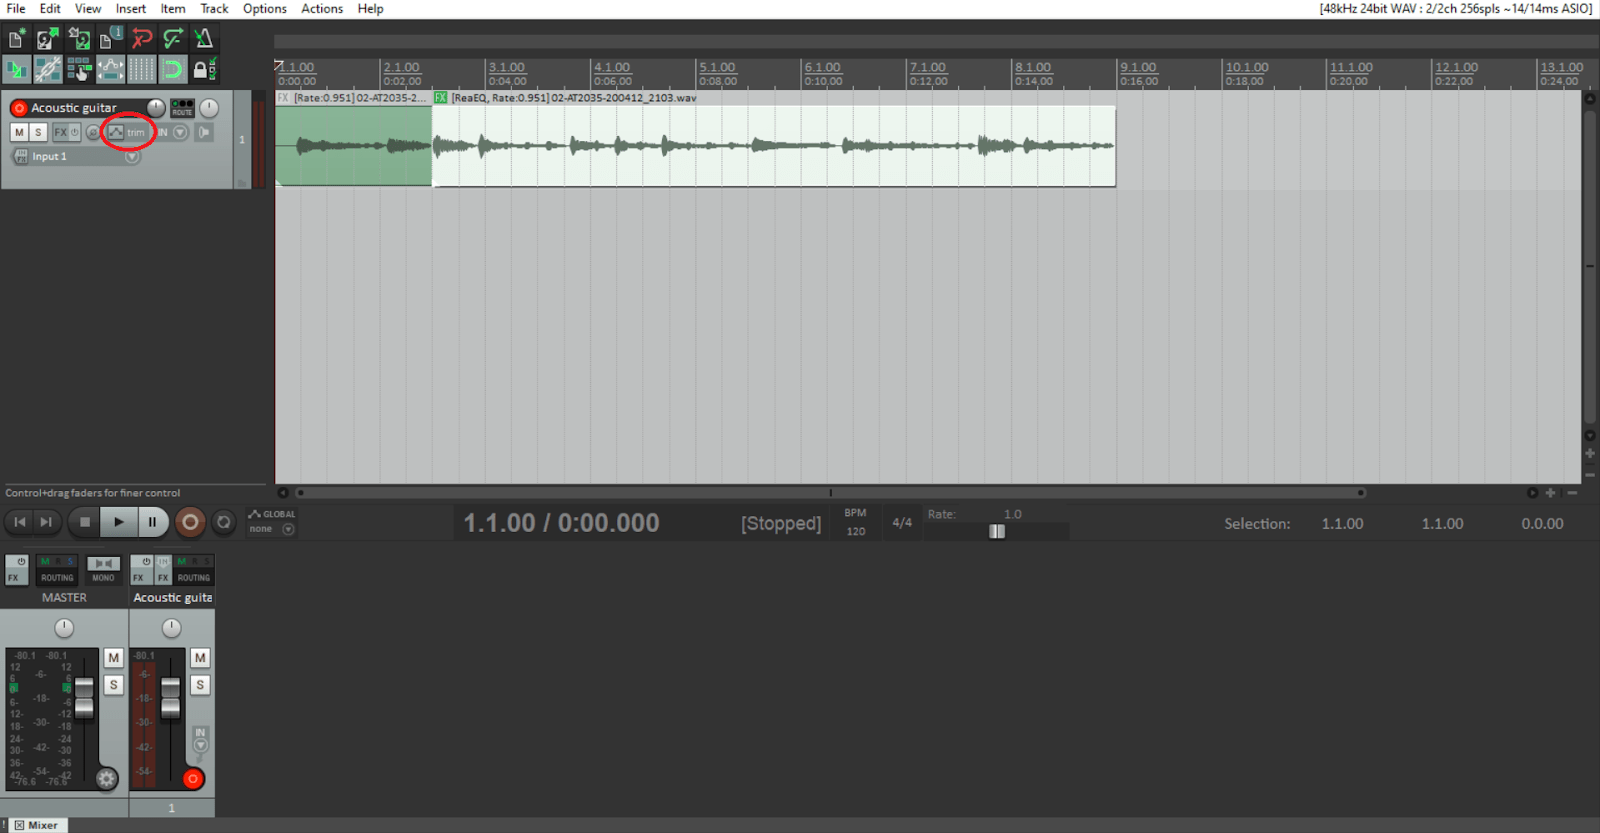
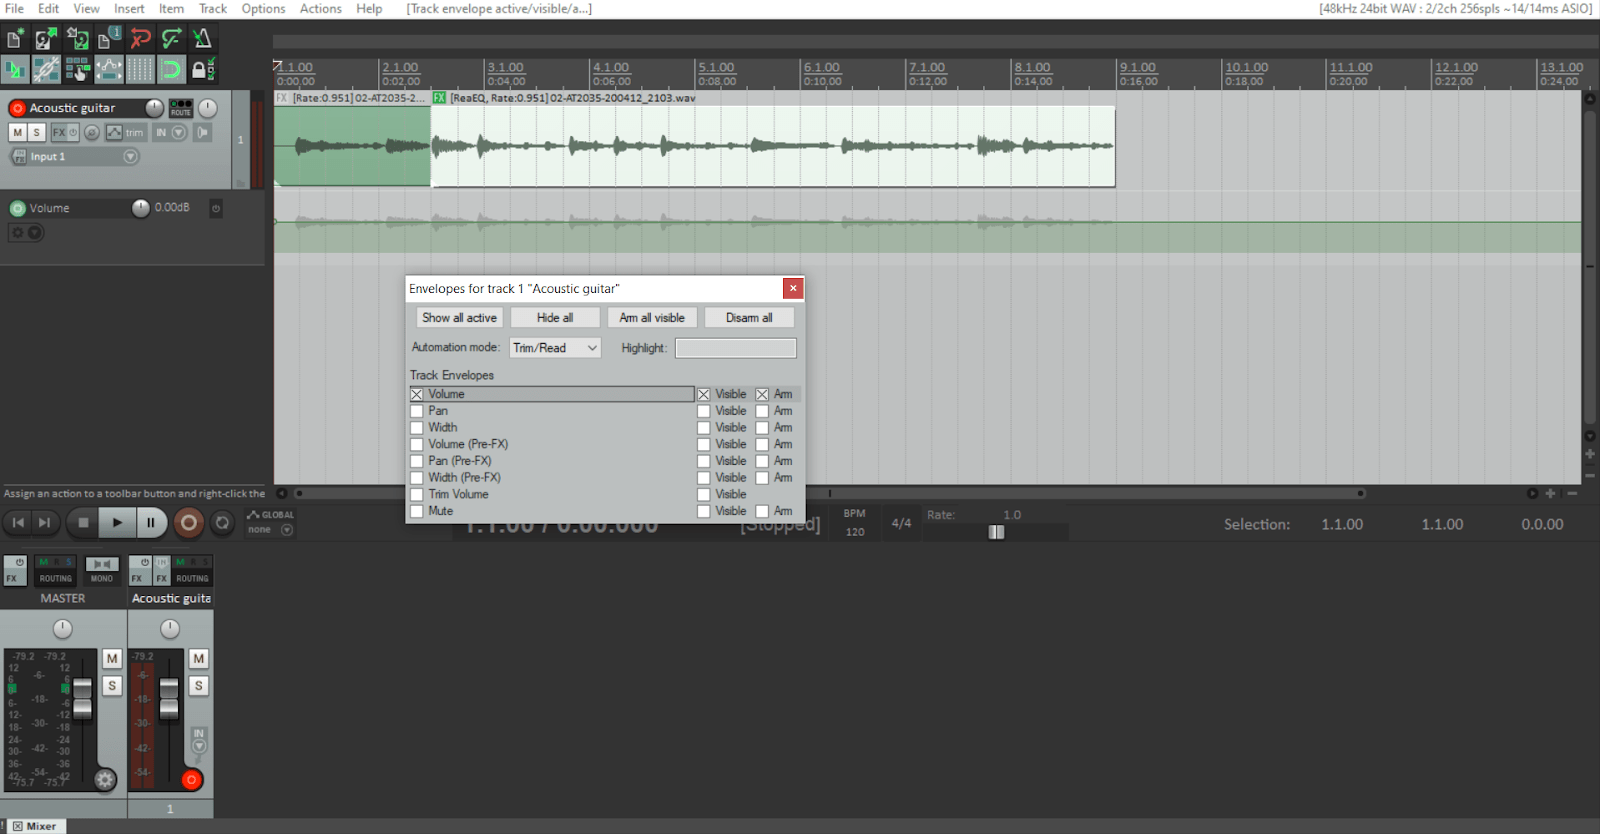
Another useful tool are envelopes. This is where you can adjust different settings on a track at different parts of the track.
This includes things like volume automation and panning. You can adjust them at different parts of the song.
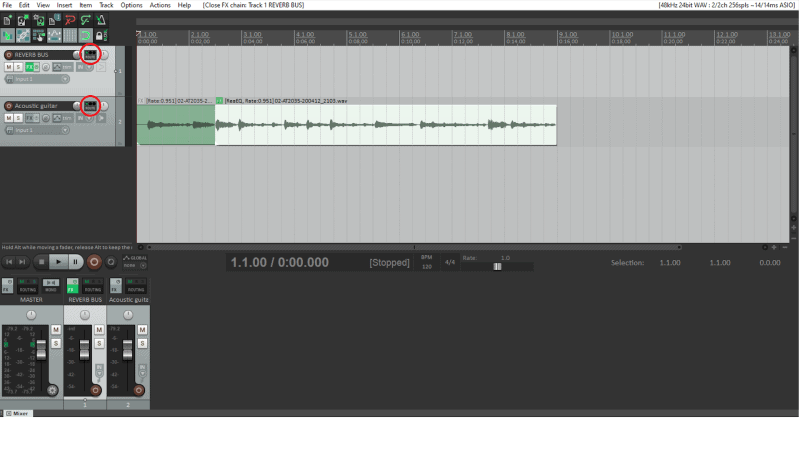
And I’ll briefly mention routing (aka bussing).
There are a lot of cool methods you can use with routing. The one I use the most is to add reverb or delay to multiple tracks at once.
Here’s how to bus a track to an effects track:
- Create a new track
- Add your desired effect to it
- Send your other tracks (like acoustic guitar, vocals, piano, etc.) to this “bus” track
Doing this will add the effect to every track routed to it.
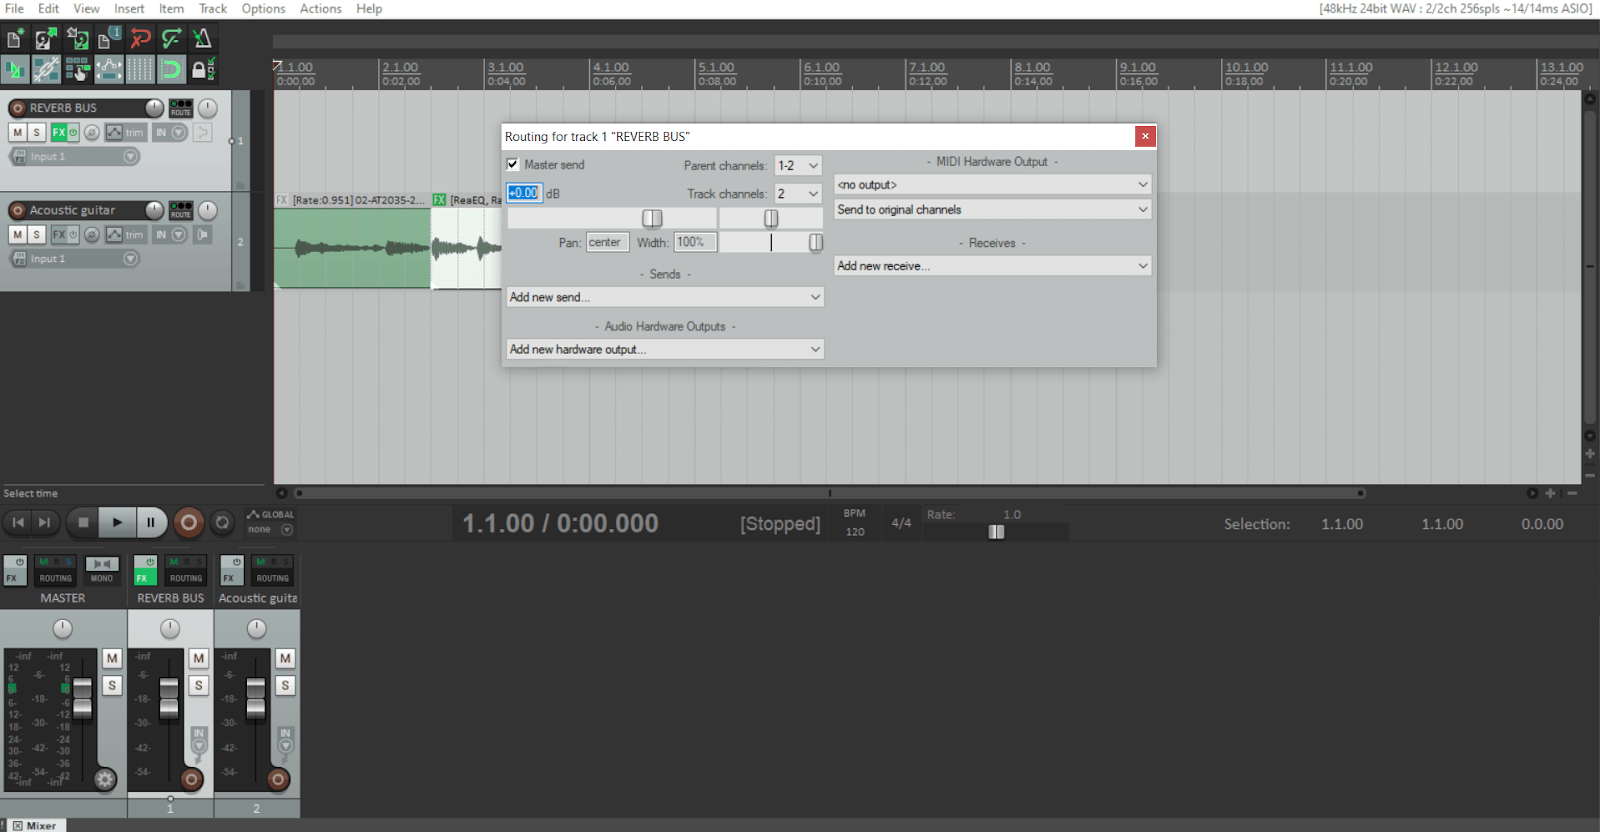
To route a track to your bus track, you have two options:
- Click the ROUTE button on the bus track (the one with the effect). Route the instrument track to it using the “Receives” drop-down box
- Click the ROUTE button on the instrument track (the one on which you want the effect). Route it to the bus track using the “Sends” drop-down box
More Reaper Resources
This tutorial is meant to get you started with Reaper. So at this point, you know everything you need to start recording with it.
But if you want to dive deeper into the world of Reaper, here are some extra resources to check out:
- Reaper’s user guide
- Reaper video tutorials
- Reaper forum: ask questions you can’t find the answers to elsewhere
(Unofficial) Reaper blog: covers just about every Reaper-related topic you can think of
Conclusion
And that’s everything you need to know to get started with Reaper!
Let me guess, you’re here because you’ve heard all the buzz around Reaper DAW and want to explore what this powerhouse has to offer.
Whether you’re a bedroom producer or a studio professional, Reaper has something for everyone.
And that’s what we’re diving into today.
In this comprehensive guide, we’ll be covering a wide range of topics to help you get up and running with Reaper, such as:
- The installation process & initial setup ✓
- Reaper’s unique interface ✓
- Recording & editing in Reaper ✓
- Working with MIDI ✓
- Mixing & mastering in the Reaper DAW ✓
- Customizing Reaper for your unique workflow ✓
- Reaper DAW vs other DAWs ✓
- The true power of Reaper ✓
- Advanced features and functions ✓
- Bonus tips, tricks & techniques to help you master Reaper ✓
By the end of this guide, you’ll not only have a solid understanding of the Reaper DAW but also a clear roadmap on how to make the most of its supreme features.
Therefore, you’ll be well on your way to becoming a Reaper DAW master.
So, let’s dive in…
Table of Contents
- Getting to Know Reaper: A Full-Featured DAW
- The Unique Offerings of Reaper DAW
- Understanding Reaper’s Interface & Advanced Features
- Setting Up Your Audio Interface
- The Role of the Audio Interface in Digital Music Production
- Connecting Your Audio Interface & MIDI Devices
- Getting Started: Reaper’s Recording & Editing Process
- Recording Your First Audio Track
- The Power of Multitrack Recording
- Editing Your Tracks Like a Pro
- Working with MIDI: A Closer Look
- Connecting and Using Your MIDI Keyboard
- Using MIDI CC Envelopes & the Piano Roll
- Mixing & Mastering in Reaper
- Harnessing the Power of Reaper’s Mixer Panels & Plug-Ins
- Achieving Pro-Quality Sound with Built-In Instruments & Effects
- Customizing Reaper for a Personalized Workflow
- Reaper’s Custom Layouts & Themes
- Optimizing Reaper for Your Specific Needs
- Reaper vs Pro Tools & Logic Pro
- Reaper vs Pro Tools
- Reaper vs Logic Pro
- Unleashing Advanced Features for Complex Tasks
- Useful Shortcuts & Workflow Enhancements
- Useful Shortcuts & Workflow Enhancements (Cont.)
- Reaper DAW: Final Thoughts
Getting to Know Reaper: A Full-Featured DAW
Let’s start off by talking about the unique offerings of the Reaper DAW.
This way, you’ll be able to fully understand how versatile and flexible it can truly be.
-
The Unique Offerings of Reaper DAW
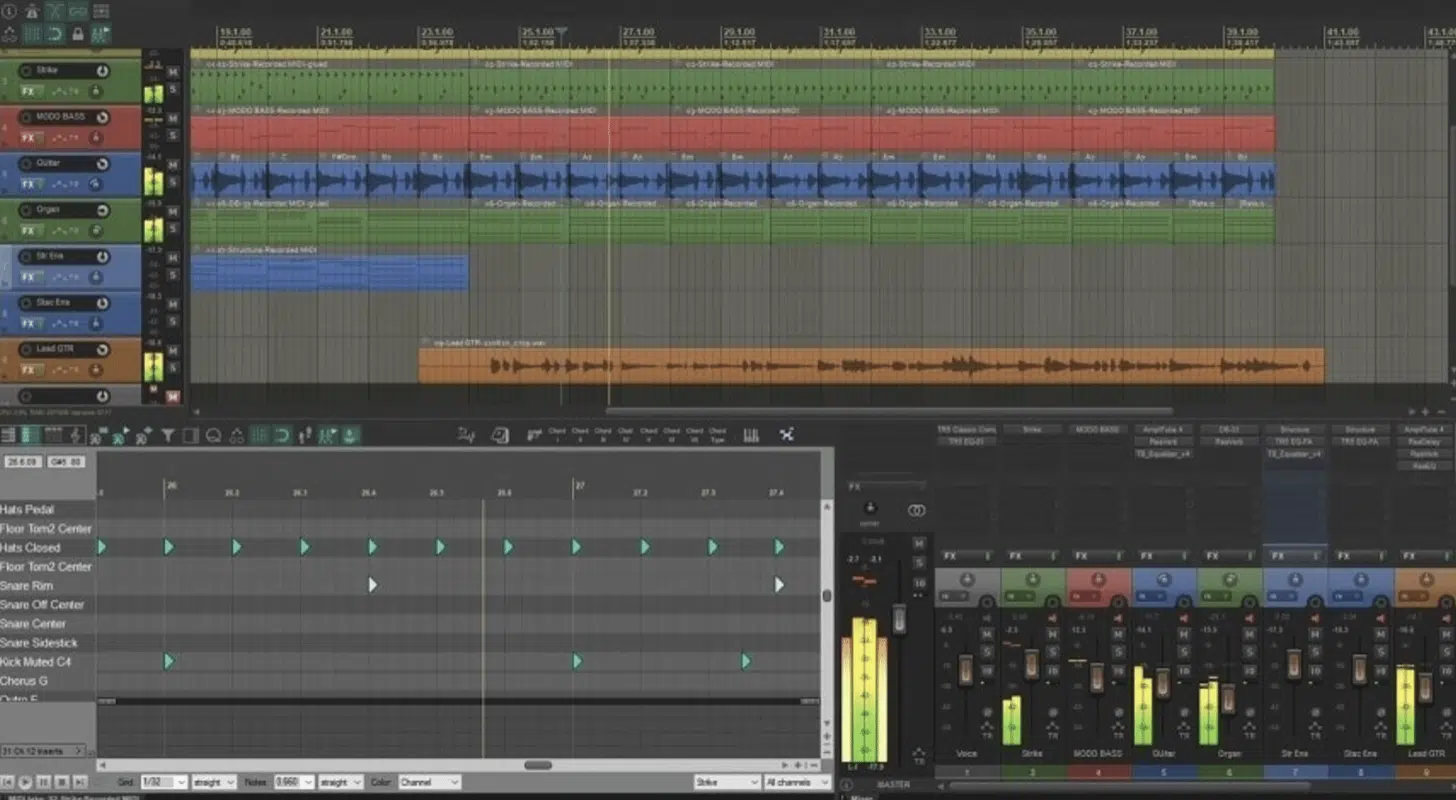
The Reaper DAW stands tall among other DAWs for several reasons.
Aside from its affordability, Reaper supports a vast array of hardware and digital audio formats.
It also runs smoothly on both MAC and Windows systems, even older hardware, which makes it accessible to virtually everyone.
Another thing I love about Reaper is the unlimited free updates.
It’s like a gift that keeps on giving.
You buy the software once, and you get a lifetime of improvements and new features.
In a world where other DAWs charge for every major update, Reaper’s offer is a breath of fresh air.
Reaper’s interface may seem a bit intimidating at first glance, but don’t let that deter you.
Once you get the hang of it, you’ll appreciate its power and flexibility.
Plus, Reaper includes several custom layouts to help you work seamlessly 一 allowing you to focus more on creating music and less on finding the right button.
Speaking of music, the sound quality you can achieve with Reaper is phenomenal.
Even if you’re just starting out, Reaper offers the tools to produce professional-quality audio tracks.
And as you grow more experienced, Reaper’s advanced features are right there to support you.
But that’s not all Reaper includes…
From its comprehensive set of stock plug-ins to a robust mixer panel, Reaper has everything you need to make the music you love.
-
Understanding Reaper’s Interface & Advanced Features
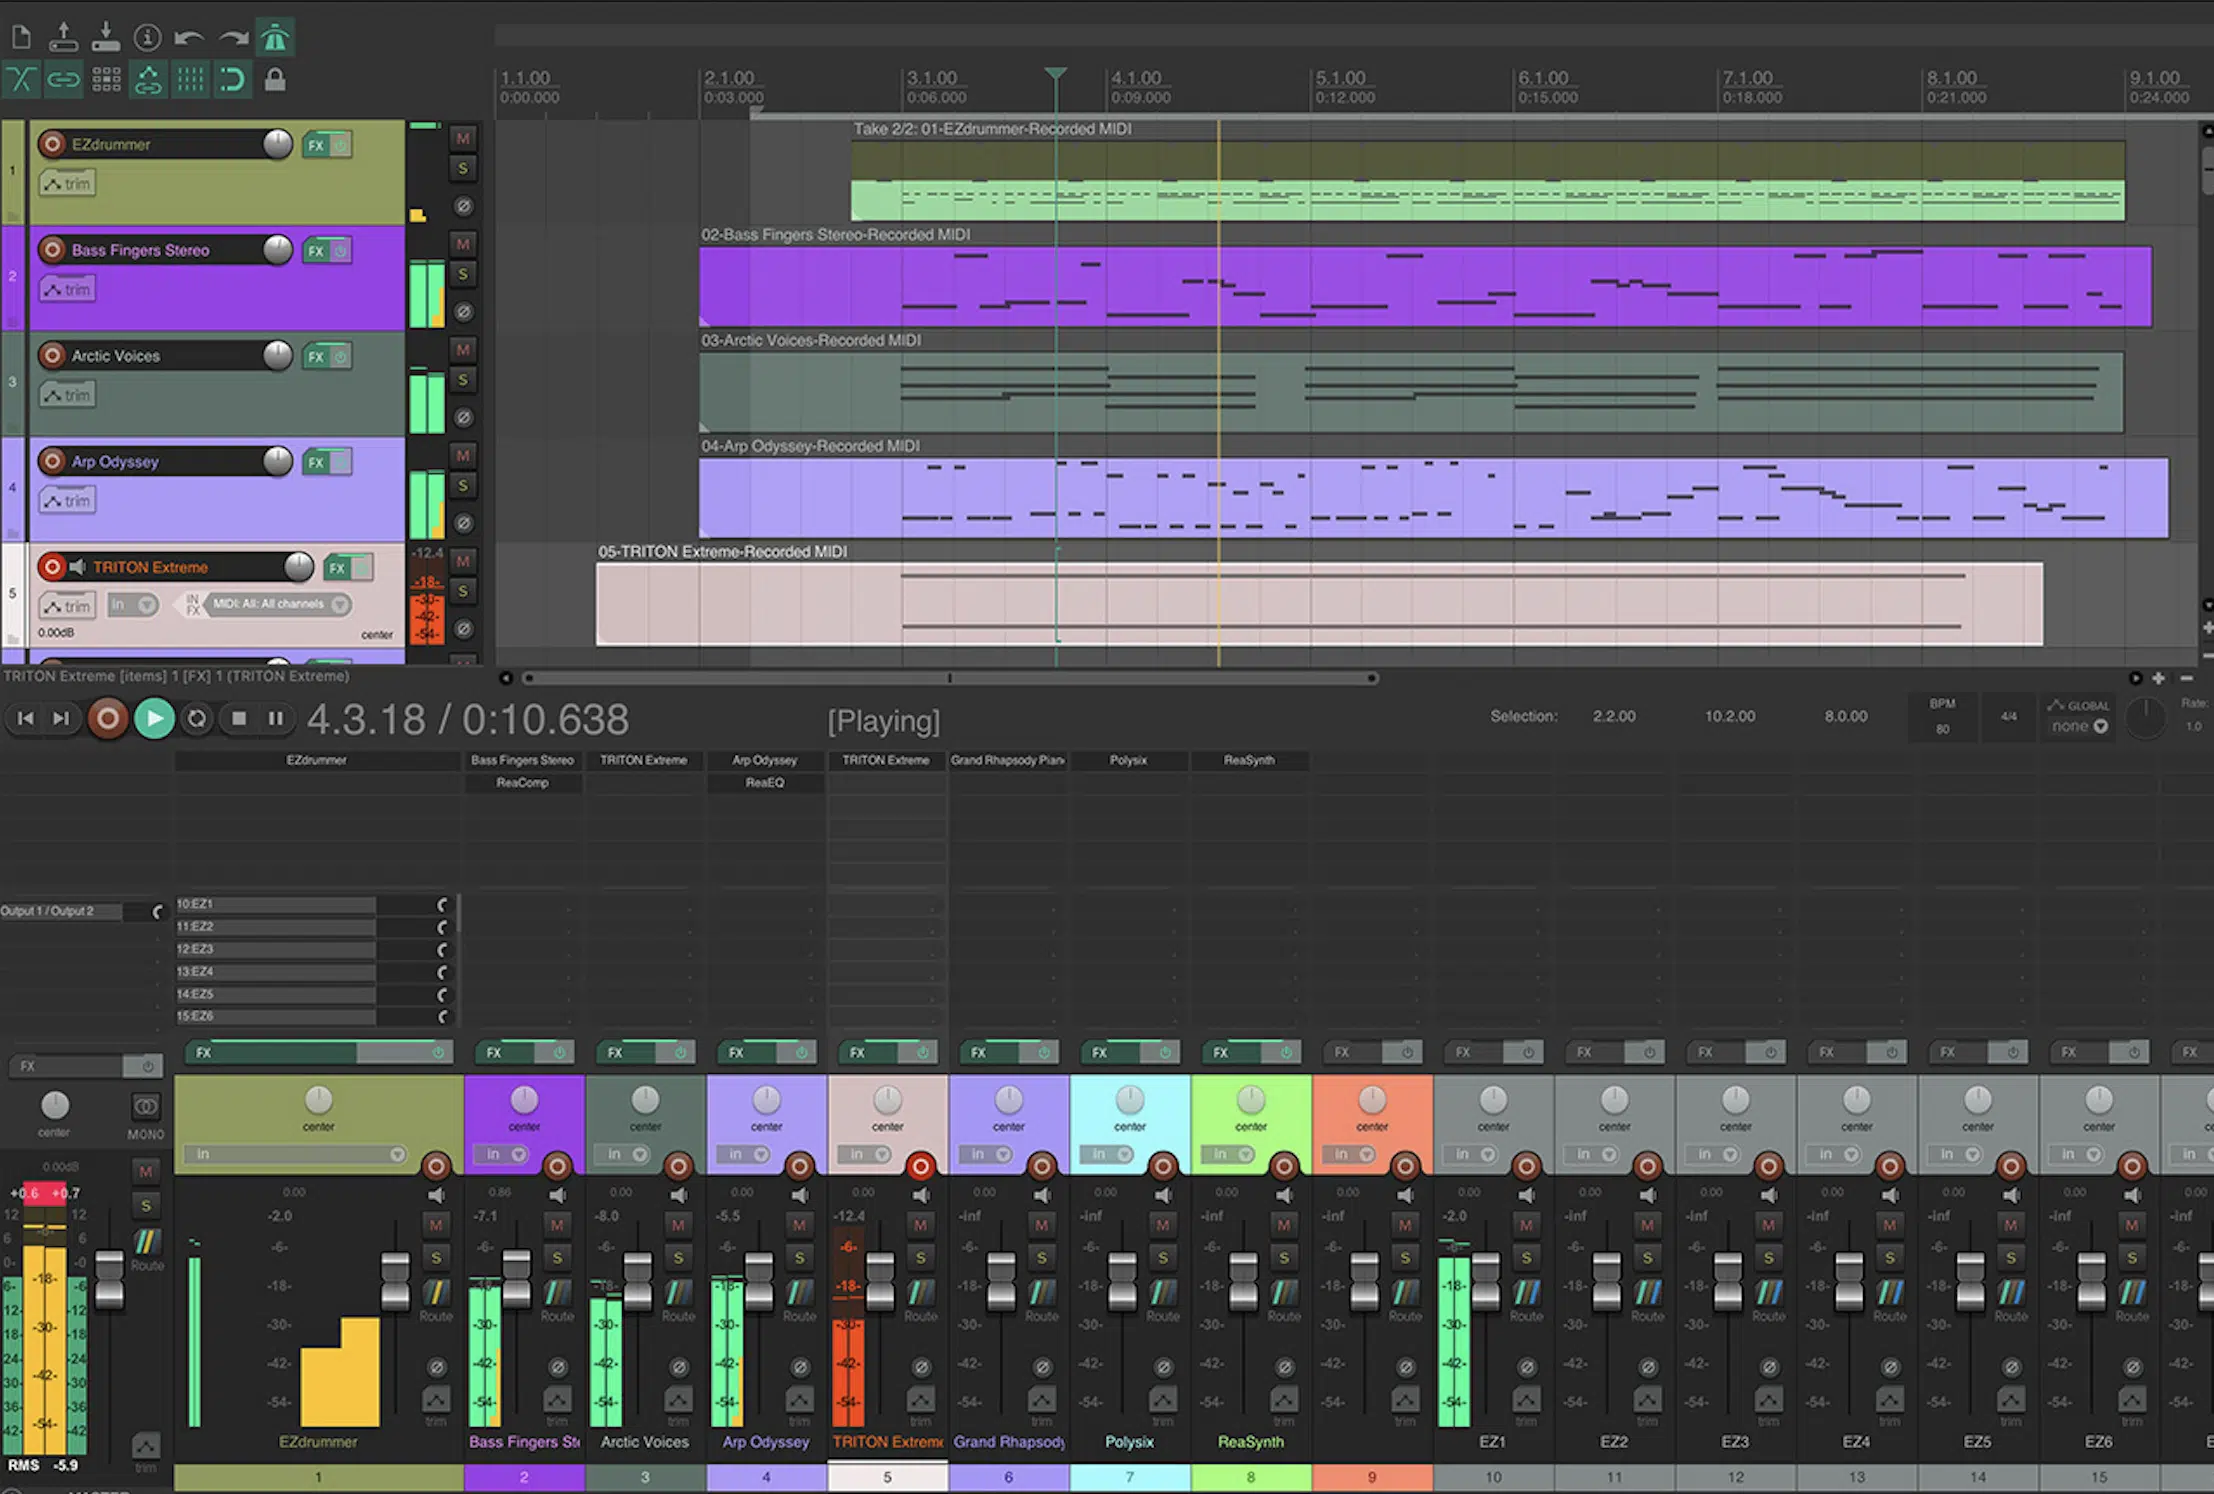
When you first open Reaper, you’ll notice the software’s clean, intuitive design.
Sure, it might seem a bit complex at first, but believe me, it’s a modern DAW that has been designed with the user in mind.
And one thing’s for sure, once you’re familiar with it, you’ll find it hard to switch to other DAWs.
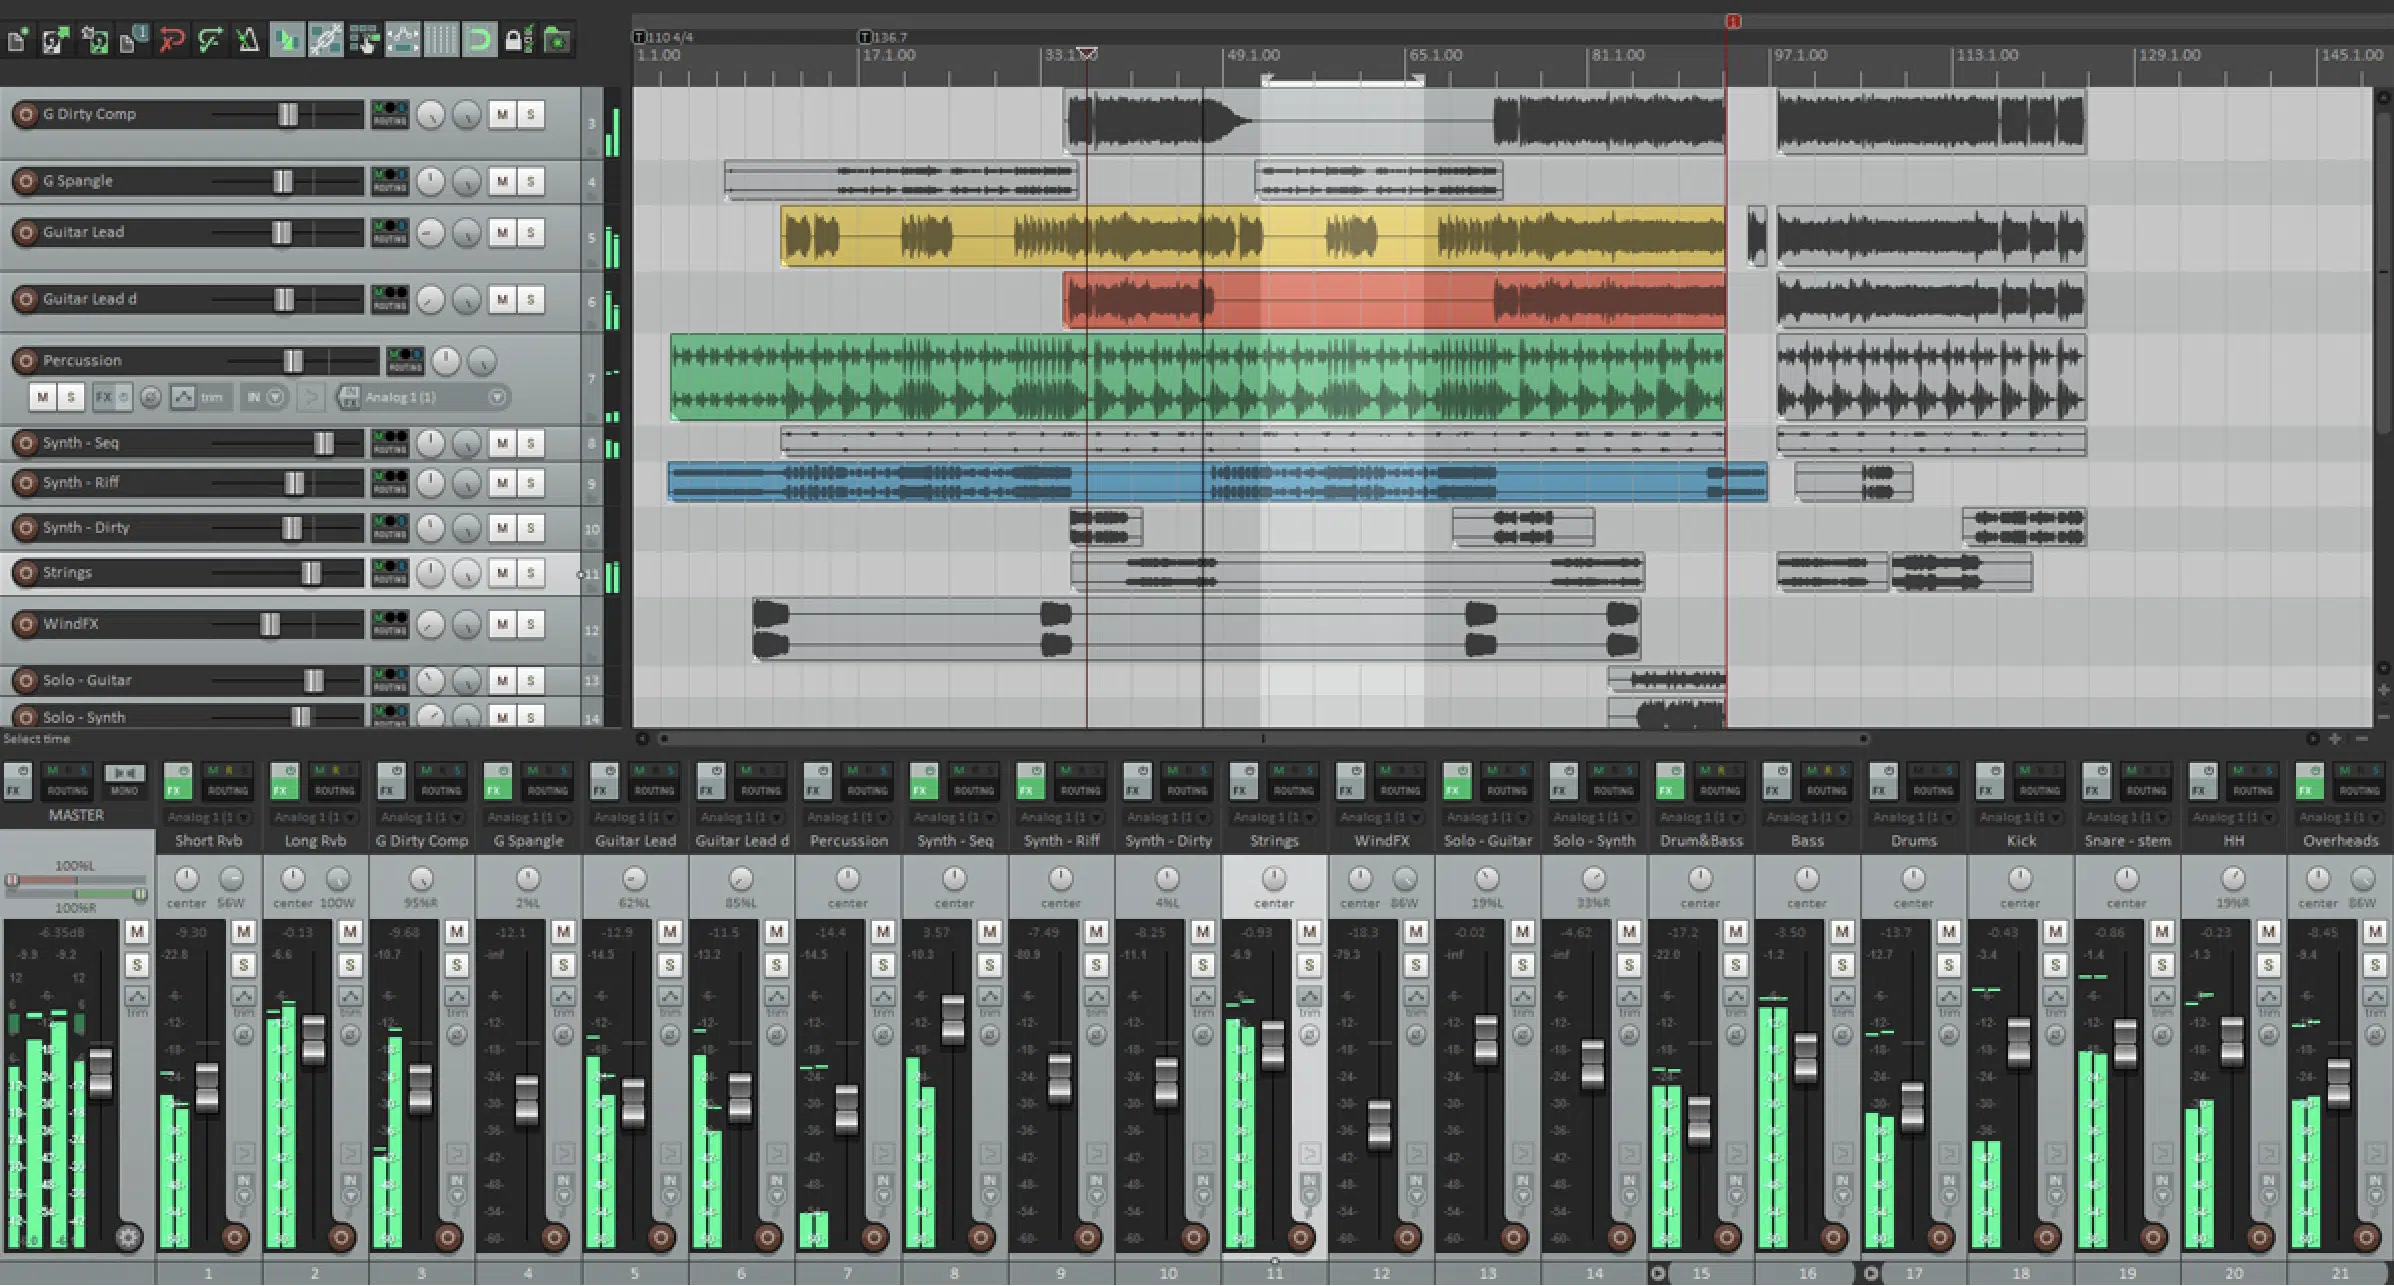
The main window in Reaper includes a timeline and track area where you can add and arrange your audio clips.
The standard controls (like the play, stop, and record buttons) are located at the top.
To the left, you’ll find the track control panel where you can manage all the features of each individual track.
But what about Reaper’s advanced features?
Well, they’re hidden right in plain sight, just a right-click away.
Try right-clicking on an audio track or even an empty space 一 you’ll see a wealth of options and settings that let you customize your workflow.
The mixer panel is located at the bottom of the screen.
It gives you control over each track’s:
- Volume
- Panning
- Audio Effects
And remember the FX button?
It’s your gateway to a treasure trove of built-in effects and plug-ins that can take your music to the next level.
Reaper also supports custom layouts.
Meaning, you can arrange the interface to suit your working style and even save different layouts for different tasks (awesome, right?).
Setting Up Your Audio Interface
Having touched upon the importance of selecting the right audio interface, let’s dive deeper into understanding its vital role in digital music production.
As well as how to set it up properly in the Reaper DAW.
-
The Role of the Audio Interface in Digital Music Production
An audio interface is an essential part of any digital music producer’s setup.
It’s the bridge between your music and your computer; converting analog signals from your instruments into digital audio that your DAW can process.
Choosing the right audio interface depends on your specific needs.
For example:
- If you’re recording a simple lofi hip-hop beat with a MIDI keyboard 一 A basic interface with one or two inputs might be enough.
- For more complex tasks, like recording a live drum kit 一 You’ll need an interface with more inputs.
Reaper supports a wide range of audio interfaces, from budget-friendly models to high-end professional gear.
The process to connect an audio interface with Reaper is straightforward, and I’ll guide you through it in the next section.
-
Connecting Your Audio Interface & MIDI Devices
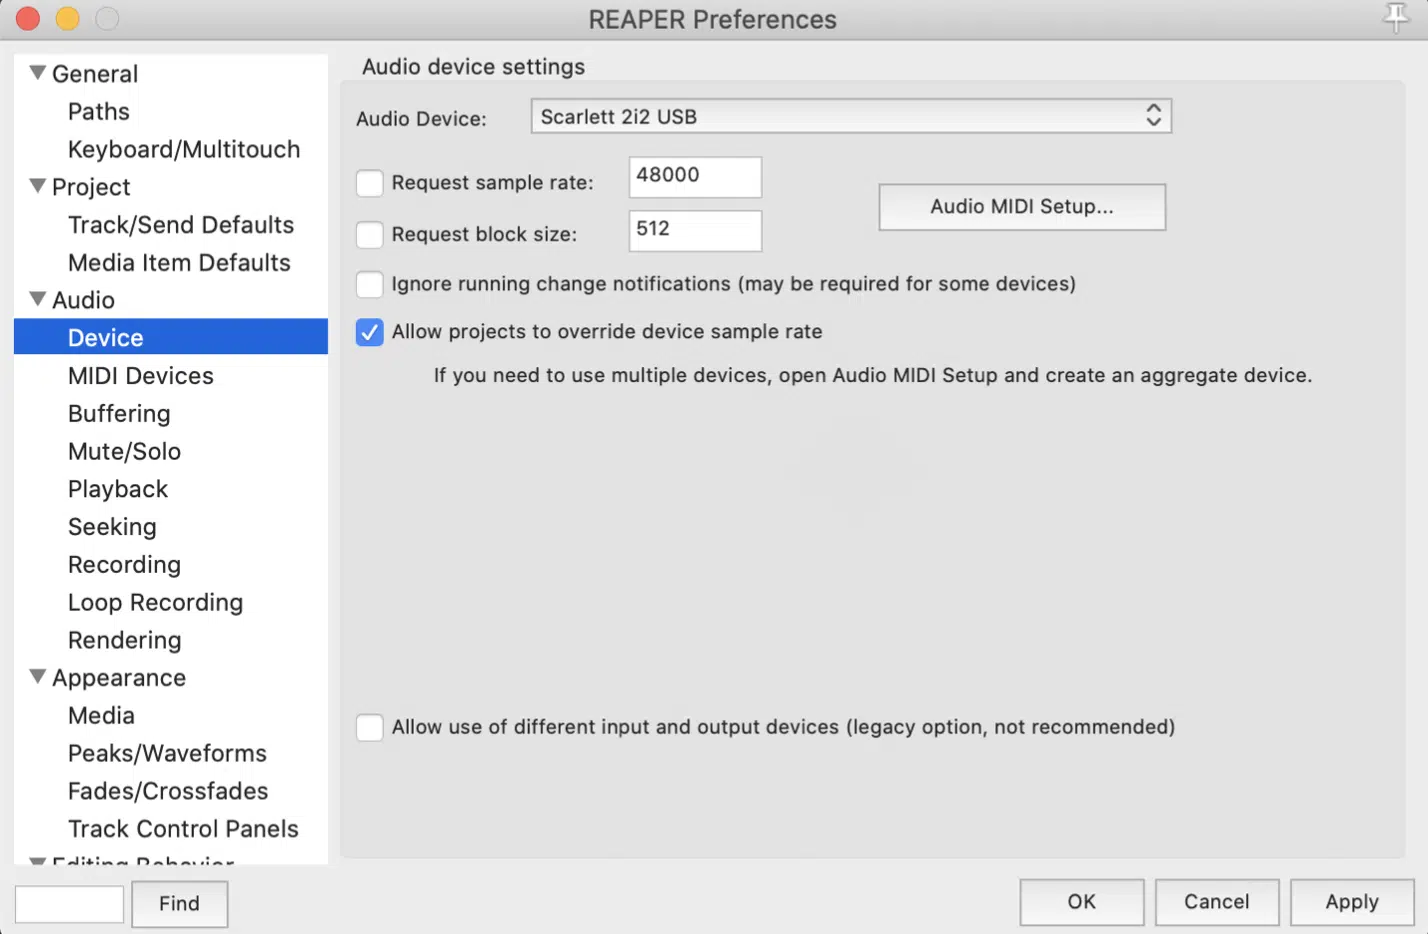
To connect your audio interface to Reaper, you’ll need to go into Reaper’s ‘Preferences.’
Here, you’ll find a section for audio device settings.
This is where you should choose your audio interface from the list of available devices.
After setting up your audio interface, it’s time to connect any MIDI devices you might have, like a MIDI keyboard or MIDI controller.
You’ll find the settings under the ‘MIDI Devices’ section in the preferences.
Simply enable your device, and you’re good to go!
NOTE: Reaper offers excellent MIDI support.
Whether you’re using a basic MIDI keyboard or a more advanced MIDI controller with multiple faders and knobs, Reaper makes it easy to connect and start creating.
After you’ve set up your audio interface and MIDI devices, you’re ready to start recording.
Which we’ll dive into next.
Getting Started: Reaper’s Recording & Editing Process
Having familiarized ourselves with the basics of the Reaper DAW and setting up the audio interface, it’s now time to delve into the meat of the matter:
Recording and editing.
-
Recording Your First Audio Track
The beauty of Reaper lies in its simplicity when it comes to recording.
To start:
- Click on the ‘Track’ menu and select ‘Insert new track.’
- Or, simply press CTRL+T (or CMD+T on MAC).
Then, you’ll see your new track appear in the track area.
Before you hit the record button, make sure to arm your track for recording.
You can do this by clicking on the red ‘record arm’ button on the track control panel.
NOTE: If you’re using a MIDI device, you’ll also want to select your input.
Now, you’re officially ready to record.
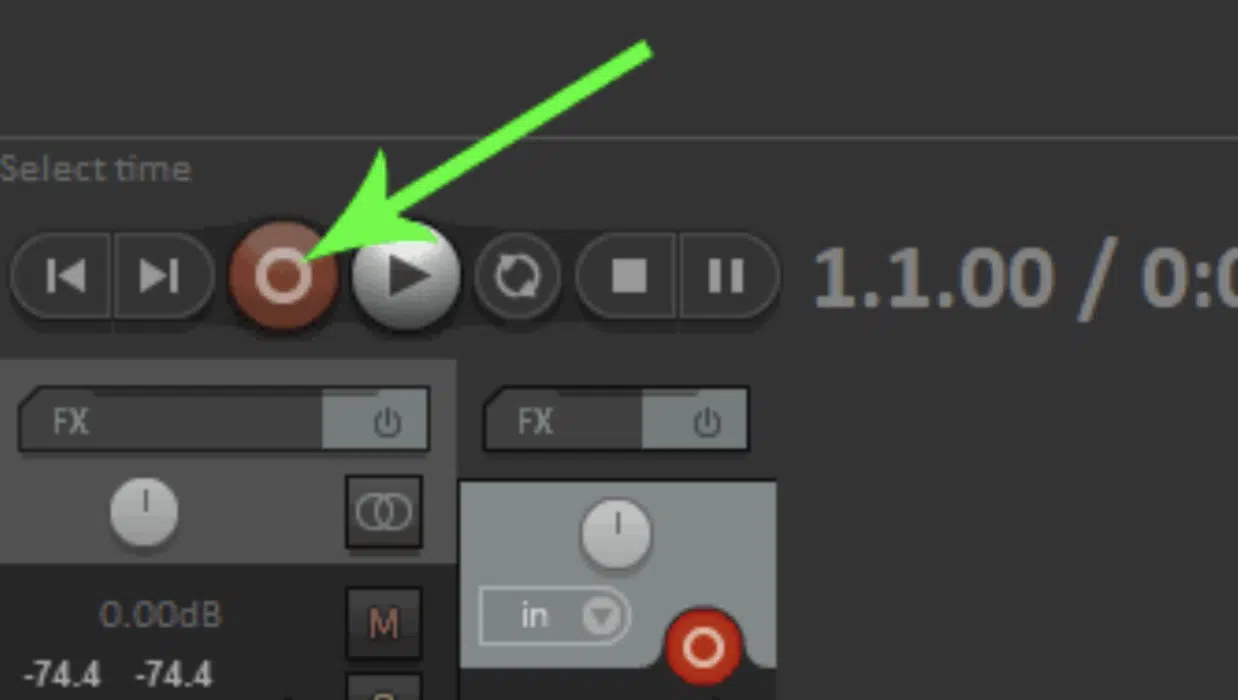
Press the record button at the top of the screen and start playing your instrument or singing your song.
When you’re finished, press stop, and voila 一 you’ve just recorded your first audio track in Reaper!
-
The Power of Multitrack Recording
With multitrack recording, you can record multiple instruments at once or build a song one track at a time.
This opens up a world of possibilities for music production, and Reaper handles it like a pro.
- For multitrack recording in Reaper 一 Simply add more tracks and repeat the recording process.
The interface allows you to easily manage and navigate multiple tracks, keeping your recording process smooth and organized.
The key here is to plan ahead.
If you’re recording a full band, for instance, ensure each instrument is assigned to its own track (grouped tracks).
This will make your editing process much more manageable.
-
Editing Your Tracks Like a Pro
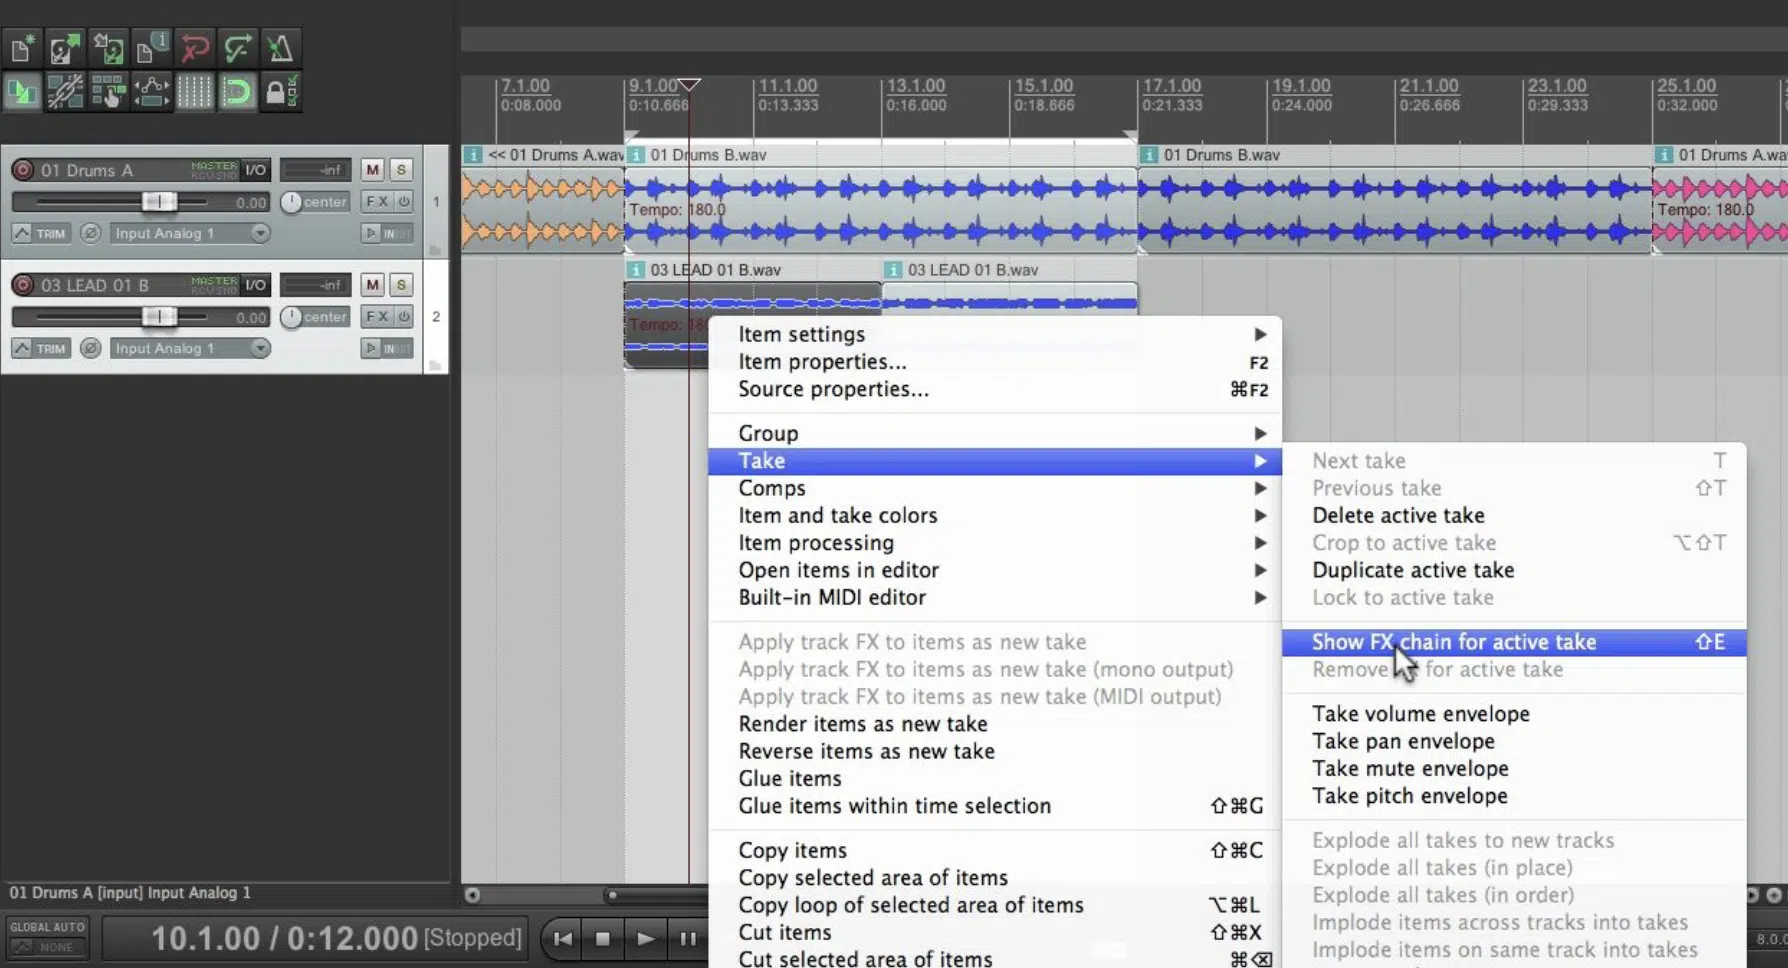
Now that you’ve recorded your tracks, it’s time to bring them to life with some editing.
In the Reaper DAW, you can adjust your audio clips in the Track area, like:
- Cut them
- Move them
- Arrange them
To cut a clip, simply position the cursor where you want to make the cut, then press ‘S’ on your keyboard.
You can also adjust the volume and panning of each track using the faders and knobs in the track control panel.
If you want to make more precise adjustments 一 you can use envelopes.
Just right-click on a track and select ‘Show envelopes’.
Here, you can draw automation curves for volume, pan, and other parameters.
Reaper also comes with a powerful set of audio processing tools.
For example, you can use the ‘Take FX’ feature (above) to apply effects to individual takes within a track.
NOTE: This is incredibly useful when you want to experiment with different sounds without affecting the entire track.
Lastly, don’t forget about Reaper’s non-destructive editing capabilities.
You can make as many changes as you want without permanently altering your original audio files.
Meaning, you can experiment freely, knowing you can always undo your changes if you’re not happy with the results.
Working with MIDI: A Closer Look
Now that we’ve got a handle on recording and editing, let’s shift our focus to the world of MIDI in Reaper.
To kick things off, we’ll start with how to connect and effectively use your MIDI keyboard.
-
Connecting and Using Your MIDI Keyboard
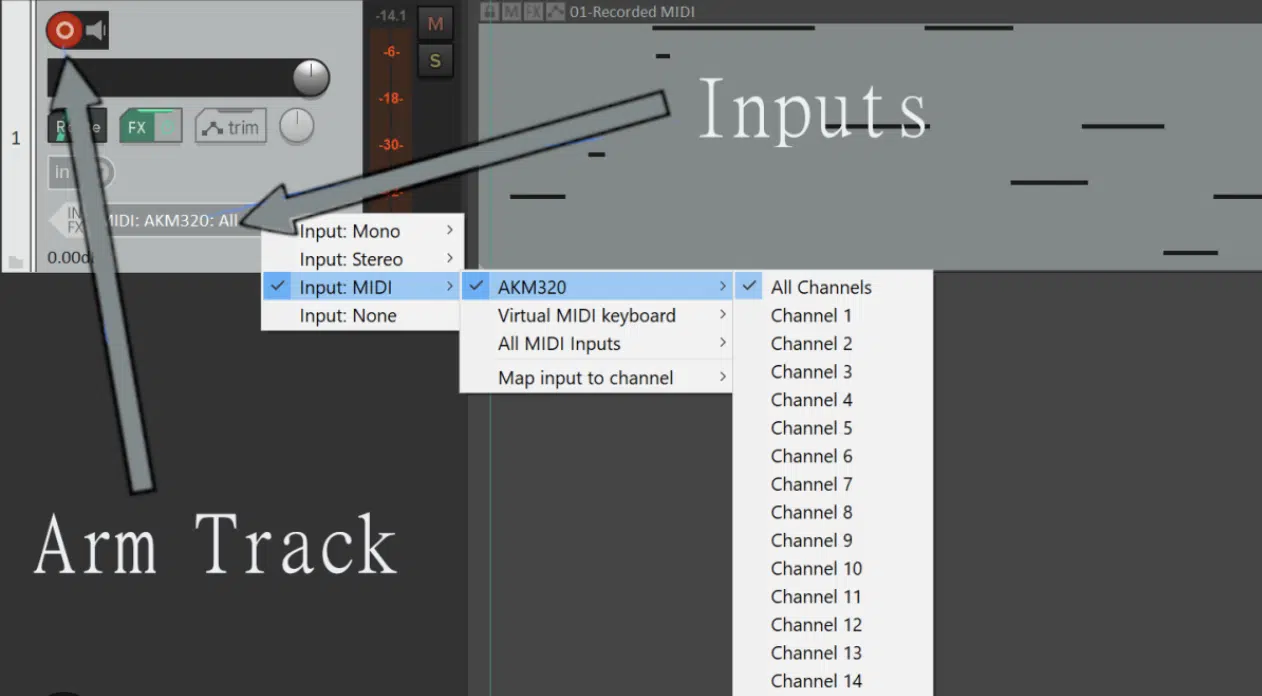
Working with MIDI in Reaper is straightforward.
Once you’ve connected and enabled your MIDI keyboard in the preferences (as we discussed in the above section), you’re ready to start playing.
To record MIDI, you follow the same process as with audio:
- Create a new track
- Arm it for recording
- Select the MIDI input
- Hit record and start playing your keyboard
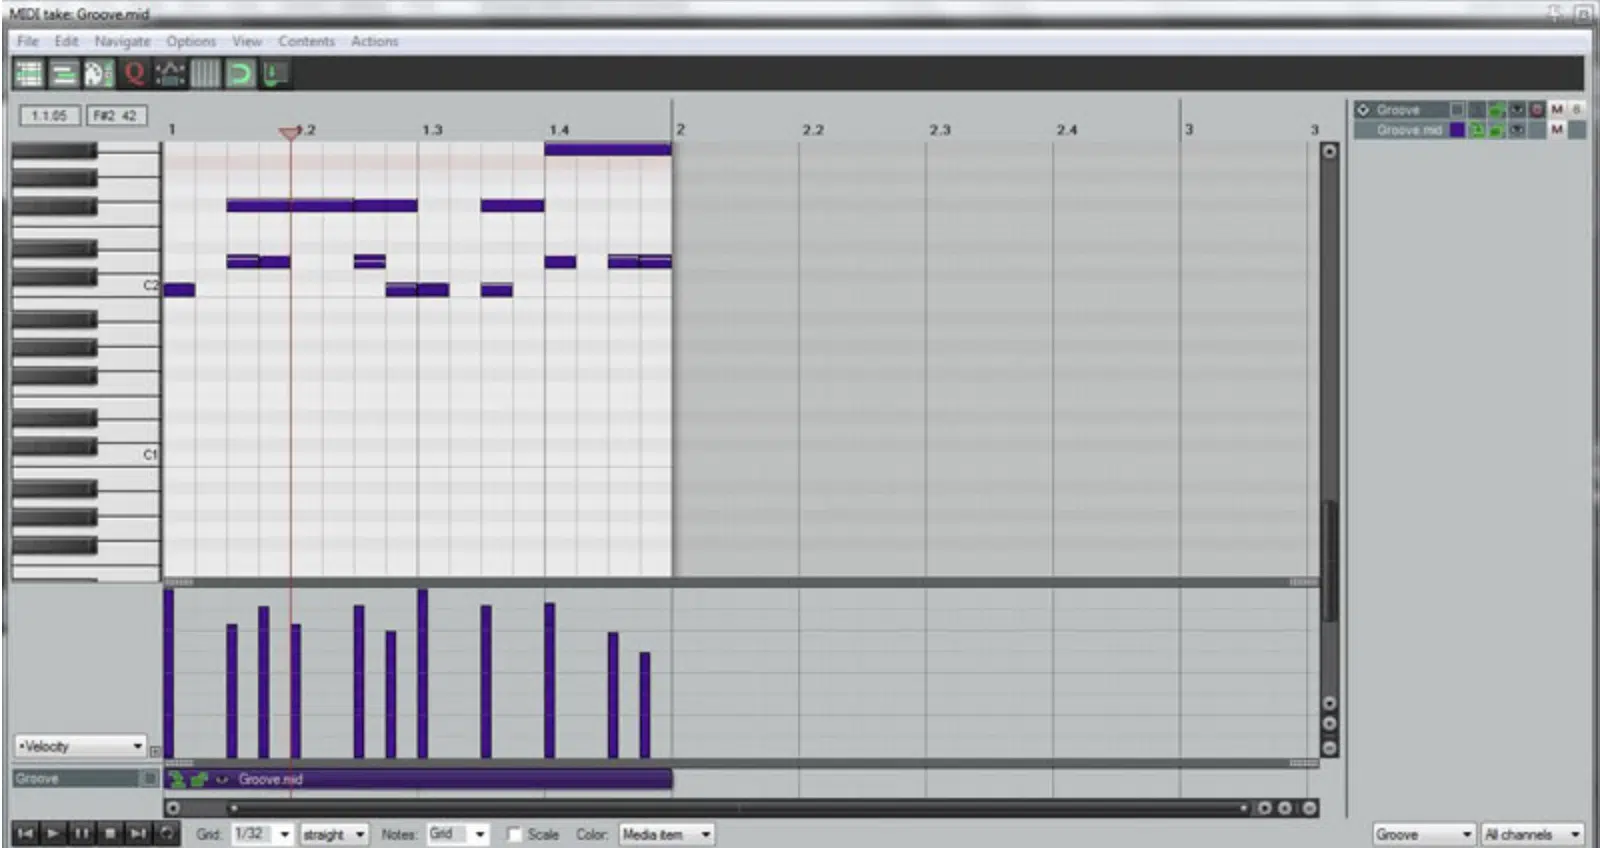
Once you’ve recorded your MIDI performance, you can edit it in the piano roll editor.
Here, you can:
- Adjust the timing and pitch of your notes
- Add or delete notes
- Even draw in automation for MIDI parameters
Once you get acclimated in the Reaper DAW, it will feel like second nature.
-
Using MIDI CC Envelopes & the Piano Roll
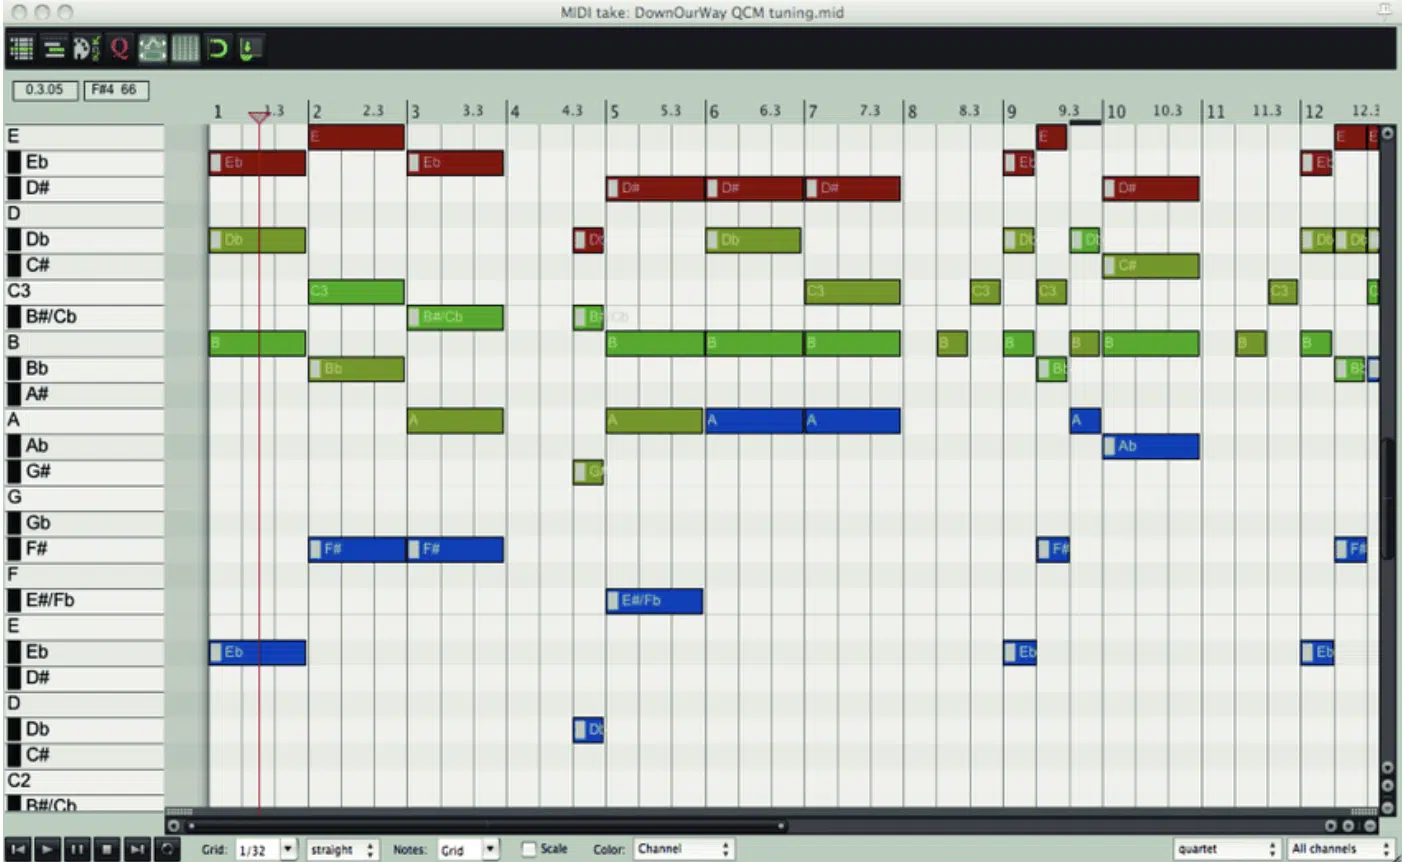
MIDI Continuous Controller (CC) envelopes are a powerful tool in Reaper.
They allow you to draw in automation for MIDI parameters and MIDI events like the modulation wheel or pitch bend on your keyboard.
To use MIDI CC envelopes:
- First, you need to record some MIDI data.
- Once you have your recording, right-click on the track and select ‘Show track envelopes’.
- Finally, Choose the MIDI CC number that corresponds to the parameter you want to automate.
The piano roll in Reaper is a versatile tool for editing your MIDI performances.
NOTE: You can access it by double-clicking on a MIDI item.
In the piano roll, you can adjust the pitch and timing of your notes, add or delete notes, and much more.
One feature I particularly love in Reaper’s piano roll is the ‘Note Grouping’ function.
This allows you to group notes together 一 making it easier to move or edit chords or melodies.
Mixing & Mastering in Reaper
With your tracks recorded and edited, and your MIDI knowledge upgraded, it’s time to venture into the crucial stages of mixing and mastering in Reaper.
Let’s begin by harnessing the power of Reaper’s versatile mixer panels and plug-ins.
-
Harnessing the Power of Reaper’s Mixer Panels & Plug-Ins
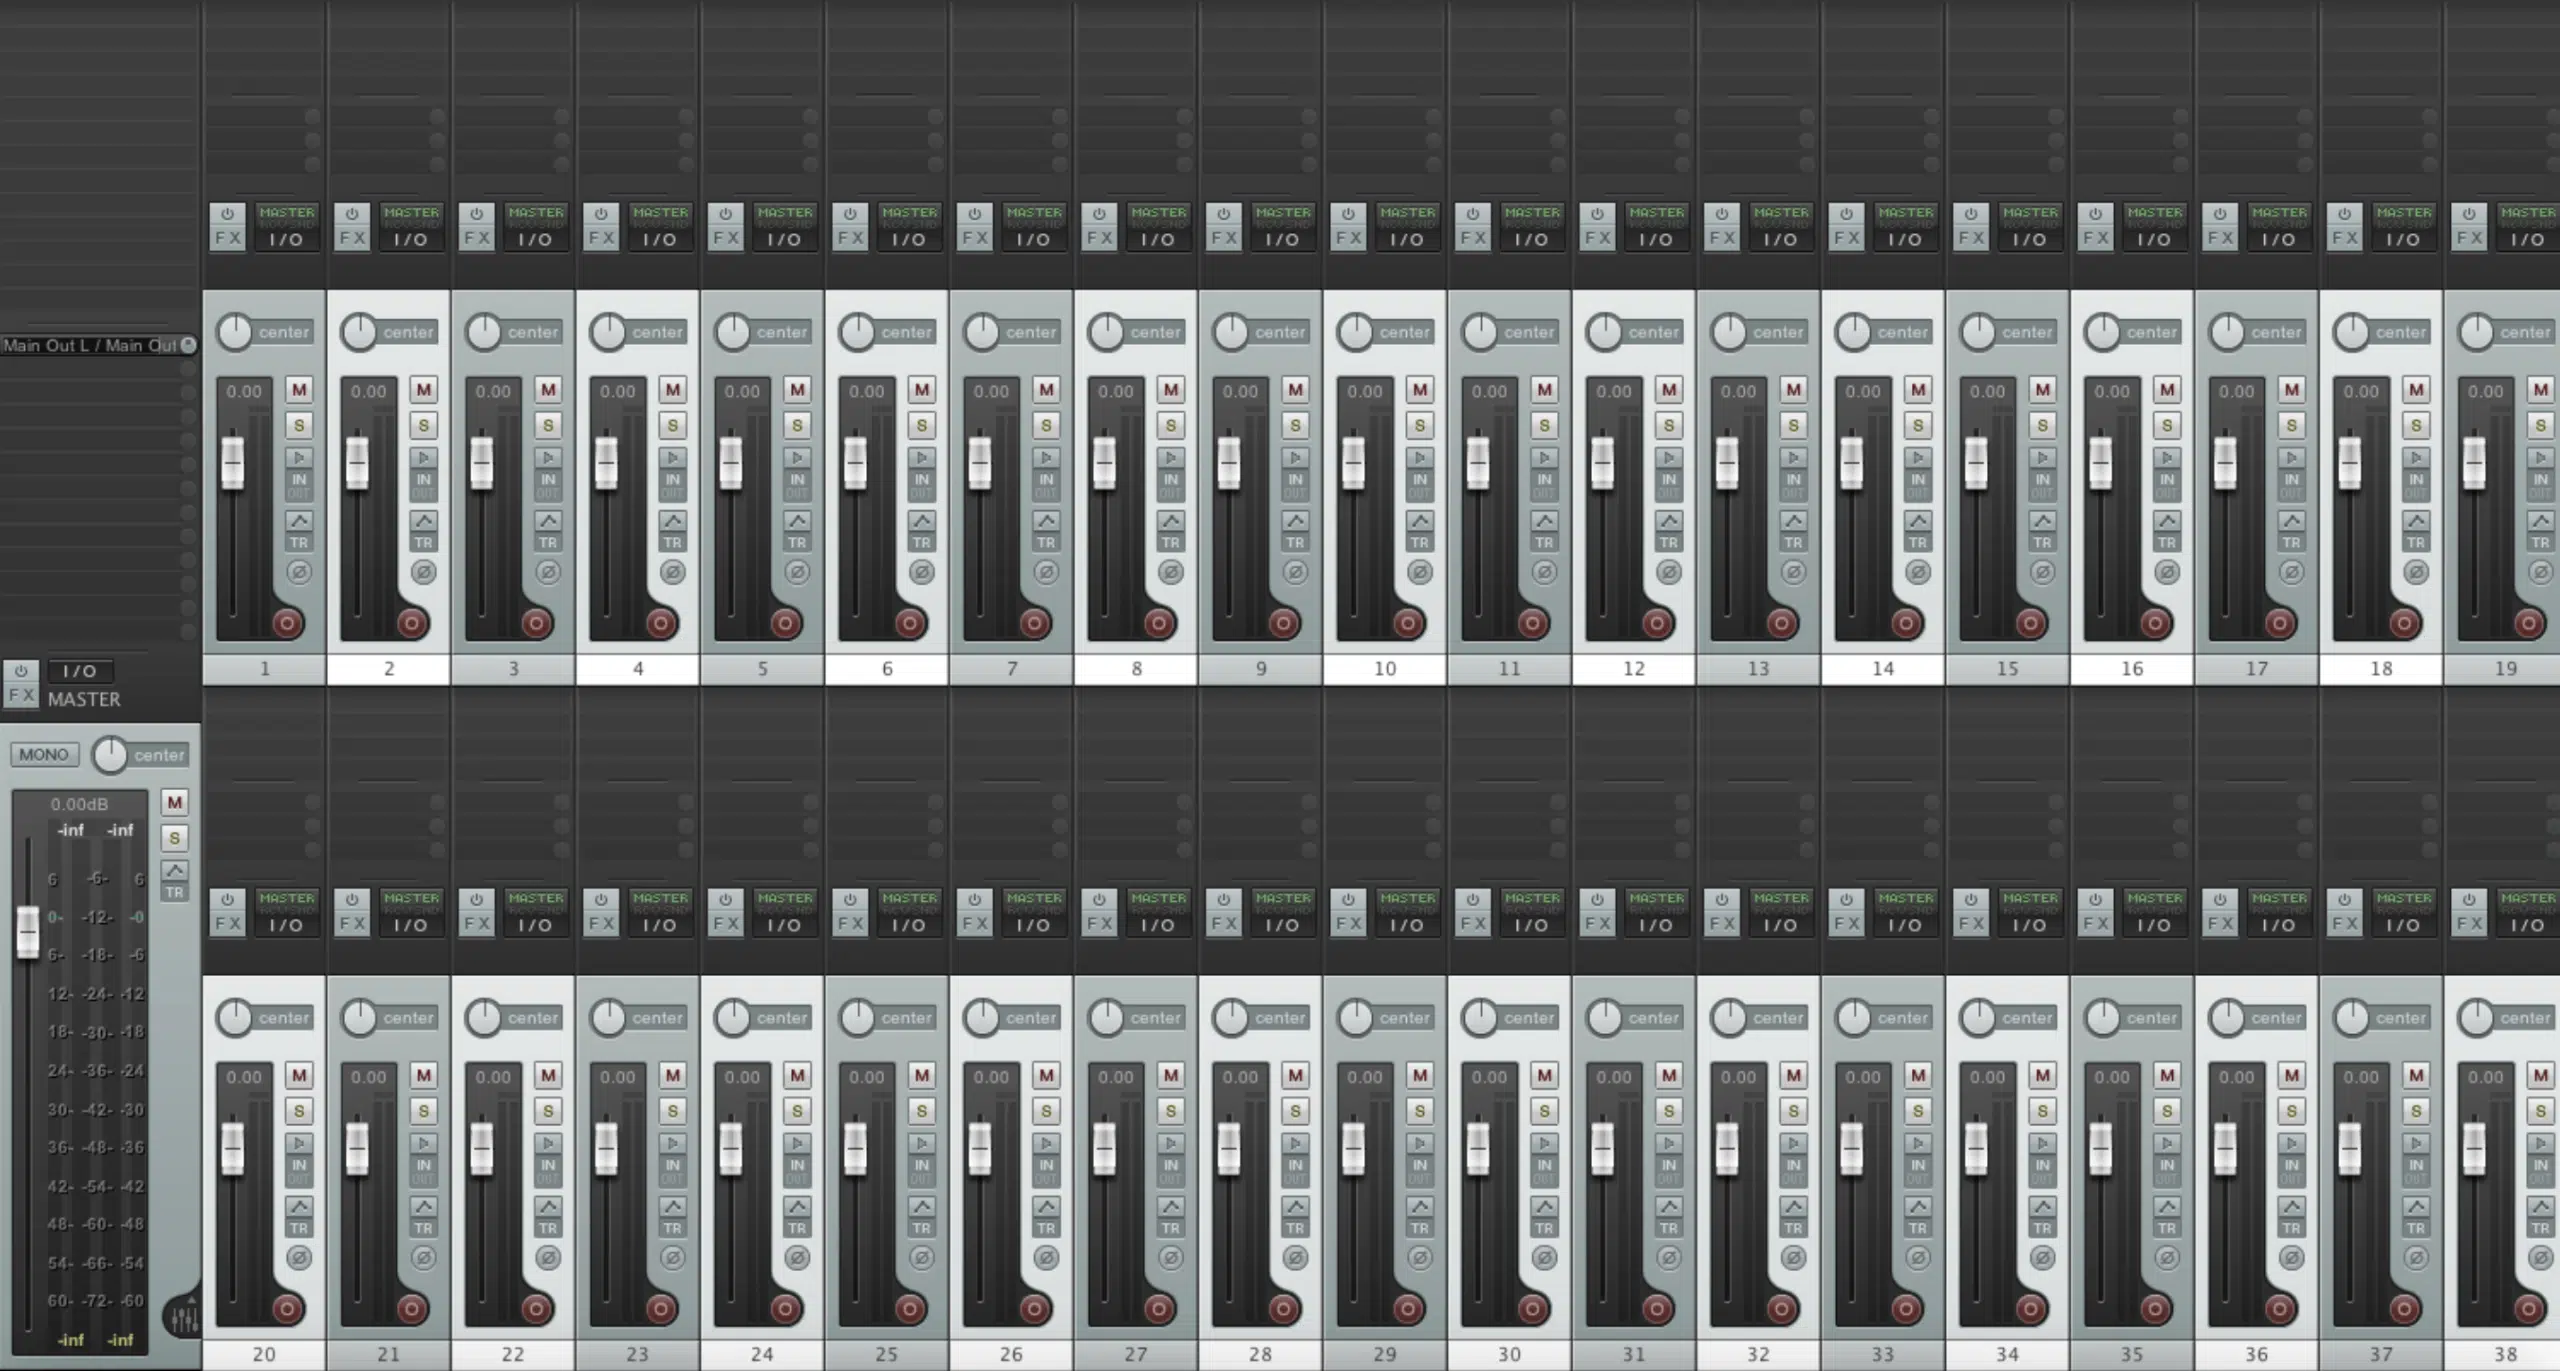
The mixer panel in Reaper is where the magic happens.
Here, you can balance the levels of your tracks, adjust the panning, and add effects.
Reaper comes with a wide array of built-in effects and plug-ins; from equalizers and compressors to reverbs and delays.
To add an effect to a track 一 simply click on the ‘FX’ button in the track control panel and select the effect you want from the list.
One thing to keep in mind while mixing in Reaper is the power of signal routing.
It allows you to:
- Send audio from one track to another
- Create complex submixes
- Even set up sidechain compression
With Reaper’s incredibly flexible routing system, you’ll be able to enhance your tracks in a major way.
-
Achieving Pro-Quality Sound with Built-In Instruments & Effects
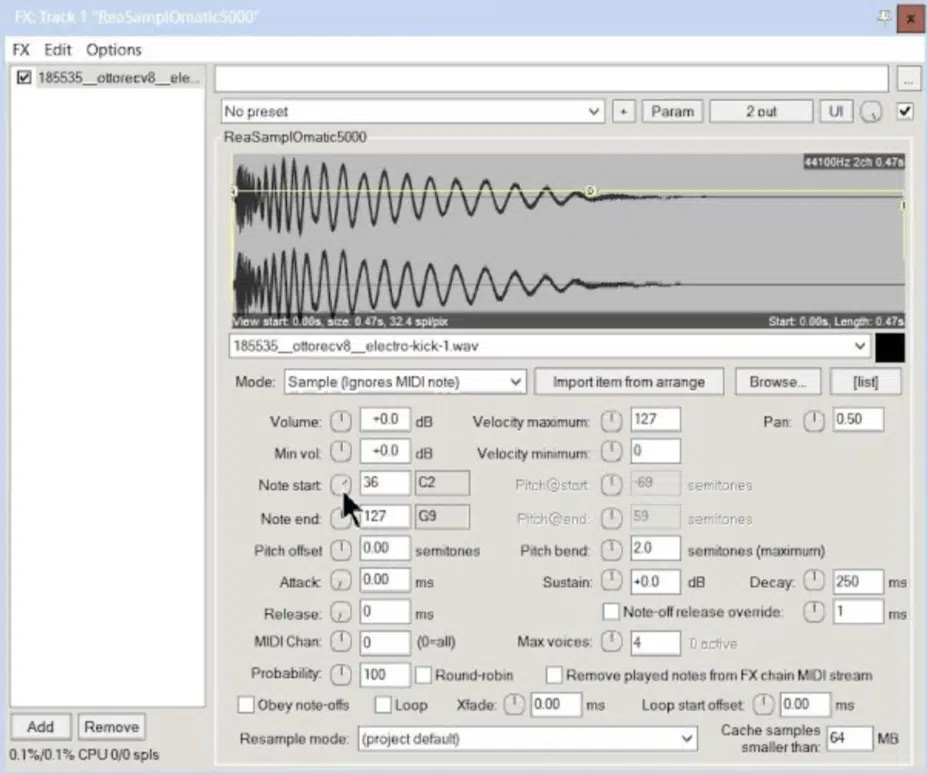
Reaper comes with a suite of built-in instruments, from synthesizers to drum machines.
These are not just basic instruments, either…
They’re full-featured tools capable of producing professional-quality sounds.
One standout is the ReaSamplOmatic5000 (above) 一 a sample player that allows you to play your own samples on a MIDI keyboard.
This is particularly handy for creating drum tracks or playing sampled instruments.
Reaper’s built-in effects are equally impressive.
From ReaEQ (a fully-parametric equalizer) to ReaVerb (a highly-flexible reverb processor), these effects can transform your tracks.
As well as help you achieve a professional sound.
It’s also worth noting that Reaper supports third-party VST and AU plug-ins, so you can expand your sonic palette with tools from other manufacturers.
This flexibility makes Reaper a powerful platform for mixing and mastering your tracks.
Customizing Reaper for a Personalized Workflow
Now that we’ve explored the recording, editing, and mixing processes in Reaper, let’s turn our attention to the customization possibilities this DAW offers.
-
Reaper’s Custom Layouts & Themes
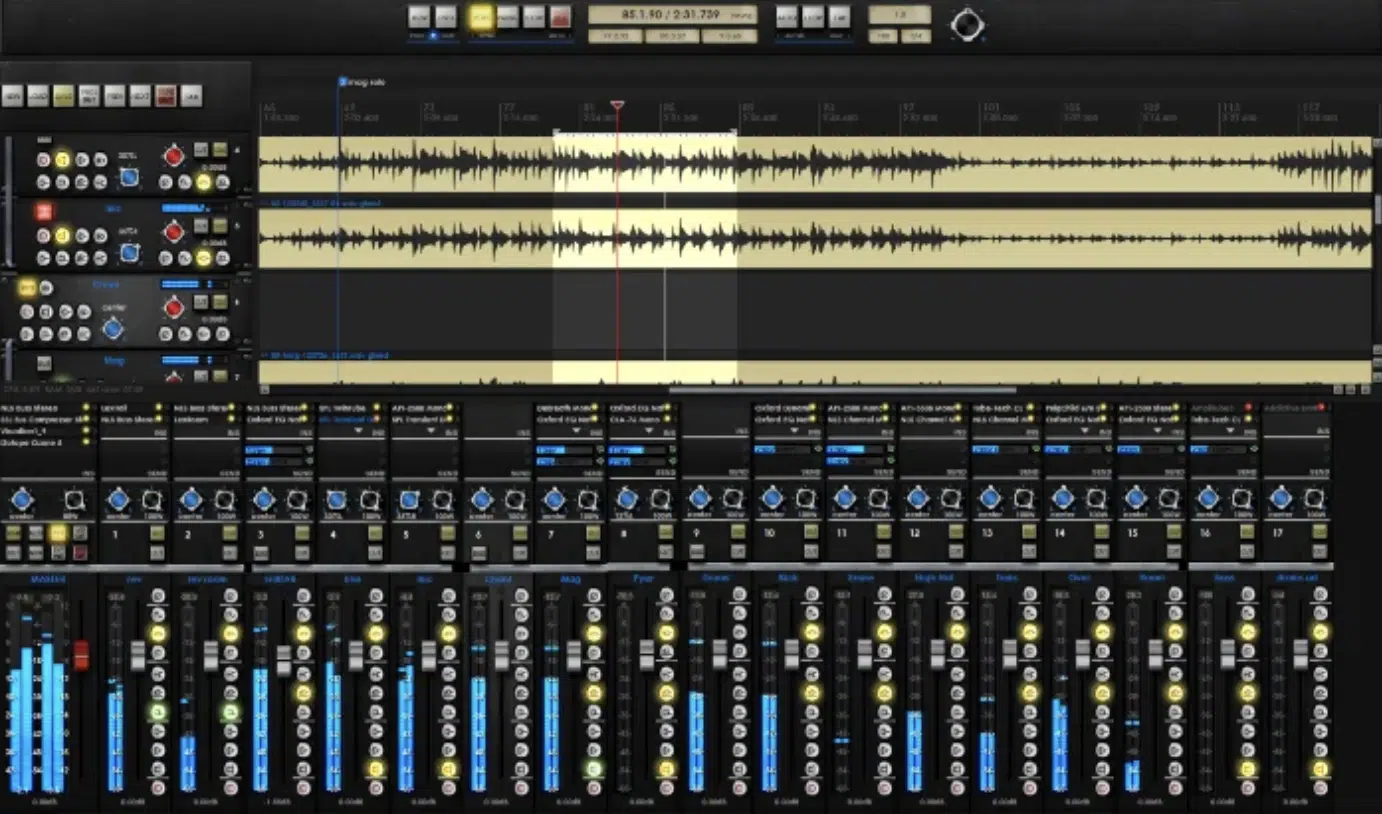
Reaper’s theme ‘Analog API’
One of Reaper’s standout features is its highly customizable interface.
Here, you can:
- Rearrange the layout to suit your workflow
- Change the color scheme
- Download custom themes created by the Reaper community
To customize the layout, simply go to the ‘View’ menu and select ‘Screen sets/Layouts.’
Here, you can save your current layout, switch between saved layouts, and even set up specific layouts for different tasks.
Changing the theme in Reaper is also easy.
Just go to the ‘Options’ menu, select ‘Themes,’ and choose from the pre-installed themes or add your own.
Customizing the look and feel of your DAW can make your music production experience more enjoyable and efficient.
-
Optimizing Reaper for Your Specific Needs
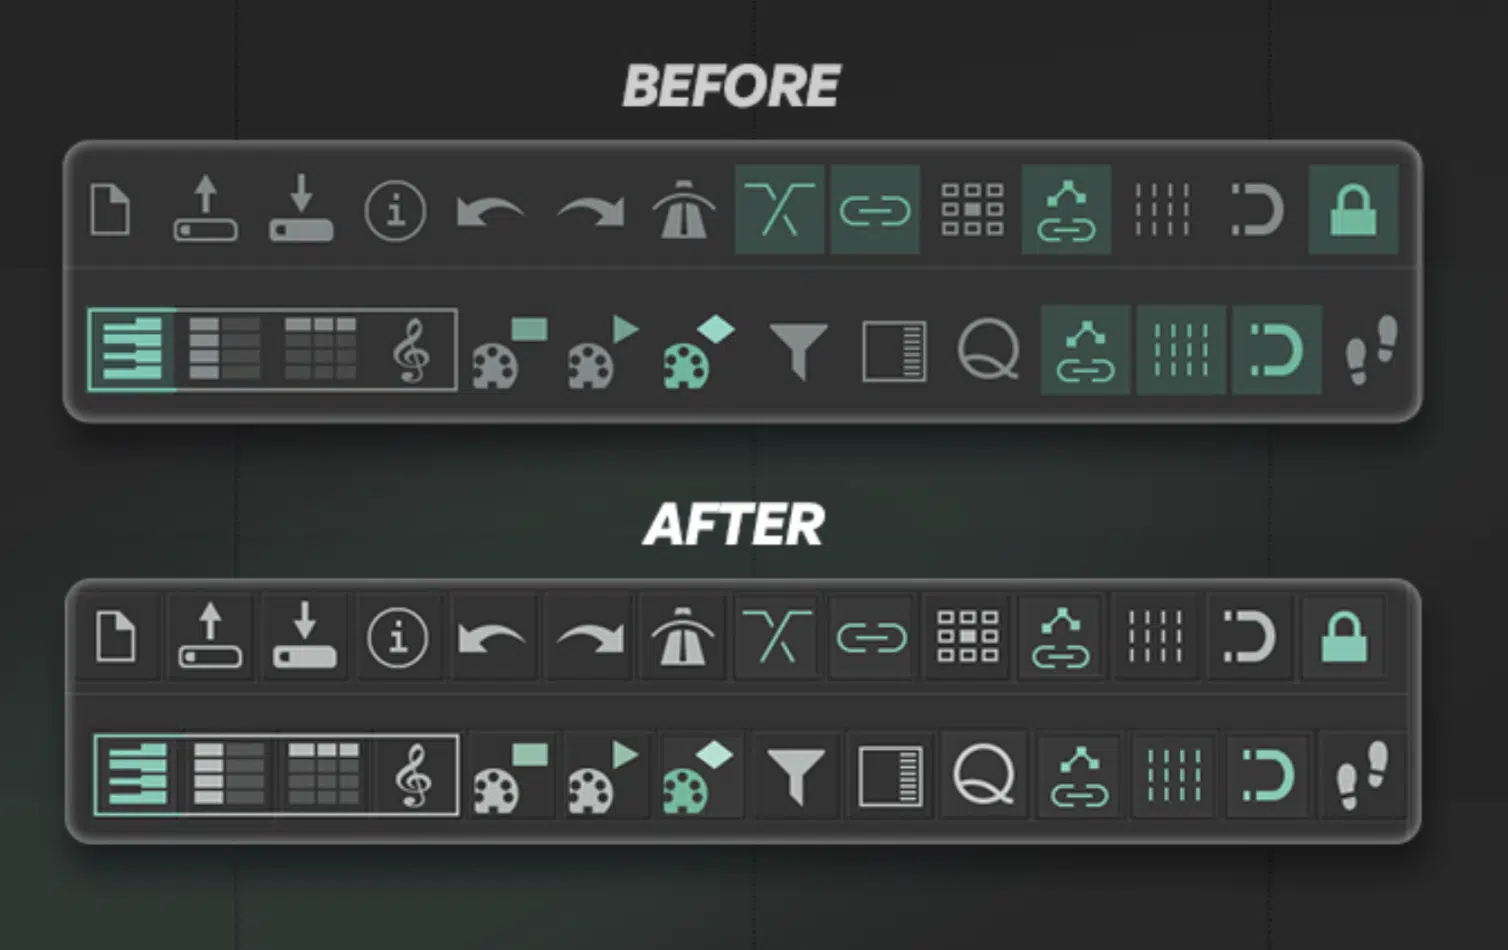
Beyond layouts and themes, Reaper offers several ways to optimize your workflow.
For example, you can customize your toolbar with the tools you use most often, or create custom actions that automate repetitive tasks.
Reaper’s powerful scripting engine allows you to create your own scripts or download scripts created by other users.
This opens up endless possibilities for customization, from automating complex tasks to adding entirely new features.
Reaper also supports custom keyboard shortcuts.
If there’s an action you use frequently, you can assign it a keyboard shortcut to save time.
You can even export your custom key mappings and use them on any computer.
Remember that Reaper is a constantly evolving platform.
The developers are continually adding new features and improvements, so it’s worth staying updated and exploring the latest versions.
NOTE: One of the often overlooked features of Reaper is its ability to run smoothly from a portable or network drive.
This makes it ideal if you’re always on the move or work across multiple studios.
Reaper vs Pro Tools & Logic Pro
I just wanted to take a second to give you a comparison of Reaper vs Pro Tools & Reaper vs Logic Pro, as they’re very popular DAWs that often get compared to Reaper.
-
Reaper vs Pro Tools
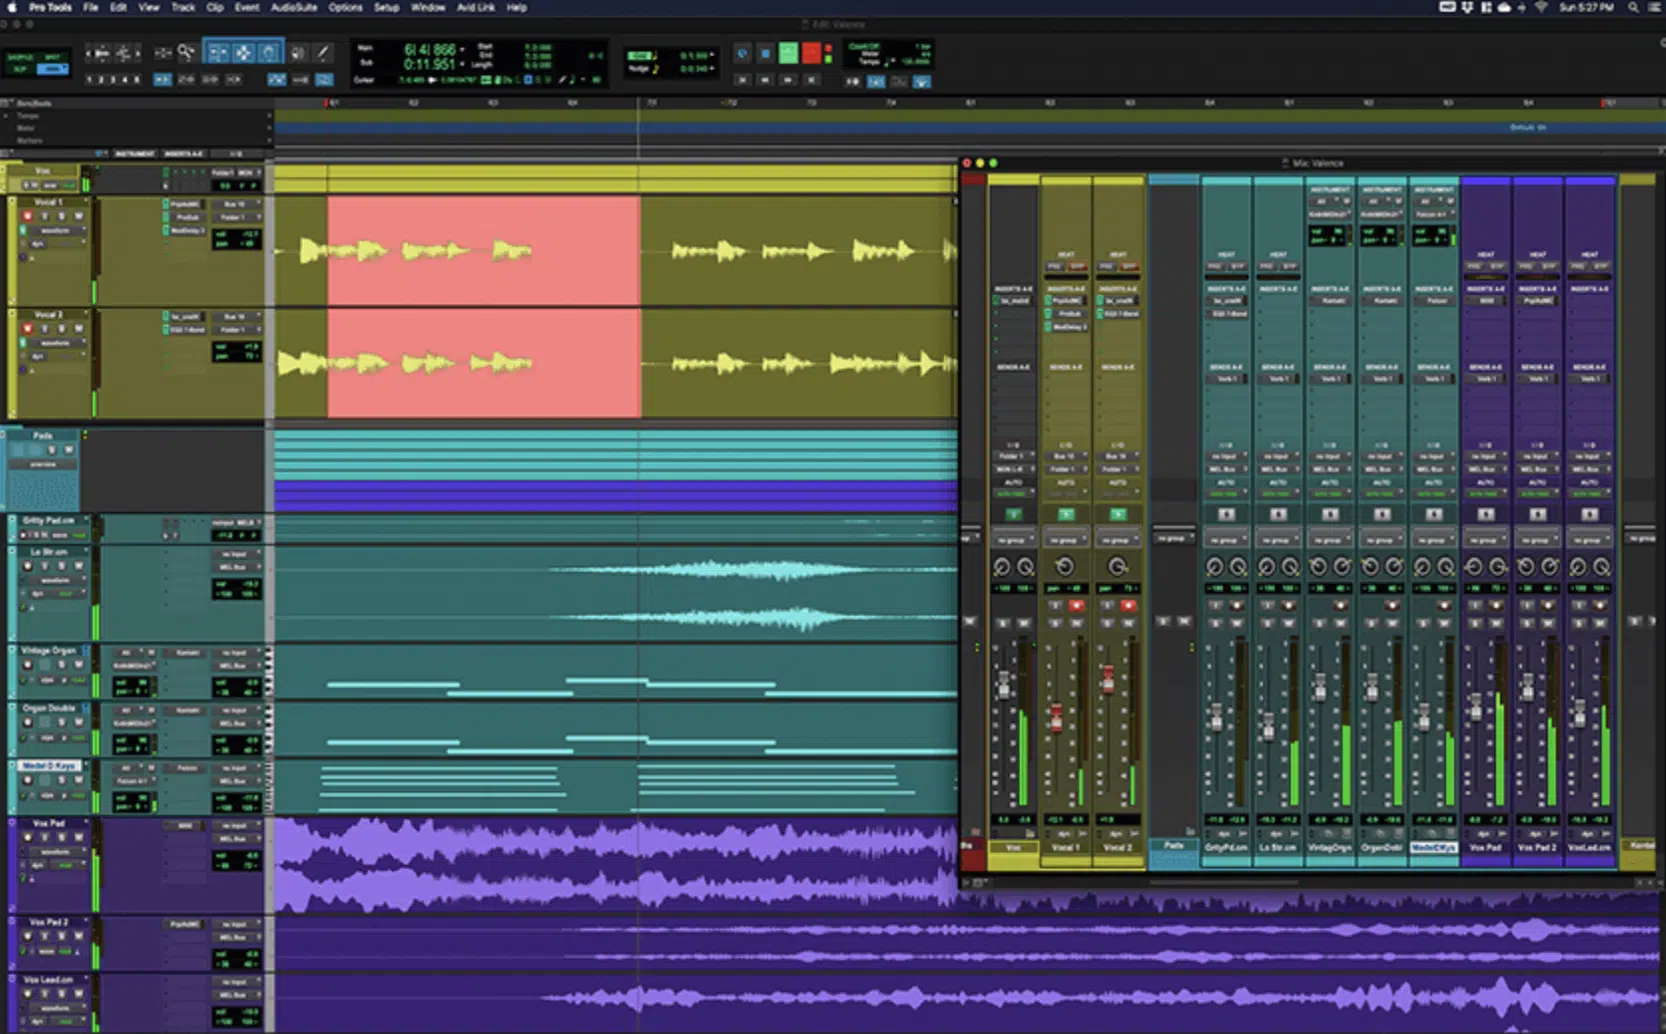
The Pro Tools vs Reaper debate is a common one among music producers.
While Pro Tools, a legendary digital audio workstation, has long been considered the industry standard, Reaper has gained a loyal following thanks to its flexibility and affordability.
Reaper supports a wide range of audio formats and plug-ins.
Its highly customizable interface can be a major advantage for producers who prefer a tailored workflow and sound quality.
Pro Tools, on the other hand, is known for its powerful recording and editing features, but it can be less flexible and more expensive than Reaper.
In terms of audio interface compatibility, both Reaper and Pro Tools work seamlessly with a wide range of devices.
However, Pro Tools is known to work best with Avid’s own hardware, whereas Reaper’s compatibility is more universal.
-
Reaper vs Logic Pro
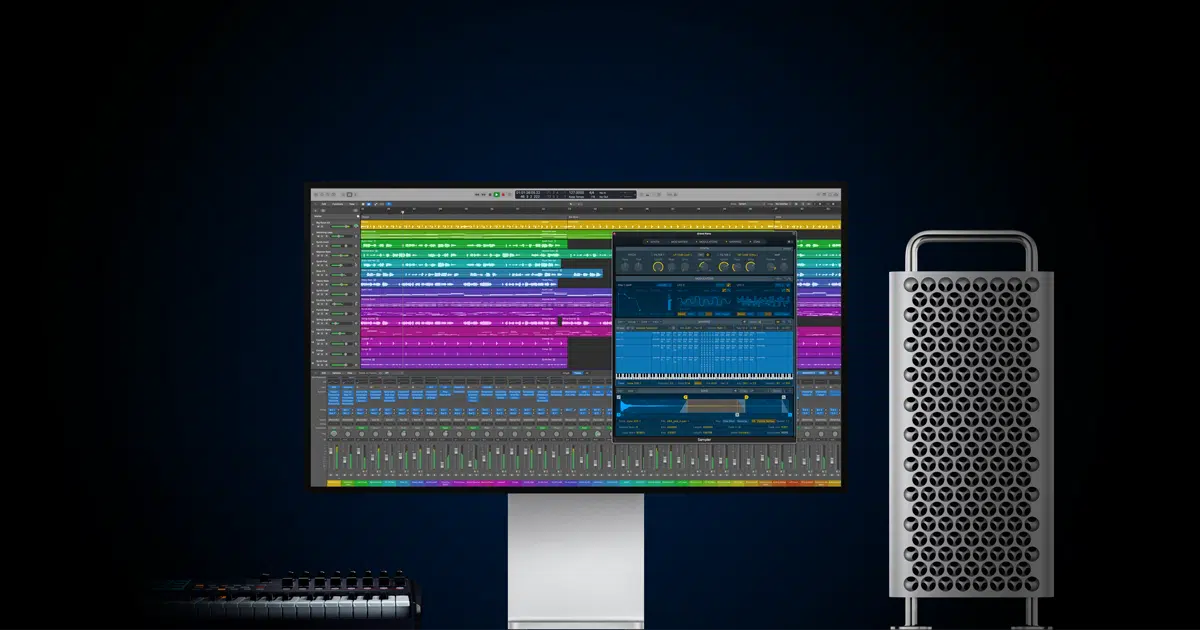
Logic Pro is another popular DAW, particularly among Mac users.
It’s well-suited to MIDI sequencing and comes with an impressive range of virtual instruments and effects, but it’s Mac-only software.
Reaper, in contrast, runs smoothly on both Windows and Mac (and even on Linux).
It might not have as many built-in instruments as Logic Pro 一 but its support for third-party plug-ins means you can easily expand your collection of tools.
In terms of cost, Reaper is also a clear winner.
While Logic Pro is reasonably priced for a one-time purchase, Reaper’s license is even more affordable, and it comes with unlimited free updates.
Unleashing Advanced Features for Complex Tasks
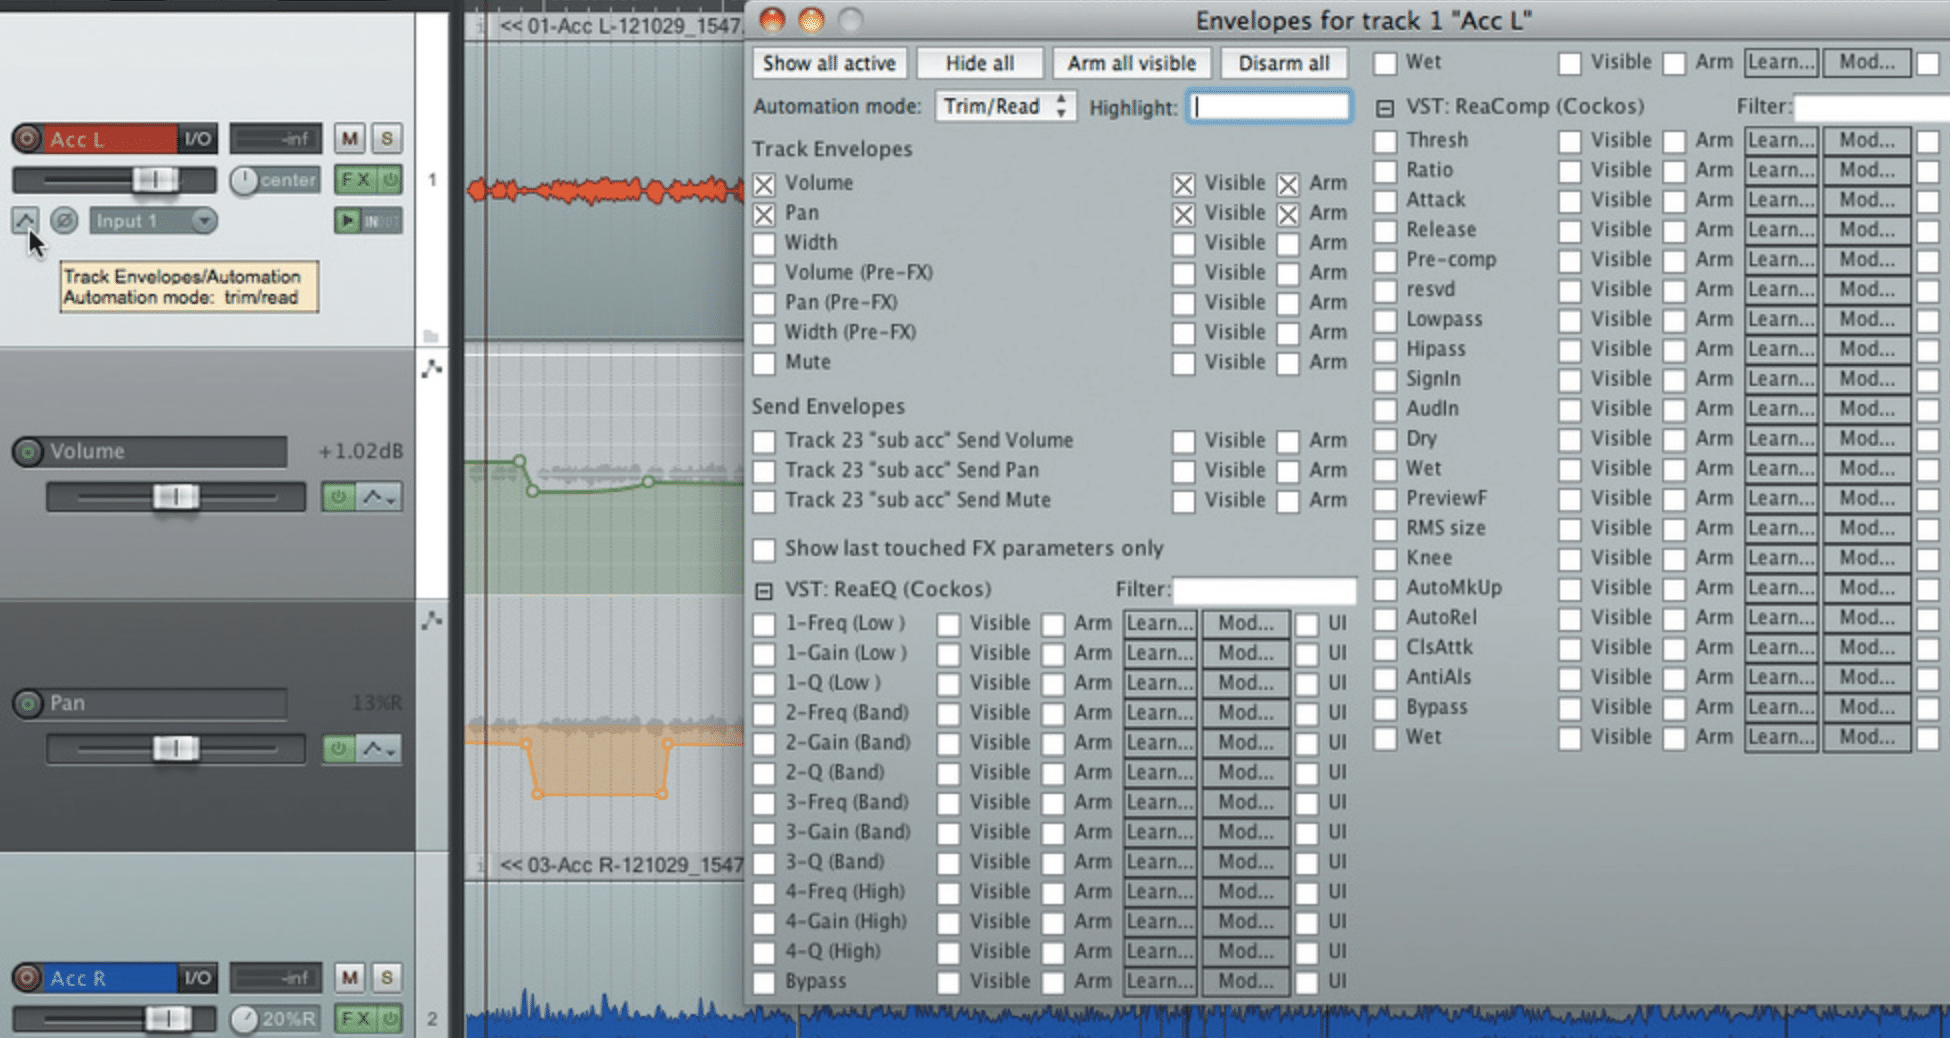
Reaper isn’t just your run-of-the-mill digital audio workstation; it’s a fully featured DAW that includes a host of advanced features that can handle complex tasks with ease.
From its powerful scripting engine to its extensive automation capabilities, Reaper is built to help you work smarter, not harder.
Let’s take a deeper dive into Reaper’s automation capabilities.
These nifty features are the unsung heroes of efficient music production.
Automation lanes in Reaper allow you to make precise adjustments to volume, panning, effects parameters, and more over time.
This means you can automate the movement of your virtual knobs and sliders 一 freeing you to focus on the broader picture while Reaper handles the hard stuff.
But Reaper’s advanced features don’t stop there… its scripting engine is another standout feature.
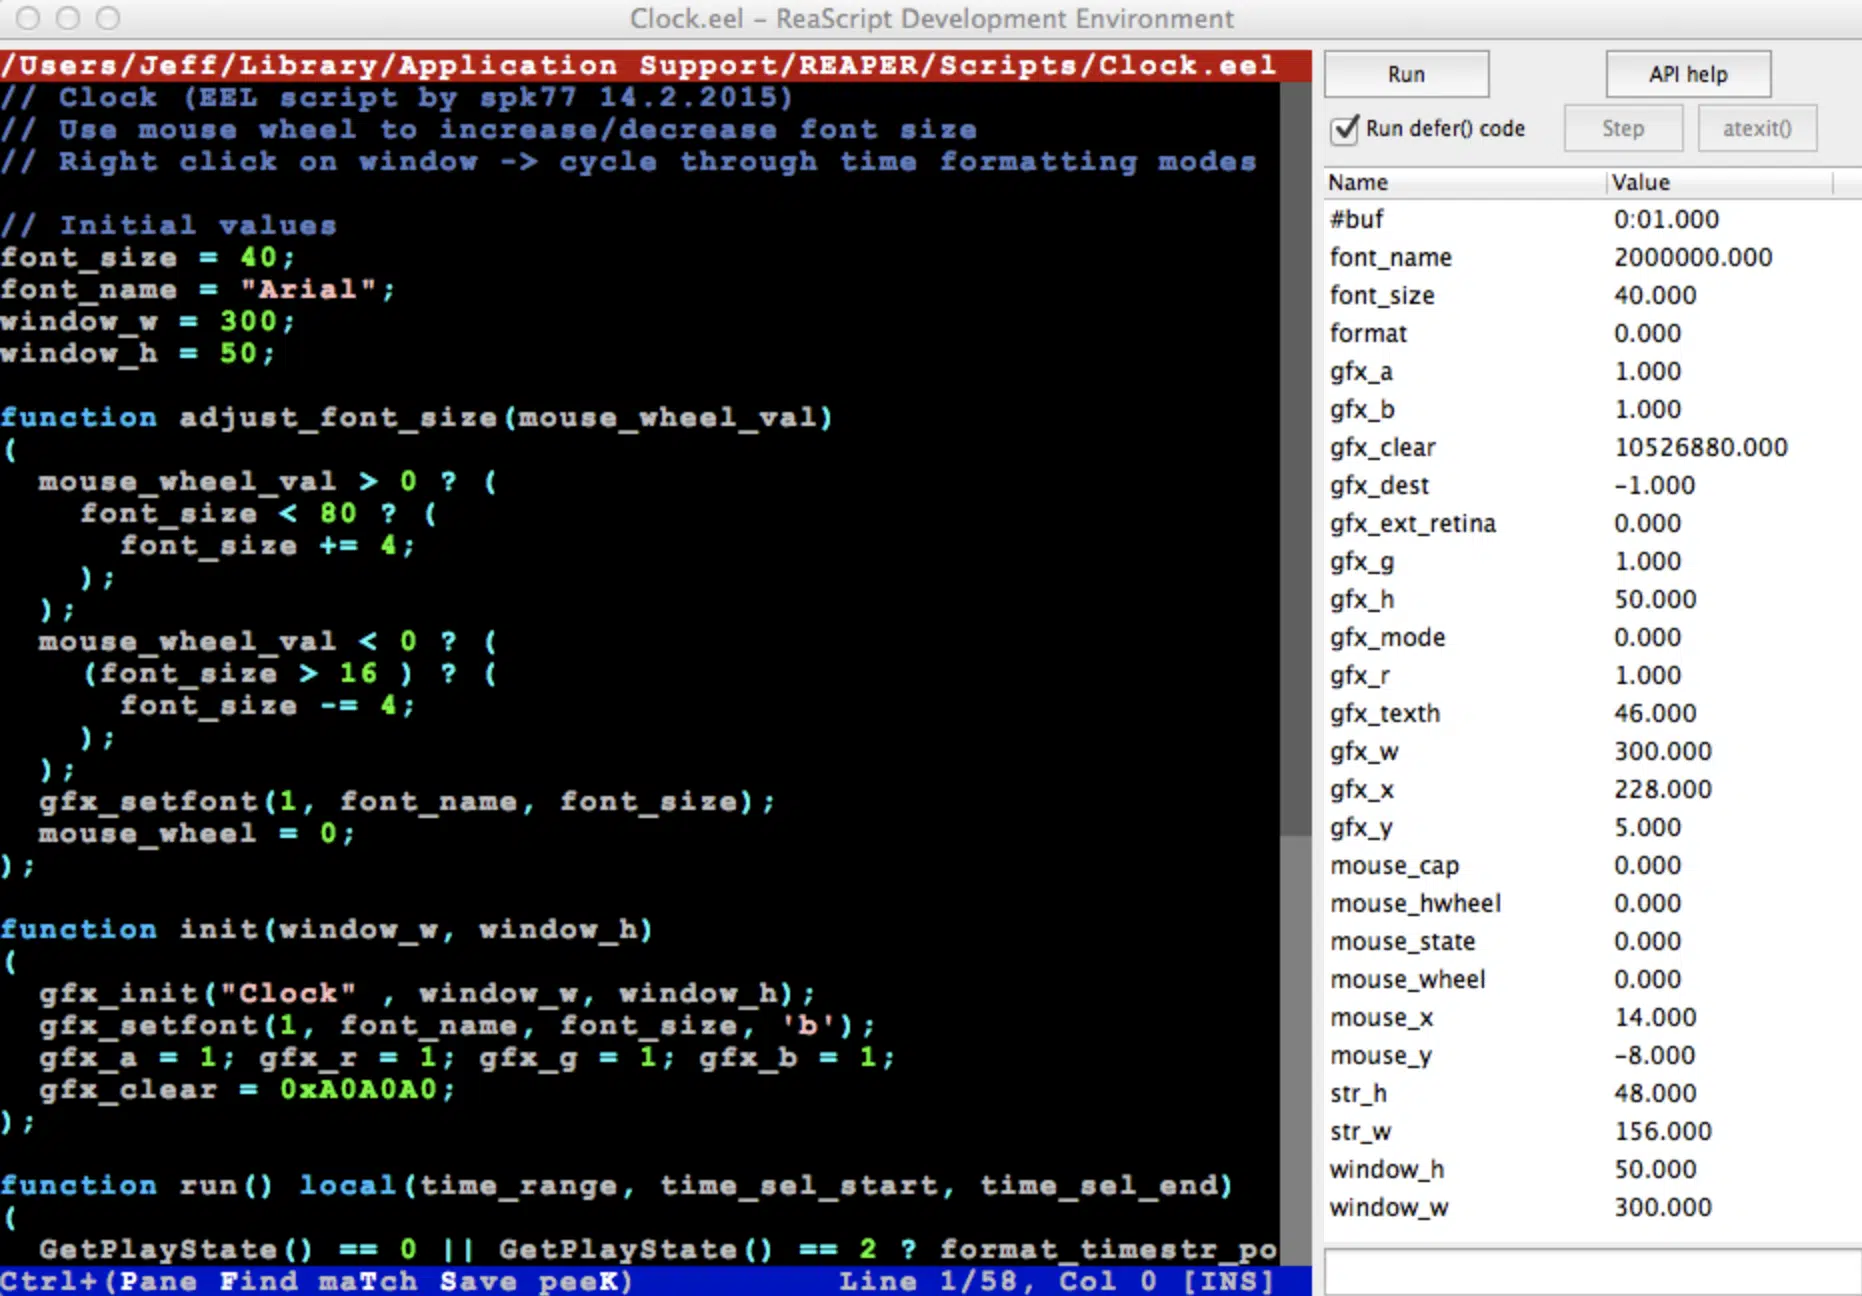
With this, you can:
- Write your own scripts.
- Use scripts created by the community to automate complex tasks.
This can drastically increase your productivity by automating repetitive tasks.
Think of it as your personal assistant, taking care of the boring stuff while you concentrate on creating magic with your music.
Now, let’s talk about spectral editing.
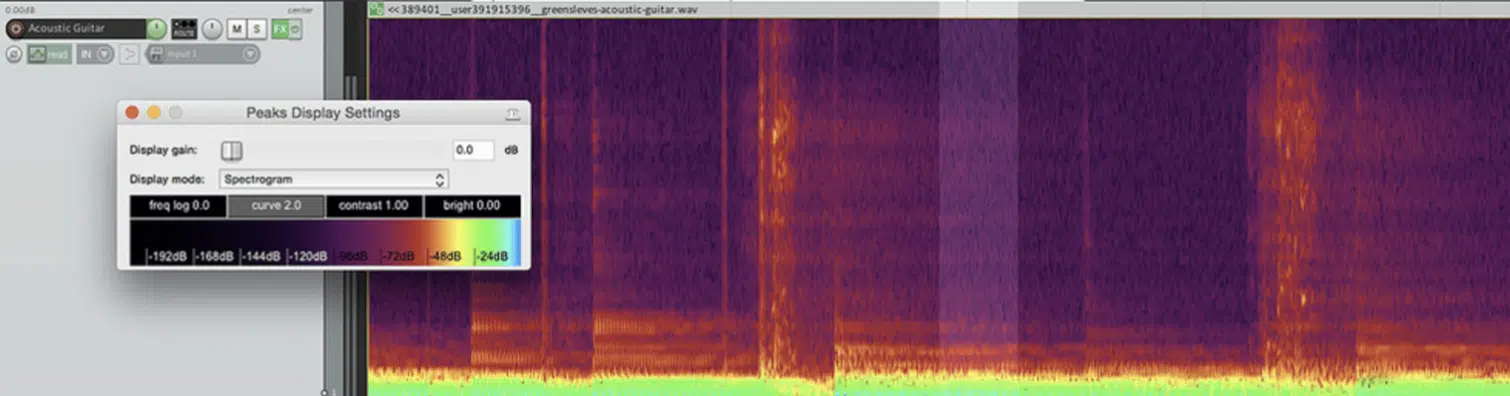
This advanced feature in Reaper allows you to view and edit the spectral content of your audio.
Instead of working with waveforms, you can work with frequencies.
This is invaluable for tasks like:
- Noise reduction
- Removing unwanted frequencies
- Detailed sound shaping
It might seem like rocket science at first, but once you get the hang of it, it’s an incredibly powerful tool to have in your audio editing arsenal.
The last advanced feature I want to touch on is Reaper’s surround sound capabilities.
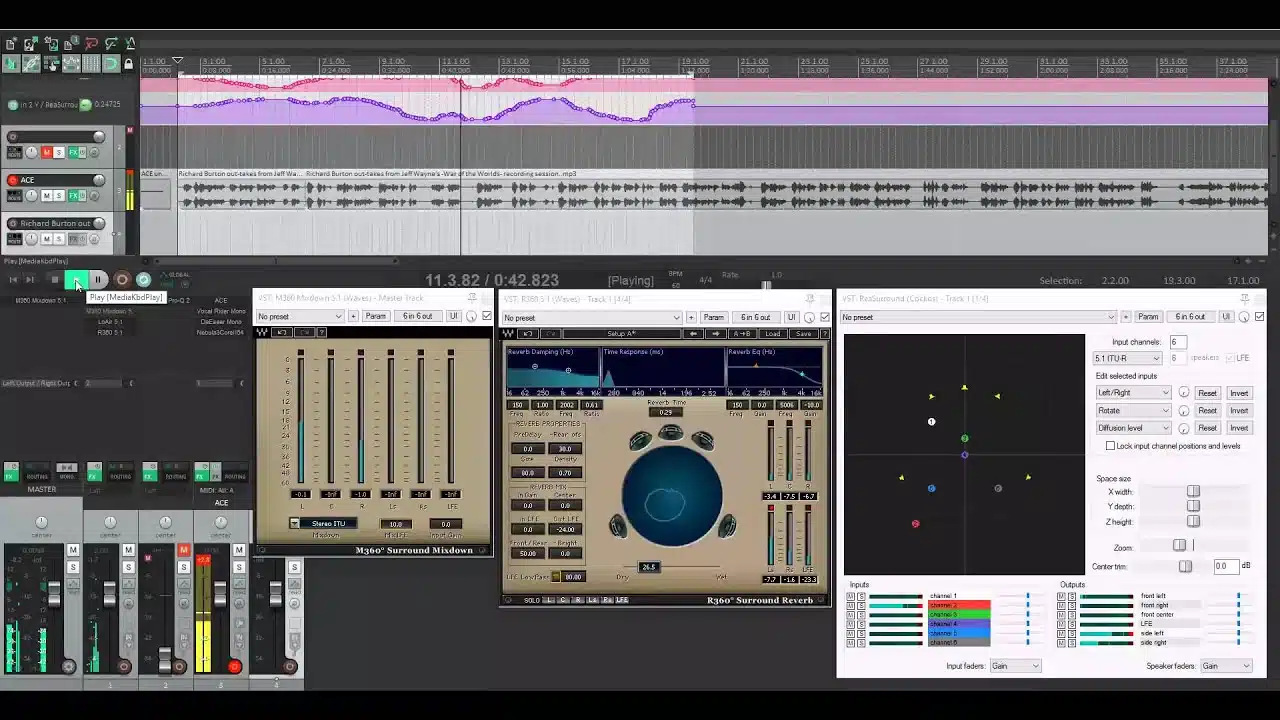
If you’re working on soundtracks for film, television, or video games, these features will come in handy.
Reaper supports multichannel audio and complex routing setups 一 making it possible to create immersive soundscapes for your projects.
Whether you’re mixing in 5.1 or 7.1, or even more expansive formats, Reaper has got you covered.
With these advanced features at your fingertips, you can tackle complex tasks that go beyond basic music production.
From film scoring and game audio design to podcast editing, sound design and more, Reaper’s advanced features open up a whole new realm of possibilities.
Just another reason why this DAW is my go-to choice for all things audio.
-
Useful Shortcuts & Workflow Enhancements
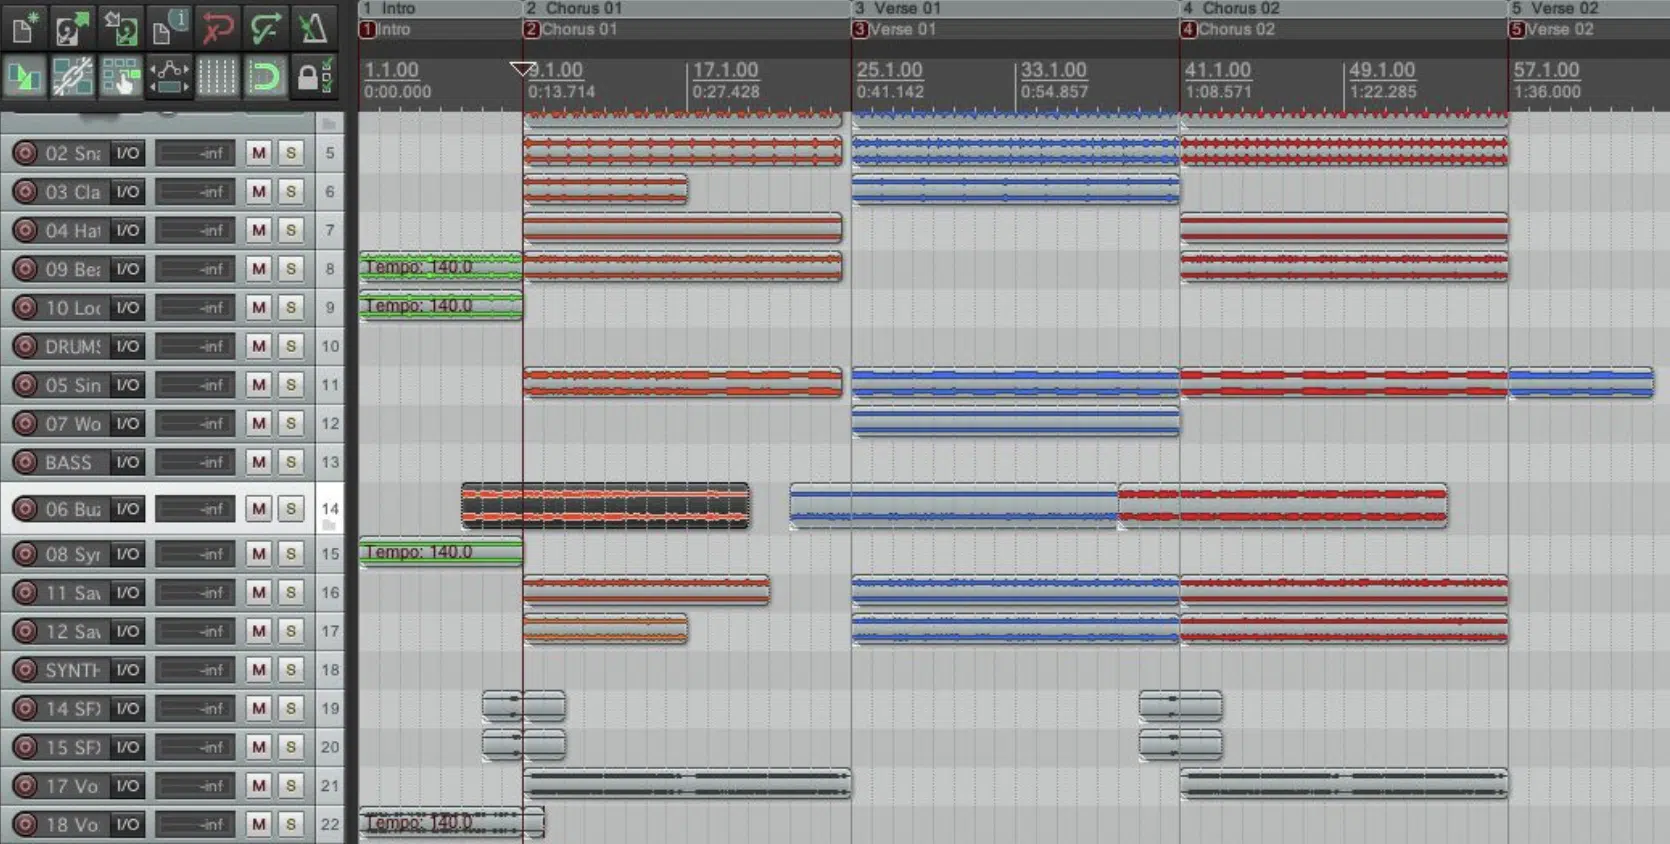
Reaper, like any other DAW, has a plethora of handy shortcuts that can dramatically speed up your workflow.
For example, hit ‘R’ to start recording and the space bar to start or stop playback.
It’s a simple thing, but once you’ve got these down, you’re already working faster and more efficiently.
Let’s not forget about Reaper’s “Ripple Editing” feature.
This is a real timesaver when making changes to a part of your track or project.
Adjustments you make can automatically propagate, or ripple, through the rest of the project 一 keeping everything synchronized and reducing the time you spend on manual edits.
Another essential trick is the utilization of track templates.
If you often use certain track configurations, with premium plugins, effects, or routing, you can save them as track templates for quick and easy recall in the future.
This can speed up your setup time significantly, allowing you to get straight into the creative flow.
-
Useful Shortcuts & Workflow Enhancements (Cont.)
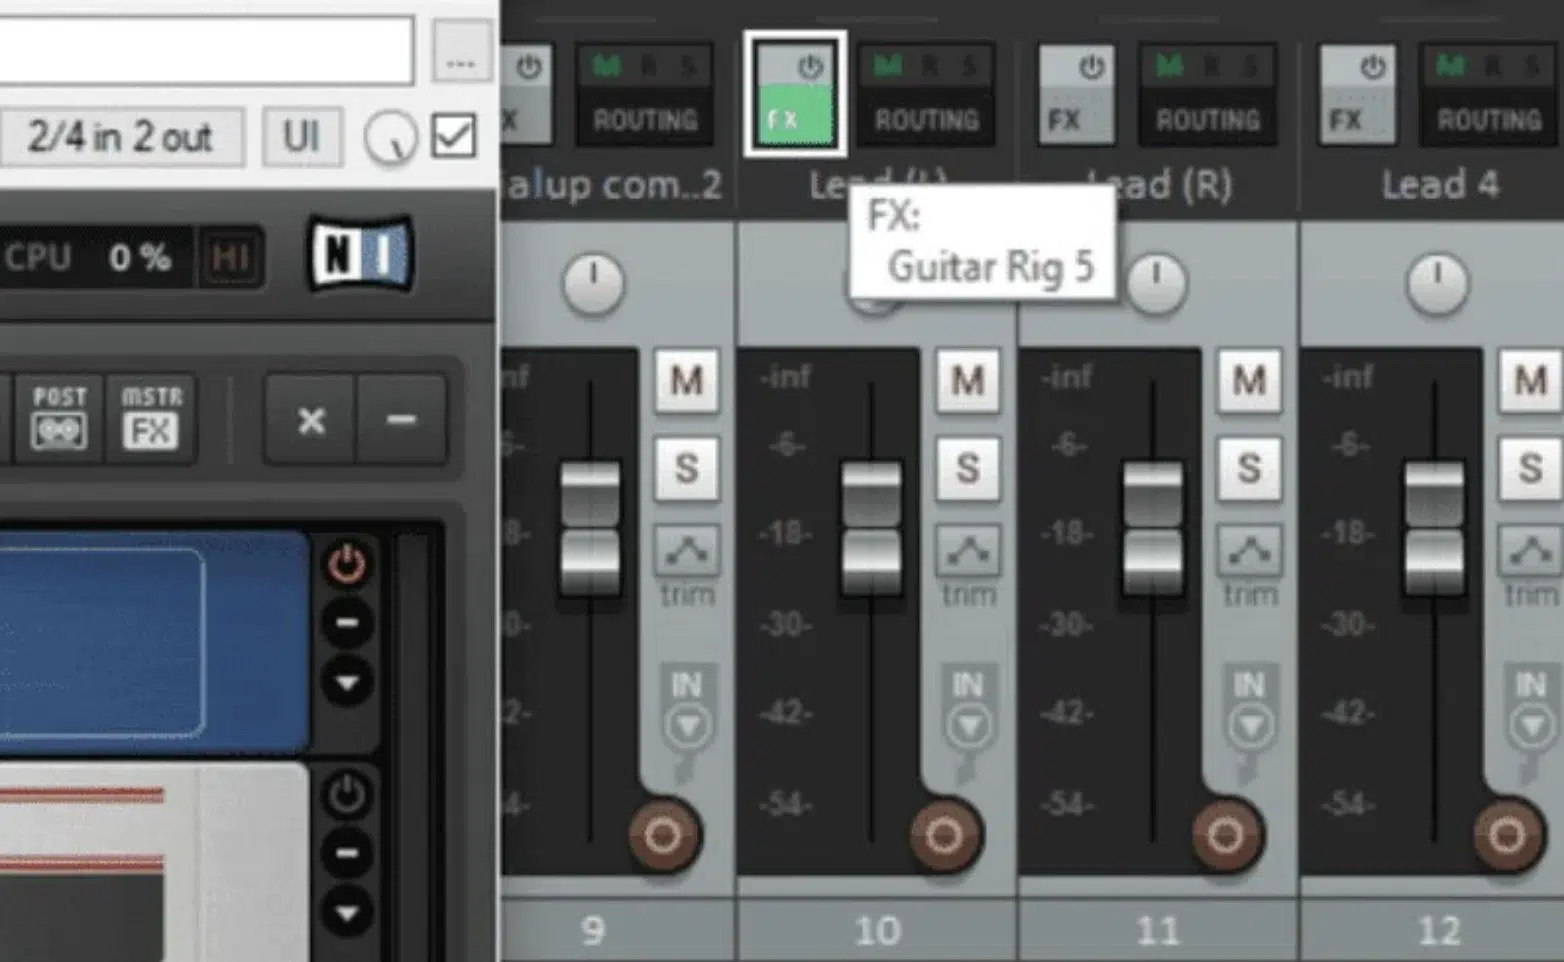
Reaper allows you to create custom actions using its in-built scripting engine.
You can write your own scripts or use scripts created by the community to automate repetitive tasks or create new features.
This is like having a digital assistant in your DAW, taking care of tedious tasks while you focus on the creative aspects of your music.
Master the use of FX chains in Reaper.
These are essentially groups of plugins that you can save and use across different projects.
It’s particularly handy if you have a specific chain of plugins that you use frequently for mastering or vocal processing.
Once you’ve saved an FX chain, you can add it to any track with just a few clicks.
These tips and tricks should help you level up your music production skills in Reaper, making you a more efficient and creative music producer.
Reaper DAW: Final Thoughts
Well, we’ve journeyed through the ins & outs of Reaper DAW together 一 discovering the plethora of features, tricks, and workflows this formidable software brings to the table.
I trust you’re now feeling confident, eager, and ready to start producing and mixing your tracks with Reaper.
But hold on a moment…
There’s one more thing I want to share with you that will elevate your productions to another level…
Let’s talk about these professionally-crafted, hard-hitting FREE drum loops.
These high-quality, genre-specific drum loops can be your secret weapon for creating epic tracks.
The beauty of using these loops is how they can seamlessly integrate with Reaper DAW.
Remember those unique processing and routing options we discussed earlier?
They’re not just for your recordings and MIDI tracks.
You can apply those innovative features to these drum loops too.
Meaning, you can manipulate, layer, and process these loops to fit your unique style and the demands of your mix.
You’ll be able to mold these professionally crafted drum loops and push them through Reaper’s in-built FX.
As well as tweak them with precise adjustments, and even layer them across multiple tracks.
The possibilities are truly endless!
With Reaper DAW as your weapon of choice and these free drum loops in your arsenal, you’re now equipped to carve out a unique sonic signature in your music.
Until next time…
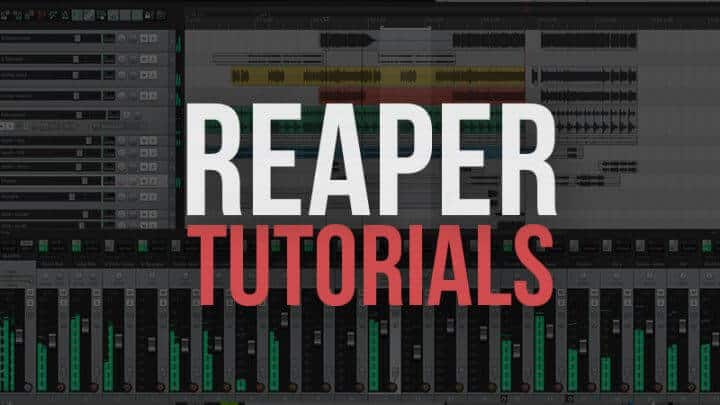
Here is a beginner’s guide on how to use Reaper, the popular affordable music production software. These Reaper tutorials will show you how to record audio, use MIDI instruments, and understand the many available tools.
Reaper is a popular digital audio workstation and MIDI sequencer software that is available for Windows, Mac, and Linux. The Reaper music software starts at $60.
Related: Music Production Courses Online
- Reaper Introduction
- Starting a New Project
- Understanding Tracks
- The Track Manager
- Recording Audio
- Basic Audio Editing
- The Grid and Snapping
- Fades & Crossfades
- Plugins & Effects
- Folders
- Track Grouping
- Track & Project Templates
- Takes & Comping
- Markers & Regions
- Ripple Editing
- Envelopes & Automation
- MIDI Instruments
- Media Explorer
- The Project Media FX Bay
- How to Render & Export
- Themes & Layouts
- Connect Audio Interface ( Mac )
- Connect Audio Interface ( Windows )
1. Reaper Introduction
Here is an introduction to the Reaper music software. Learn how to customize the app, add tracks, and more. Reaper User Guide
2. Starting a New Project
Learn how to create your first music project.
3. Understanding Tracks
This video breaks down tracks. Tracks can be used for audio, MIDI, instruments, and more.
4. The Track Manager
The track manager is used to help organize multiple tracks easier.
5. Recording Audio
Learn how to record instruments and vocals in Reaper DAW software.
6. Basic Audio Editing
Learn how to edit audio in Reaper. You can time-stretch, add fades, and chop up samples.
7. The Grid and Snapping
Here you will learn how to customize the snap and grid settings.
8. Fades & Crossfades
This tutorial will show you to use fades and crossfades in your music project.
9. Plugins & Effects
Here you will learn more about the many track effects available in Reaper.
10. Folders
Folders is another great way to organize your project better.
11. Track Grouping
In Reaper you can group tracks, and edit the settings for multiple tracks at once.
12. Track & Project Templates
You can create a project and track template to help speed up your music making process.
13. Takes & Comping
Learn how to take multiple takes of audio and select the best option.
14. Markers & Regions
Markers allow you to mark different sections of your song.
15. Ripple Editing
The ripple editing feature gives you different modes to edit audio and tracks.
16. Envelopes & Automation
Understand how to us envelopes and automation in Reaper.
17. MIDI Instruments
Learn how to record and edit MIDI instruments in Reaper.
18. Media Explorer
The media explorer is used to add audio, MIDI, and even video files into your project.
19. The Project Media FX Bay
The Project Media FX Bay displays all the files are in your current project.
20. How to Render & Export
Learn how to export your final music project to a audio file.
21. Themes & Layouts
In Reaper you can change the theme color and layout of the software.
22. Connect Audio Interface ( Mac )
Learn how to connect an audio interface to Reaper on your Mac.
23. Connect Audio Interface ( Windows )
Learn how to connect an audio interface to Reaper on your Windows computer.
Additional Beginner Guides
- How to Make Beats
- How to Use Ableton Live
- How to Use Propellerhead Reason
- How to Use FL Studio
I hope you found these free Reaper tutorials to be helpful.
Please don’t forget to share this article.