
USER’S MANUAL
QUESTIONS?
As a manufacturer, we are com-
mitted to providing complete
customer satisfaction. If you have
questions, or find there are miss-
ing or damaged parts, we will
guarantee you complete satisfac-
tion through direct assistance
from our factory.
TO AVOID UNNECESSARY
DELAYS, PLEASE CALL DIRECT
TO OUR TOLL-FREE CUSTOMER
HOT LINE. The trained techni-
cians on our customer hot line
will provide immediate assis-
tance, free of charge to you.
CUSTOMER HOT LINE:
1-800-999-3756
Mon.–Fri., 6 a.m.–6 p.m. MST
Model No. WESY19510
Serial No.
(Write the serial number in the
space above for reference.)
Serial Number Decal
CAUTION
Read all precautions and instruc-
tions in this manual before using
this equipment. Save this manual
for future reference.
Visit our website at
www.weiderfitness.com
new products, prizes,
fitness tips, and much more!
Найди любой мануал:
Например: Sony VGN-FW460J/T
Вы можете бесплатно скачать Руководство по эксплуатации для Weider 8525 (No. WESY19510).
Также вы сможете прочесть онлайн этот документ без скачивания.
Скачать Руководство по эксплуатации для Weider 8525 (No. WESY19510)
Тип файла
PDF
Размер
744 Kb
Кол-во страниц
28
Просмотров
4312
Читать онлайн Руководство по эксплуатации для Weider 8525 (No. WESY19510) (Страница 1)

Другие Домашние тренажеры Weider 8525 (No. WESY19510)
Топ Weider Домашние тренажеры
Ранее вы смотрели
Эта страница полезна для вас? Поделитесь ссылкой:
Если у вас отсутствует техническая возможность для скачивания Руководство по эксплуатации для Weider 8525 (No. WESY19510)
вы можете прочесть документ прямо на нашем сайте или
Скачать Weider 8525 (No. WESY19510) Руководство по эксплуатации
Google Ads:
Google Ads:

Google Ads:
- 1
- 2
- 3
- 4
- 5
- 6
- 7
- 8
- 9
- 10
- 11
- 12
- 13
- 14
- 15
- 16
- 17
- 18
- 19
- 20
- 21
- 22
- 23
- 24
- 25
- 26
- 27
- 28
Инструкции для прочих Weider Домашние тренажеры
Инструкции для прочих Weider

USER’S MANUAL
QUESTIONS?
As a manufacturer, we are committed to providing complete
customer satisfaction. If you
have questions, or find there are
missing or damaged parts, we
will guarantee you complete satisfaction through direct assistance from our factory.
TO AVOID DELAYS, PLEASE
CALL DIRECT TO OUR TOLLFREE CUSTOMER HOT LINE.
The trained technicians on our
customer hot line will provide
immediate assistance, free of
charge to you.
CUSTOMER HOT LINE:
1-800-999-3756
Mon.–Fri., 6 a.m.–6 p.m. MST
Model No. WESY19512
Serial No.
Write the serial number in the
space above for reference.
CAUTION
Read all precautions and instructions in this manual before using
this equipment. Save this manual
for future reference.
Visit our website at
www.weiderfitness.com
new products, prizes,
fitness tips, and much more!

2
TABLE OF CONTENTS
IMPORTANT PRECAUTIONS . . . . . . . . . . . . . . . . . . . . . . . . . . . . . . . . . . . . . . . . . . . . . . . . . . . . . . . . . . . . .3
BEFORE YOU BEGIN . . . . . . . . . . . . . . . . . . . . . . . . . . . . . . . . . . . . . . . . . . . . . . . . . . . . . . . . . . . . . . . . . . .4
ASSEMBLY . . . . . . . . . . . . . . . . . . . . . . . . . . . . . . . . . . . . . . . . . . . . . . . . . . . . . . . . . . . . . . . . . . . . . . . . . . .5
ADJUSTMENTS . . . . . . . . . . . . . . . . . . . . . . . . . . . . . . . . . . . . . . . . . . . . . . . . . . . . . . . . . . . . . . . . . . . . . . .14
WEIGHT RESISTANCE CHART . . . . . . . . . . . . . . . . . . . . . . . . . . . . . . . . . . . . . . . . . . . . . . . . . . . . . . . . . . .16
TROUBLESHOOTING AND MAINTENANCE . . . . . . . . . . . . . . . . . . . . . . . . . . . . . . . . . . . . . . . . . . . . . . . . .17
CABLE DIAGRAM . . . . . . . . . . . . . . . . . . . . . . . . . . . . . . . . . . . . . . . . . . . . . . . . . . . . . . . . . . . . . . . . . . . . .18
ORDERING REPLACEMENT PARTS . . . . . . . . . . . . . . . . . . . . . . . . . . . . . . . . . . . . . . . . . . . . . . . .Back Cover
LIMITED WARRANTY . . . . . . . . . . . . . . . . . . . . . . . . . . . . . . . . . . . . . . . . . . . . . . . . . . . . . . . . . . .Back Cover
Note: APART IDENTIFICATION CHART and a PART LIST/EXPLODED DRAWING are attached to the center of
this manual. Remove the PART IDENTIFICATION CHART and PART LIST/EXPLODED DRAWING before beginning assembly.
3
WARNING: To reduce the risk of serious injury, read the following important precautions
before using the weight system.
IMPORTANT PRECAUTIONS
1. Read all instructions in this manual and in
the accompanying literature before using the
weight system.
2. It is the responsibility of the owner to ensure
that all users of the weight system are adequately informed of all precautions.
3. The weight system is intended for home use
only. Do not use the weight system in any
commercial, rental, or institutional setting.
4. Use the weight system only on a level surface. Cover the floor beneath the weight system to protect the floor.
5. Make sure all parts are properly tightened
each time you use the weight system.
Replace any worn parts immediately.
6. Keep children under 12 and pets away from
the weight system at all times.
7. Keep hands and feet away from moving
parts.
8. Always wear athletic shoes for foot protection.
9. The weight system is designed to support a
maximum user weight of 300 pounds.
10. Always stand on a foot plate when performing an exercise that could cause the weight
system to tip.
11. Never release the press arm, butterfly arms,
leg lever, lat bar, or nylon strap while weights
are raised. The weights will fall with great
force.
12. Make sure that the cables remain on the pulleys at all times. If the cables bind while you
are exercising, stop immediately and make
sure that the cables are on all of the pulleys.
13. Always disconnect the lat bar from the
weight system when performing an exercise
that does not use the lat bar.
14. If you feel pain or dizziness at any time while
exercising, stop immediately and begin cooling down.
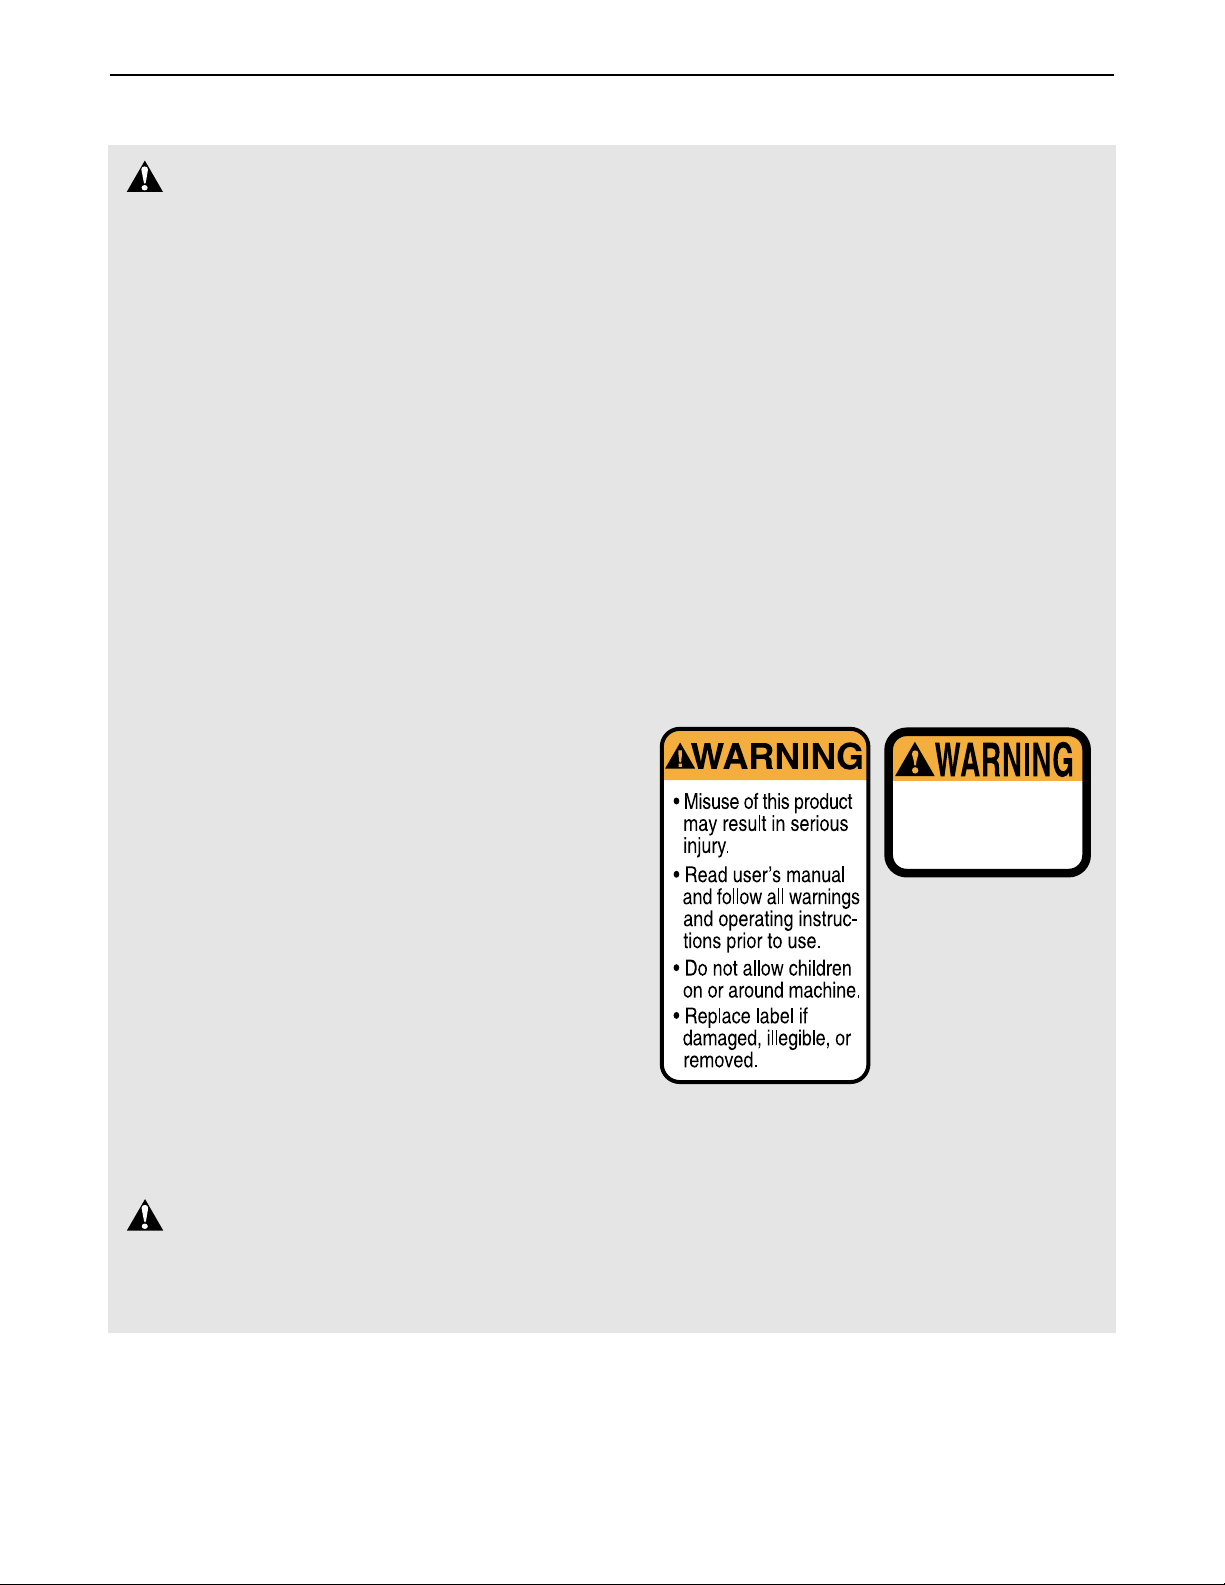
15. The decals shown below have been placed
on the weight system in the locations shown
on page 4. If a decal is missing or illegible,
call our toll-free Customer Hot Line at
1-800-999-3756 and order a free replacement
decal. Apply the decal in the location shown.
Keep hands and
fingers clear of
this area.
Decal 2
Decal 1
WARNING:
Before beginning this or any exercise program, consult your physician. This
is especially important for persons over the age of 35 or persons with pre-existing health problems.
Read all instructions before using. ICON assumes no responsibility for personal injury or property
damage sustained by or through the use of this product.
4
BEFORE YOU BEGIN
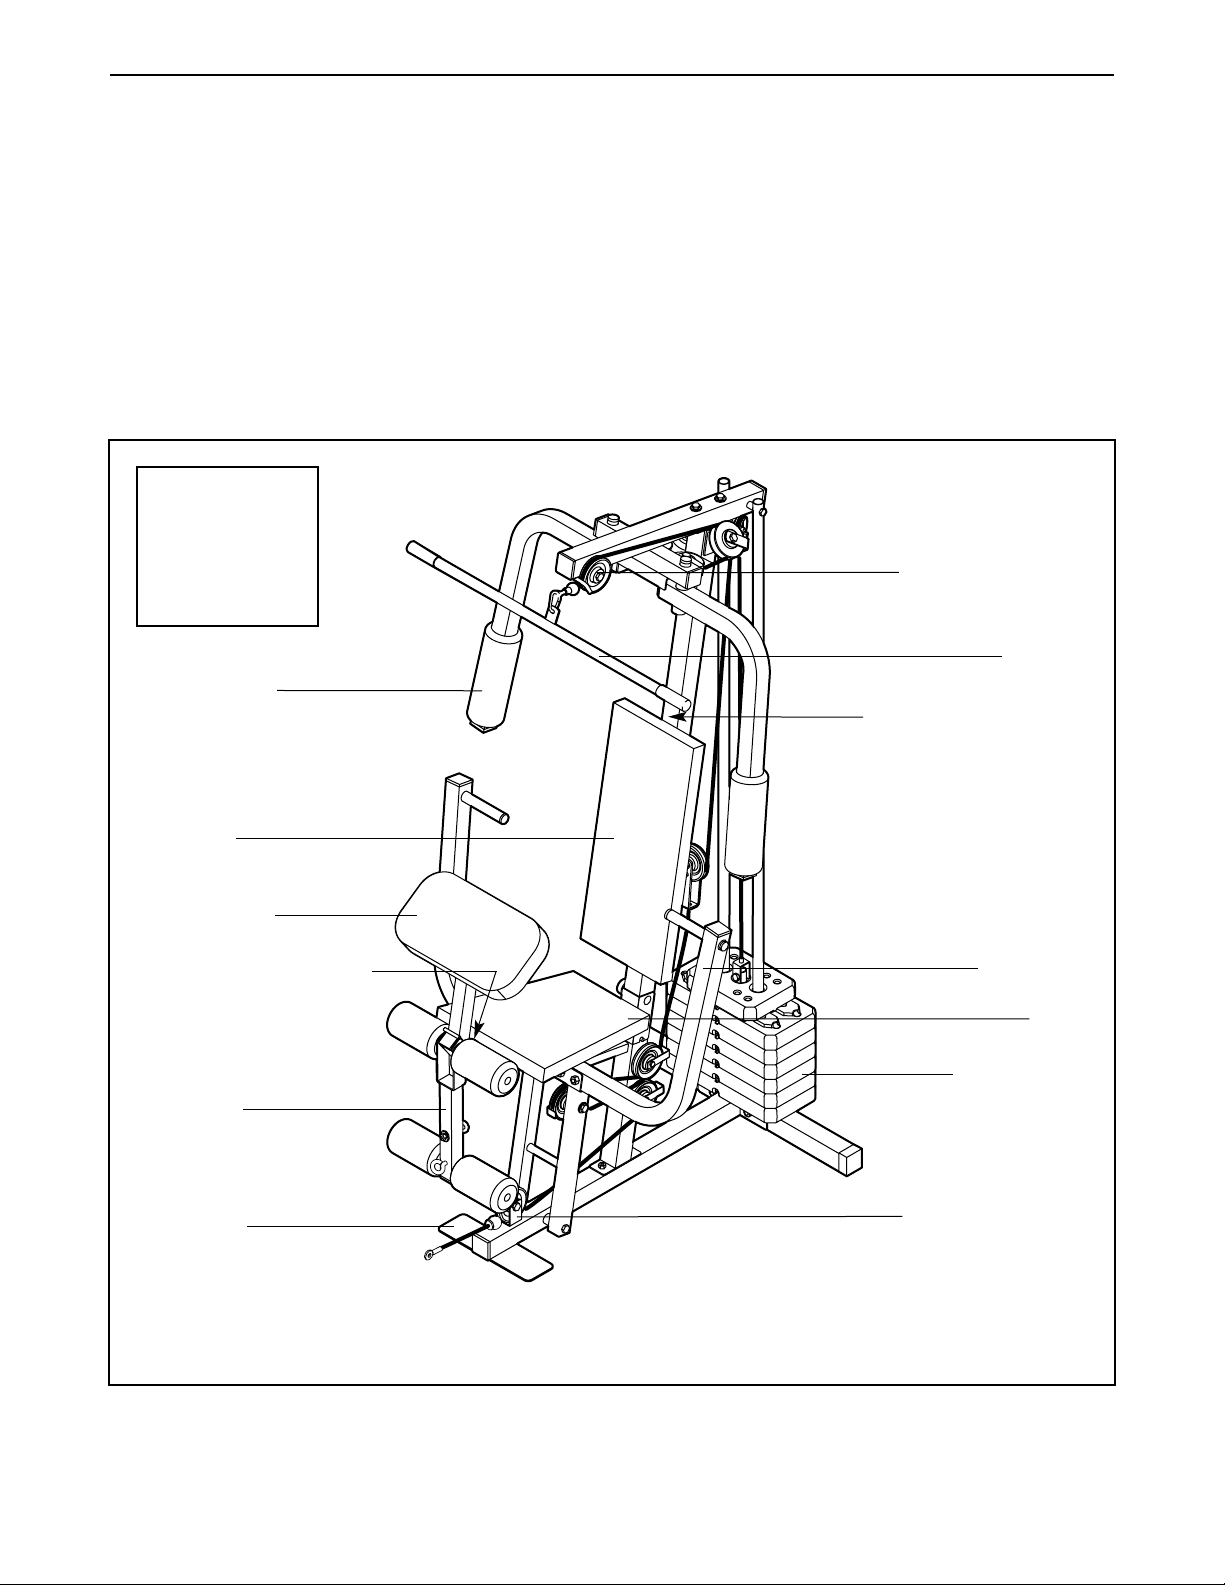
ASSEMBLED
DIMENSIONS:
Height: 76 in.
Width: 37 in.
Length: 44 in.
Foot Plate
Low Pulley Station
High Pulley Station
Left Side
Right Side
Lat Bar
Decal 1
Decal 2
Leg Lever
Butterfly Arms
Press Arm
Preacher Pad
Weight Stack
Seat
Backrest
Thank you for selecting the versatile WEIDER®8525
weight system. The weight system offers a selection of
weight stations designed to develop every major muscle group of the body. Whether your goal is to tone
your body, build dramatic muscle size and strength, or
improve your cardiovascular system, the weight system
will help you to achieve the specific results you want.
For your benefit, read this manual carefully before
using the weight system. If you have additional ques-
tions, please call our Customer Service Department
toll-free at 1-800-999-3756, Monday through Friday,
6 a.m. until 6 p.m. Mountain Time (excluding holidays).
To help us assist you, please note the product model
number and serial number before calling. The model
number is WESY19512. The serial number can be
found on a decal attached to the weight system (see
the front cover of this manual).
Before reading further, please review the drawing
below and familiarize yourself with the parts that are
labeled.
Note: The terms “right side” and “left side”
are determined relative to a person sitting
on the seat; they do not correspond to right
and left on the drawings in the manual.
5
1
3
4
27
51
51
14
1
5
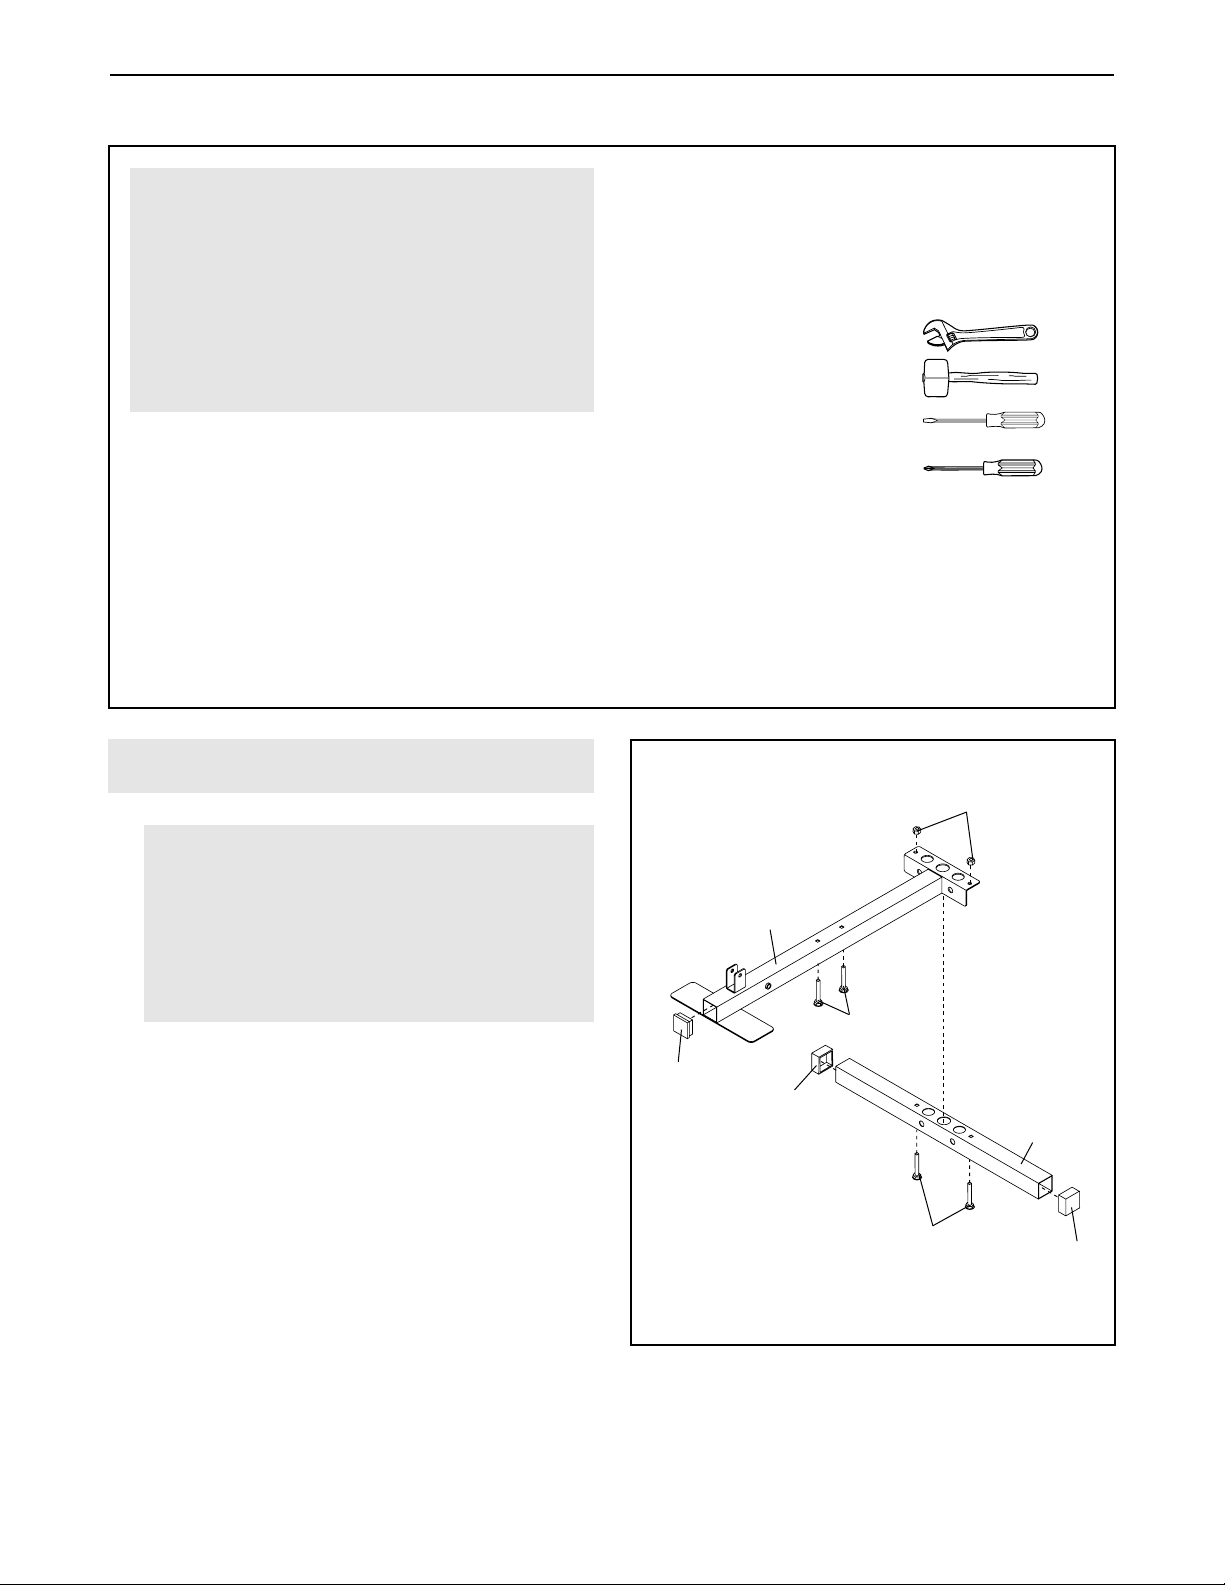
1.
Press two 2” Square Outer Caps (51) onto the
ends of the Stabilizer (5). Press a 2” Square Inner
Cap (27) into the end of the Base (4).
Insert two 5/16” x 2 3/4” Carriage Bolts (14) up
through the Stabilizer (5). Insert two 5/16” x 2 1/2”
Carriage Bolts (1) up through the Base (4). Note:
It may be helpful to place a piece of tape over
the bolt heads to hold the Bolts in place.
Attach the indicated end of the Base (4) to the
Stabilizer (5) with two 5/16” x 2 3/4” Carriage
Bolts (14) and two 5/16” Nylon Locknuts (3). Do
not tighten the Locknuts yet.
Frame Assembly
Before beginning assembly, make sure that
you have read and understand the information in the box above.
For help identifying small parts, use the
PART IDENTIFICATION CHART in the center of this manual.
• Assembly requires two people.
• Place all parts in a cleared area and remove the
packing materials. Do not dispose of the packing
materials until assembly is completed.
• Tighten all parts as you assemble them, unless
instructed to do otherwise.
• As you assemble the weight system, make sure
all parts are oriented as shown in the drawings.
• For help identifying small parts, use the PART
IDENTIFICATION CHART at the center of this
manual.
The following tools (not included) are required
for assembly:
• Two adjustable wrenches
• One rubber mallet
• One standard screwdriver
• One Phillips screwdriver
• Lubricant, such as grease or petroleum jelly,
and soapy water.
Assembly will be more convenient if you have a
socket set, a set of open-end or closed-end
wrenches, or a set of ratchet wrenches.
Make Things Easier for Yourself
Everything in this manual is designed to ensure
that the weight system can be assembled successfully by anyone. However, it is important to
realize that the weight system has many parts
and that the assembly process will take time.
Most people find that by setting aside plenty of
time, assembly will go smoothly.
ASSEMBLY
6
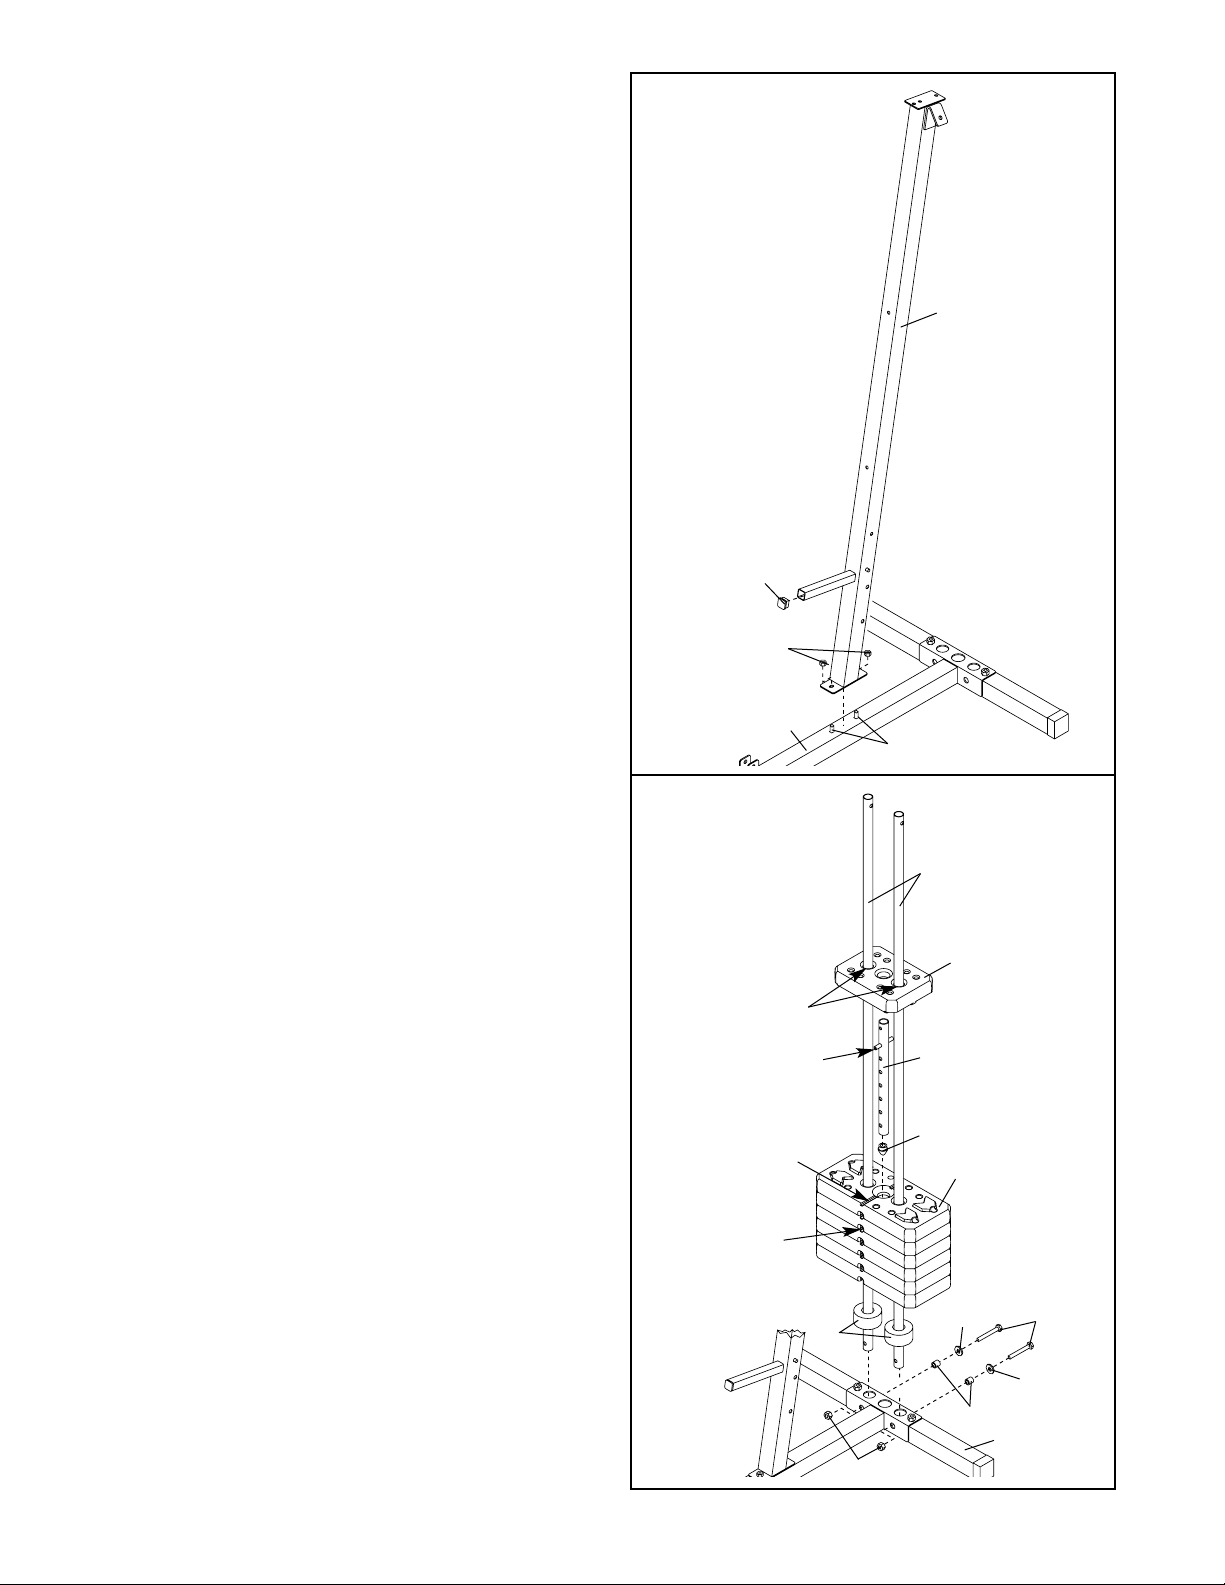
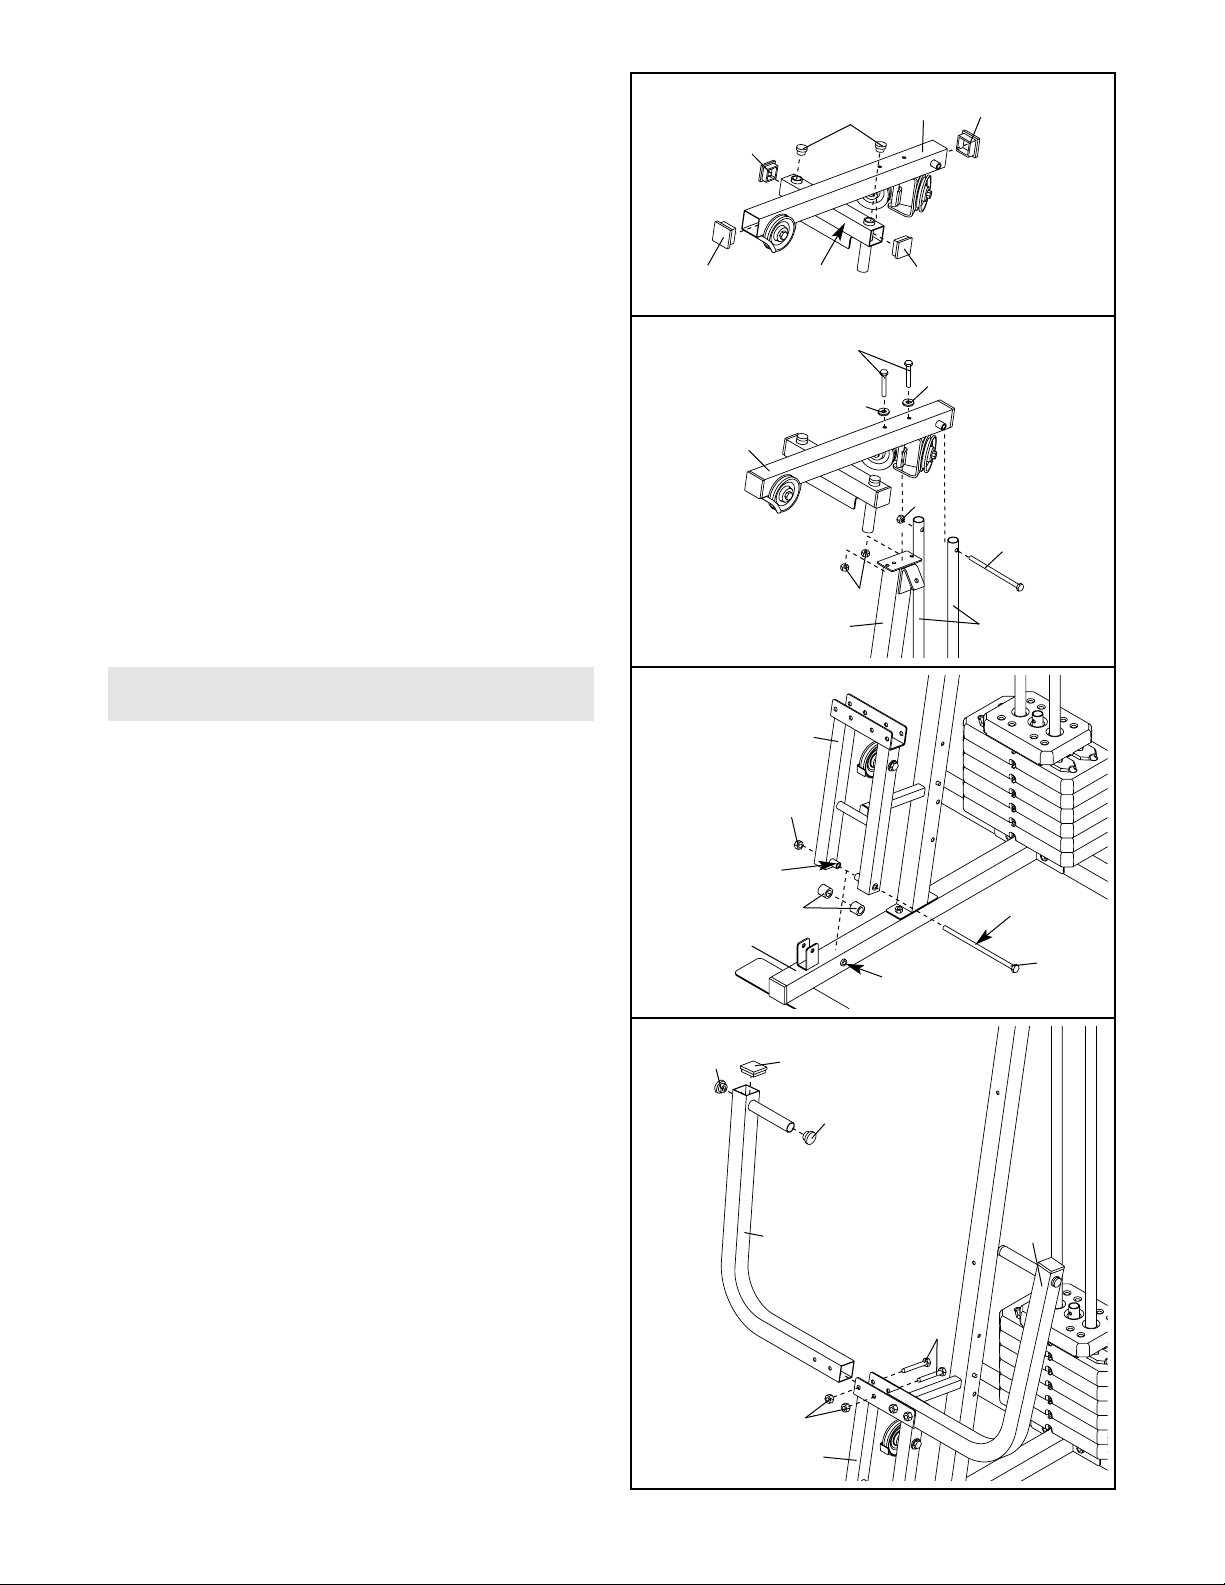
2. Press a 1” Square Inner Cap (65) into the Front
Upright (42).
Slide the Front Upright (42) onto the 5/16” x
2 1/2” Carriage Bolts (1) in the Base (4). Hand
tighten two 5/16” Nylon Locknuts (3) onto the
Carriage Bolts. Do not tighten the Locknuts
yet.
3. Attach the two Weight Guides (62) inside of the
Stabilizer (5) with two 5/16” x 2 3/4” Bolts (11),
two 5/16” Washers (8), two 1/2” x 17/32” Spacers
(61), and two 5/16” Nylon Locknuts (3).
Tighten the 5/16” Nylon Locknuts (3) used in
step 1.
Slide two Weight Bumpers (19) onto Weight
Guides (62). Stack the six Weights (25) on the
Weight Bumpers (19). Make sure that all of the
Weights are turned so the large pin grooves
are on the bottom of the Weights and on the
same side of the weight stack.
Press the Weight Tube Bumper (64) into the end
of the Weight Tube (63). Insert the Weight Tube
into the stack of Weights (25). Make sure that
the pins on the Weight Tube are resting in the
pin grooves in the upper Weight.
Lubricate the insides of the holes in the Top
Weight (76). Set the Top Weight onto the stack of
Weights (25).
2
3
42
65
3
1
4
62
76
3
61
8
8
11
64
63
25
Pin
Groove
19
5
Lubricate
Pin
Groove
Pin
7
6. Press two 1” x 7/8” Plastic Bushing (75) onto the
welded spacers on the Press Frame (17). Slide
the Press Frame into place on the Base (4) as
shown. Note: This will be a tight fit. The Plastic
Bushings should fit onto each end of the indicated tube in the Base.
Lubricate the 3/8” x 8” Bolt (59) with grease.
Attach the Press Frame (17) to the Base (4) with
the Bolt and a 3/8” Nylon Locknut (21). Do not
overtighten the Locknut; the Press Frame
must be able to pivot easily.
7
4
5
6
60
8
8
11
3
3
55
62
42
44
44
78
55
27
27
75
21
59
3
17
22
46
44
49
49
46
17
Tube
Lubricate
Welded
Spacer
4
Arm Assembly
7. Press a 1 3/4” Square Inner Cap (44) into the top
of a Press Arm (46). Press two 1” Round Inner
Caps (49) into the ends of the handle on the
Press Arm.
Attach the Press Arm (46) to one side of the
Press Frame (17) with two 5/16” x 2 1/2” Bolts
(22) and two 5/16” Nylon Locknuts (3).
Assemble the other Press Arm (46) in the
same manner.
4. Press two 2” Square Inner Caps (27) into the indicated ends of the Top Frame (55). Press two
1 3/4” Square Inner Caps (44) into the ends of
the crossbar on the Top Frame. Press two Round
Inner Caps (78) into the top of the crossbar.
5. Attach the Top Frame (55) to the Front Upright
(42) with two 5/16” x 2 3/4” Bolts (11), two 5/16”
Washers (8), and two 5/16” Nylon Locknuts (3).
Attach the upper ends of the Weight Guides (62)
to the Top Frame (55) with a 5/16” x 6” Bolt (60)
and a 5/16” Nylon Locknut (3).
Tighten the 5/16” Nylon Locknuts (3) used in
steps 2 and 5.
Crossbar
Loading…
FAQ: Types of Manuals and Their Contents
Weider 8525 Manuals come in various types, each serving a specific purpose to help users effectively operate and maintain their devices. Here are the common types of Weider 8525 User Guides and the information they typically include:
- User Manuals: Provide comprehensive instructions on how to use the device, including setup, features, and operation. They often include troubleshooting tips, safety information, and maintenance guidelines.
- Service Instructions: Designed for technicians and repair professionals, these manuals offer detailed information on diagnosing and repairing issues with the device. They include schematics, parts lists, and step-by-step repair procedures.
- Installation Guides: Focus on the installation process of the device, providing detailed instructions and diagrams for proper setup. They are essential for ensuring the device is installed correctly and safely.
- Maintenance Manuals: Provide guidance on routine maintenance tasks to keep the device in optimal condition. They cover cleaning procedures, part replacements, and regular servicing tips.
- Quick Start Guides: Offer a concise overview of the essential steps needed to get the device up and running quickly. They are ideal for users who need immediate assistance with basic setup and operation.
Each type of Weider 8525 instruction is designed to address specific needs, ensuring users have the necessary information to use, maintain, and repair their devices effectively.
Related Instructions for Weider 8525:
1
9015
Manual PDF User Guide (@IRV58G), Weider 9015 Other (22.11.2024)
31
1485
327
2
Easy Compact 90
20
1162
256
5
Tc 150 Bench
Manual Tc 150 Bench Manual — 7U4VVT
12
1238
223
9
8300 Hard Drive
Manual Weider Other Manual (File: weider-8300-hard-drive-other-28, 01st Feb 2025)
28
1438
302
10
CORe 600 831.15715.0
Operation & user’s manual Weider Home Gym Operation & user’s manual (File: weider-600-bench-home-gym-20, Wed 12.2024)
20
1062
181
Fitness Equipment Devices by Other Brands:
|
Weider 9150 Operation & User’s Manual 9150 (Other ePDF Manual, #BC5299) CAUTION 28 Oct 2024 | 30 |
|
|
Bowflex Max Trainer M7u Operation & User’s Manual Max Trainer M7u (Fitness Equipment ePDF User Guide, #A2Q598) Upgrade Kit 17 Oct 2024 | 36 |
|
|
Tunturi UB 8.0 Operation & User’s Manual Tunturi UB 8.0 Guide (Operation & user’s manual), @912V34 Important: Bitte beachten: Attention: Belangrijk: Nota: 19 Apr 2025 | 32 |
|
|
Crivit 310298 User Manual Manual Guide: Crivit 310298 (22I6IQ, Upd.Saturday 09-11-2024) DELTA-SPORT HANDELSKONTOR GMBH 09 Nov 2024 | 82 |
Categories:
Exercise bench
Home Gym
Fitness Equipment
Treadmill
Elliptical Trainer
Other