
PUB. DIR-0029-000A
Видеокамера HD
Руководство по
эксплуатации

2
Введение
Важные инструкции по
эксплуатации
ВНИМАНИЕ!
ВО ИЗБЕЖАНИЕ ОПАСНОСТИ ПОРАЖЕНИЯ ЭЛЕКТРИЧЕСКИМ ТОКОМ НЕ
СНИМАЙТЕ КОЖУХ (ИЛИ ЗАДНЮЮ ПАНЕЛЬ). ВНУТРИ КАМЕРЫ
НЕТ ДЕТАЛЕЙ, ПОДЛЕЖАЩИХ ОБСЛУЖИВАНИЮ ПОЛЬЗОВАТЕЛЕМ.
ОБСЛУЖИВАНИЕ ДОЛЖНО ВЫПОЛНЯТЬСЯ КВАЛИФИЦИРОВАННЫМ
ПЕРСОНАЛОМ.
ВНИМАНИЕ!
ВО ИЗБЕЖАНИЕ ОПАСНОСТИ ВОЗГОРАНИЯ ИЛИ ПОРАЖЕНИЯ ЭЛЕКТРИ-
ЧЕСКИМ ТОКОМ НЕ ДОПУСКАЙТЕ ПОПАДАНИЯ НА ИЗДЕЛИЕ ДОЖДЯ ИЛИ
ВЛАГИ.
ВНИМАНИЕ.
ДЛЯ УМЕНЬШЕНИЯ ОПАСНОСТИ ПОРАЖЕНИЯ ЭЛЕКТРИЧЕСКИМ ТОКОМ И СНИЖЕНИЯ
УРОВНЯ НЕЖЕЛАТЕЛЬНЫХ ПОМЕХ ПОЛЬЗУЙТЕСЬ ТОЛЬКО РЕКОМЕНДОВАННЫМИ
ДОПОЛНИТЕЛЬНЫМИ ПРИНАДЛЕЖНОСТЯМИ.
ВНИМАНИЕ.
ЕСЛИ ПРИБОР НЕ ИСПОЛЬЗУЕТСЯ, ОТСОЕДИНИТЕ ВИЛКУ ОТ ЭЛЕКТРИЧЕСКОЙ РОЗЕТКИ.
Во избежание опасности поражения электрическим током не допускайте попадания
на данное изделие капель или брызг.
Вилка питания от сети переменного тока выполняет функции разъединительного
устройства. Вилка питания от сети переменного тока должна быть легко доступна, чтобы
ее можно было отсоединить в случае какого-либо происшествия.
При использовании компактного блока питания на заворачивайте его и не закрывайте его
тканью, а также не помещайте его в ограниченное замкнутое пространство. В результате
нагрева может деформироваться пластмассовый корпус, что, в свою очередь, может
привести к поражению электрическим током или возгоранию.
Идентификационная табличка блока питания CA-590E расположена на его нижней
панели.
Использование любого другого устройства, кроме компактного блока
питания CA-590E, может привести к повреждению видеокамеры.

3
Только для Европейского Союза (Европейской экономической зоны).
Эти символы указывают, что данный продукт не должен
утилизироваться вместе с хозяйственно-бытовыми отходами в
соответствии с Директивой WEEE (2002/96/EC), Директивой об
аккумуляторах 2006/66/EC и/или законами Вашей страны,
осуществляющими данные Директивы.
Данное изделие доолжно быть передано в предназначенный для этого пункт сбора,
напрмер, на основе авторизованного обмена «один к одному», когда Вы покупаете
подобное новое изделие, или в авторизованное место сбора отходов электрического и
электронного оборудования, батарей и аккумуляторов для переработки. Неправильное
обращение с отходами подобного типа может иметь влияние на окружающую среду и
здоровье человека из-за потенциально опасных для здоровья веществ, которые, как
правило, тесно связаны с электрическим и электронным оборудованием.
Ваше сотрудничество в области правильной утилизации данного изделия вносит вклад в
рациональное использование природных ресурсов.
Чтобы узнать больше информации о переработке отходов батарей и аккумуляторов,
пожалуйста, обратитесь в местную городскую администрацию, орган по работе с
отходами или предприятие по утилизации отходов, или зайдите на
www.canoneurope.com/environment.
(Европейская экономическая зона: Норвегия, Исландия и Лихтенштейн)
Товарные знаки
• Логотип SD является товарным знаком. Логотип SDHC является товарным знаком.
• Microsoft и Windows являются торговыми марками или зарегистрированными торговы ми марками
компании Microsoft Corporation в США и/или других странах.
• Macintosh и Mac OS являются торговыми марками Apple Inc., зарегистрированными в США и других
странах.
• «x.v.Colour» и логотип «x.v.Colour» являются товарными знаками.
• HDMI, логотип HDMI и High-Definition Multimedia Interface являются
товарными знаками или зарегистрированными товарными знаками
корпорации HDMI Licensing LLC.
• «AVCHD» и логотип «AVCHD» являются товарными знаками корпораций
Panasonic Corporation и Sony Corporation.
• Изготовлено по лицензии компании Dolby Laboratories.
«Dolby» и знак в виде двойной буквы D являются товарными знаками компании Dolby Laboratories.
• YouTube является торговой маркой Google Inc.
• Прочие названия и изделия, не упомянутые выше, могут быть товарными знаками или
зарегистрированными товарными знаками соответствующих компаний.
• В этом устройстве используется технология exFAT, лицензированная у корпорации Microsoft.
• ИСПОЛЬЗОВАНИЕ ДАННОГО ИЗДЕЛИЯ ПО ЛЮБОМУ ДРУГОМУ НАЗНАЧЕНИЮ, КРОМЕ ПЕРСОНАЛЬНОГО
ИСПОЛЬЗОВАНИЯ ПОТРЕБИТЕЛЕМ ЛЮБЫМ ОБРАЗОМ, СООТВЕТСТВУЮЩИМ СТАНДАРТУ MPEG-2 ДЛЯ
КОДИРОВАНИЯ ВИДЕОИНФОРМАЦИИ ДЛЯ СЖАТЫХ НОСИТЕЛЕЙ, ПРИ ОТСУТСТВИИ ЛИЦЕНЗИИ НА
СООТВЕТСТВУЮЩИЕ ПАТЕНТЫ ИЗ ПОРТФЕЛЯ ПАТЕНТОВ MPEG-2 ЗАПРЕЩЕНО. УКАЗАННУЮ ЛИЦЕНЗИЮ
МОЖНО ПОЛУЧИТЬ В КОМПАНИИ MPEG LA, L.L.C., 250 STEELE STREET, SUITE 300, DENVER, COLORADO 80206.
• This product is licensed under AT&T patents for the MPEG-4 standard and may be used for encoding MPEG-4
compliant video and/or decoding MPEG-4 compliant video that was encoded only (1) for a personal and non-
commercial purpose or (2) by a video provider licensed under the AT&T patents to provide MPEG-4 compliant
video. No license is granted or implied for any other use for MPEG-4 standard.

Захватывающие возможности и новые функции, Видеозаписи высокой четкости, Двойная флеш-память предварительная съемка
Страница 4 Чат поддержки
- Изображение
- Текст
4
Захватывающие возможности и
новые функции
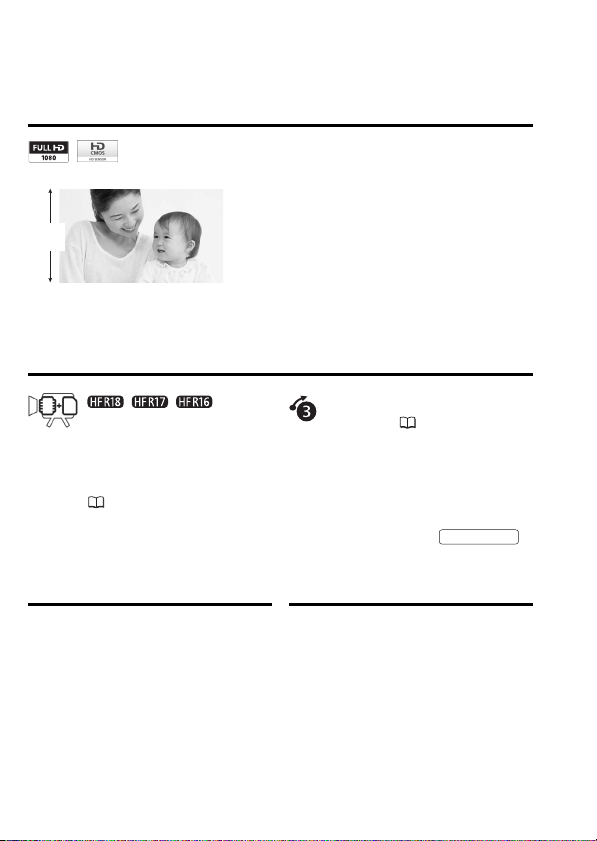
Видеозаписи высокой четкости
Установленный в видеокамере датчик
изображения высокой четкости (HD
CMOS) записывает видеоизображение с
разрешением 1920 x 1080 пикселов
2
.
Затем видеоизображение записывается
в память с высокой четкостью с
использованием спецификаций AVCHD
3
.
С Вашей новой видеокамерой HD снимать особые события из Вашей
жизни с изумительным качеством изображения и естественными
яркими цветами стало просто и весело!
/
/
Двойная флеш-память
Предварительная
съемка
(
59)
Можно записывать во
встроенную память или на
имеющиеся в продаже карты
памяти (
35).
Если включена функция
предварительной съемки,
видеокамера постоянно
записывает видеоизображение во
временную память емкостью 3 с.
При нажатии кнопки
снимаемый эпизод начинается за
3 с до начала съемки.
1
1080
строк
START/STOP
1
Символом «Full HD 1080» обозначаются видеокамеры Canon,
поддерживающие видеоизображение высокой четкости, содержащее 1080
пикселов (строк развертки) по вертикали.
2
Видеофильмы записываются с таким разрешением только при съемке в
режиме FXP. В других режимах записи изображение записывается с
разрешением 1440 x 1080 пикселов.
3
AVCHD – это стандарт записи видеоизображения высокой четкости. В
соответствии со спецификациями AVCHD видеосигнал записывается с
использованием сжатия MPEG-4 AVC/H.264, а звуковой сигнал
записывается в системе Dolby Digital.

5
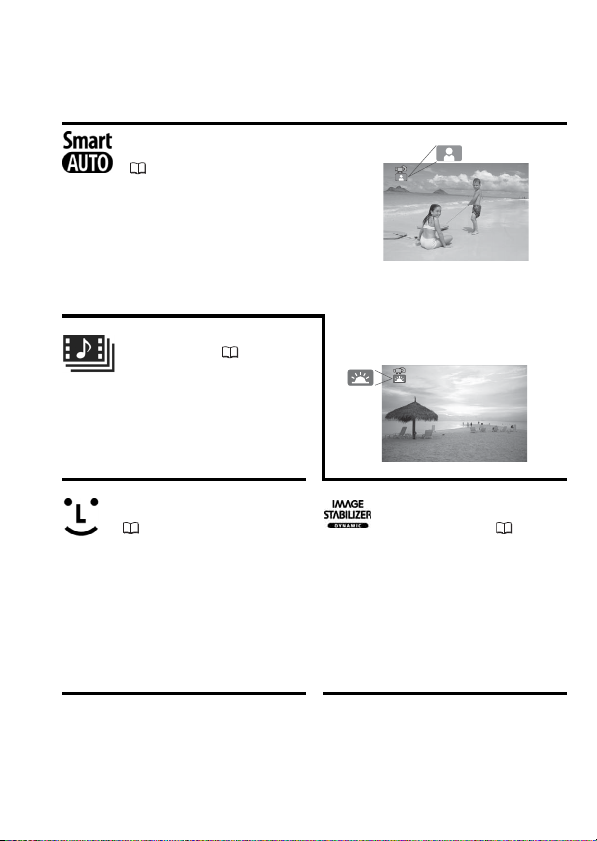
Smart AUTO
(
25)
В режиме Smart AUTO
автоматически выбираются
настройки, оптимальные для
снимаемой сцены. Вы всегда
получаете замечательные записи,
не беспокоясь о настройках.
Видеокадр
(
58)
Снимите или запишите короткие
эпизоды и создайте из них
видеоклипы с Вашим любимым
музыкальным сопровождением.
Обнаружение лица
(
63)
Стабилизация
изображения
(
138)
Видеокамера автоматически
обнаруживает лица людей и
соответствующим образом
настраивает фокусировку и
другие параметры для
достижения превосходных
результатов.
Динамичная стабилизация
изображения компенсирует
сотрясение видеокамеры при
съемке во время ходьбы. Это
обеспечивает большую свободу и
мобильность при съемке
видеофильмов.
Просто наведите
видеокамеру, и она
автоматически выберет
настройки, оптимальные
для объекта съемки

6
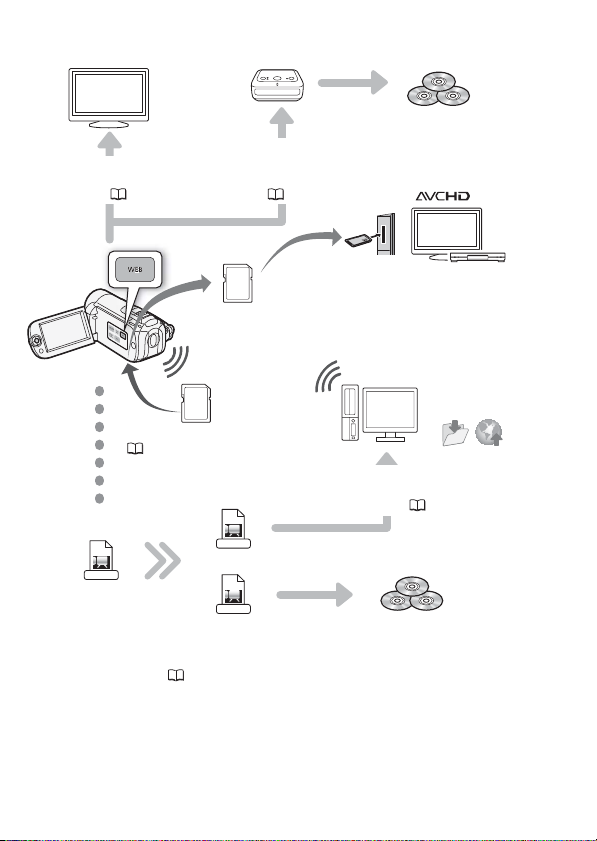
Смотрите свои записи на других устройствах
AVCHD
MPEG-2
SD-Video
Eye-Fi
SD
Подключите видеокамеру
к телевизору высокой
четкости (
112)
Подключите видеокамеру к
дополнительно приобретаемому
устройству записи DVD-дисков
DW-100 (
115, 118)
Диски AVCHD
Диски Photo DVD
Воспроизводите
видеозаписи
непосредственн
о с записанной
карты памяти
AVCHD-совместимые телевизоры
высокой четкости и цифровые
рекордеры, оснащенные гнездом
для карт памяти SD*
Используйте карту Eye-Fi
(
132) для беспроводной
загрузки записей в компьютер
или на веб-сайт для совместного
доступа к видеофильмам
Сохраните или
загрузите в
Интернет
Стандартная четкость
С помощью самой видеокамеры
преобразуйте видеофильмы высокой
четкости в файлы стандартной
четкости (
119, 129)
Высокая четкость
Стандартные
DVD-диски
Используйте прилагаемое
программное обеспечение
ImageMixer 3 SE (
113, 128)
* См. инструкцию по эксплуатации подключенного устройства. В зависимости
от используемого устройства, правильное воспроизведение может оказаться
невозможным даже на AVCHD-совместимом устройстве. В этом случае
воспроизводите записи с карты памяти с помощью данной видеокамеры.


03:46
Видеокамера Canon Legria HF R206
01:04
CANON LEGRIA HF-R106: cine mode test clips
10:40
Canon Legria HF R106 kutu açımı
03:54
Canon LEGRIA HF R106 | Full HD Video Test | 1080p
01:23
Canon Legria HF R106 Test
00:32
Canon Legria HF R106 Audio High Definition Test
Нажмите на кнопку для помощи
PUB. DIR-0029-000A
Видеокамера HD
Руководство по
эксплуатации
Введение
Важные инструкции по
эксплуатации
ВНИМАНИЕ!
ВНИМАНИЕ!
ВНИМАНИЕ.
ДЛЯ УМЕНЬШЕНИЯ ОПАСНОСТИ ПОРАЖЕНИЯ ЭЛЕКТРИЧЕСКИМ ТОКОМ И СНИЖЕНИЯ
УРОВНЯ НЕЖЕЛАТЕЛЬНЫХ ПОМЕХ ПОЛЬЗУЙТЕСЬ ТОЛЬКО РЕКОМЕНДОВАННЫМИ
ДОПОЛНИТЕЛЬНЫМИ ПРИНАДЛЕЖНОСТЯМИ.
ВНИМАНИЕ.
ЕСЛИ ПРИБОР НЕ ИСПОЛЬЗУЕТСЯ, ОТСОЕДИНИТЕ ВИЛКУ ОТ ЭЛЕКТРИЧЕСКОЙ РОЗЕТКИ.
Во избежание опасности поражения электрическим током не допускайте попадания
на данное изделие капель или брызг.
Вилка питания от сети переменного тока выполняет функции разъединительного
устройства. Вилка питания от сети переменного тока должна быть легко доступна, чтобы
ее можно было отсоединить в случае какого-либо происшествия.
При использовании компактного блока питания на заворачивайте его и не закрывайте его
тканью, а также не помещайте его в ограниченное замкнутое пространство. В результате
нагрева может деформироваться пластмассовый корпус, что, в свою очередь, может
привести к поражению электрическим током или возгоранию.
Идентификационная табличка блока питания CA-590E расположена на его нижней
панели.
ВО ИЗБЕЖАНИЕ ОПАСНОСТИ ПОРАЖЕНИЯ ЭЛЕКТРИЧЕСКИМ ТОКОМ НЕ
СНИМАЙТЕ КОЖУХ (ИЛИ ЗАДНЮЮ ПАНЕЛЬ). ВНУТРИ КАМЕРЫ
НЕТ ДЕТАЛЕЙ, ПОДЛЕЖАЩИХ ОБСЛУЖИВАНИЮ ПОЛЬЗОВАТЕЛЕМ.
ОБСЛУЖИВАНИЕ ДОЛЖНО ВЫПОЛНЯТЬСЯ КВАЛИФИЦИРОВАННЫМ
ПЕРСОНАЛОМ.
ВО ИЗБЕЖАНИЕ ОПАСНОСТИ ВОЗГОРАНИЯ ИЛИ ПОРАЖЕНИЯ ЭЛЕКТРИЧЕСКИМ ТОКОМ НЕ ДОПУСКАЙТЕ ПОПАДАНИЯ НА ИЗДЕЛИЕ ДОЖДЯ ИЛИ
ВЛАГИ.
Использование любого другого устройства, кроме компактного блока
питания CA-590E, может привести к повреждению видеокамеры.
2
Только для Европейского Союза (Европейской экономической зоны).
Эти символы указывают, что данный продукт не должен
утилизироваться вместе с хозяйственно-бытовыми отходами в
соответствии с Директивой WEEE (2002/96/EC), Директивой об
аккумуляторах 2006/66/EC и/или законами Вашей страны,
осуществляющими данные Директивы.
Данное изделие доолжно быть передано в предназначенный для этого пункт сбора,
напрмер, на основе авторизованного обмена «один к одному», когда Вы покупаете
подобное новое изделие, или в авторизованное место сбора отходов электрического и
электронного оборудования, батарей и аккумуляторов для переработки. Неправильное
обращение с отходами подобного типа может иметь влияние на окружающую среду и
здоровье человека из-за потенциально опасных для здоровья веществ, которые, как
правило, тесно связаны с электрическим и электронным оборудованием.
Ваше сотрудничество в области правильной утилизации данного изделия вносит вклад в
рациональное использование природных ресурсов.
Чтобы узнать больше информации о переработке отходов батарей и аккумуляторов,
пожалуйста, обратитесь в местную городскую администрацию, орган по работе с
отходами или предприятие по утилизации отходов, или зайдите на
www.canoneurope.com/environment.
(Европейская экономическая зона: Норвегия, Исландия и Лихтенштейн)
Товарные знаки
• Логотип SD является товарным знаком. Логотип SDHC является товарным знаком.
• Microsoft и Windows являются торговыми марками или зарегистрированными торговы ми марками
компании Microsoft Corporation в США и/или других странах.
• Macintosh и Mac OS являются торговыми марками Apple Inc., зарегистрированными в США и других
странах.
• «x.v.Colour» и логотип «x.v.Colour» являются товарными знаками.
• HDMI, логотип HDMI и High-Definition Multimedia Interface являются
товарными знаками или зарегистрированными товарными знаками
корпорации HDMI Licensing LLC.
• «AVCHD» и логотип «AVCHD» являются товарными знаками корпораций
Panasonic Corporation и Sony Corporation.
• Изготовлено по лицензии компании Dolby Laboratories.
«Dolby» и знак в виде двойной буквы D явл яются товарными знаками компании Dolby Laboratories.
• YouTube является торговой маркой Google Inc.
• Прочие названия и изделия, не упомянутые выше, могут быть товарными знаками или
зарегистрированными товарными знаками соответствующих компаний.
• В этом устройстве используется технология exFAT, лицензированная у корпорации Microsoft.
• ИСПОЛЬЗОВАНИЕ ДАННОГО ИЗДЕЛИЯ ПО ЛЮБОМУ ДРУГОМУ НАЗНАЧЕНИЮ, КРОМЕ ПЕРСОНАЛЬНОГО
ИСПОЛЬЗОВАНИЯ ПОТРЕБИТЕЛЕМ ЛЮБЫМ ОБРАЗОМ, СООТВЕТСТВУЮЩИМ СТАНДАРТУ MPEG-2 ДЛЯ
КОДИРОВАНИЯ ВИДЕОИНФОРМАЦИИ ДЛЯ СЖАТЫХ НОСИТЕЛЕЙ, ПРИ ОТСУТСТВИИ ЛИЦЕНЗИИ НА
СООТВЕТСТВУЮЩИЕ ПАТЕНТЫ ИЗ ПОРТФЕЛЯ ПАТЕНТОВ MPE G-2 ЗАПРЕЩЕНО. УКАЗАННУЮ ЛИЦЕНЗИЮ
МОЖНО ПОЛУЧИТЬ В КОМПАНИИ MPEG LA, L.L.C., 250 STEELE STREET, SUITE 30 0, DENVER, COLORADO 80206.
• This product is licensed under AT&T patents for the MPEG-4 standard and may be used for encoding MPEG-4
compliant video and/or decoding MPEG-4 compl iant video that was encoded only (1) for a personal and noncommercial purpose or (2) by a video provider licensed under the AT&T patents to provide MPEG-4 compliant
video. No license is granted or implied for any other use for MPEG-4 standard.
3
Захватывающие возможности и
новые функции
1
Видеозаписи высокой четкости
Установленный в видеокамере датчик
изображения высокой четкости (HD
1080
строк
С Вашей новой видеокамерой HD снимать особые события из Вашей
жизни с изумительным качеством изображения и естественными
яркими цветами стало просто и весело!
CMOS) записывает видеоизображение с
разрешением 1920 x 1080 пикселов
Затем видеоизображение записывается
в память с высокой четкостью с
использованием спецификаций AVCHD
2
.
3
.
//
Двойная флеш-память
Можно записывать во
встроенную память или на
имеющиеся в продаже карты
памяти ( 35).
1
Символом «Full HD 1080» обозначаются видеокамеры Canon,
поддерживающие видеоизображение высокой четкости, содержащее 1080
пикселов (строк развертки) по вертикали.
2
Видеофильмы записываются с таким разрешением только при съемке в
режиме FXP. В других режимах записи изображение записывается с
разрешением 1440 x 1080 пикселов.
3
AVCHD – это стандарт записи видеоизображения высокой четкости. В
соответствии со спецификациями AVCHD видеосигнал записывается с
использованием сжатия MPEG-4 AVC/H.264, а звуковой сигнал
записывается в системе Dolby Digital.
Предварительная
съемка (59)
Если включена функция
предварительной съемки,
видеокамера постоянно
записывает видеоизображение во
временную память емкостью 3 с.
При нажатии кнопки
снимаемый эпизод начинается за
3 с до начала съемки.
START/STOP
4
Smart AUTO
( 25)
В режиме Smart AUTO
автоматически выбираются
настройки, оптимальные для
снимаемой сцены. Вы всегда
получаете замечательные записи,
не беспокоясь о настройках.
Видеокадр ( 58)
Снимите или запишите короткие
эпизоды и создайте из них
видеоклипы с Вашим любимым
музыкальным сопровождением.
Просто наведите
видеокамеру, и она
автоматически выберет
настройки, оптимальные
для объекта съемки
Обнаружение лица
(63)
Видеокамера автоматически
обнаруживает лица людей и
соответствующим образом
настраивает фокусировку и
другие параметры для
достижения превосходных
результатов.
Стабилизация
изображения (138)
Динамичная стабилизация
изображения компенсирует
сотрясение видеокамеры при
съемке во время ходьбы. Это
обеспечивает большую свободу и
мобильность при съемке
видеофильмов.
5
Смотрите свои записи на других устройствах
Подключите видеокамеру к
Подключите видеокамеру
к телевизору высокой
четкости ( 112)
дополнител ьно приобрета емому
устройству записи DVD-дисков
DW-100 ( 115, 118)
Диски AVCHD
Диски Photo DVD
SD
AVCHD-совместимые телевизоры
высокой четкости и цифровые
Воспроизводите
видеозаписи
непосредственн
о с записанной
карты памяти
Eye-Fi
рекордеры, оснащенные гнездом
для карт памяти SD*
Сохраните или
загрузите в
Интернет
Используйте карту Eye-Fi
( 132) для беспроводной
загрузки записей в компьютер
или на веб-са йт для совместного
доступа к видеофильмам
Высокая четкость
AVCHD
С помощью самой видеокамеры
преобразуйте видеофильмы высокой
Стандартная четкость
MPEG-2
SD-Video
Используйте прилагаемое
программное обеспечение
ImageMixer 3 SE ( 113, 128)
Стандартные
DVD-диски
четкости в файлы стандартной
четкости ( 119, 129)
* См. инструкцию по эксплуатации подключенного устройства. В зависимости
от используемого устройства, правильное воспроизведение может оказаться
невозможным даже на AVCHD-совместимом устройстве. В этом случае
воспроизводите записи с карты памяти с помощью данной видеокамеры.
6

Содержание
Введение
4 Захватывающие возможности и новые функции
11 О данном Руководстве
13 Знакомство с видеокамерой
13 Дополнительные принадлежности и компакт-диски из
15 Названия компонентов
Подготовка
18 Начальная подготовка
18 Зарядка аккумулятора
21 Подготовка дополнительных принадлежностей
23 Настройка положения и яркости ЖК-дисплея
25 Основные операции с видеокамерой
25 Режимы работы
28 Джойстик и подсказка по его функциям
29 Использование меню
31 Настройки при первом включении
31 Установка даты и времени
32 Изменение языка
32 Изменение часового пояса
33 Использование карты памяти
33 Карты памяти, которые можно использовать с
34 Установка и извлечение карты памяти
35 / / Выбор памяти для записей
37 Инициализация встроенной памяти (только /
комплекта поставки
данной видеокамерой
/ ) или карты памяти
Содержание 7

Видео
39 Основные функции съемки
39 Съемка видеофильмов
40 Выбор качества видео (режим записи)
41 Зумирование
42 Функция быстрого запуска
44 Основные функции воспроизведения
44 Воспроизведение видеофильмов
46 Выбор записей для воспроизведения
49 Поиск эпизодов
51 Предварительный выбор записей на индексном
53 Удаление эпизодов
55 Расширенные функции
55 Программы съемки программной автоэкспозиции и
57 Режим кино: придайте своим записям
58 Видеокадр
59 Функция предварительной съемки
60 Таймер автоспуска
61 Ручная настройка экспозиции
62 Ручная настройка фокусировки
63 Обнаружение лица
64 Баланс белого
66 Эффекты изображения
67 Цифровые эффекты
68 Индикация на экране и код данных
69 Уровень записи звука
71 Выбор начальной точки воспроизведения
74 Операции со списком воспроизведения и
74 Воспроизведение записей с фоновым музыкальным
77 Разделение эпизодов
78 Редактирование списка воспроизведения:
8 Содержание
экране
специальных сюжетов
кинематографический вид
эпизодами
сопровождением
добавление, удаление, перемещение и
воспроизведение

81 Извлечение эпизодов «Видеокадр» из видеофильма
83 / / Копирование эпизодов на карту
памяти
Фотографии
85 Основные функции съемки
85 Съемка фотографий
86 Выбор размера и качества фотографий
88 Основные функции воспроизведения
88 Просмотр фотографий
90 Удаление фотографий
92 Увеличение фотографий во время
воспроизведения
93 Дополнительные функции
93 Слайд-шоу
94 Поворот фотографий
94 Гистограмма
95 Извлечение фотографий из видеофильма
96 Защита фотографий
98 / / Копирование фотографий на
карту памяти
101 Печать фотографий
101 Печать фотографий (прямая печать)
105 Заказы печати
Внешние соединения
108 Разъемы на видеокамере
109 Схемы подключения
112 Просмотр на экране телевизора
113 Сохранение записей и их совместное
использование
113 Сохранение записей в компьютере
115 Сохранение видеофильмов на диски высокой
118 / / Сохранение видеофильмов на
четкости (диски AVCHD/Blu-ray)
диски стандартной четкости (DVD)
Содержание 9

124 Создание дисков Photo DVD
125 Воспроизведение дисков с помощью устройства
127 Копирование записей на внешний
128 Загрузка видеофильмов на веб-сайты для
записи DVD-дисков DW-100
видеомагнитофон
совместного использования
Дополнительная информация
134 Приложение: перечень пунктов меню
134 Меню FUNC.
137 Меню настройки
148 Приложение. Значки и индикация на экране
152 Устранение неполадок
152 Устранение неполадок
159 Список сообщений
169 Правила обращения
169 Правила обращения
174 Обслуживание/прочее
175 Использование видеокамеры за рубежом
176 Общая информация
176 Дополнительные принадлежности
177 Дополнительно приобретаемые принадлежности
180 Технические характеристики
184 Алфавитный указатель
10 Содержание
О данном Руководстве
Благодарим за приобретение видеокамеры Canon LEGRIA HF R18/
LEGRIA HF R17/LEGRIA HF R16/LEGRIA HF R106. Перед началом
работы с видеокамерой внимательно прочитайте данное
Руководство и сохраните его в качестве справочника. В случае
сбоев в работе видеокамеры см. раздел Устранение неполадок
( 152).
Обозначения, используемые в данном Руководстве
• ВАЖНО: Предупреждения, относящиеся к эксплуатации
видеокамеры.
• ПРИМЕЧАНИЯ: Информация, дополняющая основные
инструкции по выполнению операций.
• ЧТО СЛЕДУЕТ ПРОВЕРИТЬ: Ограничения или требования,
относящиеся к описываемой функции.
• : Ссылка на страницу данного Руководства.
Для выполнения некоторых операций потребуется обращаться и
к другим руководствам. Такие ссылки обозначаются
приведенными ниже значками.
PHOTO
DW-100
• : Текст, относящийся только к моделям, указанным в
• В данном Руководстве используются следующие термины.
• Фотографии, используемые в данном Руководстве, являются
См. «Прикладным программам для фотографий»,
Руководство по эксплуатации, записанное в виде
файла PDF на диске, прилагаемом к видеокамере.
См. руководство по эксплуатации дополнительно
приобретаемого устройства записи DVD-дисков
DW-100.
значке.
Если не указано конкретно «карта памяти» или «встроенная
память», то термин «память» относится к обоим типам памяти.
Под термином «эпизод» понимается один блок видеофильма с
момента нажатия кнопки для начала записи до
повторного нажатия этой кнопки для приостановки записи.
имитацией и сняты с помощью фотокамеры. Если не указано
иное, иллюстрации и значки меню относятся к модели .
START/STOP
Введение 11
Таймер автоспуска
Отображается символ .
Для видеофильмов: нажмите .
Видеокамера начинает съемку после 10-секундного обратного
отсчета. Обратный отсчет отображается на экране.
Для фотографий: нажмите кнопку – сначала наполовину
для включения автофокусировки, затем полностью.
Видеокамера снимет фотографию после 10-секундного обратного
отсчета. Обратный отсчет отображается на экране.
• После начала обратного отсчета при выполнении любого из
указанных ниже действий таймер автоспуска отменяется.
— Нажатие кнопки (при съемке видеофильмов) или
полное нажатие кнопки (при съем ке фотографий).
Режимы работы:
FUNC.
FUNC.
START/STOP
PHOTO
START/STOP
PHOTO
Скобки [ ] используются для
обозначения пунктов меню,
отображаемых на экране.
Названия большинства
кнопок и переключателей
заключаются в рамку
«кнопки».
Например, .
Стрелка служит для сокращенного отображения порядка выбора
пунктов меню. Подробные инструкции по использованию меню см. в
разделе Использование меню ( 29). Краткую сводку пунктов меню
и их значений см. в приложении Перечень пунктов меню ( 134).
Значок вида означает, что функция доступна в указанном режиме
работы, а значок вида означает, что функция недоступна.
Подробные пояснения см. в разделе Режимы работы ( 25).
FUNC.
12 Введение
Знакомство с видеокамерой
Дополнительные принадлежности и компакт-диски
из комплекта поставки
В комплект поставки видеокамеры входят следующие
дополнительные принадлежности.
XКомпактный блок питания CA-590E
(с кабелем питания)
Аккумулятор BP-2L5W
XUSB-кабель IFC-300PCU
СтереофоническийW
Желтый • Красный • Белый штекеры
XКомпонентный кабель CTC-100/S
Красный • Зеленый • Синий штекеры
видеокабель STV-250NW
Краткое руководствоW
Введение 13

В комплект поставки видеокамеры входят следующие компакт-диски
и программное обеспечение.
• Компакт-диск PIXELA Application – Disc 1* и Руководство по
установке «PIXELA Applications»
— ImageMixer 3 SE Transfer Utilities — программное обеспечение для
сохранения и передачи видеофильмов и музыкальных файлов,
которые можно использовать как фоновое музыкальное
сопровождение.
• Компакт-диск PIXELA Application – Disc 2*
— ImageMixer 3 SE Video Tools – программное обеспечение для
систематизации, редактирования и воспроизведения
видеофильмов.
• Компакт-диск Руководство по эксплуатации/Прикладным
программам для фотографий Ver. 34.0*/Диск с музыкальными
файлами (обозначаемый в данном Руководстве как «диск,
прилагаемый к видеокамере»)
— Руководство по эксплуатации – полный вариант руководства по
эксплуатации видеокамеры (настоящий PDF-файл).
— Прикладным программам для фотографий – программное
обеспечение для сохранения, систематизации и печати
фотографий.
— Музыкальные данные – музыкальные файлы, которые можно
использовать для фонового сопровождения во время
воспроизведения. Эти музыкальные файлы предназначены
исключительно для использования с прилагаемым программным
обеспечением ImageMixer 3 SE. Данный диск не может
воспроизводиться в проигрывателях компакт-дисков.
Подробнее см. руководство по программному обеспечению
«ImageMixer 3 SE».
* Данный компакт-диск содержит руководство по работе с программным
обеспечением (в виде PDF-файла).
14 Введение
Названия компонентов
Вид слева
Вид справа
Вид спереди
Кнопка (камера/
1
воспроизведение) ( 27)
Кнопка VIDEO SNAP (видеокадр)
2
(58)
// Кнопка WEB
3
(128)
Кнопка ( 25)/
4
// Кнопка INDEX
SEL. (выбор индекса) ( 46)/
Кнопка PLAYLIST ( 46)
Кнопка DISP. (индикация на экране)
5
(68)
Индикатор обращения ACCESS
6
(39, 85)
Крепление ремня ( 21)
7
Динамик ( 44)
8
Ручка ( 21)
9
Стереомикрофон ( 69)
Aq
Датчик мгновенной
Aa
автофокусировки (I.AF) ( 138)
Введение 15
Вид сверху
Панель ЖК-дисплея
Вид сзади
Рычаг зумирования ( 41)
As
Кнопка PHOTO ( 85)
Ad
Кнопка POWER
Af
Индикатор ON/OFF (CHG) (зарядка):
Ag
Зеленый – Вкл.
Оранжевый – режим ожидания
(42)
Красный – зарядка ( 18)
Экран ЖК-дисплея ( 23)
Ah
Джойстик ( 28)
Aj
Кнопка FUNC. ( 29, 134)
Ak
Al Разъем USB ( 108, 111)
Разъем HDMI OUT ( 108, 109)
Sq
Разъем COMPONENT OUT
Sa
( 108, 110)
Разъем AV OUT ( 108, 111)
Ss
Разъем DC IN ( 18)
Sd
Sf Кнопка START/STOP ( 39)
16 Введение
Вид снизу
Sg Штативное гнездо ( 170)
Sh Гнездо карты памяти ( 34)
Sj Отсек аккумулятора
Sk Защелка фиксатора аккумулятора
Sl Крышка отсека аккумулятора/
крышка гнезда карты памяти
Dq Серийный номер
Наклейка с серийным номером
находится на крышке отсека
аккумулятора.
Введение 17
Подготовка
В этой главе, позволяющей лучше познакомиться с
видеокамерой, рассматриваются основные операции,
такие как перемещение по меню и настройки при первом
включении.
Начальная подготовка
Зарядка аккумулятора
Питание видеокамеры возможно от аккумулятора или
непосредственно от компактного блока питания. Перед
использованием аккумулятора его необходимо зарядить.
Приблизительное время зарядки и
время съемки/воспроизведения с
полностью заряженным аккумулятором
см. в таблице на стр. 177 – 178.
1 Подсоедините кабель питания к
компактному блоку питания.
2 Подсоедините компактный блок
питания к электрической розетке.
3 Подсоедините компактный блок
питания к разъему DC IN
видеокамеры.
• При подсоединении кабеля
компактного блока питания к
видеокамере (
совместите треугольные метки на
разъемах кабеля и видеокамеры ( ).
3
) обязательно
4
Разъем
DC IN
Индикатор ON/OFF
(CHG) (зарядка)
4 Сдвиньте крышку отсека
аккумулятора в сторону от
объектива и откройте ее.
18 Подготовка
5 Снимите крышку клемм с аккумулятора.
6 Полностью вставьте
аккумулятор в отсек и аккуратно
нажмите до фиксации со
щелчком.
7 Закройте крышку и сдвиньте ее в
сторону объектива до фиксации
со щелчком.
8 Зарядка начинается при
выключении видеокамеры.
• Если видеокамера была
включена, при ее выключении
зеленый индикатор ON/OFF
7
(CHG) выключается. Через
некоторое время индикатор ON/
OFF (CHG) начинает мигать
красным цветом (аккумулятор
заряжается). После того как
аккумулятор полностью
зарядится, индикатор ON/OFF
(CHG) выключается.
• Если индикатор часто мигает, см.
раздел Устранение неполадок ( 152).
Снятие аккумулятора
1 Сдвиньте крышку отсека
аккумулятора в сторону от
объектива и откройте ее.
2Нажмите защелку
фиксатора аккумулятора и
извлеките аккумулятор.
3 Закройте крышку и
сдвиньте ее в сторону
объектива до фиксации со
щелчком.
Защелка фиксатора аккумулятора
6
Подготовка 19

ВАЖНО
• Перед подсоединением и отсоединением компактного блока
питания выключайте видеокамеру. После нажатия кнопки
POWER
для выключения видеокамеры производится обновление важных
данных в памяти. Обязательно дождитесь выключения зеленого
индикатора ON/OFF(CHG).
• При первом использовании аккумулятора полностью зарядите
его, а затем работайте с видео-камерой до полной разрядки
аккумулятора.
• Не подключайте к разъему DC IN видеокамеры или к компактному
блоку питания никакое другое электрическое оборудование, кроме
явно рекомендованного для использования с этой видеокамерой.
• Во избежание отказа и излишнего нагрева оборудования не
подсоединяйте входящий в комплект поставки компактный блок
питания к преобразователям напряжения (во время зарубежных
поездок) или к специальным источникам питания (например, к
розеткам на борту самолетов или кораблей, к инверторам и т.п.).
ПРИМЕЧАНИЯ
• Аккумулятор заряжается только при выключенной видеокамере.
• Аккумулятор рекомендуется заряжать при температуре от 10 до
30 °C. При температуре менее 0 °C или более 40 °C зарядка не
начинается.
• Если оставшееся время работы от аккумулятора является
критичным, для питания видеокамеры можно использовать
компактный блок питания, чтобы аккумулятор не разряжался.
• Поскольку заряженный аккумулятор постепенно самопроизвольно
разряжается, заряжайте его в день использования или накануне,
чтобы обеспечить полный заряд.
• Рекомендуется подготовить запасные аккумуляторы в расчете на
время съемки, в 2 – 3 раза превышающее планируемое.
20 Подготовка
Подготовка дополнительных принадлежностей
Закрепите ремень ручки.
Отрегулируйте ремень ручки таким
образом, чтобы указательный палец
доставал до рычага зумирования, а
большой палец доставал до кнопки
START/STOP
Снятие ремня ручки
1 Поднимите клапан ручки и отсоедините ремень от подушечки
застежки-«липучки».
2 Потянув за ремень, извлеките его сначала из переднего
кронштейна видеокамеры, затем из ручки и, наконец, из
заднего кронштейна видеокамеры.
.
Подготовка 21
Закрепление дополнительно приобретаемого наручного
ремня
Пропустите крепящий конец
наручного ремня через задний
кронштейн видеокамеры, затем
пропустите наручный ремень сквозь
петлю и затяните его.
Можно также закрепить наручный
ремень на креплении ремня ручки, и
использовать оба ремня для
дополнительного удобства и защиты.
Закрепление дополнительно приобретаемого наплечного
ремня
Пропустите концы наплечного ремня через крепления на ремне
ручки и настройте длину наплечного ремня.
22 Подготовка
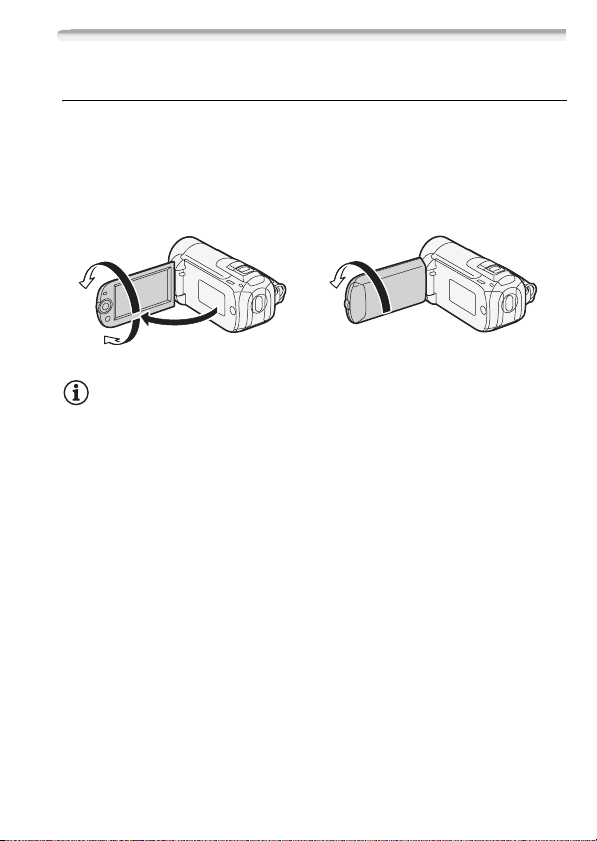
Настройка положения и яркости ЖК-дисплея
Поворот панели ЖК-дисплея
Откройте ЖК-дисплей на 90°.
• ЖК-дисплей можно повернуть на 90° вниз.
• ЖК-дисплей можно развернуть на 180° в сторону объектива.
Разворот ЖК-дисплея на 180° может быть полезен, если
требуется включить самого себя в кадр при съемке с таймером
автоспуска.
180°
180°
90°
Объект съемки может контролировать
изображение на экране ЖК-дисплея.
ПРИМЕЧАНИЯ
• Экран ЖК-дисплея: экран изготавливается с использованием
высокоточных технологий, и более 99,99% пикселов
работоспособны. Менее 0,01 % пикселов могут иногда
самопроизвольно загораться или отображаться в виде черных,
красных, синих или зеленых точек. Это не оказывает никакого
влияния на записываемое изображение и не является
неисправностью.
Подготовка 23
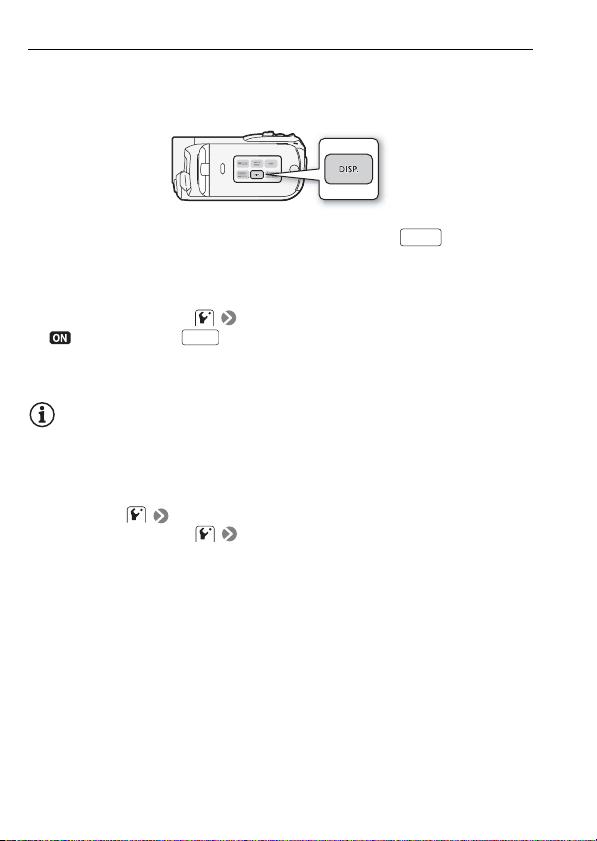
Подсветка ЖК-дисплея
Во время съемки при ярком освещении может быть сложно
пользоваться ЖК-дисплеем. Включите подсветку ЖК-дисплея,
чтобы увеличить его яркость.
При включенной видеокамере нажмите кнопку и
DISP.
удерживайте ее нажатой более 2 с.
• Повторите эту операцию для выключения подсветки ЖК-дисплея
(Нормальный) или ее включения (Яркий).
• Если для параметра [Диммер экрана ЖКД] задано значение
[ Вкл] и кнопка удерживается нажатой более 2 с,
DISP.
затемнение экрана ЖК-дисплея отключается и восстанавливается
предыдущее значение яркости.
ПРИМЕЧАНИЯ
• Яркость ЖК-дисплея не влияет на яркость записей.
• Использование повышенной яркости сокращает эффективное
время работы от аккумулятора.
• Яркость экрана ЖК-дисплея можно настраивать с помощью
параметра [Яркость ЖКД] или можно затемнить экран с
помощью параметра [Диммер экрана ЖКД] для
использования в местах, в которых свет от экрана ЖК-дисплея
может мешать.
24 Подготовка
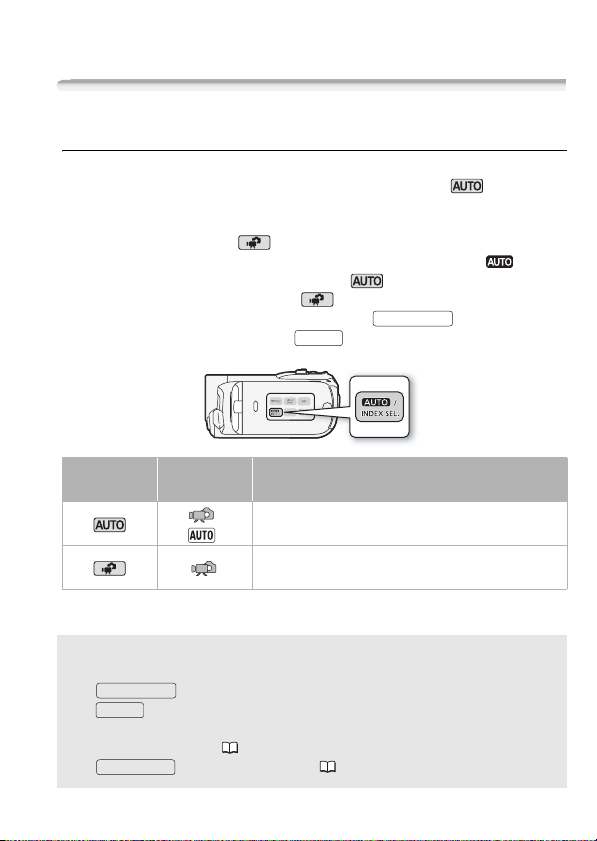
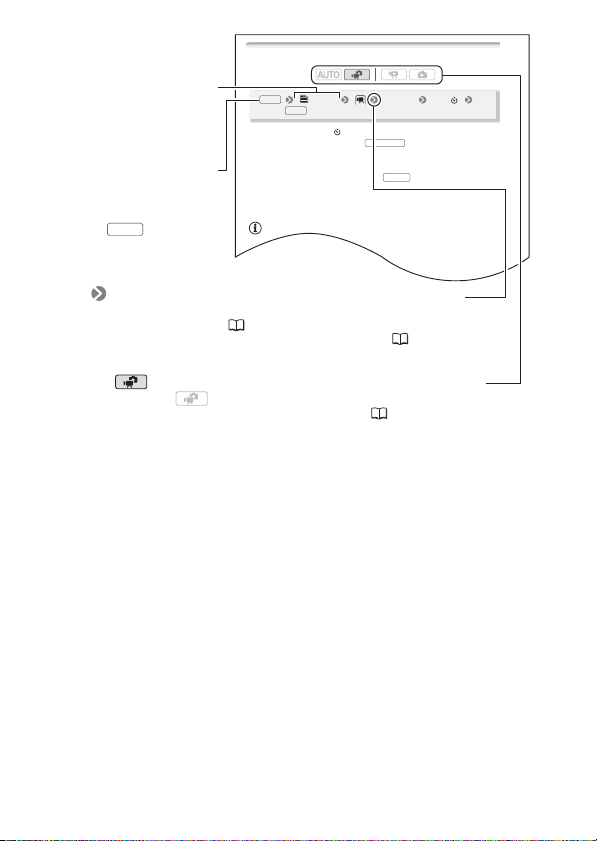
Основные операции с видеокамерой
Режимы работы
Съемка
В видеокамере предусмотрены два базовых режима съемки
видеофильмов и фотографий: режим Smart AUTO ( ) для
начинающих или для случаев, когда нет необходимости
заниматься подробной настройкой параметров видеокамеры, и
режим гибкой съемки ( ), позволяющий вносить требуемые
изменения в настройки видеокамеры. Нажмите кнопку для
переключения видеокамеры в режим , нажмите эту кнопку
еще раз для возврата в режим . В обоих режимах можно
снимать видеофильмы, нажимая кнопку , или
фотографии, нажимая кнопку .
PHOTO
START/STOP
Режим
работы
* Отображаемый значок режима изменяется в соответствии с оптимальным
режимом, выбранным функцией Smart AUTO.
Значок на
экране
*
Выполняемая операция
Простая съемка видеофильмов и фотографий.
Съемка видеофильмов и фотографий с полным
доступом к меню и расширенным функциям.
О режиме Smart AUTO
• В этом режиме доступны только следующие кнопки/функции.
START/STOP
— для съемки видеофильмов.
PHOTO
— для съемки фотографий.
— Рычаг зумирования.
— Быстрый запуск ( 42).
VIDEO SNAP
— для видеокадров ( 58).
Подготовка 25
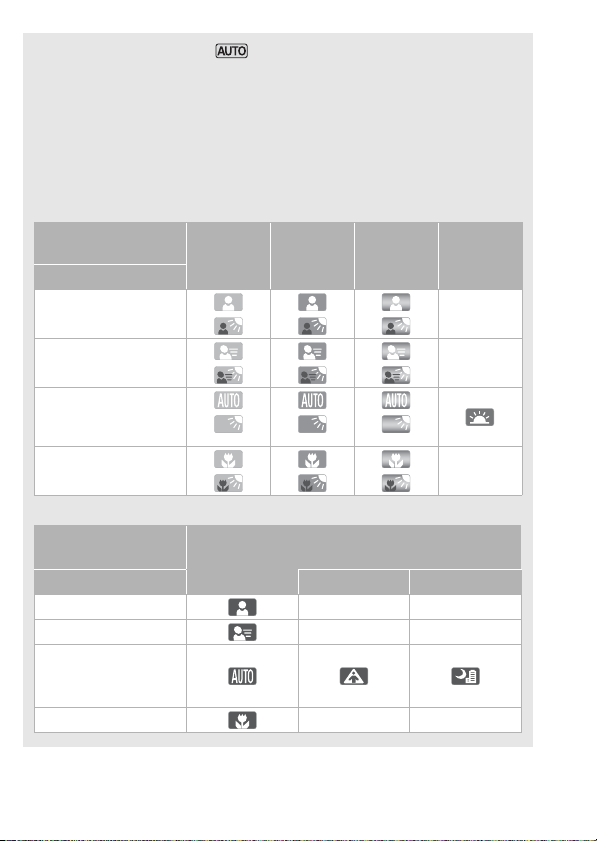
• При съемке в режиме видеокамера автоматически
определяет нужные характеристики объекта, заднего плана,
условий освещения и т. д. Затем видеокамера настраивает
различные параметры (среди прочего, фокусировку,
экспозицию, цвета, стабилизацию изображения и качество
изображения), выбирая оптимальные настройки для снимаемого
эпизода. Значок режима Smart AUTO меняется на один из
следующих значков.
Значки Smart AUTO
Задний план →
(цвет значка)
Объект ↓
Люди (неподвижные)
Люди (движущиеся)
Объекты, отличные от
людей, такие как
пейзажи
Близкие объекты
Значок в скобках отображается в условиях контрового света.
Задний план →
(цвет значка)
Объект ↓ Прожектор Ночная сцена
Люди (неподвижные) – –
Люди (движущиеся) – –
Объекты, отличные от
людей, такие как
пейзажи
Близкие объекты – –
Яркий
(серый)
() () ()
() () ()
() () ()
() () ()
Синее небо
(светло-
синий)
Темный (темно-синий)
Яркие цвета
(зеленый/
красный)
Закаты
(оранжевый)
–
–
–
26 Подготовка
ПРИМЕЧАНИЯ
• В режиме доступ к меню невозможен, но можно заранее
изменить указанные ниже параметры.
— Режим записи видеофильмов
— Размер/качество фотографий
— / / Выбранный носитель для видеофильмов/
фотографий
— Длительность видеокадров.
— Автоматическая длительная выдержка
— Все настройки на вкладках , и меню настройки.
• Даже в режиме гибкой съемки видеокамера может помочь
сделать правильные настройки. Например, можно использовать
программы съемки специальных сюжетов ( 55) для установки
сразу всех настроек, оптимальных для специальных условий
съемки.
• В некоторых условиях отображаемый на экране значок Smart
AUTO может не соответствовать фактическому сюжету. В
частности, при наличии оранжевого или синего заднего плана
может отображаться значок «Закат» или один из значков «Синее
небо», при этом цвета могут выглядеть неестественными. В таком
случае рекомендуется снимать в режиме [ Программная
автоэкспоз.] ( 55).
Воспроизведение
Для переключения видеокамеры между режимами камеры
(съемки) и воспроизведения нажимайте кнопку (камера/
воспроизведение). Нажав кнопку на выключенной
видео-камере, можно включить ее сразу в режиме
воспроизведения.
Подготовка 27
Режим
работы
Значок
на экране
Нажмите
кнопку
Выполняемая операция
Воспроизведение видеофильмов.
Просмотр фотографий.
ПРИМЕЧАНИЯ
• / / При переключении в режим воспроизведения
выбирается память, использовавшаяся в данный момент для
съемки.
Джойстик и подсказка по его функциям
Используйте джойстик для работы с меню видеокамеры.
Для выбора параметра или
изменения его значения отклоняйте
джойстик вверх, вниз, влево или
вправо ( , ).
Для сохранения параметров или
подтверждения операции нажмите на
сам джойстик ( ). На экранах меню
это обозначается значком .
Если на экране отсутствует подсказка по функциям джойстика,
нажмите или нажмите джойстик ( , ) для ее отображения.
Отображаемая функция зависит от режима работы.
• Режим или : выберите ( ) функцию и нажмите для
изменения настройки. Для некоторых функций потребуется
выполнить дальнейшие настройки ( ).
• Режим : сначала выберите ( ) «строку» функций; затем
нажмите для включения находящейся в середине функции
или нажмите джойстик ( или ) для включения функции с
левой или правой стороны строки соответственно.
Через 2 с подсказка по функциям джойстика сворачивается. Даже
если подсказка по функциям джойстика свернута, можно
настраивать или включать/выключать выбранную функцию;
можно также развернуть ( ) подсказку по функциям джойстика
для выбора другой функции или полностью скрыть ( ) подсказку.
28 Подготовка
Использование меню
Многие функции видеокамеры можно
настраивать в меню, открывающемся
при нажатии кнопки . В режиме
доступ к меню невозможен и, за
немногими исключениями, для
большинства параметров меню
восстанавливаются значения по
умолчанию.
Подробнее доступные пункты меню и их значения рассматриваются
в приложении Перечень пунктов меню (134).
Выбор пункта в меню FUNC.
Ниже приведен пример выбора пункта меню FUNC. в режиме
. В режимах воспроизведения порядок выполнения операций
зависит от выбранной функции, поэтому при необходимости см.
соответствующую главу.
1Нажмите кнопку .
2 Выберите ( ) в левом столбце
значок функции, которую
требуется изменить.
Недоступные пункты меню
отображаются серым цветом.
3 Выберите ( ) требуемую настройку из списка значений,
отображаемых в нижней строке.
• Выбранная настройка выделяется оранжевым цветом.
• Для некоторых настроек требуется сделать дополнительный
выбор и/или нажать . Следуйте дополнительным указаниям,
отображаемым на экране (например, значок , небольшие
стрелки и т.п.).
4 Нажмите кнопку для сохранения настроек и закрытия
меню.
Нажав кнопку , можно закрыть меню в любой момент.
FUNC.
FUNC.
FUNC.
FUNC.
Подготовка 29
Выбор пунктов в меню настройки
1 Нажмите кнопку .
2 Выберите ( , ) пункт
[ Меню] и нажмите для
открытия меню настройки.
Можно также сразу открыть экран
меню настройки, нажав кнопку
FUNC.
и удерживая ее нажатой
долее 1 с.
3 Выберите вкладку ( ) требуемого меню.
4 Выберите ( ) параметр, значение которого требуется
изменить, и нажмите кнопку .
• Оранжевая полоса выбора указывает текущий выбранный пункт
меню. Недоступные пункты меню отображаются серым цветом.
• Для выбора другого меню (шаг 3) переместите ( ) оранжевую
рамку выбора на вкладки в верхней части экрана.
5 Выберите ( , ) требуемое значение и нажмите для
сохранения настройки.
6 Нажмите кнопку .
Нажав кнопку , можно закрыть меню в любой момент.
FUNC.
FUNC.
FUNC.
30 Подготовка
Loading…
View the manual for the Canon Legria HF R106 here, for free. This manual comes under the category camcorders and has been rated by 7 people with an average of a 8.9.
This manual is available in the following languages: English. Do you have a question about the Canon Legria HF R106 or do you need help?
Ask your question here
Canon Legria HF R106 specifications
Below you will find the product specifications and the manual specifications of the Canon Legria HF R106.
The Canon Legria HF R106 is a camcorder that offers a range of features for capturing high-quality video footage. With a digital zoom of 400x and an optical zoom of 20x, it allows for close-up shots and the ability to capture distant subjects with clarity. The camcorder has a total megapixel count of 2.39 MP, providing detailed images and videos.
Featuring a 1/5.5″ CMOS optical sensor, the Legria HF R106 is designed to capture clear and vibrant footage in various lighting conditions. The closest focusing distance of 0.1 meter ensures that subjects can be accurately recorded from a close range.
The camcorder has a 2.7″ LCD display, which allows for easy framing and playback of recorded videos. It also includes a built-in flash for low-light situations. The Legria HF R106 offers both auto focus and manual focus options, providing flexibility for users to achieve their desired level of sharpness.
For white balance settings, the camcorder includes options such as auto, daylight, incandescent, and tungsten, allowing users to accurately adjust the color and tone of their videos based on the lighting conditions.
Overall, the Canon Legria HF R106 provides a range of features and capabilities for capturing high-quality video footage. With its zoom capabilities, optical sensor, LCD display, and focus options, it offers users the tools they need to create professional-looking videos.
Closest focusing distance
0.1 m
General
| Brand | Canon |
| Model | Legria HF R106 | 4434B016 |
| Product | camcorder |
| EAN | 8714574549118, 8714574550817 |
| Language | English |
| Filetype | User manual (PDF) |
Lens system
| Digital zoom | 400 x |
| Optical zoom | 20 x |
| Focal length range | 3 — 60 mm |
| Focal length (35mm film equivalent) | 40 — 800 mm |
| Image stabilizer | Yes |
Image sensor
| Total megapixels | 2.39 MP |
| Optical sensor size | 1/5.5 « |
| Sensor type | CMOS |
| Effective megapixels (movie) | 1.56 MP |
Focusing
| Closest focusing distance | 0.1 m |
Display
| Display | LCD |
| Display diagonal | 2.7 « |
Flash
Other features
| Auto focus | Yes |
| Manual focus | Yes |
| Sports | Yes |
| Spotlight | Yes |
| Interface | USB 2.0 |
| Night mode | Yes |
| Video out | 1 |
| Audio output | 1 |
White balance
| White balance | Auto, Daylight, Incandescent, Tungsten |
Camera
| Photo effects | Black&White, Neutral, Sepia, Skin tones, Vivid |
| Minimum illumination | 0.4 lx |
| Self-timer delay | 10 s |
| Photo mode | Yes |
Video
| Maximum video resolution | 1920 x 1080 pixels |
Still image
| Still image resolution(s) | 640 x 480,1600 x 1200,1920 x 1080 |
Audio
| Built-in microphone | Yes |
| Audio system | Dolby Digital |
| Audio dubbing | No |
Shutter
| Camera shutter speed | 1/2 — 1/2000 s |
Ports & interfaces
| PictBridge | Yes |
| USB 2.0 ports quantity | 1 |
| Component video (YPbPr/YCbCr) out | 1 |
| HDMI | Yes |
| DC-in jack | Yes |
| Microphone in | Yes |
Storage
| Compatible memory cards | SD, SDHC |
| Maximum memory card size | 32 GB |
Weight & dimensions
| Weight | 270 g |
| Width | 60 mm |
| Depth | 124 mm |
| Height | 64 mm |
Design
| Product color | Black, Grey |
Battery
| Battery type | BP-2L5 |
| Battery technology | Lithium-Ion (Li-Ion) |
| Battery life (max) | 1.41 h |
Packaging content
| Bundled software | PIXELA ImageMixer 3 SE\nMusic Transfer |
show more
Frequently Asked Questions
Can’t find the answer to your question in the manual? You may find the answer to your question in the FAQs about the Canon Legria HF R106 below.
Why is the recorded video coming out blurry?
A possible reason for blurry video is failing to adjust the focus correctly. Make sure to focus on the main subject by half-pressing the camcorder’s record button until the subject is clear, and then fully pressing to start recording.
How can I extend the battery life of my camcorder?
To maximize battery life, avoid using power-consuming features like Wi-Fi or continuous autofocus when not necessary. Additionally, dimming the LCD screen or using the viewfinder instead can significantly conserve battery power.
How can I improve the sound quality of my recordings?
For better audio, consider using an external microphone instead of the built-in one. This will help reduce background noise and improve overall sound quality. Additionally, make sure to adjust the microphone levels in the camcorder’s settings for optimal audio recording.
Why won’t my camcorder turn on?
If your camcorder fails to turn on, check if the battery is properly inserted and charged. Ensure that the battery compartment is clean and free from any debris. If the issue persists, try resetting the camcorder by removing the battery, waiting for a few seconds, and then reinserting it.
How can I transfer my recorded videos to a computer?
To transfer videos to a computer, connect your camcorder using the provided USB cable. Ensure that the camcorder is powered on and set to playback mode. Your computer should recognize the camcorder as a storage device, allowing you to access and transfer the recorded videos to your desired location.
Does the Canon Legria HF R106 have a digital zoom?
Yes, the Canon Legria HF R106 has a digital zoom of 400x. This means that it can magnify the image up to 400 times digitally.
Does the Canon Legria HF R106 have an optical zoom?
Yes, the Canon Legria HF R106 has an optical zoom of 20x. This means that it can zoom in 20 times using the lens without any loss of image quality.
How many megapixels does the Canon Legria HF R106 have?
The Canon Legria HF R106 has a total of 2.39 megapixels. This determines the resolution and quality of the images and videos captured.
What is the closest focusing distance of the Canon Legria HF R106?
The closest focusing distance of the Canon Legria HF R106 is 0.1 meters. This means that it can focus on subjects as close as 0.1 meters away, allowing for detailed close-up shots.
What is the size of the optical sensor of the Canon Legria HF R106?
The Canon Legria HF R106 has an optical sensor size of 1/5.5 inch. This determines the sensitivity and low-light performance of the camcorder’s image sensor. A larger sensor size generally results in better image quality.
What is the weight of the Canon Legria HF R106?
The Canon Legria HF R106 has a weight of 270 g.
What is the height of the Canon Legria HF R106?
The Canon Legria HF R106 has a height of 64 mm.
What is the width of the Canon Legria HF R106?
The Canon Legria HF R106 has a width of 60 mm.
What is the depth of the Canon Legria HF R106?
The Canon Legria HF R106 has a depth of 124 mm.
What is the screen size of the Canon Legria HF R106?
The screen size of the Canon Legria HF R106 is 2.7 «.
What does the abbreviation ‘MP’ stand for?
MP stands for MegaPixels.
What is a megapixel?
The number of megapixels denotes how many pixels there are in the sensor. 1 megapixel equals 1 million pixels. The more pixels, the higher the potential image quality.
Is the manual of the Canon Legria HF R106 available in English?
Yes, the manual of the Canon Legria HF R106 is available in English .
Is your question not listed? Ask your question here
Manufacturer:Canon
Category:Computers & Peripherals
Device:Canon LEGRIA HF R106
Name:ImageBrowser EX / CameraWindow — Instruction Manual
Language:Latviešu
Version:2.00
Pages:89
Size:5.45 MB
Manufacturer:Canon
Category:Computers & Peripherals
Device:Canon LEGRIA HF R106
Name:ImageBrowser EX / CameraWindow — Instruction Manual
Language:Português
Version:2.00
Pages:92
Size:6.99 MB
Manufacturer:Canon
Category:Computers & Peripherals
Device:Canon LEGRIA HF R106
Name:ImageBrowser EX / CameraWindow — Instruction Manual
Version:2.00
Pages:89
Size:6.56 MB
Manufacturer:Canon
Category:Computers & Peripherals
Device:Canon LEGRIA HF R106
Name:ImageBrowser EX / CameraWindow — Instruction Manual
Language:Eesti
Version:2.00
Pages:89
Size:5.00 MB
Manufacturer:Canon
Category:Computers & Peripherals
Device:Canon LEGRIA HF R106
Name:ImageBrowser EX / CameraWindow — Instruction Manual
Language:Русский
Version:2.00
Pages:89
Size:5.61 MB
Manufacturer:Canon
Category:Computers & Peripherals
Device:Canon LEGRIA HF R106
Name:ImageBrowser EX / CameraWindow — Instruction Manual
Language:Україньска
Version:2.00
Pages:89
Size:5.53 MB
Manufacturer:Canon
Category:Computers & Peripherals
Device:Canon LEGRIA HF R106
Name:ImageBrowser EX / CameraWindow — Instruction Manual
Language:Čeština
Version:2.00
Pages:89
Size:6.58 MB
Manufacturer:Canon
Category:Computers & Peripherals
Device:Canon LEGRIA HF R106
Name:ImageBrowser EX / CameraWindow — Instruction Manual
Language:Lietuvių
Version:2.00
Pages:89
Size:5.55 MB
Manufacturer:Canon
Category:Computers & Peripherals
Device:Canon LEGRIA HF R106
Name:ImageBrowser EX / CameraWindow — Instruction Manual
Language:Ελληνικά
Version:2.00
Pages:89
Size:6.78 MB
Manufacturer:Canon
Category:Computers & Peripherals
Device:Canon LEGRIA HF R106
Name:ImageBrowser EX / CameraWindow — Instruction Manual
Language:Deutsch
Version:CA.2.00
Pages:89
Size:6.33 MB
Manufacturer:Canon
Category:Computers & Peripherals
Device:Canon LEGRIA HF R106
Name:ImageBrowser EX / CameraWindow — Instruction Manual
Language:Svenska
Version:CA.2.00
Pages:89
Size:6.61 MB
Manufacturer:Canon
Category:Computers & Peripherals
Device:Canon LEGRIA HF R106
Name:ImageBrowser EX / CameraWindow — Instruction Manual
Language:Italiano
Version:CA.2.00
Pages:89
Size:6.48 MB
Manufacturer:Canon
Category:Computers & Peripherals
Device:Canon LEGRIA HF R106
Name:ImageBrowser EX / CameraWindow — Instruction Manual
Language:Dansk
Version:CA.2.00
Pages:89
Size:6.80 MB
Manufacturer:Canon
Category:Computers & Peripherals
Device:Canon LEGRIA HF R106
Name:ImageBrowser EX / CameraWindow — Instruction Manual
Language:English
Version:CA.2.00
Pages:89
Size:6.91 MB
Manufacturer:Canon
Category:Computers & Peripherals
Device:Canon LEGRIA HF R106
Name:ImageBrowser EX / CameraWindow — Instruction Manual
Language:Español
Version:CA.2.00
Pages:91
Size:6.20 MB
Manufacturer:Canon
Category:Computers & Peripherals
Device:Canon LEGRIA HF R106
Name:ImageBrowser EX / CameraWindow — Instruction Manual
Language:Suomi
Version:CA.2.00
Pages:89
Size:6.62 MB
Manufacturer:Canon
Category:Computers & Peripherals
Device:Canon LEGRIA HF R106
Name:ImageBrowser EX / CameraWindow — Instruction Manual
Language:Nederlands
Version:CA.2.00
Pages:89
Size:6.64 MB
Manufacturer:Canon
Category:Computers & Peripherals
Device:Canon LEGRIA HF R106
Name:ImageBrowser EX / CameraWindow — Instruction Manual
Language:Français
Version:CA.2.00
Pages:91
Size:6.97 MB
Manufacturer:Canon
Category:Computers & Peripherals
Device:Canon LEGRIA HF R106
Name:ImageBrowser EX / CameraWindow — Instruction Manual
Language:Polski
Version:2.00
Pages:89
Size:6.80 MB
Manufacturer:Canon
Category:Computers & Peripherals
Device:Canon LEGRIA HF R106
Name:ImageBrowser EX / CameraWindow — Instruction Manual
Version:2.00
Pages:89
Size:5.09 MB
Manufacturer:Canon
Category:Computers & Peripherals
Device:Canon LEGRIA HF R106
Name:ImageBrowser EX / CameraWindow — Instruction Manual
Language:Magyar
Version:2.00
Pages:89
Size:6.76 MB
Manufacturer:Canon
Category:Computers & Peripherals
Device:Canon LEGRIA HF R106
Name:LEGRIA HF R16 / LEGRIA HF R17 / LEGRIA HF R18 / LEGRIA HF R106 — Instruction Manual
Language:Română
Version:1.00
Size:3.07 MB
DescriptionCanon LEGRIA HF R106 LEGRIA HF R16 / LEGRIA HF R17 / LEGRIA HF R18 / LEGRIA HF R106 — Instruction Manual
This file is an electronic guide (PDF file) for the LEGRIA HF R16 /
LEGRIA HF R17 / LEGRIA HF R18 / LEGRIA HF R106.
Manufacturer:Canon
Category:Computers & Peripherals
Device:Canon LEGRIA HF R106
Name:Instruction Manual
Language:Italiano
Version:1.0
Pages:179
Size:6.28 MB
Manufacturer:Canon
Category:Computers & Peripherals
Device:Canon LEGRIA HF R106
Name:Instruction Manual
Language:Nederlands
Version:1.0
Pages:174
Size:12.05 MB
Manufacturer:Canon
Category:Computers & Peripherals
Device:Canon LEGRIA HF R106
Name:Instruction Manual
Language:Polski
Version:1.0
Pages:172
Size:11.90 MB
Manufacturer:Canon
Category:Computers & Peripherals
Device:Canon LEGRIA HF R106
Name:Instruction Manual
Language:Português
Version:1.0
Pages:172
Size:11.76 MB
Manufacturer:Canon
Category:Computers & Peripherals
Device:Canon LEGRIA HF R106
Name:Instruction Manual
Language:Русский
Version:1.0
Pages:188
Size:6.41 MB
Manufacturer:Canon
Category:Computers & Peripherals
Device:Canon LEGRIA HF R106
Name:Instruction Manual
Version:1.0
Pages:172
Size:11.86 MB
Manufacturer:Canon
Category:Computers & Peripherals
Device:Canon LEGRIA HF R106
Name:Instruction Manual
Language:Svenska
Version:1.0
Size:11.66 MB
DescriptionCanon LEGRIA HF R106 Instruction Manual
Please use Acrobat Reader v5.0 or later to view these files.
Manufacturer:Canon
Category:Computers & Peripherals
Device:Canon LEGRIA HF R106
Name:Instruction Manual
Language:English
Version:1.0
Pages:172
Size:6.21 MB
Manufacturer:Canon
Category:Computers & Peripherals
Device:Canon LEGRIA HF R106
Name:Instruction Manual
Language:Čeština
Version:1.0
Pages:172
Size:11.81 MB
Manufacturer:Canon
Category:Computers & Peripherals
Device:Canon LEGRIA HF R106
Name:Instruction Manual
Language:Dansk
Version:1.0
Pages:172
Size:11.84 MB
Manufacturer:Canon
Category:Computers & Peripherals
Device:Canon LEGRIA HF R106
Name:Instruction Manual
Language:Deutsch
Version:1.0
Pages:184
Size:6.31 MB
Manufacturer:Canon
Category:Computers & Peripherals
Device:Canon LEGRIA HF R106
Name:Instruction Manual
Language:Español
Version:1.0
Pages:172
Size:11.83 MB
Manufacturer:Canon
Category:Computers & Peripherals
Device:Canon LEGRIA HF R106
Name:Instruction Manual
Language:Suomi
Version:1.0
Size:11.69 MB
DescriptionCanon LEGRIA HF R106 Instruction Manual
Please use Acrobat Reader v5.0 or later to view these files.
Manufacturer:Canon
Category:Computers & Peripherals
Device:Canon LEGRIA HF R106
Name:Instruction Manual
Language:Français
Version:1.0
Pages:182
Size:6.33 MB
Manufacturer:Canon
Category:Computers & Peripherals
Device:Canon LEGRIA HF R106
Name:Instruction Manual
Language:Magyar
Version:1.0
Pages:172
Size:11.86 MB
-
Страница 1
PUB. DIE-0343-000Axc HD Camcorder Instruction Manual[…]
-
Страница 2
2 Introd u ction Important Usage Instructions WARNING! TO REDUCE THE RISK OF ELECTRIC SHOCK , DO NOT REMO VE COVER (OR BACK). NO USER SERVICEA BLE PAR TS INSIDE. REFER SERVICING TO QUALIFIED SERVICE PERSONN EL. WARNING! TO REDUCE THE RISK OF FIRE OR ELECTRIC SHOCK, DO NOT EXPOSE THIS PRODUCT TO RAIN OR MOISTURE. CAUTION: TO REDUCE THE RISK OF ELECT[…]
-
Страница 3
3 European Union (and EEA) only . These symbols indicate that thi s product is not to be disposed of with your household waste, ac cording to the WEEE Directi ve (2002/96/E C ), the Batter y Directiv e (2006/66/E C ) and/or y our national laws implementing t hose Dire ctives. This produ ct should be handed over to a designated co llection po int, e[…]
-
Страница 4
4 Exciting F eatures and New Functions High-Definition Vi deo Y our ca mcorder ’ s high-definition image s en s or (HD CMO S ) capture s video at a re s olution of 1,9 20 x 1,080 pi xel s 2 . Video s are th en record ed in t he m emory in h igh definition, u s ing A VCHD s pecification s 3 . With your new HD camcorder , capturing the s pecial mom[…]
-
Страница 5
5 Smart AUTO (2 4 ) S mart AUTO automatically s el ect s the be s t s etting s for the s cene you want to s hoo t. Yo u g e t s pect acular r ecor ding s ever y tim e with out w orry ing abou t s etting s . Video Snap s hot (5 6 ) S hoot or capt ure s hor t s cene s and arrange them into a video clip s et to you r favori te bac k gro und mu s ic. F[…]
-
Страница 6
6 Enjoying yo u r Recording s on Oth er D evi ce s AVCHD MPEG- 2 S D-Video Eye-Fi SD C onnect the camco rder to an HDTV ( 104) C onnect the camcorde r t o the optional DW-100 DV D Burner ( 107, 109) AV C HD di scs Photo DVD s Play video dir ectly from your rec orded memory card AV C HD-compatible HDTVs and digital recor ders with an S D memory card[…]
-
Страница 7
Table of conte nt s 7 Introduction 4 Exciting Feature s and New Function s 11 About thi s Manual 13 Getting to Know the Camcorder 13 S upplied A cce ss orie s and CD-ROM s 15 Name s of Part s Preparations 18 Ge ttin g S tar ted 18 Charging the B attery Pac k 21 Preparing t he Acce ss orie s 22 Adju s ting the Po s ition and Brightne ss […]
-
Страница 8
8 Table of cont ent s V ide o 38 B a s ic Recording 38 S hooting Video 39 S electing the Video Quali ty (Recor ding Mode) 40 Zoomin g 41 Quic k S tart Function 43 B a s ic Playbac k 43 Playing Bac k the V ideo 45 S electing what Recor ding s to Play Bac k 47 S earching for S cene s 50 Pre- s electing Recor ding s fr om the Index S creen 51 […]
-
Страница 9
Table of conte nt s 9 Photos 80 Ba s ic Recording 80 T a k ing Ph oto s 81 S electing Ph oto S ize and Quality 83 Ba s ic Pl ayb ac k 83 Viewing Photo s 84 Deleting Photo s 86 Magnifying Photo s during Play bac k 87 Additional Function s 87 S li de s how 88 Rotating Photo s 88 Hi s togram D i s play 89 Cap turing Photo s from a Movie 90 Pro[…]
-
Страница 10
10 Table of cont ent s Additional Information 123 Appendix: Men u Option s Li s t s 123 FUNC. Menu 126 S etup Menu s 136 On s creen Icon s and Di s play s 140 T rou ble ? 140 T rouble s hooting 146 Li s t of Me ss age s 156 Do’ s and D on’t s 156 Handling Precaution s 160 Maintenance/Other s 161 U s ing the Camcorder Abroad 162 General […]
-
Страница 11
Introdu ction 11 Abo u t thi s Man u al Than k you for purcha s ing the Canon LEGRIA HF R18 / LEGRIA HF R17 / LEGRIA HF R16 / LEGRIA HF R106. Plea s e read thi s manual car efully before y ou u s e the camcor der and r etain it for futur e ref erence . S hould your ca mcor der fail to op erate corr ectly , r efer t o Tr o u b l e s h o o t i n […]
-
Страница 12
12 Introduction Selecting the Video Q u ality (Recording M ode) The camcorder offer s 4 recording mode s . Changing the recording mode will change the recording time available on the memory . S elect FXP or XP+ mode for better movie q uality; s elect LP mode for longer record ing t ime s . The following table give s approximate r ecording time […]
-
Страница 13
Introdu ction 13 Getting to K now th e C amc or der S u pplied Acce ss orie s and CD-ROM s The following acce ss orie s are s upplied with the camcorder: X C A-590E C ompact Power Adapter (incl. power cord) BP-2L5 Batter y Pack W X IF C -300P C U USB C ab le STV-250N Stereo Video C able W Y ellow • Red • White plugs X C T C -100/S C omponen[…]
-
Страница 14
14 Introduction The following CD -ROM s and s oftwa re ar e s up plie d wi th th e cam cord er: • PIXELA Applicat ion — Disc 1 CD-ROM* and ‘PIXELA Application s’ In s tall ation Gu ide — ImageMi xer 3 SE T ran s fer Uti litie s — So ftware for s aving and tran s ferring movie s and mu s ic file s you can u s e a s backgr ound mu s ic. •[…]
-
Страница 15
Introdu ction 15 Name s of Part s 1 (camera /play) b utton ( 26) 2 VI DEO S NAP (vid eo s nap s hot) b utton (5 6 ) 3 // WEB bu tton ( 117) 4 butt on ( 24 )/ // INDEX S EL. (ind ex s election) bu tton ( 45 )/ PLA YL I S T bu tto n ( 45 ) 5 DI S P. ( o n — s creen d i s play) butto n (6 5 ) 6 ACCE SS in dic at or ( 38 , 80 ) 7 S tr ap mo unt ( 2[…]
-
Страница 16
16 Introduction A s Zoom l ever ( 40 ) A d PHOTO butto n ( 80 ) A f POWER but ton A g ON/OFF (CHG) (charge) ind icator: Green – On Orange – S tandby ( 41 ) Red – Cha rging ( 1
 A h LCD s cr een ( 22) A j Joy s tic k (2 7 ) A k FUNC. button ( 28 , 123) A l U S B terminal ( 100, 103) S q HDMI OUT terminal ( 100, 101) S a CO MPONE NT OUT t[…]
 -
Страница 17
Introdu ction 17 S g Tri p o d s oc k et ( 156) S h Me mory ca rd s lo t (3 4 ) S j Batte ry compar tment S k Battery relea s e latch S l Battery com partmen t cover/M emory car d s lot cover D q Serial numb er The s eri al number label i s located on the bat tery com partment cover . Botto m vi ew[…]
-
Страница 18
18 Prepa rati on s Prepar ation s Thi s cha pter de s cribe s ba s ic op er ation s , s uch a s navigating the menu s , and f ir s t time s etting s to help you learn more about your camcord er . Getting Started Charging the Batter y Pack The camco rd er can be power ed with a battery pa c k or directly u s ing the com- pact power ada p ter . C[…]
-
Страница 19
Prepa ration s 19 4 Sl ide the battery compartment cover away from the lens and open it. 5 Remo ve the battery terminal cover from the battery pack. 6 I nsert the battery pack all the way into the compartment and press gently until it clicks. 7 Clo se the co ver and sli de it toward the lens until you hear a click. 8 Ch arging w ill start when […]
-
Страница 20
20 Prepa rati on s To remove the batte ry pac k 1 S lide the batte ry compartme nt cove r a way from th e le n s and open it. 2P r e ss the battery rele a s e l atch and pul l out the batte ry pac k . 3C l o s e the cover and s lide it toward the len s until you hear a clic k . IMPORT AN T • T urn off the camcorder b efore con necting or di s[…]
-
Страница 21
Prepa ration s 21 • W e recommen d that you pre p ar e battery pa ck s to la s t 2 to 3 time s longer th an you think you might need . Prep arin g the A cce ss orie s Fasten the grip belt. Adju s t the gri p belt s o th at you can reac h the zoom l ever with your in d ex finger , and the button with your thumb. To r emove th e grip belt 1 L i[…]
-
Страница 22
22 Prepa rati on s To attach an optio nal wri s t s trap Pass the attaching end o f the wrist strap through the rear bracket on the cam- corder , thread the wrist strap through the loop and fasten. Y ou can al s o attach the wri s t s trap to the s trap mount on the grip belt to u s e both for extra conveni ence and pro tectio n. To attach an o[…]
-
Страница 23
Prepa ration s 23 NOTES • About the LCD s creen: The s cr een i s produced u s ing extr emely high- pre- ci s ion manufacturi ng techniqu e s , with more than 99.99% of the pixel s operating to s pecification. Le ss than 0.01% of the pixel s may occa s ion — ally m i s fire or appear a s bl ack, red, blue or green dot s . Thi s ha s no ef fec[…]
-
Страница 24
24 Prepa rati on s Ba s ic Operation of the Camco rder Operating Mode s Recording The camcor der of fer s two ba s ic mode s for recording video and photo s : S mar t AU TO ( ) mo de fo r b egin ner s or i f y ou ju s t pre fer not to bother wi th detaile d camcor der s etting s , and flexible r ecor d ing ( ) mode, which let s you c hange the […]
-
Страница 25
Prepa ration s 25 •W h e n s hooting in mode, the camcor der will autom atical ly detect ce rtain cha racteri s tic s of the s ubje ct, ba ckg round, lightin g con dition s , e tc. I t will th en ad ju s t variou s s etting s (focu s , expo s ur e, colo r , image s tabilization, image quality , among other s ), s electing the be s t s etting […]
-
Страница 26
26 Prepa rati on s NOTES • In mode, menu s cannot b e acce ss ed but the follow ing s etting s can be chan ged in a dvance. — Recording mode of mo vie s — Size /qua lity o f phot o s — // Yo u r s election of r ecording media for movi e s / photo s -V i d e o s nap s hot leng th -A u t o s low s hutte r -A l l s etting s under the s etu p men[…]
-
Страница 27
Prepa ration s 27 NOTES • // Wh en s witching to a pl ayback mo de, the m emory s elected for play back will be the s ame curr ently u s ed fo r rec ord ing . Joy s tick and Joy s tick G u ide U s e the joy s tic k to op erat e th e cam cord er’ s menu s . If the joy s tic k guide doe s not ap pear on the s cr een, pre ss or pu s h the joy […]
-
Страница 28
28 Prepa rati on s U s ing the Men us Many of the camcor der’ s fu n ctio n s can be adj u s ted from the menu s that open after p re ss ing . I n mode , menu s cannot be acce ss ed and, e xcept in a few ca s e s , mo s t menu s etting s will return to their default value s . For detail s ab out the a vai lab le m en u option s and s etting s[…]
-
Страница 29
Prepa ration s 29 Selecting an Option from t he Setu p Menus 1P r e s s . 2 Se lect ( , ) [ Me nu] and press to open th e setup menus. Y ou ca n al s o hold pre ss ed down for mor e than 1 s ec ond t o open dir ectly the s etup menu s s cre en. 3 Se lect ( ) the tab of the desir ed menu. 4 Se lect ( ) the setting you want to change and press . […]
-
Страница 30
30 Prepa rati on s Fir s t Time Setting s Setting the Date an d Time Y ou will need to s et the date and time of the camcor der befor e you can s tart u s ing it. The [ Date/Time] s cre en will appear automatically when t he cam- cord er’ s cl oc k i s not s et. When the [ Date/T ime] s cr een ap pear s , the year will be s elected. 1 Change […]
-
Страница 31
Prepa ration s 31 Changing the Lang u age The default language of the c amcorder i s Engli s h. Y ou can s et it to on e of 23 other language s . NOTES •T h e d i s play s and that a ppear in s ome menu s creen s re fe r t o the name of button s on the c amcorder and will not change, regardl e ss of the language s el ected. Changing the Time […]
-
Страница 32
32 Prepa rati on s U s ing a Memor y Ca rd Memory Card s Compati ble fo r U s e with th e Camcorder Y ou can u s e commercially available S ec ure D igi tal ( S D) card s with thi s camcor der . Howe ver , dependi ng on the memor y card , you may not be able t o reco rd movie s . Refer to the table below . A s of May 2010, the movie record ing […]
-
Страница 33
Prepa ration s 33 IMPORT AN T •I f y o u u s e an S DX C m e mo r y ca rd w it h a co m pu t e r O S t ha t i s not SDXC- compat ible, you may be prompt ed to f ormat the memory car d. In s uch ca s e, cancel the operation to prevent data loss . •T o u s e an SDXC memor y card w ith exte rnal device s , s uc h a s ca rd re ad- er s or di gi[…]
-
Страница 34
34 Prepa rati on s In s erting and Removing a Memor y Card Ma k e s ure to initialize ( 36) all memory card s bef ore u s ing them with thi s camc order . 1 T ur n off the camcorder . Make s ure the ON/OFF (CHG) indicato r i s off. 2 Slide the memory card slot cover away from the lens and open it. 3 Insert the memory card straight, with the lab[…]
-
Страница 35
Prepa ration s 35 // Sele cting the Mem ory for the R ecording s Y ou can s elect to recor d your movie s and phot o s in the built-in m em- ory or on a memory card. The built-in memory i s the default memory for r ecording bo th. POINTS TO CHECK •B e s ure you under s tand the inf ormatio n pro vided in Eye- Fi ca rd s ( 33) b efore u s ing […]
-
Страница 36
36 Prepa rati on s * The approximat e availab le recording time w ill now reflect t he combi ned s pace in the b uil t-in memo ry an d me mory c ar d. NOTES • Any of the fol lowing action s will de activ ate the relay recordin g fun cti on. — T ur ning off the ca mcord er — Opening the memory car d s lot cov er — Changing th e camcor der ’s[…]
-
Страница 37
Prepa ration s 37 *P r e ss to ca ncel t he c omp le te init ia liza tio n w hil e it i s in progr e ss . All recor ding s will be era s ed and th e memory ca n be u s ed without any problem. Opt ion s IMPORT AN T • Initial izing the mem ory will pe rman ently er a s e al l recording s . Lo s t o rigi — nal rec ordi ng s ca nn ot be rec o ver[…]
-
Страница 38
38 Video Vid eo Thi s chapte r cover s function s re lated to s hooting movie s , including recor ding, playbac k , advanced function s and pl ayli s t and s cene op eration s . Ba s ic Recording Shooting Video 1 T ur n on the camcorder . // By defa ult, movie s are re cor ded in th e buil t-in memory . Alter nativ ely , you can s et the me mor[…]
-
Страница 39
Video 39 •B e s ur e to s ave y our recording s regularly ( 105), e s pe cially afte r mak- ing im portant reco rd ing s . Can on s hall not b e lia ble for an y lo ss or cor- ruption of da ta. NOTES • About the P ower Save mode: If [Power Saving M ode] i s s et to [ On], the cam cor der w ill s h ut off aut omaticall y to s ave p ower when[…]
-
Страница 40
40 Video Zoomin g The camcor der offer s optical (20x ) and digital ( // : 400x, : 800x) zoom. Y ou can turn o n the digital zoom with the [Digital Zoom] s etting. Move the zoom lever tow ard W (w ide a n g l e ) t o z o o m o u t . M o v e i t t o w a r d T (tel eph oto) t o zoo m in. By default, the zoom lever operate s at a variable s peed ?[…]
-
Страница 41
Video 41 • I n mode, you can al s o s et [Zoom Speed] to one of three con s tant s peed s (3 i s the fa s te s t, 1 the s lowe s t). • Whe n [Zoom Speed] i s s et to [ V aria ble], the zoom s pee d wi ll be fa s te r in re cord pa u s e mode than whe n actually r ecording , exce pt wh en pre-r ecording ( 57) i s activated . Q u ick Start F […]
-
Страница 42
42 Video • The cam corder will s hut off if left in s tandby mode for 10 minute s , rega rdl e ss of the [Pow er Saving Mode] s etting. Pr e ss to turn on the c amcorder . •Y o u c a n s elect the len gth of time until s hut-off or turn off the Quick Start functi on altogethe r with the [Quic k Start] s etting. • When the camcorder exi t […]
-
Страница 43
Video 43 Ba s ic Playback Playing Back the Video 1P r e s s . •T h e o r i g i n a l m o v i e s in dex s creen will appear in mo s t ca s e s . • If a photo a ppear s in s ingle photo view , move the zoom lever towar d W to ope n th e ph oto ind ex s creen. Sw itch to t he or igina l mov ie s index s creen ( 45). 2 M ove ( , ) the selectio[…]
-
Страница 44
44 Video IMPORT AN T •O b s erve the following pr ecaution s while the ACCESS indicator i s on or fla s hing. Failing to do s o may re s ult in per man ent data lo ss . — Do no t ope n the me mory car d s lot cov er . -D o n o t d i s connec t the power s ourc e or turn of f th e camcor der . — Do not change the c amcorder ’s operat ing mod[…]
-
Страница 45
Video 45 Sk ippin g s cen e s Open ( ) the joy s tic k guide S elect ( ) the middle row Pu s h the joy s tic k () toward * to sk ip to the beginning of the cur rent s cene or to sk ip to the next s cene. *P u s h t he joy s tick/ pre ss the button tw ice to s kip t o the b eginnin g of the previou s s cene. Ending s pecial playbac k mode s Duri[…]
-
Страница 46
46 Video 1 In the index s creen, move ( ) the oran ge selection fr ame to the tabs on the top of the screen. 2 Select ( ) the tab corr espondin g to the r ecordings you want to play back. 3 Return ( ) to the index screen to select a scene or photo. By default, the index s creen will s how up to 6 item s ( s cene s or phot o s ). Move the zoom l[…]
-
Страница 47
Video 47 // For s cene s in the b uilt-in memory: pre ss For s cene s on the memory car d: pr e ss and then s elect [Playli s t]. Pre ss . T o open the in dex s cr een f or s cene s co nverted into s tanda rd defini tion ( / / only ) Y ou can al s o open the inde x s creen for s cene s converted into s tanda rd definitio n for We b upload ( 118[…]
-
Страница 48
48 Video • // Yo u c a n s elect the original movie s in t he built- in memory or on the mem ory card. •Y o u c a n p r e ss to open the inde x s cr een for vid eo s nap s hot s cene s . 2 Open the calendar screen. • The ca lend ar s creen appea r s . •D a t e s that con tain s cene s (that i s , movie s were rec ord ed o n t ha t date)[…]
-
Страница 49
Video 49 •T h e l i s t of rec o rdin g s di s play s all da te s i n w hi ch re c o rd i n g s wer e made. An orange s election f rame appear s on the day . • The thum bnail s how s a s till imag e from the fir s t s c en e re co rde d on that day . Bel ow it will appear the n umb er of s ce ne s rec ord ed ( ) and the total re cording tim[…]
-
Страница 50
50 Video NOTES •Y o u c a n p r e ss to return to the normal index s cr een at any time. Pre- s electi ng Rec ording s from the Index Scre en Y ou can s elect in adva nce a number of ori ginal m ovie s or ph oto s from the index s creen i n or der to perfo rm certai n acti on s on them collec- tively , all at once. mod e: De let e, co py* or […]
-
Страница 51
Video 51 4 P ress twice to close the menu. To cancel all the s elect ion s NOTES •T h e p r e — s election of s cene s /photo s will be cancel ed if you turn of f t he camcorder or change the operating mode. •S c e n e s in th e playli s t cannot be in cluded in the pre- s elec tion. Delet ing Scen e s Y ou can delete tho s e s cene s that […]
-
Страница 52
52 Video Thi s s tep i s not nece ss ary to delete a ll s cene s or previou s ly s el ect ed s cene s . 3 Delete the scene(s). *I f y o u s el ected any op tion oth er than [Thi s Scene], you ca n pre ss to in ter — rupt the o peration while it i s in progr e ss . Some s cene s will be deleted neverthe- le ss . Option s IMPORT AN T • B e car […]
-
Страница 53
Video 53 Advanced F u nction s Progr ammed AE and S pecial Scene Reco rding Progra m s The r ecor ding pr ogr am determi ne s how much control you have over the cam cor der’ s rec ord i ng- re lat ed s etting s . S elect th e [ Prog rammed AE] r ecording pr ogram to give y ou full cont rol ov er functi on s li k e the white balance or image e[…]
-
Страница 54
54 Video [S p o r t s ] T o rec ord s por t s s cene s s uch a s tenni s or golf. [S n o w ] T o re co rd i n b ri gh t s ki re s ort s without the s ubject being unde rexpo s ed. [ Beach] T o recor d on a s unny beac h without the s ubject being unde rexpo s ed. [S u n s e t ] T o re c o rd s un s et s in vib rant colo r s . [ Night Scene] T o[…]
-
Страница 55
Video 55 NOTES • [ Portrait]/[ Sport s ]/[ Sno w]/ [ Beac h]: Th e pic ture m ay no t appea r s moot h during playback . • [ Portrai t]: T he bl ur ef fect of t he backgr ound in crea s e s the more you zoom in ( T ). • [ Snow]/[ Beach]: The s ubject may be come ove rexpo s ed on cloud y day s or in s haded place s . Chec k the imag e on […]
-
Страница 56
56 Video To change the frame rate Video Snap s hot Recor d a s erie s of s hort s cene s . Play your video s nap s hot s cene s s et to your favorite mu s ic ( 70) to create your own fun mu s ic video. Y ou will be s urpri s ed how by changing the bac k ground mu s ic, you can give your s ce ne s an entire ly new feel. 1P r e s s . • A blue b[…]
-
Страница 57
Video 57 Pre-recording F u nction The camcorder will s tart re co rdi ng 3 s ec ond s bef ore you pre ss , en s uring you d o not mi ss important s hooting opp ortuni- tie s . Thi s i s e s pecially u s eful when it i s diffi cult to pred ict when to s tart reco rd in g. 1 O pen ( ) the joystick guide. 2 Se lect ( ) [ Pre REC] and press . • a[…]
-
Страница 58
58 Video For mo vies: Pr ess . The ca mcorder s tart s r ecordi ng after a 10- s econd countdown. The coun tdown app ear s on the s creen. For photos: Press , first halfway to activate the autofocus and then fully . The camcorder will record the photo after a 10 — s econd countdown. The coun tdown app ear s on the s creen. NOTES • Once the co[…]
-
Страница 59
Video 59 •T h e a d j u s tment ran ge and t he le ngth of th e expo s ure ad ju s tment indic ator w ill v ary depen ding on t he in itial b righ tne ss of the pictur e. • If you op erate the zoom , the bright ne ss of the im age may chan ge. 3 A djust the ( ) the brightn ess of th e image as requir ed, then hide ( ) the joystick guide. ?[…]
-
Страница 60
60 Video • The cente r of th e s creen w ill b e mag nifie d to help y ou f ocu s mor e ea s ily . Y ou can al s o turn off thi s function with the [Focu s A ss i s tance] s et ting. 4 Adjust ( ) the focus as required. •I f y o u w i s h to focu s on faraway s ubject s s uch a s mounta in s or firework s , pu s h the joy s tick ( ) t oward […]
-
Страница 61
Video 61 To s e lect the main s ubje ct If ther e i s mor e than one per s on in the pictur e, the camcor der will auto- matical ly s elect one per s on it determine s i s the main s ubject. The main s ubject i s indicate d by a white f ace detecti on frame and the camc o rder will optimize the s etting s for t h at per s on. Other face s will […]
-
Страница 62
62 Video * When you s elect [ Cu s tom WB ], do n ot pre ss and co ntinue in s t ead with the follow ing p rocedure. To s et the cu s tom wh ite bala nce 1 Point the camc o rder at a white object s o it fill s the w hole s creen a nd pre ss . When t he adju s tment i s co mple ted, s top s fla s hin g a nd s tay s o n. The cam cord er r etain s[…]
-
Страница 63
Video 63 Image Effect s Y ou can u s e the image effect s t o change th e color s aturation a nd con- tra s t to record movie s and ph oto s with s pecial color ef fect s . POINTS TO CHECK • Se lect a r ecor ding pr ogram o ther than t he Speci al Scene r ecordi ng pr o- gram s . Opt ion s ( Default value) Digital Effect s The icon of t h[…]
-
Страница 64
64 Video Option s ( Default value) Apply ing the Sel ected Digit al Effect 1 Open ( ) the joystick guide. 2 Select ( ) [ Digital Effects] and press . • The i con of the s elec ted digi tal e ffect tu rn s gr een. •P r e ss again to de activ ate the digi tal effect (it s icon wi ll turn white again). To fa de in/ou t Activate the s elect[…]
-
Страница 65
Video 65 • F ader s cannot be u s ed when recor ding v ideo s nap s hot s ce ne s or whe n pre- rec ord ing i s ac tiv ate d. On-Screen Di s play s and Data Co de Y ou can turn mo s t on — s creen di s pl ay s on or off. Repeatedly press t o turn the on-screen displays on/off in the following sequence: mode: • All di s play s on •M o s t […]
-
Страница 66
66 Video A u dio Recording Level Y ou can adju s t the audio recor ding level of the built-in microphone. Y ou can di s play the audio level ind icator while r ecording. Manual Ad justment of the Audio Reco rding Le vel 1 Open ( ) the joystick guide. 2 Select ( ) [ Mic. Level] and press . • The ma nua l adj u s tm ent i con will appear to t h[…]
-
Страница 67
Video 67 NOTES • Whe n the audio l evel meter re ache s the re d point (0 dB mark ), t he s ound may be di s tort ed . • If the audi o lev el i s too high and the s ound get s di s torted, act ivate the micr ophone attenua tor with the [Micr ophone Attenuator] s ett ing. Selecting the Playback Starti ng Point If you have a very long s cene,[…]
-
Страница 68
68 Video 3 Select ( ) the playback starting point fr om the timeline ruler . 4 Press to begin the playback. To s elect another s cene Move ( ) the orange s election frame t o the l arge thumbna il and s elect ( ) another s cene. To move between tim eline ruler page s Move ( ) the orange s election frame to the s lidebar below the ruler and di s[…]
-
Страница 69
Video 69 3 Se lect ( ) the p layback starting point from th e segment r uler . 4 P ress to begin the playback. Y ou c an s elect anot her s cene an d m ove be twe en s e gment ruler pag e s in th e s ame wa y a s in the m ovie timeli ne s cr een ( 67). NOTES •F o r a s ingle s cene, up to 100 s egment s /cha nge s in main s ubjec t will appea[…]
-
Страница 70
70 Video Scene and Playli s t Operation s Playin g Bac k Record ing s Set to Backgro u nd M us ic Y ou can play b ac k video s nap s hot s cene s , s cene s in the pl ayli s t and photo s lide s how s s et to bac k ground mu s ic (in s tead of the original s ound) u s ing one of the s upplie d trac ks . Using a Supplied Music T rack as Backgr o[…]
-
Страница 71
Video 71 •Y o u c a n p r e ss to li s ten to the track s elec ted. Pre ss to s top the pl ayba ck. • Sel ect [Of f] to pla y back s cene s with their ori ginal s ound or to play back s lid e s how s without any mu s ic. 4 Back in the in dex screen, select ( , ) t he recor ding from which to s tart playback. 5 P ress to begin the playback s[…]
-
Страница 72
72 Video • M ac OS u s er s : U s e the Finder to tran s fer mu s ic file s from the [MUSIC] folder on the s u pplied Ca mcorder Supplement al Di s c to the memor y car d connecte d to a comput er after i t i s initia lized . Refe r to About the mu s ic fi le s ( 169) for the folder s tructure of the memory car d. • // The Camcor der Supple[…]
-
Страница 73
Video 73 4 Se lect ( ) the icon and press to divide the scene. 5 Se lect ( ) [Y es] and press . The video from the divi s ion poin t to the end of the s cene wil l appear a s a new s cen e in the in dex s cre en. NOTES • Whe n advanci ng/re ver s ing fram e s whil e dividing t he s cene s , the i nterval will be 0.5 s econd . •I f t h e s c[…]
-
Страница 74
74 Video 2 Select ( , ) the scene you want to add to the playlist, or a scene recorded on the date you wa nt to add to the p laylist. 3 Add the s cene(s) to th e playlist. Option s • Whe n the operat ion i s complete d [S cene( s ) added to the pla yli s t] will be di s played. • // Scene s ar e add ed t o the playli s t on the s ame memor […]
-
Страница 75
Video 75 Deleting Sce nes from th e Playli st Deleting s cen e s from the playli s t will not af fect your original record ing s . 1 O pen the play list index screen. • // Before opening the playli s t, you can s elect the original movie s in t he b uilt- in me mory or on the memo ry car d to op en the pl ayli s t of th e re s pect ive me mor[…]
-
Страница 76
76 Video • T o open the pl ayli s t index s creen from th e origin al movie s inde x s creen: — // For s cene s in the buil t-in me mory , pr e ss . For s cene s on the memory car d, pre ss and then s el ect [Pl ayli s t]. — P r e ss . •Y o u c a n p r e ss to open the pl ayli s t i ndex s cr een for vide o s nap s hot s cene s ( 56). 2 Sel[…]
-
Страница 77
Video 77 • // The cap tur ed video s nap s hot s cene i s s aved to the s ame mem ory that contain s the movie. •V i d e o s nap s hot s cene s cannot be captur ed from a ny of the following type s of movie s . -M o v i e s s horter than 1 s econd -S c e n e s that were edi ted u s ing the s oftw ar e on the s upplied s oftware ImageMixer 3[…]
-
Страница 78
78 Video 3 Copy the scene(s). *P r e ss to interrupt the operat ion while it i s in pr ogre ss . Option s C opying th e Entire Pl aylist 1 Open the index screen of the built-in memory’ s playlist. •I n t h e o r i g i n a l m o v i e s in dex s creen , s elect the tab under the icon , and t hen op en the p layli s t index s cr een: — // For[…]
-
Страница 79
Video 79 -D o n o t d i s co nne ct t he p ower s ource or turn of f the ca mcor der . — Do not c han ge th e ca mcorde r ’s operating m ode. NOTES • If the memory card s lot co ver i s open, or th e LOCK s witch on the mem- ory card i s s et to pr event writ ing, y ou will not be a ble to co py movie s to the me mory car d.[…]
-
Страница 80
80 Phot o s Photo s Refer to thi s chapter for detail s on s hooting photo s – ta k in g photo s an d playi ng them bac k , capturi ng photo s from video and prin ting photo s . Ba s ic Recording T a king Photo s 1 T ur n on the camcorder . • // By d efault , photo s ar e r ecor ded in the built-in memory . Y o u can s et the memo ry card a[…]
-
Страница 81
Photo s 81 IMPORT AN T •O b s erve th e foll ow ing pr ecaution s while the AC CESS in dica tor i s on or fla s hing. Faili ng to do s o may re s ult in permanent data l o ss . — Do not open the me mory card s lot cover . -D o n o t d i s co nne ct t he p ower s ource or turn of f the ca mcor der . — Do not c han ge th e ca mcorde r ’s oper[…]
-
Страница 82
82 Phot o s NOTES • The actual num ber of photo s that can be re cor ded wi ll va ry depen d ing on the s ubje ct and s hooting condition s . •T h e c a m c o r d e r r e t a i n s the la s t s etting u s ed even i f you s et th e cam- cor d er t o mode. • When p rinting photo s , u s e the follo win g gu idel ine s a s a re fere nc e f o[…]
-
Страница 83
Photo s 83 Ba s ic Playback Viewing Photo s 1P r e s s . •T h e o r i g i n a l m o v i e s in dex s creen will appear in mo s t ca s e s . • If a photo a ppear s in s ingle photo view , move the zoom lever towar d W to open the photo index s cre en. Proceed t o s tep 3. 2 Open the photo i ndex scr een. • // Y ou can s elect the photo s i[…]
-
Страница 84
84 Phot o s Photo Jump Funct ion When you have recor ded a large number of photo s , you can jump 10 or 100 photo s at a t ime. 1 Open ( ) the joystick guide. 2 Select ( ) the icon and press . 3 Select ( ) [ Jump 10 photos] or [ Jump 100 photos]. 4 Jump ( ) the number of photos selected and p ress . IMPORT AN T •O b s erve the following pr ec[…]
-
Страница 85
Photo s 85 U s ing the FU NC. M enu 1 I n single ph oto view , open the p hoto selectio n screen. [ D e l e t e ] a p p e a r s on the s creen. 2 Se lect ( ) the photo you want to delete and press . 3 Se lect ( ) [Y es] and press t o delete the p hoto. 4 Rep eat steps 2-3 to delete additio nal photos or press twice to close th e menu. Deleting […]
-
Страница 86
86 Phot o s Option s IMPORT AN T • B e car eful when d elet ing pho to s . Dele ted pho to s can not be reco v ered . • Pr otected p hoto s cannot be del eted. Magnifying Photo s d u ring P layback In s ingle photo view , photo s can be magnified up to 5 time s . w ill appear for ph oto s that cannot be enlar ged. 1 Move the zoo m lever to […]
-
Страница 87
Photo s 87 Additional F u nction s Slide s how Y ou can play a s lide s how of all the photo s and even s et it to mu s ic ( 70). 1 Open the photo i ndex scr een. 2 Se lect the background mus ic to use when playing back the ph oto slideshow ( 70). 3 Back in the in dex screen, select firs t photo of th e slideshow. 4 St art the slideshow set to […]
-
Страница 88
88 Phot o s NOTES • The backgr ound mu s ic may not b e played bac k corr ectly when playin g back a s lide s how from a memory ca rd with s low t ran s fer rate s . • When playi ng back a s lide s how wit h mu s ic fr om an ext ernal audi o player , the s lide s how w ill repea t un til the m u s ic fi ni s he s . Rotating Photo s Y ou can[…]
-
Страница 89
Photo s 89 The ar ea to the right of the hi s togram rep re s ent s highl i ght s and th e left s ide rep re s ent s s hado w s . A photo who s e hi s togram sk ew s to the right i s re la — tively bright; while one who s e hi s to- gram pea ks to the left, i s rel atively dar k . Capt u ring Photo s from a Mov ie Y ou can captur e a s ingle ph[…]
-
Страница 90
90 Phot o s IMPORT AN T • When ca pturing photo s on an Ey e-Fi card, phot o s w ill be upl oad ed automa ticall y if you a re within the ran ge of a conf igur ed network. Al way s verify that Ey e-Fi ca rd s have been approv ed in the country/r egion of u s e. See al s o U s ing an Eye-Fi ca rd ( 122). NOTES • T h e d a t a c o d e o f t h[…]
-
Страница 91
Photo s 91 // Y ou can s elect the photo s in the built- in memory or on the me mory car d. 2 Se lect ( , ) t he photo you want to protect. Opt ion s IMPORT AN T • Initial izing the mem ory will pe rman ently er a s e al l recording s , inclu ding pr otect ed photo s . // Copying Photo s to a Mem ory Card Y ou can copy photo s only fr om the […]
-
Страница 92
92 Phot o s 2 Open the photo selection screen. [ Copy ( )] appe ar s on the s creen. 3 Select ( ) the photo you want to copy and pr ess . 4 Select ( ) [Y es] and press to copy the photo. 5 Repeat steps 3-4 to copy additional photos or pres s twice to close the menu. C opying Pho tos from th e Index Sc reen 1 Open the index screen of the photos […]
-
Страница 93
Photo s 93 Opt ion s IMPORT AN T •O b s erve th e foll ow ing pr ecaution s while the AC CESS in dica tor i s on or fla s hing. Faili ng to do s o may re s ult in permanent data l o ss . — Do not open the me mory card s lot cover . -D o n o t d i s co nne ct t he p ower s ource or turn of f the ca mcor der . — Do not c han ge th e ca mcorde r[…]
-
Страница 94
94 Phot o s Printing Photo s Print ing Pho to s (Dir ect Print) The camcor der can be connecte d to any PictBridge-c ompatible printer . Y ou can mar k in advance the photo s you wan t to print a nd s et the de s ired number of copie s a s a print orde r ( 97). Canon print ers: S ELPHY printer s of the CP , D S and E S s er ie s and in k jet pr[…]
-
Страница 95
Photo s 95 — Removing all print or de r s NOTES • will ap pear f or photo s that cannot be printed. • W e recommen d powering the camco rder u s ing the co mpact powe r adapt er . • R efer al s o to the p rinter ’s in s truction manual . • I f you have no intenti on to u s e the optional DW-100 DVD Burner , y ou can s et or [USB Conne[…]
-
Страница 96
96 Phot o s Option s [P a p e r S i z e ] * Available paper s iz e s vary depend ing on the prin ter model. [P a p e r T y p e ] * Select [Photo], [Fa s t Photo], [Plain] or [Defau lt]. [P a g e L a y o u t ] * Select [Default], [Bordered] or one of the follow- ing page layout s . [Borderle ss ]: The photo i s enlarg ed and m ay be s lightly cr[…]
-
Страница 97
Photo s 97 NOTES •P r i n t s etting option s and [D efau lt] s etting s vary depending on the printer model. Fo r detail s , refer to the prin ter ’s in s truction manua l. To cancel a print job 1P r e ss ([ S top]) while printing. 2 S elect ( ) [O K ] a nd pre ss . When you hav e fini s hed pri nting Di s conn ect the U S B cable fr om th[…]
-
Страница 98
98 Phot o s POINTS TO CHECK •O n l y p h o t o s on the memor y car d can be s et for pr int orde r s . Marking Si ngle Photos with Prin t Orders 1 In single photo view , open the photo selection screen. appe ar s on the s creen. 2 Select ( ) the photo you want to mark with a print order . 3 Press to set t he print order . The number of c opi[…]
-
Страница 99
Photo s 99 Opt ion s NOTES • // To s et print order s s et f or p hot o s recor ded in t he bui lt -in me mory , c opy the pho to s to the memory card in advan ce. [Individ ual Photos] Set print order s for individu al photo s . [Selected Photos (1 copy each)] Set s a p rint order of 1 copy of each of the photo s s elect ed in ad vance ( mark[…]
-
Страница 100
100 Exter nal Con nection s Extern al Connection s Thi s chapte r explain s how to connect your camcorde r to an external devi ce s uch a s a TV , VCR, or compu ter . Te r m i n a l s on the Camcorder * When co nnecting a cable to the cam corder , make s ure to align the tr iangle mark s on the cab le ’s con nector a nd on t he camc order ’[…]
-
Страница 101
External Conne ction s 101 Connection D iagram s In the following connection di agram s , th e le ft s ide s how s the term inal s on the camco rde r and the right s id e s ho w s (for refer ence only) an example of te rminal s on a connect ed devic e. C onnectio n T ype: Digital Q u ality: High definition O u tp u t only C onnect to a high-d e[…]
-
Страница 102
102 Exter nal Con nection s C onnection T ype: Analog Q u ality: High definition O u tp u t onl y C onnect to a high-de finition TV (HDT V) with component vi deo input terminal s. C onnection T ype: Analog Q u ality: Standard definition O u tp u t only C onnect to a standard T V or a V C R with audio/vid eo input te rminals. C hange the followi[…]
-
Страница 103
External Conne ction s 103 C onnectio n T ype: Digital data connection O u tp u t o nly C onnect to a co mputer to save your reco rdings, to the optional DW-100 DVD B urner to create D VD discs from them, or to a printer to print out ph otos. 4 USB C able (supplied)[…]
-
Страница 104
104 Exter nal Con nection s Playback on a TV Sc reen Connect the camcor der to a TV to enjoy your r ecording s with family and friend s . Play bac k on an HDTV u s ing one of the high-definition con- nection s wil l en s ure th e be s t playbac k q uality . 1 T ur n off the ca mcorder and the TV . 2 Connect the c amcorder to the TV . Refer to C[…]
-
Страница 105
External Conne ction s 105 Saving and Sharing Y o u r Rec ording s Saving Recording s on a Comp u ter Movie s and pho to s recor ded with thi s camcorder are s aved in t he built-in memory ( // only) or on the memory card. Becau s e s pace i s li mited, ma k e s ure to s ave your r ecord ing s on a computer o n a r egular ba s i s . Car efully […]
-
Страница 106
106 Exter nal Con nection s Refer to Starting Ca meraWindow . U s ing th e s oftwar e 1 Power the camcor der with the compact power adapter . 2 Set t he c am corder to mod e, in si ngle pho to v iew. 3 Connect the camcorder to t he computer using the suppl ied USB cable. • Connec tion . Refer to Conn ect ion Di agr am s ( 103). • I f the de[…]
-
Страница 107
External Conne ction s 107 • If you c onn ect the camco rder to the compu ter whil e it i s s et to mode, the proce ss of cr ea ti ng s ce ne thumbnai l s will s tart au tom atic ally . In s uch ca s e, s elect [Ski p] to s top th e proc e ss and u s e the compu ter ’s S af e l y R e m o v e H a rd w a re f un c t i o n ( W i nd o w s ) or […]
-
Страница 108
108 Exter nal Con nection s C onnecting to t he DW-100 DVD Burner and C re atin g a Di sc 1 T ur n on the DVD bur ner . Refer to Cr eatin g DVD s . 2 Connect the c amcorder to the DVD bu rner us ing the su pplied USB cable. • Connec tion . Refer to Conn ect ion Di agr am s ( 103) and Connection s . • I f the devi ce s elec tion s cr een app[…]
-
Страница 109
External Conne ction s 109 IMPORT AN T • Whi le the ca mcor der i s connecte d to the DVD burner , do not open the memory card s lot cov er a nd do no t r emove t he me mory car d. •O b s erve th e foll ow ing pr ecaution s while the ACCESS indica tor on the camco rder i s on or fla s hing. Fail ing to do s o may re s ult i n permanent data[…]
-
Страница 110
110 Exter nal Con nection s Y ou can complete the conve r s ion to s tandard d efinition in the cam- cord er and then u s e the s up pl ied s oftwa re ImageMixer 3 SE to s ave the converte d s cen e s an d bur n the m ont o DVD s in your computer . Y our comp uter mu s t have a prein s talled DVD drive wit h writing capabil- itie s . In s talla[…]
-
Страница 111
External Conne ction s 111 1 If a me ss ag e appea r s regarding mu s ic file s , follow th e in s truction s on the s creen. 2 Thi s s tep i n not n ece ss ary for s cene s in the pl ayl i s t. 3 The left s ide of the s creen di s play s the total p layback ti me of th e s cene s to be con- verted; the right s ide s ho w s the file s ize of th[…]
-
Страница 112
112 Exter nal Con nection s -A l l t h e s elected s cene s in th e playl i s t ar e merged into one conver ted s cen e. Ho wev er , if t he c onv erte d s cene i s too larg e, it will b e s plit into 2 GB- s ized s cene s . — When converting only p art of a s cene, t he ma ximum length of the converte d s cene will be 10 minute s fr om th e s […]
-
Страница 113
External Conne ction s 113 •O b s erve th e foll ow ing pr ecaution s while the ACCESS indica tor on the camco rder i s on or fla s hing. Fail ing to do s o may re s ult i n permanent data lo ss . — Do not open the me mory card s lot cover . -D o n o t d i s co nne ct th e U SB ca ble. -D o n o t d i s co nne ct t he p ower s ource or turn of[…]
-
Страница 114
114 Exter nal Con nection s NOTES • When t he camcorder co ntain s a large number of s cene s to be s aved on di s c s , it may take a long ti me for the connec tion to the DVD burner to be comp leted. F or be s t perform ance, we r ecommend limi ting the num- ber of s ce ne s to be s aved to 500 or fewe r s cene s . (With 500 s cene s , i t […]
-
Страница 115
External Conne ction s 115 — Do not c han ge th e ca mcorde r ’s operating m ode. NOTES • If you are cre ating a Pho to D VD f rom p hoto s o n the me mory ca rd and the mem ory car d contain s s cene s conv erte d into s tandard defini tion for We b upload , the thumbnai l s for tho s e s cen e s will al s o be added to the Photo DVD a s i[…]
-
Страница 116
116 Exter nal Con nection s IMPORT AN T •W h i l e t h e c a m c o r d e r i s connected to t he DV D burner , do not open the memory card s lot cove r and do not re move th e memo ry car d. NOTES • Onl y A VCHD di s c s create d with the DW-100 DVD burner can be played back u s ing the DVD burne r . •T h e c a m c o r d e r ’s menu s c[…]
-
Страница 117
External Conne ction s 117 In S tanda rd Def initio n Y ou can copy your movie s by connecting t he camcor der to a VCR or a digital video recorder with an alog audio/vi deo input s . Video output will be in s tandard definition, although the original s cene s are in hi gh defi- nition. C on nec ting Connect the camcor der to the VCR u s ing Co[…]
-
Страница 118
118 Exter nal Con nection s If you are u s ing an Eye-Fi car d, after converti ng your video recor ding s into s tandar d definition s cene s you can upload your movie s wirel e ss ly , dir ectly fr om the camcor d er . Refer to Eye-Fi’ s ho mepage for the late s t information on compatible W eb s ite s . // Y ou can complete the conv er s io[…]
-
Страница 119
External Conne ction s 119 •I f a m e ss age appear s regard in g m u s ic file s , follow the i n s truction s on the s cr een. •T h e l e f t s ide o f th e s creen di s play s the to tal playb ack t i me of the s cene s to be conver ted; the righ t s ide s how s the file s ize of the s cene s after co nver s i on and th e available s pac[…]
-
Страница 120
120 Exter nal Con nection s NOTES • When conv erting s cene s in th e playli s t or video s nap s hot inde x s creen: -T h e s cene s are conve rte d with the s elected back gr ound mu s ic ( 70) in s tead of the ori ginal s ound. -A l l t h e s elected s cene s in th e playl i s t ar e merged into one conver ted s cen e. Ho wev er , if t he […]
-
Страница 121
External Conne ction s 121 IMPORT AN T • Whi le the ca mcor der i s con nect ed t o the co mputer , d o n ot op en t he memory card s lot cov er a nd do no t r emove t he me mory car d. •O b s erve th e foll ow ing pr ecaution s while the AC CESS in dica tor i s on or fla s hing. Faili ng to do s o may re s ult in permanent data l o ss . — […]
-
Страница 122
122 Exter nal Con nection s IMPORT AN T U s ing an Eye-Fi card : •T h i s product i s not gu aranteed to s upp ort E ye-Fi card functi on s (includ- ing wirele ss tran s fer ). In ca s e of an i ss ue with an Eye -Fi car d, plea s e chec k with t he car d manufactu rer . Al s o note tha t an app roval i s requi red to u s e Ey e-Fi c ard s in[…]
-
Страница 123
Addition al Informatio n 123 Addition al In for mati on Thi s chapter contain s trouble s hooting advice, s cr een me s — s ag e s , handling and ma intenance tip s , and other information. Appendix: Men u Opt ion s Li s t s Menu item s not available appea r grayed out. For detail s a bout how to s elect an ite m, ref er to Using the Menus ( 28[…]
-
Страница 124
124 Additional Information Setup Men us FUNC . Menu (Playb ac k Mode s ) (movie p layback), (pl ayback of vid eo s nap s ho t s cene s ): — available only in the original index s creen; — available onl y in the pl ayli s t index s creen ; z — a vail- able in bo th; — — not availab le in eithe r . (photo playback): — available only in s ingle […]
-
Страница 125
Addition al Informatio n 125 1 // Ava ilable only for photo s on the memory ca rd. 2 Available o nly for s cene s i n th e bu ilt in me mo ry . [Protect] – – – 90 [In divid ua l Ph otos ], [ Sel ecte d Ph otos ], [Remove A ll] –– [Print Or ders] 1 0-99 copies – – 97 [Individual Pho tos], [Selected Phot os (1 copy each)], [Remove A[…]
-
Страница 126
126 Additional Information Set u p Men us Came ra S etup 1 ( Mode) [Frame R ate]: Select s the frame rate to be u s ed wh en rec ord in g. [ PF25]: 25 frame s per s ec ond , progre ss ive . U s in g th i s frame r ate w ill give your recor ding s a cinematic look. When c ombined wit h the [ Cine Mode] record ing program ( 55), the cinematic loo[…]
-
Страница 127
Addition al Informatio n 127 * [ 80 0x] for th e . ** For movi e s only . [Digita l Zoom] : Determi ne s the operation of the digital zoom. The c olor o f the indicator ind i- cate s the zoom. • Whe n activa ted, the c a m- corder w ill s wi tch aut oma tica lly to digital zoom when you zoom in beyond the optical zoom range. • With the digi[…]
-
Страница 128
128 Additional Information • If the degr ee of camcor d er s hake i s too high, th e image s tabil ize r ma y not be ab le to f ully c ompen s ate. The image s tabili zer may not be able to s ucce ss fully elimi nate a ll blur if th e cam corder o r the s ubject i s moving too much. •T h e i m a g e s tabilizer may not w ork well on s ubjec[…]
-
Страница 129
Addition al Informatio n 129 [Focus As sistance]: When th e fo cu s a ss i s tanc e i s activated , the image at the center of th e s cr een i s magn ified t o he lp y ou f ocu s manua lly ( 59). •U s ing the focu s a ss i s tance w ill not a ffe ct th e r ecording s . It will be can- celled automatica lly af ter 4 s econd s or when you s ta […]
-
Страница 130
130 Additional Information [Data C ode]: Di s play s the date and/o r time w hen the s cene wa s record ed . [ C amera Dat a]: Di s pl ay s the apertur e (f- s top) and s hutter s peed u s ed when r ecord ing t he s ce ne. [USB Connecti on T ype]: Select the conne ction prot oc ol to u s e when co n- nect ing t he ca mco rder to an ext er nal d[…]
-
Страница 131
Addition al Informatio n 131 [LCD B rightn ess]: Adju s t s the bri ghtne ss of the LCD s cr een. • Chan ging the bri ght ne ss of the LCD s creen d oe s not affe ct the bright- ne ss of your r ecordi ng s or the b rightne ss o f t he pla yback image on a TV . [LCD Screen Dimmer ]: When s et to [ On ], the LCD s creen i s dim med. Doing s o i[…]
-
Страница 132
132 Additional Information 1 Option no t available when the cam corder i s connect ed to an HDTV u s ing an HDMI cable. 2 Option available only fr o m the original movie s index s creen. [Notif ication Soun ds]: A b eep wil l accom pany s ome operation s like tur n- ing on the camcorde r , the s elf -timer countdown, etc. [Power Savi ng Mod e]:[…]
-
Страница 133
Addition al Informatio n 133 • D epending on the TV s et, additio nal s etti ng s m ay b e r eq u i red o n th e TV it s elf to acti vate the HDMI-CEC f unction. Ref er to the TV ’s in s truction manual. • Cor r ect opera tion of the HDM I-CEC fun ction canno t be guaran teed even when con necting the camcor der to com patib le TV s et s […]
-
Страница 134
134 Additional Information Languag e and Da te/Time S etup [Date Form at]: Se lect th e dat e form at to be u s ed for mo s t on- s creen d i s — play s , a nd (if s elected ) for the date p rinted on photo s . [Calendar Start Day]: Sele ct the day on w hich t he week s tart s fo r the cal- endar di s play ( 47). Information S cr een s Menu ite[…]
-
Страница 135
Addition al Informatio n 135 [Memor y Info ]/[Mem ory C ard Info ]: Di s pl ay s a s cree n wher e you can ver- if y how much o f th e built -in me mory or the memor y car d i s curr ently in u s e ( total recor ding time and total number of photo s ) and how much s pace r emain s availab le for r ecord ing. •E s timated figur e s ab out ava […]
-
Страница 136
136 Additional Information Appendix: On s creen Icon s and Di s play s Recording Movies 1 Ope rating mode ( 2 4) 2 Recordi ng progra m ( 53, 5 5) 3 White balance ( 6 1) 4 Image effect ( 63) 5 Digital effect ( 63) 6 Re cord in g mo de ( 39) 7 Flic k er re duc ti on ( 127) 8 Pre-recording ( 57) 9 Me mory o perati on ( 139) A q In s tant AF ( 127 […]
-
Страница 137
Addition al Informatio n 137 Recording Photos S f Zoom ( 40), Expo s ure ( 58) S g Photo q uality/ s ize ( 81) S h S elf timer ( 57) S j Number of available p hoto s On the memo ry ca rd // In the built- in me mory S k Camco rder s ha k e war ning ( 127 ) S l Fa ce detectio n ( 60) D q AF f rame ( 80) D a Fo cu s and ex po s ure loc k ( 80) Pla[…]
-
Страница 138
138 Additional Information * The lig ht meter ing mod e canno t be changed . Viewing Photos D f Hi s tog ram ( 88) D g Current phot o / T otal nu mber of photo s D h Photo num ber ( 132) D j Prote cted p hoto mar k (9 0 ) D k Date and time o f recording D l File s ize F q Manua l expo s ure ( 58) F a Photo s ize ( 81 ) F s Apertu re value F d E[…]
-
Страница 139
Addition al Informatio n 139 Memory operation Recor d, Recor d pau se, Pla yback, Pla ybac k paus e, Fast pl aybac k, Fa st re ver se p layb ack , Slow pla yba ck, Slow re verse p layb ack Remaining battery time • The icon shows a rough est imate of the remaini ng charge as a percentage of the full charge of the batt ery p ack. • When is di[…]
-
Страница 140
140 Additional Information Tro ub le? Tr o u ble s hooting If you have a problem with your camcor der , r efer to thi s s ecti on. S ome- time s what you t hin k i s a mal function o f the camcor der may have the s imple s t of s olution s — ple a s e read the “CHEC K THI S FIR S T” box before going on to the m ore detailed problem s and s […]
-
Страница 141
Addition al Informatio n 141 Recording Pre ss ing will not s tart recording. — Y ou cannot record while the camcorder is writi ng previous recordings onto the memory (while the A CC ESS indicator is on or flashing). Wa it until the camcorder has finished . — The memory is full or it already contains the max imum number of scenes (3,999 sc enes)[…]
-
Страница 142
142 Additional Information Cannot move s cene s in the playli s t. — The memory is full. Delete some recordings ( 51, 84) or initialize the memory ( 36) to free some space. Cannot delete a s cene. — Y ou may not be able to delete scenes recorded or edited using another device and then trans- ferred to a memory card connected to a compu ter . De[…]
-
Страница 143
Addition al Informatio n 143 Indicators and Onscre en Disp lays light s u p in red. — Battery pack is exhausted. Repl ace or charge the battery pack. light s u p in red. — A memory ca rd error occurred . T urn off the camcorder . Remove and re insert the memor y card. Initialize the memory card if the displ ay does not change back to normal. — […]
-
Страница 144
144 Additional Information Screen di s play s t u rn on and off repeatedly . — The battery pack is exhausted. Replace or charge the battery pack. — Remove the battery pack and reattach it correctly. Abnormal character s appear on the s creen and the camcorder doe s not ope rate properly . — Disconnect the power source and reconne ct it a fter a[…]
-
Страница 145
Addition al Informatio n 145 — The folder and file numbers have reached their maximum value. Set [Photo Number- ing] to [Reset] and insert a new memo ry card. Cannot u pload file s us ing an Eye-Fi card. — Files cannot be u ploaded when [Eye-Fi C ommunication] is set to [Off] (when appears on the screen). C hange this s etting to [Automatic]. -[…]
-
Страница 146
146 Additional Information — Disconnect the USB cable and turn off the camcorder . After a short while, turn it on again and restore the connection. — C onnect the camcorder to a different USB port on the co mputer . — The camcorder will no t be recognized while all photos ar e being deleted or a ll print orders are being removed. The printer i[…]
-
Страница 147
Addition al Informatio n 147 Back u p recordin g s reg u larly — This message may appear when you turn on the camcorder . In the event of a malfunction, recordings may be los t so back up your recordings regularly . B u ffer overflow . Recording wa s s topped. — The data transfer rate was too high for the memo ry card in use and the recording w[…]
-
Страница 148
148 Additional Information Cannot play back — There is a problem wi th the memor y . If this me ssage appears often without apparent reason, contact a C anon Service C enter . // Cannot play back Cannot acce ss the b u ilt-in memory — There is a problem with the built-in memory . Save your recordings ( 105) and initialize the built-in memory us[…]
-
Страница 149
Addition al Informatio n 149 Cannot reco rd movie s on thi s memor y card — Movies canno t be recorded on a 64 MB or smal ler memory card. Use a recommended mem- ory card ( 32). Cannot reco rd movie s on thi s memor y card Initialize only us ing the camcorder — The memory card in the camcorder wa s initia lized usi ng a computer . Initialize th[…]
-
Страница 150
150 Additional Information Initialize only us ing the camcorder — There is a problem with the file s ystem that prevents accessing the se lected memor y . Initial- ize the memory with this camcorder ( 36). LCD Screen ha s been dimmed -H o l d pressed for 2 s econds to restore the L C D screen to its pr evious brightness se t- ting. May not be p[…]
-
Страница 151
Addition al Informatio n 151 — After selecting [Sc ene Search] [Scenes with Face s], no scenes contain people’ s faces or no scenes were recorded using the face detection function. — // This message will appear when ther e are no high-defini tion scenes on the memory card. If you converted sce nes in to standard definition, you can s till ope[…]
-
Страница 152
152 Additional Information Thi s photo co u ld not be deleted — Protected photos ( ) cannot be deleted. Remove the pr otection ( 90). // T h i s memory card contain s s cene s . Delete all s cene s to us e relay recordi ng. — Save the movies on the memory card ( 116) and initialize the memory card ( 36). Thi s photo cannot be di s played — Y ou[…]
-
Страница 153
Addition al Informatio n 153 Cannot read the di s c . Check the di s c. — During disc recording mo de, this message can appear when a c ommercially available DVD disc (a DVD disc containing mo vies, software, etc.) or an 8 cm mini DVD disc is inser ted. Replace with a brand new d isc. — During disc playback mode , this messa ge can appear when […]
-
Страница 154
154 Additional Information Direct Prin t Related Messa ges Data tran s fer error — C ancel printing, disconnect the USB cable and turn of f the printer . After a while, turn the printer back on and reconnect the USB cable. — Y ou attempted to print from a memory ca rd that contains a large number of photos . Reduce the number of photos. File er[…]
-
Страница 155
Addition al Informatio n 155 Print head not in s talled — No print head is installed in t he printer or the print head is defec tive. Printer cover open — C lose the printer cover securely . Printer error — A malfunction has occurred that may requir e repairs. ( C anon inkjet printers: the pr inter’ s green power lamp and orange er ror lamp f[…]
-
Страница 156
156 Additional Information Do’ s and D on’t s Handling Preca u ti on s Camcorder Be s ur e to ob s erve the following pre caution s to en s ur e maximum per- formance. • Save your recordings periodically . Make s ure to tran s fer yo ur re co rd- ing s to an ext er nal devic e s uch a s a computer or d igital video r ecorder ( 105) an d s[…]
-
Страница 157
Additional Information 157 • When record ing movies, try t o get a calm, stable picture. Exc e ss iv e cam cor der mo ve ment wh ile s hooting and exten s ive u s e of fa s t zoom s and panning can re s ult in jittery s cene s . I n extr eme ca s e s , the playba ck of s uch s cene s may r e s ul t in vi s ually induced mot ion s ickn e ss . […]
-
Страница 158
158 Additional Information About the batter y t erminal cover The bat tery ter minal cover ha s a [ ]- s haped hole. Thi s i s u s eful when you wi s h to diff er entiate be tween charge d and uncharge d battery pa ck s . Memory Card • W e recommend backi ng up the re cor ding s on the memory ca rd onto your comp uter . Data may be corrup ted[…]
-
Страница 159
Additional Information 159 B u ilt- in Rec hargeabl e Lithi u m Batter y The camcor der ha s a built-in recha rgeable lithium battery to k eep the date/time and other s etting s . The built-in lithium battery i s re charged while you u s e the camcord er; however , it will di s char ge completely if you do not u s e the ca mcorder for about 3 m[…]
-
Страница 160
160 Additional Information Maintenance/Other s Cleaning Cam corder Body •U s e a s oft, dry c l oth to cl ean the camcor d er body . Never u s e c hemic all y tr eated c l oth s or volatile s olvent s s uch a s p aint t hinner . Len s and In s tant AF S en s or •I f t h e l e n s s urf ace or In s ta nt AF s en s or i s dirt y , a utofocu s[…]
-
Страница 161
Additional Information 161 • R emove the memo ry ca rd and b attery p ack . Then, place the camcorde r in an air tight pla s tic ba g and let it adju s t gr aduall y to temperatu re chang e s befor e r emoving it f ro m the bag. Whe n cond en s atio n i s det ected The c amcor der automa ticall y s hut s off. The preci s e time r equir ed for[…]
-
Страница 162
162 Additional Information Gener al Informa tion Acce ss or ie s Option al acce ss orie s not li s ted below a r e de s cribed in more detail in the following page s . * Supplied wi th the cam corder; no t available a s a n option al acc e ss ory . ** If nece ss ary , u s e a comm ercially availab le SCART adapter . (Av ailability differs from […]
-
Страница 163
Additional Information 163 Optional Ac ce ss ori e s Batter y Pac ks When you need e xtra battery pack s , s elec t the NB- 2LH. The s upplied BP-2L 5 i s not avai lable a s a s eparat e optional acce ss ory . CB-2L W E Bat tery Charger U s e the battery cha rger to charg e the battery pack s . Chargi ng Tim e s The ch argi ng tim e s given in […]
-
Страница 164
164 Additional Information decrea s e w hen reco rding in co ld s urro unding s , when u s ing the brig hter s creen s etting s , et c. // Using the built-in memor y Using a memor y card * Approximate ti me s for recording wi th repeated op eration s s uch a s s tart/ s top, zoom ing, and po wer on/o f f. CBC-NB2 Car Bat tery Charger U s e the […]
-
Страница 165
Additional Information 165 S C-2000 S oft Carry ing Ca s e A ha ndy camc or der bag wit h padd ed comp artm ent s and plenty of s pace for acce ss orie s . HTC-100 H DMI Cable U s e thi s cab le t o conn ect t he camc order to an ex ter nal devic e u s in g an all-di gital connecti on, a llowing you to enjoy p lay- back at t he hig he s t qua l[…]
-
Страница 166
166 Additional Information Specification s LEGRIA HF R18 / LEGRIA HF R17 / LEGRIA HF R16 / LEGRIA HF R106 S y s tem • Recording Sy s tem Movies: AV C HD Video compression: MPEG-4 AV C /H.264; Audio compression: D olby Digital 2ch Photos: D C F (Design rule for C amera File system), compatible with Exif* Ver . 2.2 and with DPOF** Image compres[…]
-
Страница 167
Additional Information 167 Effective pixels (all figures are approximate values) Movies: 1,040,000 pixels (optical zoom, [Image Stabilizer] set to [Dynamic]) 1,560,000 pixels ([Image Stabilizer] set to [Off] or [Standard]) 16:9 photos: 1,560,000 pixels 4:3 photos: 1,730,000 pixels • LCD Screen: 6.7 cm (2.7 in.), wide, TFT color , approx. 112,[…]
-
Страница 168
168 Additional Information Power/Other s • Power su pply (rated) 7.4 V D C (battery pack), 8.4 V D C (compact power adapter) • Power con su mption: 2.7 W (SP mode, AF on, L C D normal brightness) • Operating temperat u re: 0 – 40 ° C • Dimen s ion s [W x H x D] (excl u ding the grip belt): 60 x 64 x 124 mm • Weight (camcorder body […]
-
Страница 169
Additional Information 169 Abou t the mu s ic file s The s pecif ica tion s of the mu s ic file s compatibl e with t he camcor der are a s follow s . Audio e ncoding : Linear PCM Audi o samplin g: 48 k Hz, 16 bit s , 2 channel s Minimum length: 1 s eco nd File extensio n: WA V The mu s ic data i s s aved in the memory under the followi ng folde[…]
-
Страница 170
170 Additional Information Index 25p Cinem a Mode . . . . . . . . . . . . . 55 A Abr oad, u s ing the camcorder . . . . 161 A s pect r atio of a connect ed TV (TV type) . . . . . . . . . . . . . . . . . . 130 Audio recording level . . . . . . . . . . . 66 Auto Bac k light Correction . . . . . . 127 Auto s low s hutter . . . . . . . . . . . . 12[…]
-
Страница 171
Additional Information 171 I Image effect s . . . . . . . . . . . . . . . . 6 3 Image s tabilizer . . . . . . . . . . . . . . 127 Index s cre en . . . . . . . . . . . . . . 4 3, 45 Initialization (buil t-in memory */mem ory car d) .3 6 J Joy s tic k . . . . . . . . . . . . . . . . . . . . 27 Joy s tic k gu ide . . . . . . . . . . . . . . . . 2 […]
-
Страница 172
172 Additional Information T Te l e p h o t o . . . . . . . . . . . . . . . . . . . 4 0 Time zo ne/D S T . . . . . . . . . . . . . . . 31 Timeline . . . . . . . . . . . . . . . . . . . . 67 Tr a n s fe rring reco rding s to a comput er . . . . . . . . . . . . . . . . . 105 Tr i p o d . . . . . . . . . . . . . . . . . . . . . 156 Tr o u b l e s […]
-
Страница 173
Canon Europa N.V . Bovenkerkerweg 59-61, 1185 XB Amstelveen, The Netherlands www .canon-europa.com Canon UK Ltd CCI Service Centre, Unit 130 Centennial Park, Borehamwood, Hertfordshir e, WD6 3SE, United Kingdom T elephone 0870-241-2161 Canon Australia Pty Ltd T el: 13-13-83 (within Australia only) (61) 02-9805-2555 www .canon.com.au Canon New Zeala[…]
 A h LCD s cr een ( 22) A j Joy s tic k (2 7 ) A k FUNC. button ( 28 , 123) A l U S B terminal ( 100, 103) S q HDMI OUT terminal ( 100, 101) S a CO MPONE NT OUT t[…]