
| Название | Русский | English |
|---|---|---|
| PSR-270 Owner’s Manual | — |
[3.7MB] |
| PSR-2700/PSR-1700 Owner’s Manual | — |
[1.9MB] |
| PSR-2700/PSR-1700 Owner’s Manual (Text Version) | — |
[123KB] |
SPECIAL MESSAGE SECTION
This product utilizes batteries or an external power supply (adapter).
DO NOT connect this product to any power supply or adapter other
than one described in the manual, on the name plate, or specifically
recommended by Yamaha.
This product should be used only with the components supplied or; a
cart, rack, or stand that is recommended by Yamaha. If a cart, etc., is
used, please observe all safety markings and instructions that accompany the accessory product.
SPECIFICATIONS SUBJECT TO CHANGE:
The information contained in this manual is believed to be correct at the
time of printing. However, Yamaha reserves the right to change or
modify any of the specifications without notice or obligation to update
existing units.
This product, either alone or in combination with an amplifier and headphones or speaker/s, may be capable of producing sound levels that
could cause permanent hearing loss. DO NOT operate for long periods
of time at a high volume level or at a level that is uncomfortable. If you
experience any hearing loss or ringing in the ears, you should consult
an audiologist.
IMPORTANT: The louder the sound, the shorter the time period before
damage occurs.
NOTICE:
Service charges incurred due to a lack of knowledge relating to how a
function or effect works (when the unit is operating as designed) are not
covered by the manufacturer’s warranty, and are therefore the owners
responsibility. Please study this manual carefully and consult your
dealer before requesting service.
ENVIRONMENT AL ISSUES:
Yamaha strives to produce products that are both user safe and environmentally friendly. We sincerely believe that our products and the
production methods used to produce them, meet these goals. In keeping with both the letter and the spirit of the law, we want you to be
aware of the following:
Battery Notice:
This product MAY contain a small non-rechargeable battery which (if
applicable) is soldered in place. The average life span of this type of
battery is approximately five years. When replacement becomes
necessary, contact a qualified service representative to perform the
replacement.
This product may also use “household” type batteries. Some of these
may be rechargeable. Make sure that the battery being charged is a
rechargeable type and that the charger is intended for the battery
being charged.
When installing batteries, do not mix batteries with new, or with batteries of a different type. Batteries MUST be installed correctly. Mismatches or incorrect installation may result in overheating and battery
case rupture.
Warning:
Do not attempt to disassemble, or incinerate any battery. Keep all
batteries away from children. Dispose of used batteries promptly and
as regulated by the laws in your area. Note: Check with any retailer of
household type batteries in your area for battery disposal information.
Disposal Notice:
Should this product become damaged beyond repair, or for some
reason its useful life is considered to be at an end, please observe all
local, state, and federal regulations that relate to the disposal of products that contain lead, batteries, plastics, etc. If your dealer is unable
to assist you, please contact Yamaha directly.
NAME PLATE LOCA TION:
The name plate is located on the bottom of the product. The model
number, serial number, power requirements, etc., are located on this
plate. You should record the model number, serial number, and the
date of purchase in the spaces provided below and retain this manual
as a permanent record of your purchase.
Model
Serial No.
Purchase Date
92-BP (bottom)
PLEASE KEEP THIS MANUAL
FCC INFORMATION (U.S.A.)
1. IMPORTANT NOTICE: DO NOT MODIFY THIS UNIT!
This product, when installed as indicated in the instructions contained in this manual, meets FCC requirements. Modifications not
expressly approved by Yamaha may void your authority, granted
by the FCC, to use the product.
2. IMPORTANT: When connecting this product to accessories and/
or another product use only high quality shielded cables. Cable/s
supplied with this product MUST be used. Follow all installation
instructions. Failure to follow instructions could void your FCC
authorization to use this product in the USA.
3. NOTE: This product has been tested and found to comply with
the requirements listed in FCC Regulations, Part 15 for Class “B”
digital devices. Compliance with these requirements provides a
reasonable level of assurance that your use of this product in a
residential environment will not result in harmful interference with
other electronic devices. This equipment generates/uses radio
frequencies and, if not installed and used according to the instructions found in the users manual, may cause interference harmful
to the operation of other electronic devices. Compliance with FCC
* This applies only to products distributed by YAMAHA CORPORATION OF AMERICA.
Entsorgung leerer Batterien (nur innerhalb Deutschlands)
Leisten Sie einen Beitrag zum Umweltschutz. Verbrauchte Batterien oder Akkumulatoren dürfen nicht in den Hausmüll. Sie können bei einer
Sammelstelle für Altbatterien bzw. Sondermüll abgegeben werden. Informieren Sie sich bei Ihrer Kommune.
regulations does not guarantee that interference will not occur in
all installations. If this product is found to be the source of interference, which can be determined by turning the unit “OFF” and
“ON”, please try to eliminate the problem by using one of the
following measures:
Relocate either this product or the device that is being affected by
the interference.
Utilize power outlets that are on different branch (circuit breaker
or fuse) circuits or install AC line filter/s.
In the case of radio or TV interference, relocate/reorient the antenna. If the antenna lead-in is 300 ohm ribbon lead, change the
lead-in to co-axial type cable.
If these corrective measures do not produce satisfactory results,
please contact the local retailer authorized to distribute this type
of product. If you can not locate the appropriate retailer, please
contact Yamaha Corporation of America, Electronic Service Division, 6600 Orangethorpe Ave, Buena Park, CA90620
The above statements apply ONLY to those products distributed
by Yamaha Corporation of America or its subsidiaries.
(class B)
(battery)
PRECAUTIONS
PLEASE READ CAREFULLY BEFORE PROCEEDING
* Please keep these precautions in a safe place for future reference.
WARNING
Always follow the basic precautions listed below to avoid the possibility of serious injury or even death from electrical shock,
short-circuiting, damages, fire or other hazards. These precautions include, but are not limited to, the following:
• Do not open the instrument or attempt to disassemble the internal parts
or modify them in any way. The instrument contains no user-serviceable
parts. If it should appear to be malfunctioning, discontinue use immediately and have it inspected by qualified Yamaha service personnel.
• Do not expose the instrument to rain, use it near water or in damp or wet
conditions, or place containers on it containing liquids which might spill
into any openings.
• If the AC adaptor cord or plug becomes frayed or damaged, or if there is
a sudden loss of sound during use of the instrument, or if any unusual
smells or smoke should appear to be caused by it, immediately turn off
CAUTION
Always follow the basic precautions listed below to avoid the possibility of physical injury to you or others, or damage to the
instrument or other property. These precautions include, but are not limited to, the following:
the power switch, disconnect the adaptor plug from the outlet, and have
the instrument inspected by qualified Yamaha service personnel.
• Use the specified adaptor (PA-3B or an equivalent recommended by
Yamaha) only. Using the wrong adaptor can result in damage to the instrument or overheating.
• Before cleaning the instrument, always remove the electric plug from the
outlet. Never insert or remove an electric plug with wet hands.
• Check the electric plug periodically and remove any dirt or dust which
may have accumulated on it.
• Do not place the AC adaptor cord near heat sources such as heaters or
radiators, and do not excessively bend or otherwise damage the cord,
place heavy objects on it, or place it in a position where anyone could
walk on, trip over, or roll anything over it.
• When removing the electric plug from the instrument or an outlet, always
hold the plug itself and not the cord.
• Do not connect the instrument to an electrical outlet using a multipleconnector. Doing so can result in lower sound quality, or possibly cause
overheating in the outlet.
• Unplug the AC power adaptor when not using the instrument, or during
electrical storms.
• Always make sure all batteries are inserted in conformity with the +/polarity markings. Failure to do so might result in overheating, fire, or
battery fluid leakage.
• Always replace all batteries at the same time. Do not use new batteries
together with old ones. Also, do not mix battery types, such as alkaline
batteries with manganese batteries, or batteries from different makers, or
different types of batteries from the same maker, since this can cause
overheating, fire, or battery fluid leakage.
• Do not dispose of batteries in fire.
• Do not attempt to recharge batteries that are not intended to be charged.
• If the instrument is not to be in use for a long time, remove the batteries
from it, in order to prevent possible fluid leakage from the battery.
• Keep batteries away from children.
• Before connecting the instrument to other electronic components, turn off
the power for all components. Before turning the power on or off for all
components, set all volume levels to minimum.
• Do not expose the instrument to excessive dust or vibrations, or extreme
cold or heat (such as in direct sunlight, near a heater, or in a car during the
day) to prevent the possibility of panel disfiguration or damage to the
internal components.
• Do not use the instrument near other electrical products such as televisions, radios, or speakers, since this might cause interference which can
affect proper operation of the other products.
• Do not place the instrument in an unstable position where it might accidentally fall over.
• Before moving the instrument, remove all connected adaptor and other cables.
• When cleaning the instrument, use a soft, dry cloth. Do not use paint
thinners, solvents, cleaning fluids, or chemical-impregnated wiping cloths.
Also, do not place vinyl, plastic or rubber objects on the instrument, since
this might discolor the panel or keyboard.
• Do not rest your weight on, or place heavy objects on the instrument, and
do not use excessive force on the buttons, switches or connectors.
• Use only the stand/rack specified for the instrument. When attaching the
stand or rack, use the provided screws only. Failure to do so could cause
damage to the internal components or result in the instrument falling over.
• Do not operate the instrument for a long period of time at a high or uncomfortable volume level, since this can cause permanent hearing loss. If you
experience any hearing loss or ringing in the ears, consult a physician.
■SAVING USER DATA
• Save all data to an external device such as the Yamaha MIDI Data Filer
MDF3, in order to help prevent the loss of important data due to a malfunction or user operating error.
Yamaha cannot be held responsible for damage caused by improper use or modifications to the instrument, or data that is lost or destroyed.
Always turn the power off when the instrument is not in use.
Make sure to discard used batteries according to local regulations.
* The illustrations and LCD screens as shown in this owner’s manual are for in-
structional purposes only, and may be different from the ones on your instrument.
(4)-3
1
3
Congratulations on your purchase of the Yamaha
PSR-270 PortaTone!
You now own a portable keyboard that combines advanced func-
tions, great sound and exceptional ease-of-use in a highly compact
package. Its outstanding features also make it a remarkably ex-
pressive and versatile instrument.
Read this Owner’s Manual carefully while playing your new
PortaTone in order to take full advantage of its various features.
Main Features
The PSR-270 is a sophisticated yet easy-to-use keyboard
with the following features and functions:
Yamaha Education Suite
………………………………………… Pages 60-71
The PortaTone features the new Yamaha Education
Suite — a set of learning tools that utilize the latest
technology to make studying and practicing music
more fun and fulfilling than ever before!
The Yamaha Education Suite includes:
Chord Guide functions in the Style mode —
Smart and Dictionary — that make it exceptionally
easy to learn chords and chord relationships.
There’s also a powerful EZ Chord function that lets
you easily record and play back chord progressions.
• Smart lets you easily play harmonically “correct”
chord progressions for whatever key you specify. It’s
great for learning — and performing!
• Dictionary is a built-in “chord encyclopedia” that
teaches you how to play specific chords. You type
in the chord name, and the PortaTone shows you
which notes to play!
• EZ Chord is a powerful and simple way to program and play chord progressions. Record all the
chord changes you need for a song, then play back
the chords one after another by simply playing a
single key!
Portable Grand……………………….Page 24
The PortaTone also has a Portable Grand function for
realistic piano performance. Pressing the PORTABLE
GRAND button instantly calls up the stunningly
authentic “Stereo Sampled Piano” voice and configures
the entire PortaTone for optimum piano play. Special
Pianist styles — with piano-only accompaniment — are
also provided.
Other powerful features include:
• Exceptionally realistic and dynamic sounds with 100
voices, utilizing digital recordings of actual instruments.
• Dual voice and Split voice modes that let you layer two
voices together or assign two voices to separate sections of
the keyboard
• Four high-quality effects — Reverb, Chorus, DSP, and
Harmony — each with a variety of different types.
• 100 auto accompaniment styles, each with different
Intro, Main A and B, and Ending sections. All styles
(except for the Pianist styles) also have their own four Fillin patterns. The PortaTone also gives you convenient
control over accompaniment Styles — including Tempo
and independent Accompaniment Volume.
• Powerful song recording operations for recording and
playing back complete compositions (three User songs are
available). Up to six tracks can be recorded to a song,
including a special chord track for style accompaniment.
• One Touch Setting (OTS), for automatically calling up an
appropriate voice for playing with the selected style. Plus,
there are 16 User OTS memory spaces that let you save
your custom panel settings for instant recall.
• Touch response (with front panel on/off switch) for
maximum expressive level control over the voices. This
also works in conjunction with the Dynamic Filter, which
dynamically adjusts the timbre or tone of a voice according to your playing strength — just a like a real musical
instrument!
• Convenient footswitch control over various functions —
including sustain, start/stop, and more.
• GM (General MIDI) compatibility and full GM voice set.
• Large custom LCD (backlit) gives you easy, at-a-glance
confirmation of all important settings, as well as chord and
note indications.
• Comprehensive MIDI functions that let you integrate the
PortaTone into a MIDI music system, for sequence recording and other advanced applications.
• Built-in, high-quality stereo amplifier/speaker system.
4
4
2
Contents
PANEL CONTROLS AND
TERMINALS 6
• Front Panel …………………………. 6
• Rear Panel ………………………….. 7
SETTING UP 8
POWER REQUIREMENTS …………….. 8
TURNING ON THE POWER …………. 8
ACCESSORY JACKS ……………………. 9
Quick Guide —
How to Use Your New
PSR-270 PortaTone 10
Step 1 Voices ……………………….. 10
Step 2 Auto Accompaniment …. 12
Step 3 Chord Guide ……………… 14
Step 4 Songs ……………………….. 16
Step 5 Function Parameters …… 18
Step 6 MIDI …………………………. 20
PANEL DISPLAY INDICATIONS
• Music Stand ……………………… 23
22
PORTABLE GRAND 24
PLAYING THE PORTABLE GRAND .. 24
USING THE METRONOME ………….. 24
• Setting the Metronome
Time Signature ………………….. 25
• Adjusting the Metronome
Volume …………………………….. 26
PLAYING VOICES —
THE VOICE MODE 27
PLAYING A VOICE — MAIN VOICE 27
• About Panel Voices and
GM Voices ………………………… 29
• Drum Kit Voice Chart
(voices 101 — 110) ……………… 30
Function Parameters — Main Voice
TRANSPOSE AND TUNING …………. 32
Transpose ……………………………… 32
Tuning ………………………………….. 33
PLAYING TWO VOICES —
DUAL VOICE …………………………….. 34
Function Parameters — Dual Voice
PLAYING TWO VOICES —
SPLIT VOICE ……………………………… 36
Function Parameters — Split Voice 37
ADDITIONAL VOICE
FUNCTIONS — VOICE SET AND
TOUCH SENSITIVITY …………………. 38
Function Parameters —
Voice Set and Touch Sensitivity ….. 39
30
35
EFFECTS 40
REVERB …………………………………….. 40
CHORUS …………………………………… 41
DSP …………………………………………. 42
HARMONY ……………………………….. 43
Function Parameters — Effects …… 44
• Effect Types ………………………. 45
AUTO ACCOMPANIMENT —
THE STYLE MODE 47
SELECTING A STYLE AND
PLAYING THE ACCOMPANIMENT ..47
ACCOMPANIMENT CONTROLS ….. 52
USING THE AUTO
ACCOMPANIMENT FEATURES …….. 52
CHANGING THE TEMPO ……………. 53
ACCOMPANIMENT SECTIONS
(MAIN A, MAIN B AND FILL-INS) …54
ADJUSTING THE
ACCOMPANIMENT VOLUME ……… 55
USING AUTO ACCOMPANIMENT —
MULTI FINGERING …………………….. 56
Single Finger Chords ……………… 56
Fingered Chords ……………………. 56
SETTING THE ACCOMPANIMENT
SPLIT POINT …………………………….. 58
Function Parameter —
Accompaniment Split Point ………. 59
WHAT IS A CHORD? ………………….. 60
WRITING CHORD NAMES ………….. 61
The Intervals of the Scale ……….. 61
Other Chords ………………………… 61
CHORD GUIDE ………………………….. 62
Dictionary …………………………….. 62
Smart ……………………………………. 64
• Smart Chord List ……………….. 65
EZ Chord ………………………………. 66
EZ Chord — Playback ………………. 66
• Bank Chain ……………………….. 67
EZ Chord — Recording ……………..68
• Recording a Space……………… 69
• Playing the Accompaniment
During EZ Chord Recording … 69
• HINT — Using Spaces…………. 70
Clearing an EZ Chord Bank ……….. 71
ONE TOUCH SETTING (OTS) 72
ONE TOUCH SETTING — USER …… 72
Recording a User One Touch
Setting ………………………………….. 72
Recalling a User One Touch Setting
• Selecting a User Bank …………. 73
ONE TOUCH SETTING — PRESET … 74
Selecting a Preset One Touch
Setting ………………………………….. 74
73
SELECTING AND PLAYING
SONGS — THE SONG MODE 75
SELECTING AND PLAYING A SONG
CHANGING THE TEMPO ……………. 76
ABOUT THE BEAT DISPLAY …………. 77
ADJUSTING THE SONG VOLUME … 78
75
SONG RECORDING 79
RECORDING A USER SONG —
REALTIME RECORDING ……………… 80
• Using the Metronome ………… 81
• Additional Operations ………… 83
RECORDING A USER SONG —
STEP RECORDING ……………………… 84
Recording Notes ……………………… 85
• Additional Operations ………… 87
Replacing a Note or Rest ………….. 88
Entering Velocity Curves …………… 89
• Velocity Curve Chart…………… 89
CLEARING A SONG ……………………. 90
FOOTSWITCH 91
• Footswitch Assign Functions … 92
MIDI FUNCTIONS 93
WHAT IS MIDI? …………………………. 93
Channel Messages …………………… 94
System Messages …………………….. 94
• MIDI Terminals ………………….. 94
CONNECTING TO A PERSONAL
COMPUTER ………………………………. 95
FUNCTION PARAMETERS — MIDI .. 96
USING BULK DUMP SEND
TO SAVE DATA ………………………….. 99
Saving Bulk Data …………………….. 99
Loading Bulk Data …………………. 101
USING INITIAL SETUP SEND
WITH A SEQUENCER ……………….. 102
Sending Initial Setup Data ………. 102
TROUBLESHOOTING ……………….. 104
DATA BACKUP & INITIALIZATION 105
SPECIFICATIONS ……………………… 106
SONG SCORES
(EZ Chord banks 1, 2) ………………. 107
VOICE LIST ……………………………… 108
STYLE LIST ……………………………… 111
DRUM KIT LIST ……………………….. 112
MIDI IMPLEMENTATION CHART .. 114
INDEX ……………………………………. 117
5
3
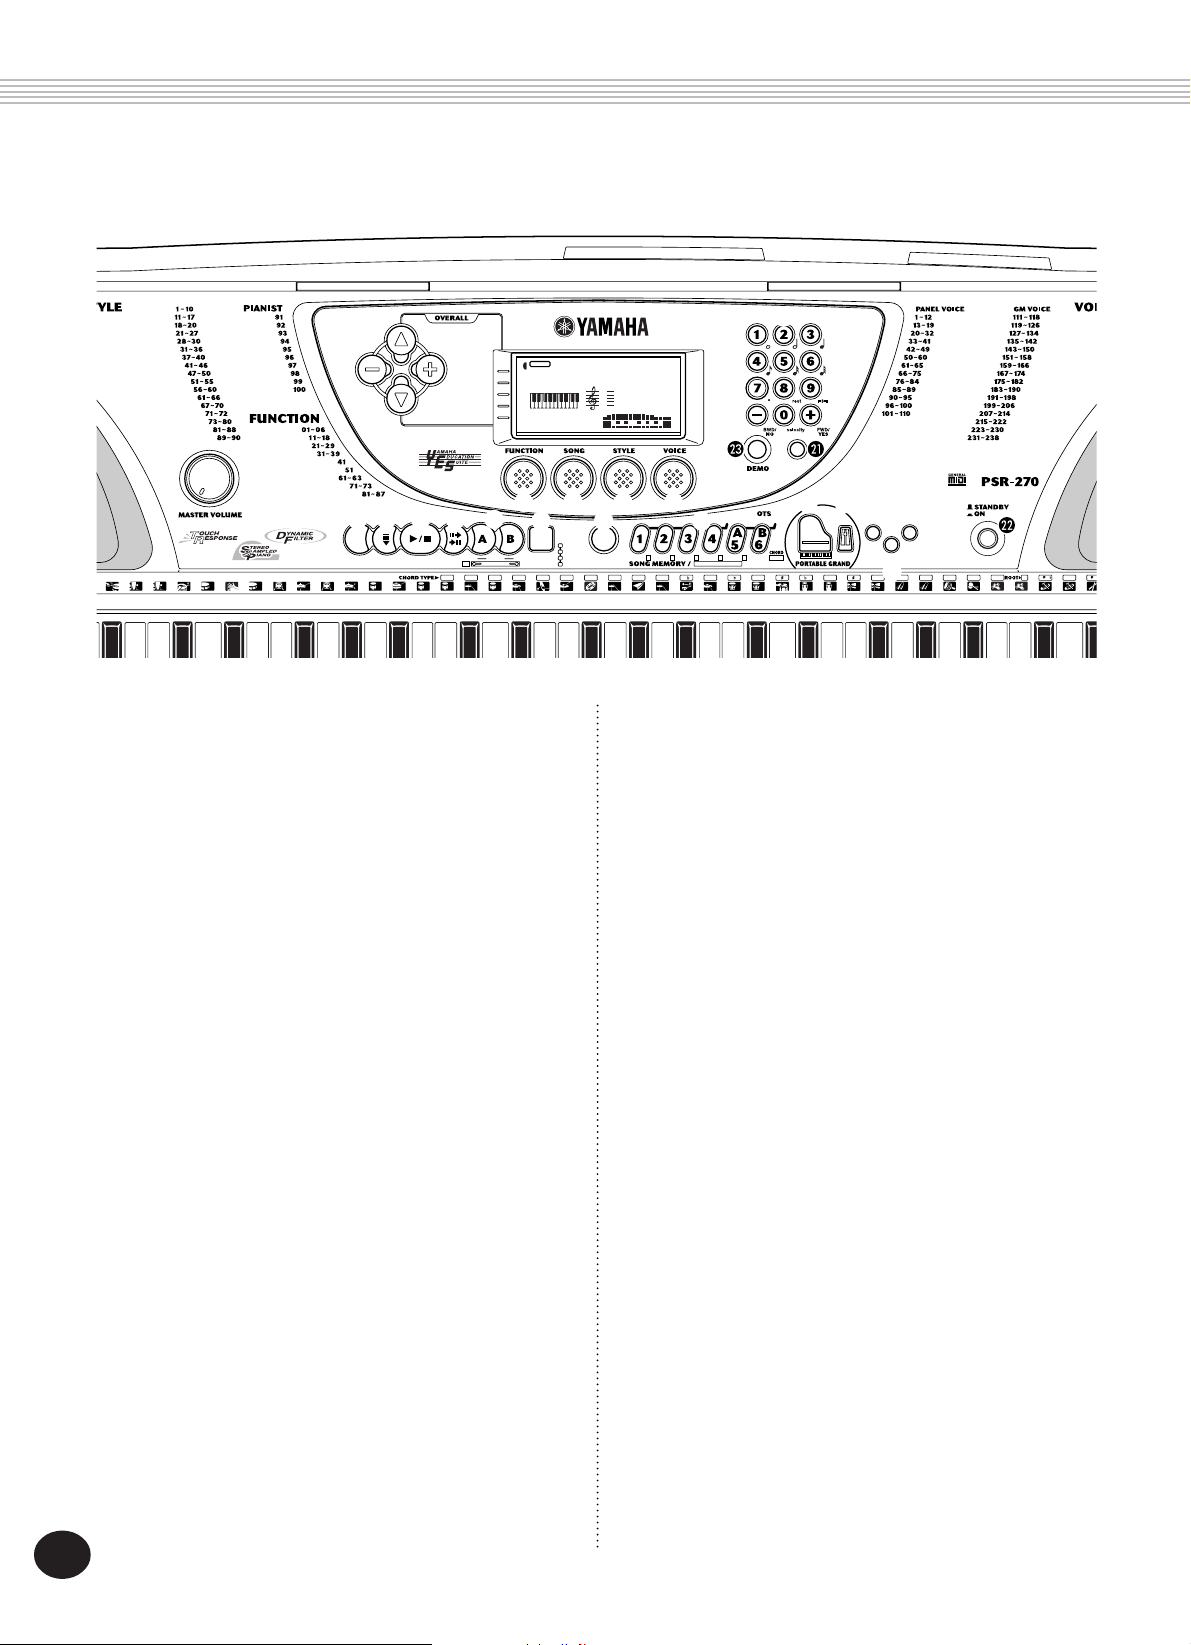
PANEL CONTROLS AND TERMINALS
Front Panel
8BEAT
16BEAT
6/8 BALLAD
DANCE
DISCO
ROCK & ROLL
RHYTHM & BLUES
CONTEMPORARY JAZZ
TRADITIONAL JAZZ
COUNTRY & WESTERN
BALLROOM LATIN
BALLROOM STANDARD
MARCH & WALTZ
547
46 51 53
2483
ROCK-A-BALLAD
8BEAT
SWING
LATIN
CARIBBEAN
JAZZ BALLAD
2BEAT
BOOGIE
RAGTIME
ARPEGGIO
WALTZ
MAIN VOICE
DUAL VOICE
SPLIT VOICE
ONE TOUCH SETTING
HAPPY
EFFECT
ROCK
AMERICAS
쐃
MIN MAX
50
49 55 70 71 74 81
52
2
3
L H
STYLE
SONG
54
UTILITY
쐇
MIDI
쐅
쐈
ACMP
SYNC-
ON/OFF
START
56 58 59
L
TEMPO
TRANSPOSE
TUNING
ACMP/SONG
VOLUME
METRONOME
VOLUME
쐉
START/
STOP
57
씉
씈
MAINAB
INTRO/
rit.
AUTO FILL
ENDING
(9)
6 mM7 M7
M
M
M
C
60
L
H
R
61
62
H
1
1
쐃 MASTER VOLUME dial
This determines the overall volume of the
PortaTone.
쐇 OVERALL buttons (
These are for selecting the various “overall”
functions and setting their values. (See pages
22, 24.)
▲, ▼
, +, -)
VOICE
STYLE
001
MEASURE
TEMPO
001 116
쐏
씊 씋
DICTIONARY
SMART
EZ
CHORD
OFF
GUIDE
m m(9)
64
63
65
R
PIANO
MALLET
ORGAN
GUITAR
BASS
ENSEMBLE
STRINGS
BRASS
REED
PIPE
SYNTH LEAD
SYNTH PAD
DRUM KITS
DUALREVERB
aug
7aug
7sus4 Csus4 C /D D /ED
80 85
H L
82 83H84
GrandPno
쐄 쐂쐋
RECORD
(9)
m7 m7 5m67
m7
C
67
66
69
68
S
2
씌
SONG TRACK
쐆
TOUCH
쐊 쐎
PRESETUSER
6~16
45321
)
( 9)7(9)7(
9
R
72
H
2
( 13)
7
7
73
L
씎 씏
METRO-
NOME
HARMONY
씍
)
( 11)
7(13
7
dim7 dim
75H76L77H78L79
• Setting the time signature for the Metronome (page 25)
• Setting the key signature for the Smart
Chord function (page 64)
쐊 PORTABLE GRAND button
This instantly changes to the Voice mode and
calls up the Grand Piano voice. (See page 24.)
GUITAR
BASS
STRINGS
ENSEMBLE
BRASS
REED
PIPE
SYNTH LEAD
SYNTH PAD
SYNTH EFFECTS
ETHNIC
PERCUSSIVE
SOUND EFFECTS
L
PIANO
CHROMATIC
ORGAN
86
쐋 FUNCTION button
This selects the Function mode. (See page 18.)
쐏 SONG button
This selects the Song mode. (See pages 16, 75.)
쐄 STYLE button
This selects the Style mode. (See pages 12, 47.)
쐂 VOICE button
This selects the Voice mode. (See pages 10, 27.)
쐆 Numeric keypad, +/- buttons
These are for selecting songs, voices, and styles.
(See pages 28, 47, and 76.) They are also used
for making various settings, such as:
• Selecting and changing the Function
parameters (page 18)
• Setting note values and other settings for
the Step Record function (page 85)
쐎 METRONOME button
This turns the metronome on and off. (See page
24.)
쐅 ACMP ON/OFF button
When the Style mode is selected, this turns the
auto accompaniment on and off. (See page 52.)
This button has no function in the Song Play
mode.
쐈 SYNC-START button
This turns the Sync-Start function on and off.
(See page 48.)
쐉 START/STOP button
When the Style mode is selected, this alternately
starts and stops the auto accompaniment. (See
page 48.) In the Song mode, this alternately
starts and stops song playback. (See page 76.)
6
4

PANEL CONTROLS AND TERMINALS
씈 INTRO/ENDING button
When the Style mode is selected, this is used to
control the Intro and Ending functions. (See
pages 49, 51.)
씉 MAIN A/B (AUTO FILL) buttons
When the Style mode is selected, these are used
to change auto accompaniment sections and
control the Auto Fill function. (See page 54.)
씊 CHORD GUIDE button
When the Style mode is selected, this is used to
control the Chord Guide functions. (See page
62.)
씋 RECORD button
This is used for selecting and enabling the
recording functions: Song (pages 80, 84), EZ
Chord (page 68), and One Touch Setting (page
72).
씌 ONE TOUCH SETTING / SONG MEMORY
buttons
When the Style mode is selected, these are used
to select the One Touch Setting registrations
(page 73). When the Song mode is selected,
these are used to select specific tracks (pages 81,
85).
씍 HARMONY button
This turns the Harmony effect on and off. (See
page 43.)
씎 REVERB button
This turns the Reverb effect on and off. (See
page 40.)
씏 DUAL button
This turns the Dual mode on and off. (See page
34.)
TOUCH button
This turns the Touch function on and off. (See
page 38.)
Power switch (STANDBY/ON)
DEMO button
This is used to play the Demo songs. (See page
16.)
Rear Panel
쐃 쐇
DC IN 10-12V
PHONES/
OUTPUT
쐃 DC IN 10-12V jack
This is for connection to a PA-3B AC power
adaptor. (See page 8.)
쐇 PHONES/OUTPUT jack
This is for connection to a set of stereo headphones or to an external amplifier/speaker
system. (See page 9.)
쐋
FOOT SWITCH
쐏
MIDI
IN OUT
쐋 FOOT SWITCH jack
This is for connection to an optional FC4 or FC5
Footswitch. The footswitch is generally used to
control sustain, but it can conveniently be set to
control one of a variety of functions instead.
(See pages 9, 91.)
쐏 MIDI IN, OUT terminals
These are for connection to other MIDI instruments and devices. (See page 94.)
7
5
SETTING UP
This section contains information about setting up your PortaTone for playing.
Make sure to read this section carefully before using the instrument.
POWER REQUIREMENTS
Although the PSR-270 will run either from an
optional AC adaptor or batteries, Yamaha recommends use of an AC adaptor whenever
possible. An AC adaptor is more environmentally friendly than batteries and does not deplete
resources.
Never interrupt the power supply (e.g. remove the batteries or
unplug the AC adaptor) during any PSR-270 record operation!
Doing so can result in a loss of data.
Using an AC Power Adaptor
To connect your PortaTone to a wall socket, you
will need the optionally available Yamaha PA-3B
Power Adaptor. Use of other AC adaptors could
result in damage to the instrument, so be sure to
ask for the right kind. Connect one end of the
adaptor to the DC IN 10-12V jack on the rear
panel of your PortaTone, and the other end to a
suitable electrical outlet.
• Use ONLY a Yamaha PA-3B AC Power Adaptor (or other
adaptor specifically recommended by Yamaha) to power your
instrument from the AC mains. The use of other adaptors may
result in irreparable damage to both the adaptor and the PSR-
270.
• Unplug the AC Power Adaptor when not using the PSR-270,
or during electrical storms.
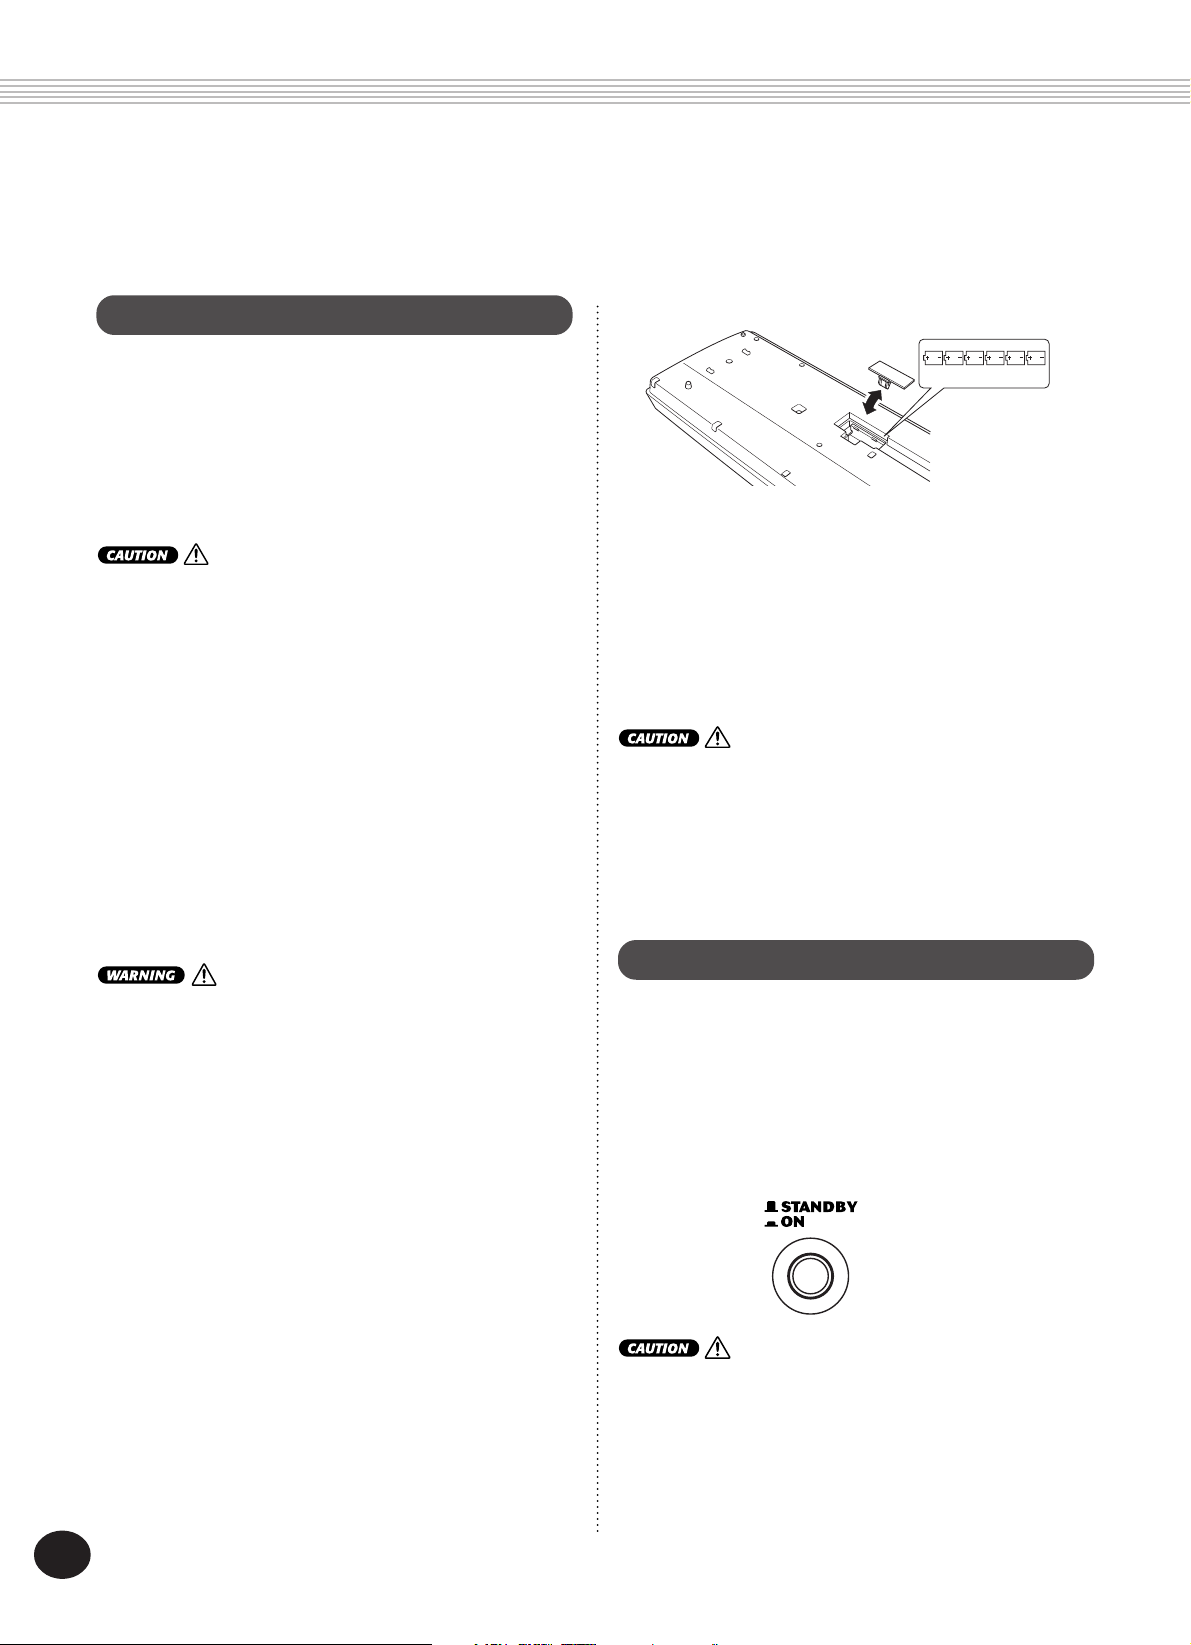
BATTERIES 1.5V x 6
■ When the Batteries Run Down
When the batteries run low and the battery
voltage drops below a certain level, the
PortaTone may not sound or function properly.
As soon as this happens, replace them with a
complete set of six new batteries.
• Never mix old and new batteries or different types of
batteries (e.g., alkaline and manganese).
• To prevent possible damage from battery leakage, remove
the batteries from the instrument if it is not to be used for a
long time.
TURNING ON THE POWER
With the AC power adaptor connected or with
batteries installed, simply press the power switch
until it locks in the ON position. When the
instrument is not in use, be sure to turn the
power off. (Press the switch again so that it
pops up.)
Using Batteries
■ Inserting Batteries
Turn the instrument upside-down and remove
the battery compartment lid. Insert six 1.5-volt
size “D” (SUM-1, R-20 or equivalent) batteries as
shown in the illustration, making sure that the
positive and negative terminals are properly
aligned, and replace the lid.
8
Even when the switch is in the “STANDBY” position, electricity
is still flowing to the instrument at the minimum level. When
you are not using the PSR-270 for a long time, make sure you
unplug the AC power adaptor from the wall AC outlet, and/or
remove the batteries from the instrument.
6
SETTING UP
ACCESSORY JACKS
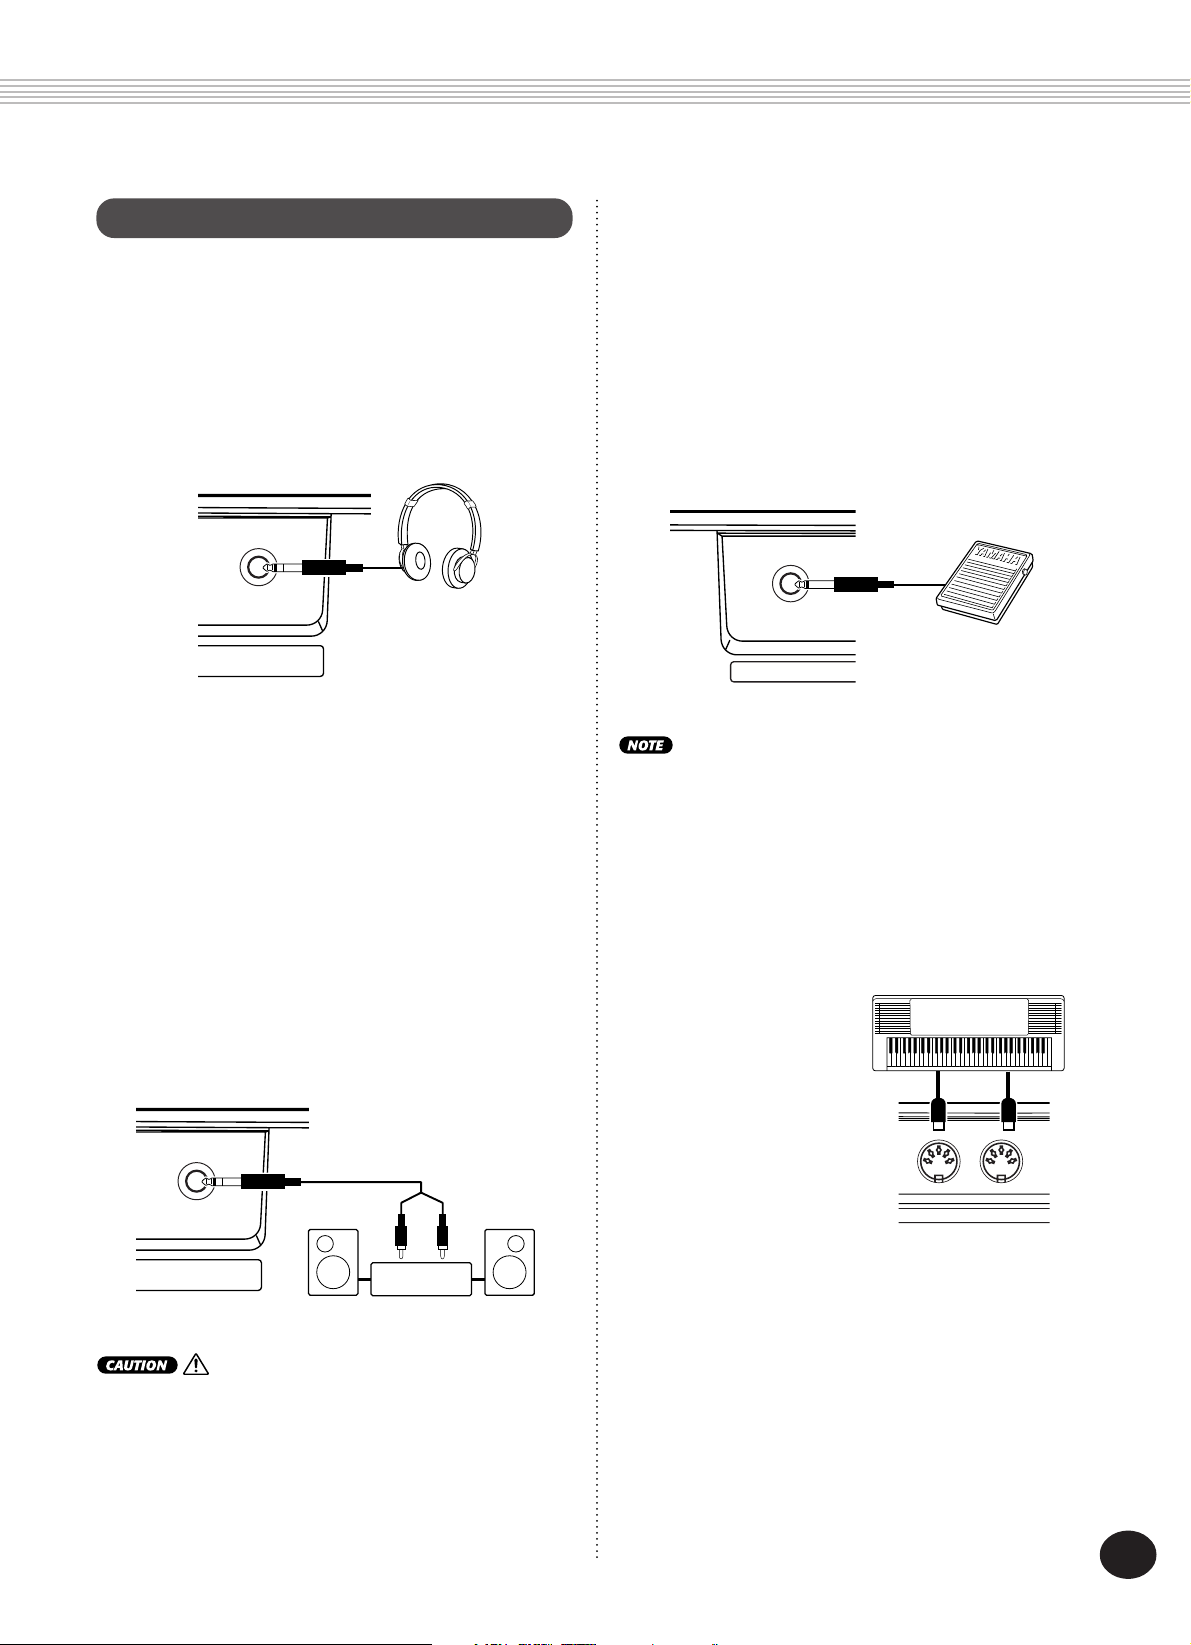
■ Using Headphones
For private practicing and playing without
disturbing others, connect a set of stereo headphones to the rear panel PHONES/OUTPUT jack.
Sound from the built-in speaker system is automatically cut off when you insert a headphone
plug into this jack.
PHONES/
OUTPUT
■ Connecting a Keyboard Amplifier or Stereo
System
Though the PortaTone is equipped with a builtin speaker system, you can also play it through
an external amplifier/speaker system. First,
make sure the PortaTone and any external
devices are turned off, then connect one end of
a stereo audio cable to the LINE IN or AUX IN
jack(s) of the other device and the other end to
the rear panel PHONES/OUTPUT jack on the
PortaTone.
■ Using a Footswitch
This feature lets you use an optional footswitch
(Yamaha FC4 or FC5) to sustain the sound of the
voices, or control a variety of other functions.
(See page 91.) When this is used for sustain, the
footswitch functions the same way as a damper
pedal on an acoustic piano — press and hold
down the footswitch as you play the keyboard
to sustain the sound.
FOOT SWITCH
• Make sure that the footswitch plug is properly connected to
the FOOT SWITCH jack before turning on the power.
• Do not press the footswitch while turning the power on.
Doing this changes the recognized polarity of the footswitch,
resulting in reversed footswitch operation.
■ Using the MIDI Terminals
The PortaTone also
features MIDI termi-
MIDI instrument
nals, allowing you to
interface the
PortaTone with other
MIDI instruments and
devices. (For more
information, see
pages 20, 93.)
MIDI
IN OUT
PHONES/
OUTPUT
To prevent damage to the speakers, set the volume of the
external devices at the minimum setting before connecting
them. Failure to observe these cautions may result in electric
shock or equipment damage.
Stereo system
9
7
001
001 063
MEASURE TEMPO
GrandPno
VOICE
STYLE
Quick Guide — How to
Quick Guide — How to
Use Your New PSR-270
Use Your New PSR-270
CCCCCDDDDDDEEEEE
ГГГГГДДДДДДЕЕЕЕЕ
PortaTone
PortaTone
Step 1 Voices
This brief, easy-to-follow section shows you how to
use the basic features and functions of your new
PSR-270 PortaTone. If you’ve never touched an
electronic keyboard before, reading and going
through the steps in this section will make you
familiar with the PortaTone in a very short time. It
will also give you the tools you need to explore the
advanced capabilities of the instrument and use
them effectively in your own music. Good
luck…and enjoy!
VOICE
TEMPO
TRANSPOSE
TUNING
ACMP/SONG
VOLUME
METRONOME
VOLUME
STYLE
MEASURE
GrandPno
001
TEMPO
001 116
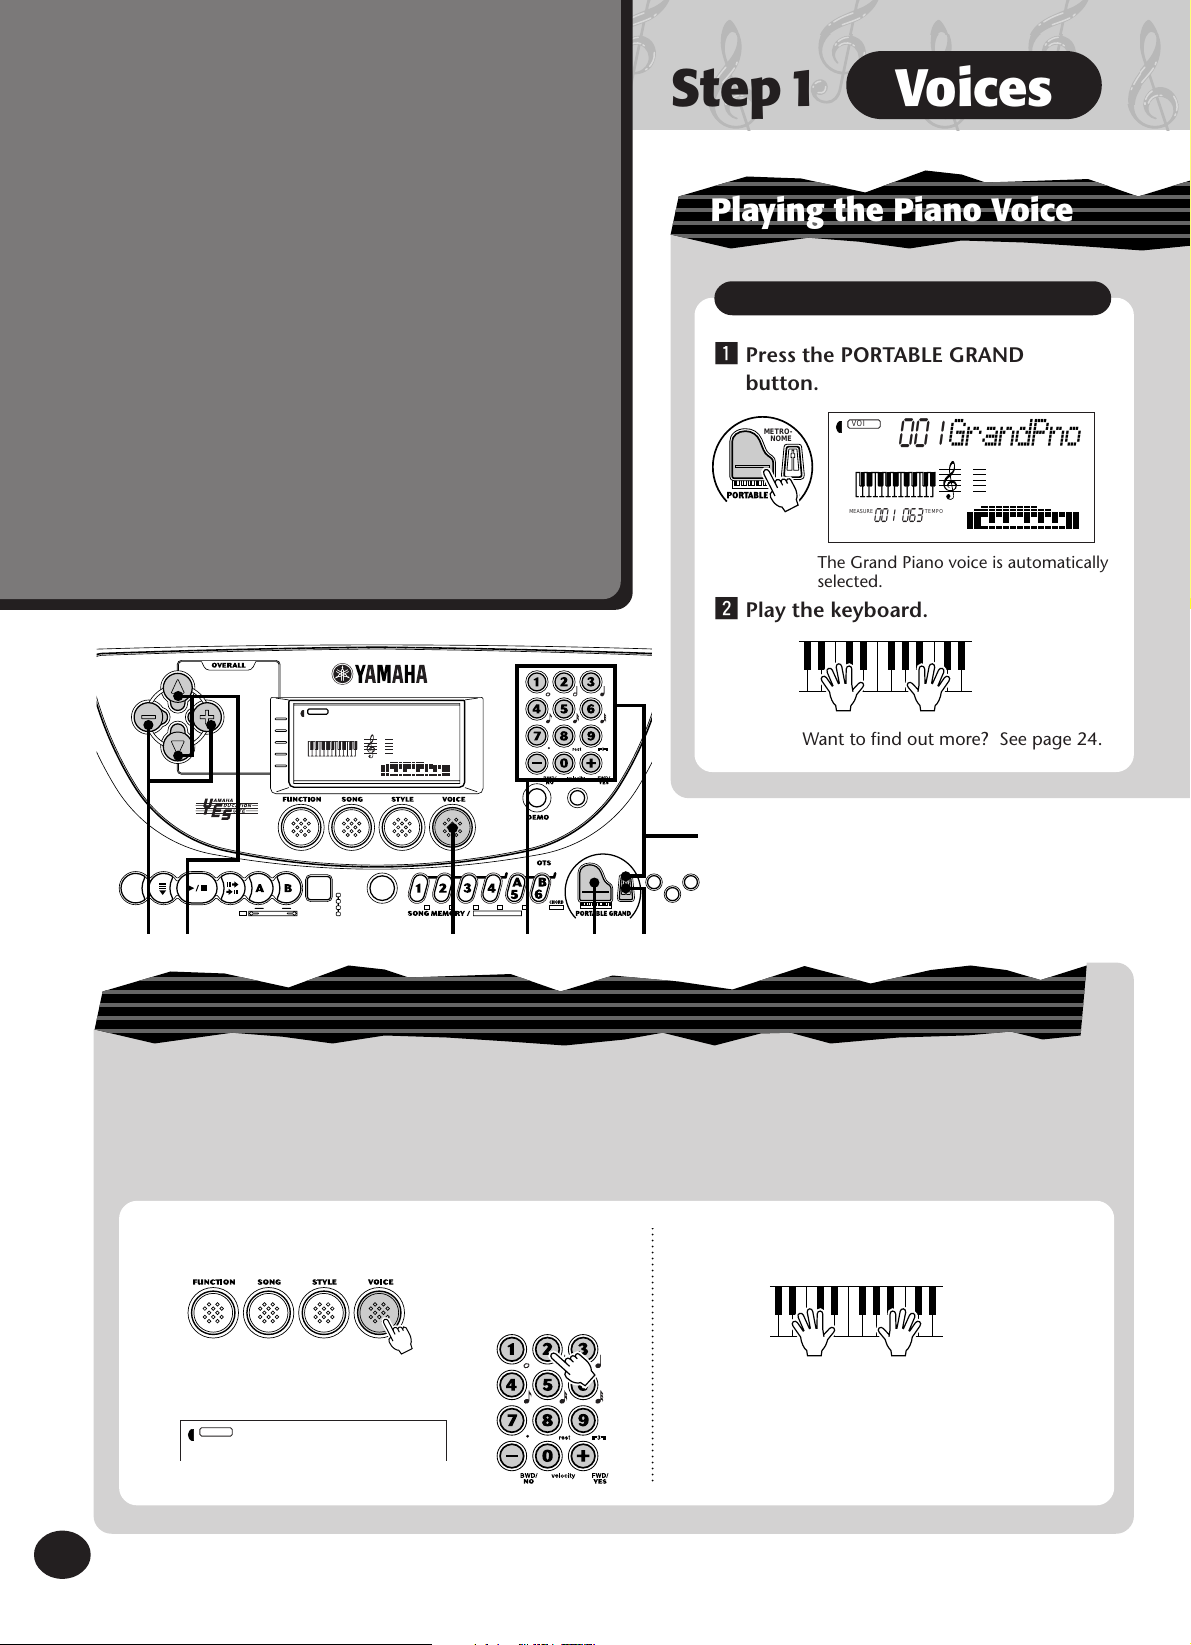
Playing the Piano Voice
Portable Grand
z Press the PORTABLE GRAND
button.
METRO-
NOME
The Grand Piano voice is automatically
selected.
x Play the keyboard.
Want to find out more? See page 24.
TOUCH
q
METRO-
ACMP
ON/OFF
SYNC-
START
PRESETUSER
DICTIONARY
SMART
START/
STOP
INTRO/
ENDING
MAINAB
rit.
AUTO FILL
CHORD
GUIDE
EZ
RECORD
OFF
12
45321
SONG TRACK
zx
NOME
6~16
zq
DUALREVERB
HARMONY
Selecting other voices
The PSR-270 features a total of 238 high-quality voices. Let’s try a few of them out…
Panel voices ……….. 1 — 100 (100 voices)
101 — 110 (10 drum kit voices)
GM voices ………….. 111 — 238 (128 voices)
z Enter the Voice mode.
x Select a voice.
c Play the keyboard.
10
VOICE
STYLE
002
BritePno
Want to find out more? See page 27.
8
Step1
CCCCCCDDDDD
EEEEE
ГГГГГГДДДДД
ЕЕЕЕЕ
Voices
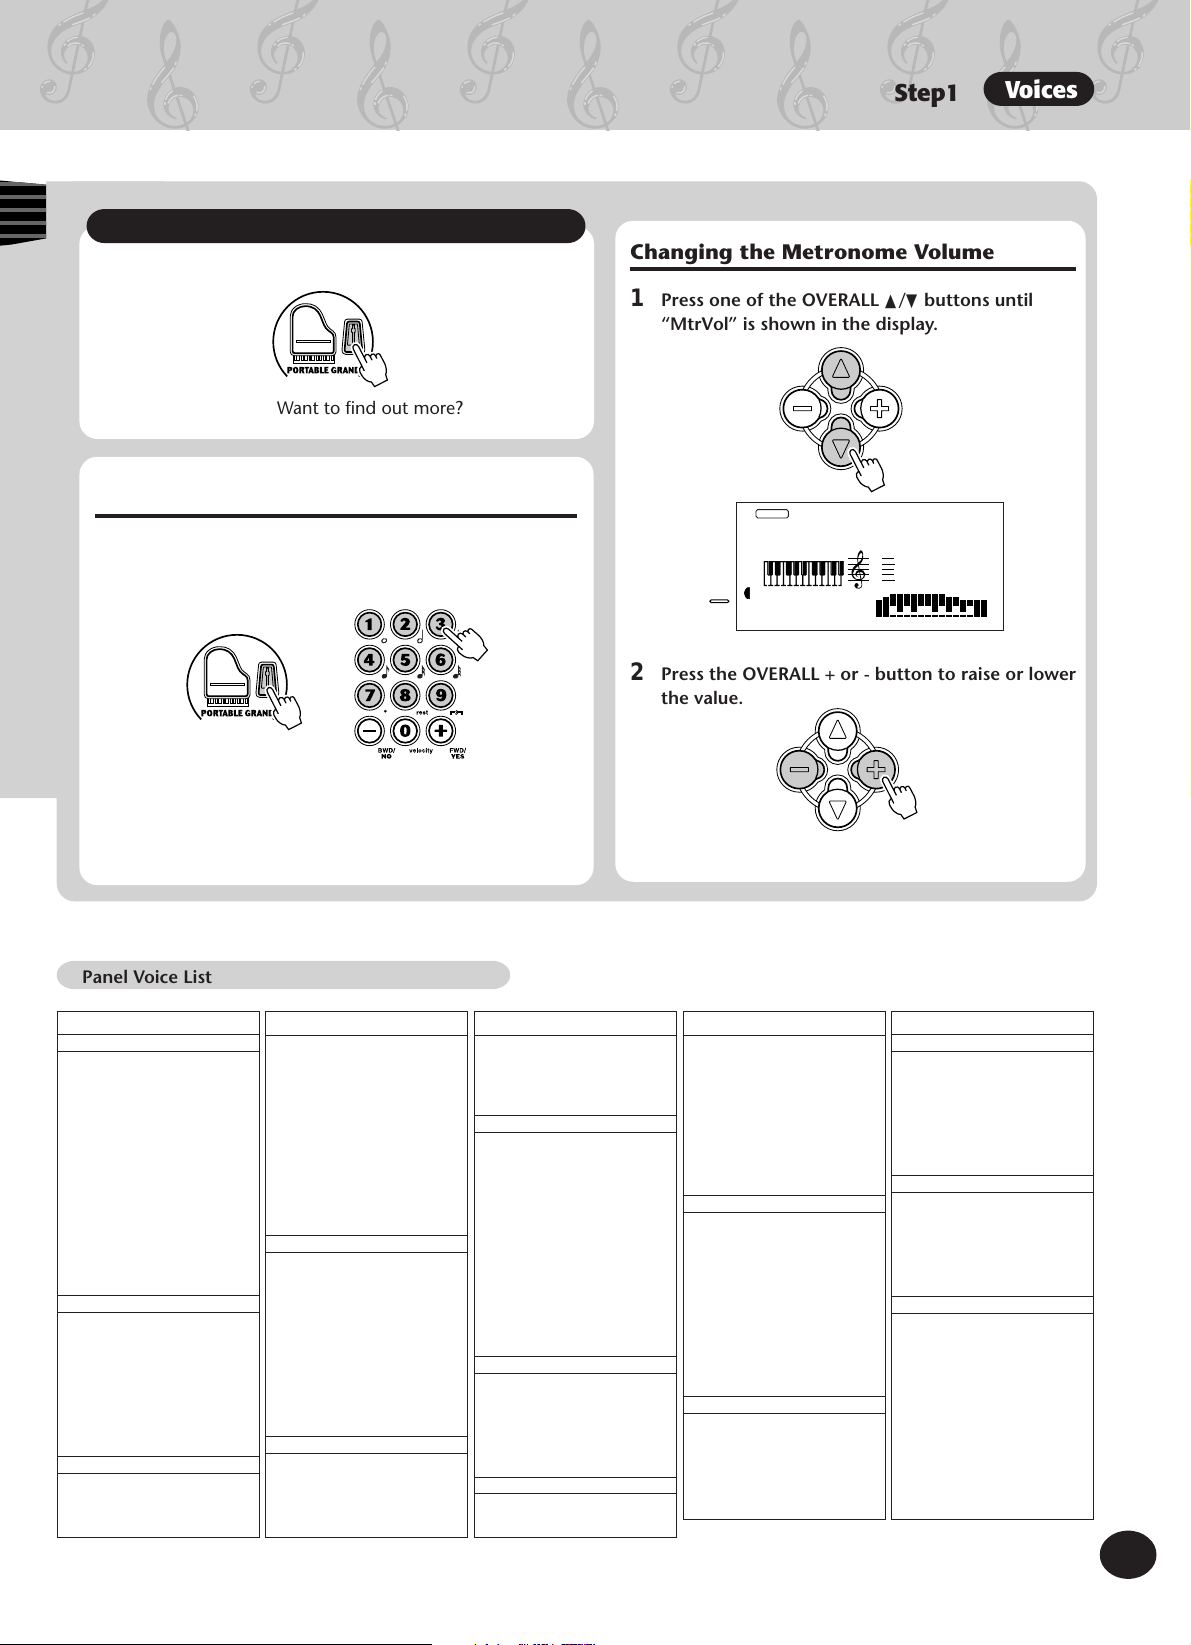
Playing along with the Metronome
q Press the METRONOME button.
METRO-
NOME
Want to find out more? See page 24.
Changing the Metronome Volume
1 Press one of the OVERALL
“MtrVol” is shown in the display.
▲/▼
buttons until
Changing the time signature of the Metronome
q Simultaneously hold down the METRONOME button
and one of the number buttons (1 — 9) on the
numeric keypad.
METRO-
NOME
+
Normally, the Metronome is set to play in 4/4
time. To change this to 2/4, press number button
“2.” To change it to 3/4 time, press number
button “3.”
Want to find out more? See page 25.
Panel Voice List
No. Voice Name
PIANO
001 Grand Piano
002 Bright Piano
003 Honky-tonk Piano
004 Funky Electric Piano
005 DX Electric Piano
006 MIDI Grand Piano
007 CP 80
008 Hyper Electric Piano
009 Bell Electric Piano
010 Harpsichord
011 Clavi
012 Celesta
MALLET
013 Vibraphone
014 Marimba
015 Xylophone
016 Tubular Bells
017 Timpani
018 Steel Drums
019 Music Box
ORGAN
020 Jazz Organ 1
021 Jazz Organ 2
022 Jazz Organ 3
No. Voice Name
023 Full Organ
024 Rock Organ 1
025 Rock Organ 2
026 16’+2′ Organ
027 16’+4′ Organ
028 Church Organ
029 Reed Organ
030 Musette Accordion
031 Traditional Accordion
032 Bandoneon
GUITAR
033 Classical Guitar
034 Folk Guitar
035 12Strings Guitar
036 Jazz Guitar
037 Octave Guitar
038 Clean Guitar
039 Muted Guitar
040 Overdriven Guitar
041 Distortion Guitar
BASS
042 Acoustic Bass
043 Finger Bass
044 Pick Bass
045 Fretless Bass
No. Voice Name
046 Slap Bass
047 Synth Bass
048 Techno Bass
049 Dance Bass
ENSEMBLE
050 Strings
051 Chamber Strings
052 Synth Strings
053 Slow Strings
054 Tremolo Strings
055 Pizzicato Strings
056 Choir
057 Choir Aahs
058 Choir Oohs
059 Synth Choir
060 Orchestra Hit
061 Violin
062 Cello
063 Contrabass
064 Banjo
065 Harp
066 Trumpet
067 Muted Trumpet
STRINGS
BRASS
VOICE
METRONOME
VOLUME
STYLE
MEASURE
001 063
MtrVol
100
TEMPO
2 Press the OVERALL + or — button to raise or lower
the value.
Want to find out more? See page 26.
No. Voice Name
068 Trombone
069 Trombone Section
070 French Horn
071 Tuba
072 Brass Section
073 Synth Brass
074 Jump Brass
075 Techno Brass
REED
076 Soprano Sax
077 Alto Sax
078 Tenor Sax
079 Baritone Sax
080 Oboe
081 English Horn
082 Bassoon
083 Clarinet
084 Harmonica
PIPE
085 Piccolo
086 Flute
087 Pan Flute
088 Recorder
089 Ocarina
No. Voice Name
SYNTH LEAD
090 Square Lead
091 Sawtooth Lead
092 Voice Lead
093 Crystal
094 Brightness
095 Analog Lead
SYNTH PAD
096 Fantasia
097 Bell Pad
098 Xenon Pad
099 Angels
100 Dark Moon
DRUM KITS
101 Standard Kit 1
102 Standard Kit 2
103 Room Kit
104 Rock Kit
105 Electronic Kit
106 Analog Kit
107 Dance Kit
108 Jazz Kit
109 Brush Kit
110 Symphony Kit
11
9
Step 2 Auto Accompaniment
CCCCCDDDDDDEEEEE
ГГГГГДДДДДДЕЕЕЕЕ
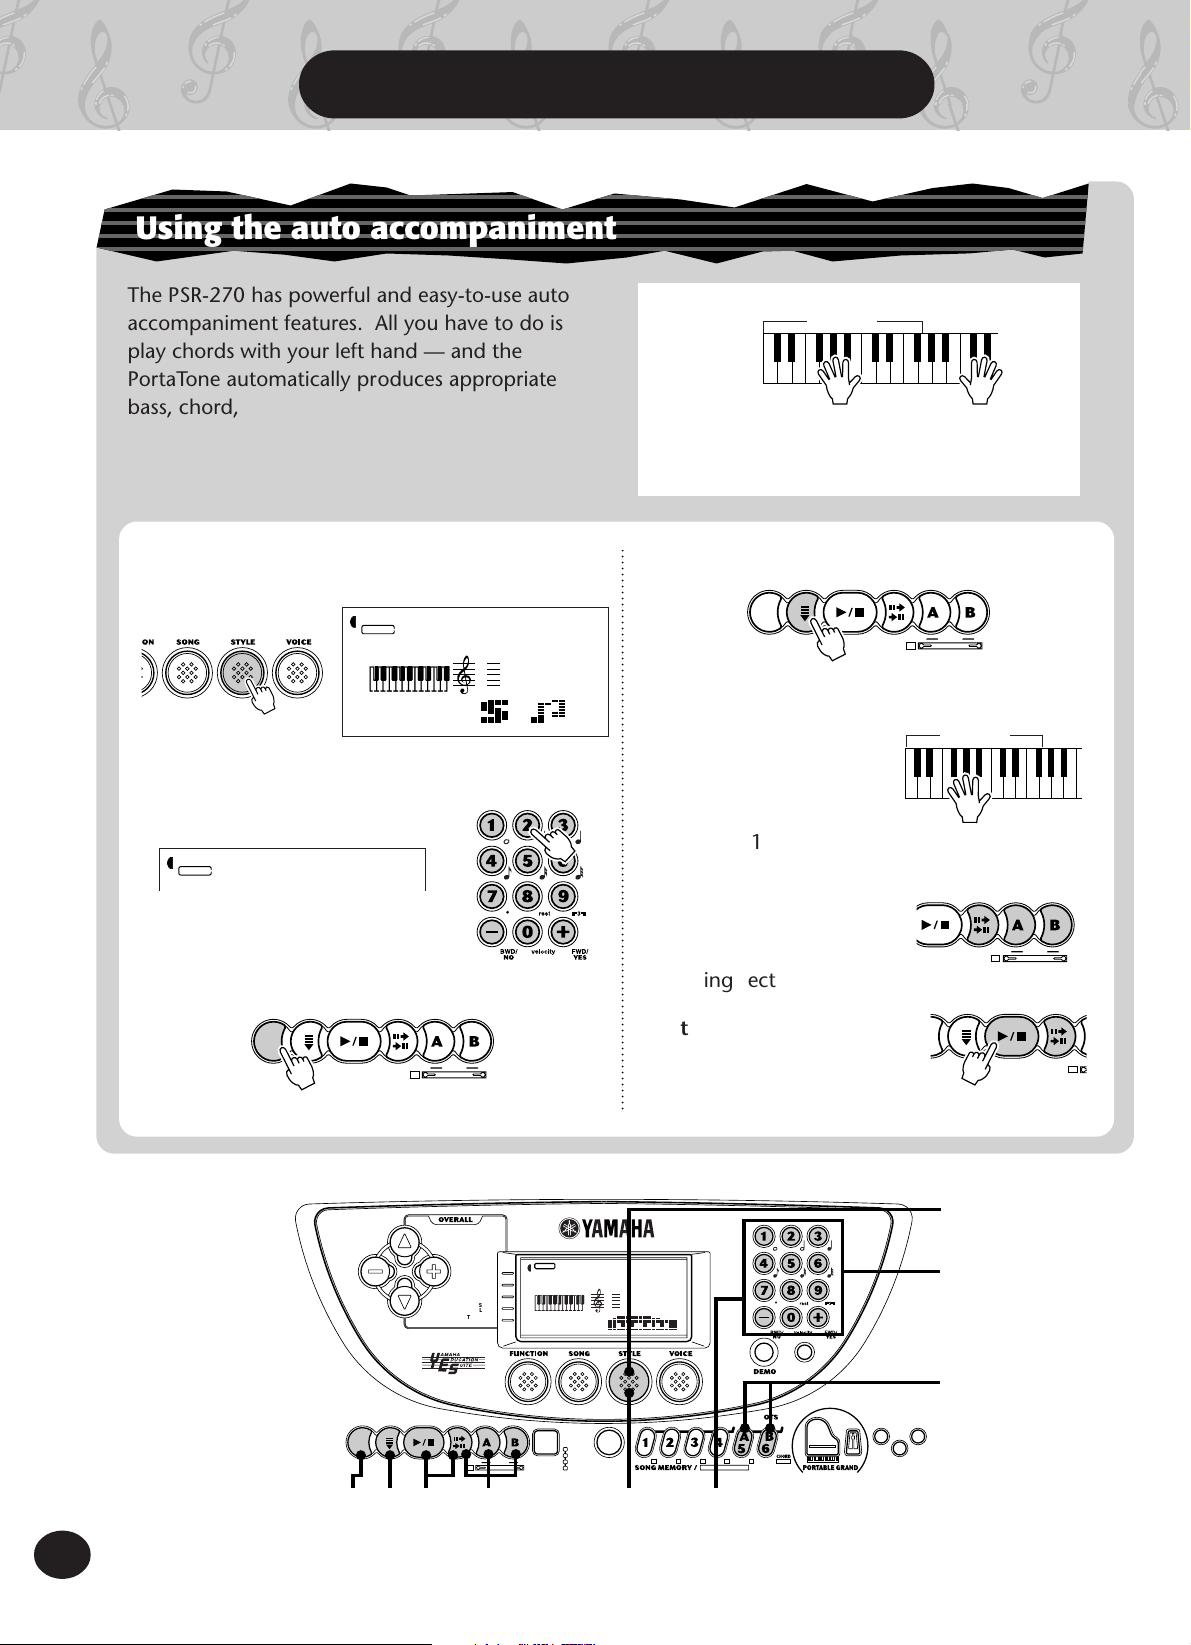
Using the auto accompaniment
The PSR-270 has powerful and easy-to-use auto
accompaniment features. All you have to do is
play chords with your left hand — and the
PortaTone automatically produces appropriate
bass, chord, and rhythm backing for your performance. Use your right hand to play melodies,
and you’ll sound like an entire band!
z Enter the Style mode.
STYLE
MEASURE TEMPO
001 116
8BtPop1
001
x Select a style.
For a list of styles, see page 13.
STYLE
8BtPop2
002
c Turn the auto accompaniment on.
Accompaniment
section
+
Left hand
Auto accompaniment
Right hand
Melody
(for example, bass + guitar + drums)
v Turn the Sync-Start function on.
ACMP
ON/OFF
SYNC—
START
START/
STOP
INTRO/
ENDING
MAINAB
rit.
AUTO FILL
b Play a chord with your left hand.
For help in learning
how to play chords,
refer to “Using the
Chord Guide function”
on page 14.
Accompaniment
section
n Select a section.
Try playing with the
START/
Intro, Main A/B, and
Ending sections.
STOP
INTRO/
ENDING
MAINAB
rit.
AUTO FILL
12
ACMP
ON/OFF
SYNC-
START/
START
cxzvnm
STOP
ACMP
ON/OFF
INTRO/
ENDING
SYNCSTART
MAINAB
rit.
AUTO FILL
START/
INTRO/
STOP
ENDING
TEMPO
TRANSPOSE
TUNING
ACMP/SONG
VOLUME
METRONOME
VOLUME
rit.
VOICE
STYLE
MEASURE
MAINAB
CHORD
AUTO FILL
GUIDE
001
001 116
DICTIONARY
SMART
EZ
OFF
TEMPO
m Stop the auto accompa-
niment.
Want to find out more? See pages 47-61.
GrandPno
TOUCH
PRESETUSER
6~16
RECORD
SONG TRACK
45321
METRO-
NOME
HARMONY
SYNC-
START
START/
STOP
MP
OFF
INTRO/
ENDING
A
rit.
z
x
c
DUALREVERB
10

Step 2
CCCCCCDDDDD
EEEEE
ГГГГГГДДДДД
ЕЕЕЕЕ
Auto Accompaniment
Selecting a complete music style with ideal voice and other
settings — One Touch Setting
The PortaTone features 100 different styles in various music genres. With the One Touch Setting
function, you can call up voice and other settings that best match the selected style. Each style has
been programmed with two Preset One Touch Settings.
z Enter the Style mode.
x Select a style.
For a list of styles, see below.
STYLE
Style List
No. Style Name
8BEAT
1 8Beat Pop 1
2 8Beat Pop 2
3 8Beat Uptempo
4 8Beat Standard
5 Folkrock
6 Pop Rock
7 8Beat Medium
8 8Beat Ballad
9 Epic Ballad
10 Piano Ballad
16BEAT
11 16Beat Shuffle 1
12 16Beat Shuffle 2
13 16Beat Pop
14 Funk 1
15 16Beat Ballad 1
16 16Beat Ballad 2
17 Soul Ballad
6/8 BALLAD
18 Slow Rock 1
19 Slow Rock 2
20 6/8 Ballad
8BtPop2
002
STYLE
MEASURE TEMPO
001 116
No. Style Name
DANCE
21 Dance Pop 1
22 Dance Pop 2
23 Techno
24 Eurobeat
25 Euro House
26 Hip Hop
27 Synth Boogie
DISCO
28 70s Disco
29 Disco Tropical
30 Polka Pop
ROCK
31 8Beat Rock Ballad
32 16Beat Rock Ballad
33 Hard Rock
34 Rock Shuffle
35 6/8 Heavy Rock
36 US Rock
ROCK & ROLL
37 Rock & Roll 1
38 Rock & Roll 2
39 Boogie
40 Twist
8BtPop1
001
c Press one of the One Touch Setting
buttons: Preset A or B.
v Play the keyboard.
No. Style Name
RHYTHM & BLUES
41 R&B
42 Funk 2
43 Soul
44 Gospel Shuffle
45 6/8 Gospel
46 4/4 Blues
CONTEMPORARY JAZZ
47 Cool Jazz
48 Jazz Ballad
49 Jazz Waltz
50 Fusion
TRADITIONAL JAZZ
51 Swing
52 Big Band Swing
53 Big Band Ballad
54 Jazz Quartet
55 Dixieland
AMERICAS
56 Cajun
57 Banda
58 Mariachi
59 Tejano
60 Cumbia
Want to find out more? See page 74.
No. Style Name
COUNTRY & WESTERN
61 Bluegrass
62 Country 2/4
63 Country Rock
64 Country Ballad
65 Country Shuffle
66 Country Waltz
BALLROOM LATIN
67 Cha Cha
68 Rhumba
69 Pasodoble
70 Tango Continental
BALLROOM STANDARD
71 Foxtrot
72 Jive
MARCH & WALTZ
73 March 1
74 March 2
75 6/8 March
76 Polka
77 Standard Waltz
78 German Waltz
79 Viennese Waltz
80 Musette Waltz
PRESETUSER
No. Style Name
LATIN
81 Bossa Nova 1
82 Bossa Nova 2
83 Salsa
84 Samba
85 Mambo
86 Beguine
87 Merengue
88 Bolero Lento
CARIBBEAN
89 Reggae 12
90 Pop Reggae
PIANIST
91 Rock-A-Ballad
92 8Beat
93 Swing
94 Jazz Ballad
95 2Beat
96 Boogie
97 Ragtime
98 Arpeggio
99 Waltz
100 Happy
13
11
Step 3 Chord Guide
001 116
MEASURE TEMPO
ACMP ON
M
7
CCCCCDDDDDDEEEEE
ГГГГГДДДДДДЕЕЕЕЕ
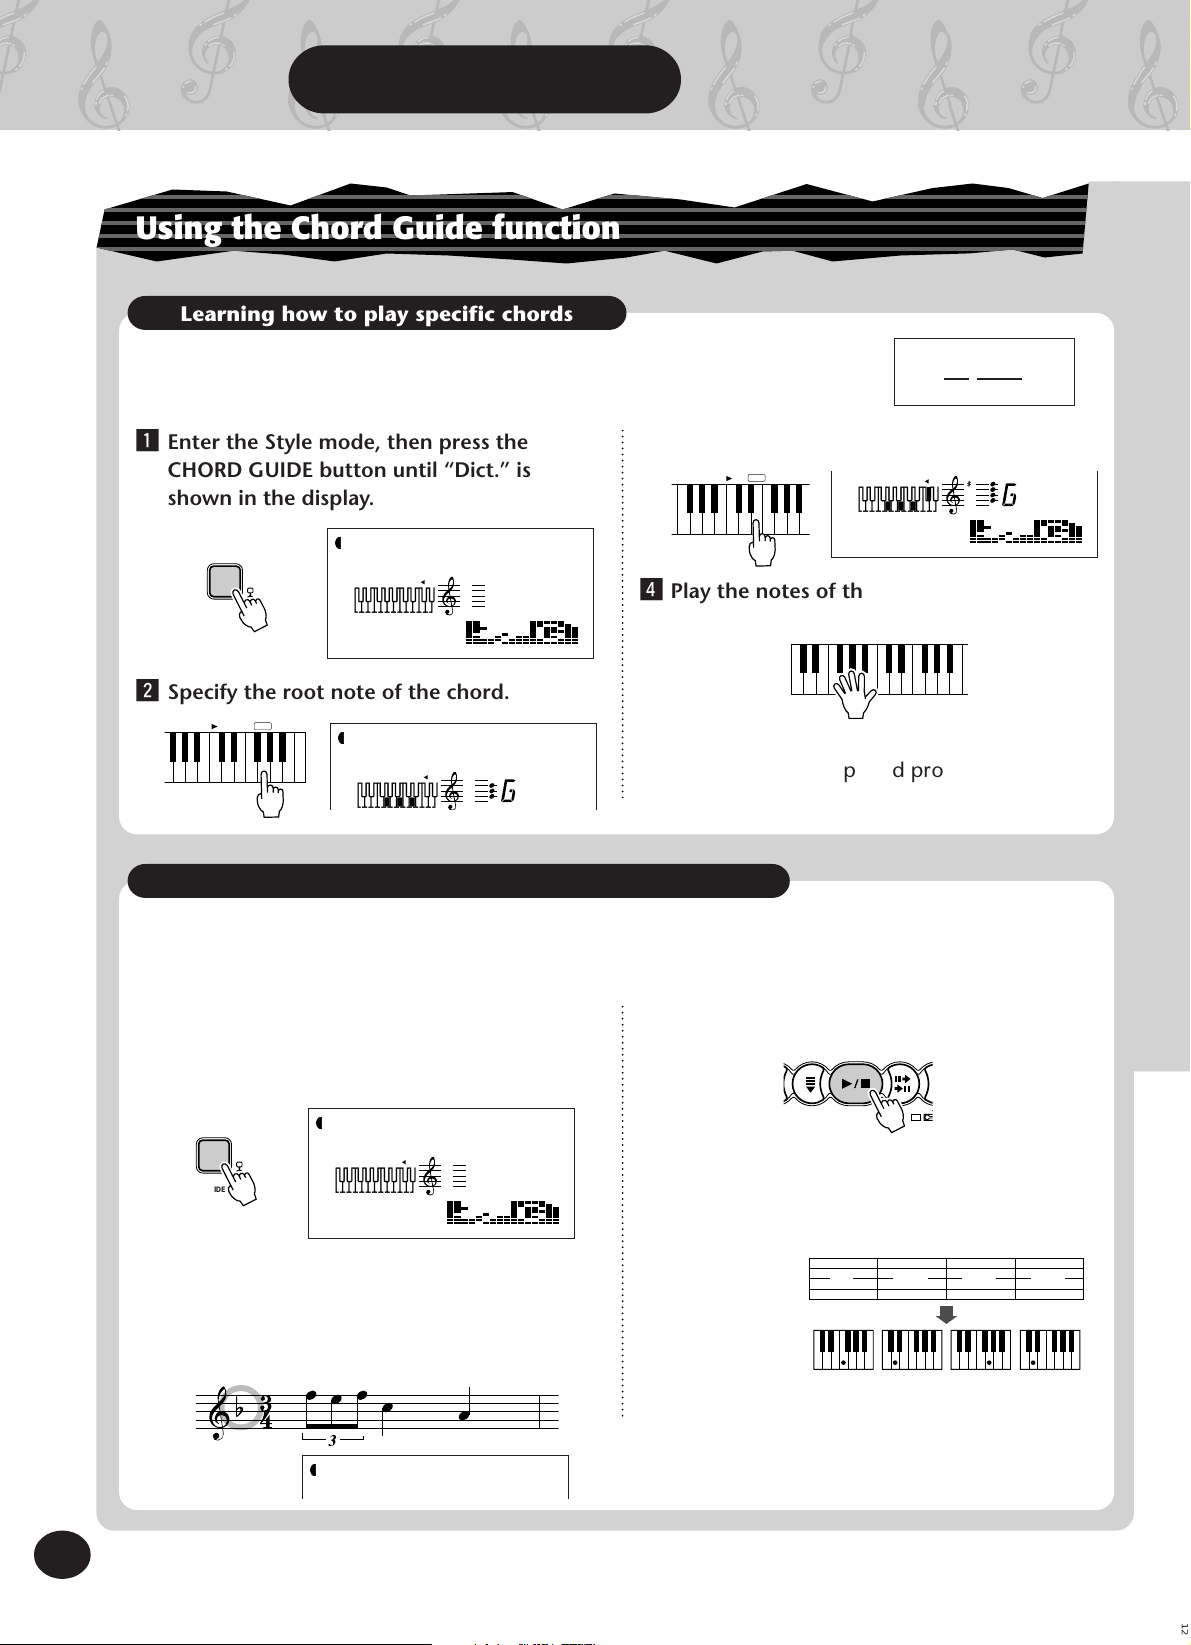
Using the Chord Guide function
Learning how to play specific chords
M7
Example:
GM
7
Root note Chord type
Here, you’ll learn how to use the Chord Guide functions to show
the individual notes of chords.
z Enter the Style mode, then press the
CHORD GUIDE button until “Dict.” is
c Specify the chord type of the chord.
CHORD TYPE
shown in the display.
CHORD
GUIDE
DICTIONAR
SMART
EZ
OFF
STYLE
MEASURE TEMPO
001 116
ACMP ON
Dict.
v Play the notes of the chord as indicated
in the keyboard diagram in the display.
x Specify the root note of the chord.
ROOT
The PortaTone also lets you easily create appropriate chords for a given scale by simply playing single
notes in the scale.
G
STYLE
Dict.
ACMP ON
The notes in the keyboard diagram flash
when the chord is played properly.
Playing appropriate chords with just one finger
Want to find out more? See page 62.
14
z Enter the Style mode, then press the
CHORD GUIDE button until “Smart” is
shown in the display.
CHORD
GUIDE
DICTIONAR
SMART
EZ
OFF
STYLE
MEASURE TEMPO
001 116
Smart
ACMP ON
x Set the key to match that of the song you
wish to play.
Enter the number of sharps or flats of the
corresponding key.
STYLE
15
b=1
c Start the auto accompaniment.
SYNC-
START/
F
START
STOP
INTRO/
ENDING
A
rit.
v Play single note chords (root note) on the
keyboard.
To play these
chords….
…..press these
keys (root notes)
F Dm Gm Dm
Want to find out more? See page 64.
12
Step 3
CCCCCCDDDDD
EEEEE
ГГГГГГДДДДД
ЕЕЕЕЕ
Chord Guide
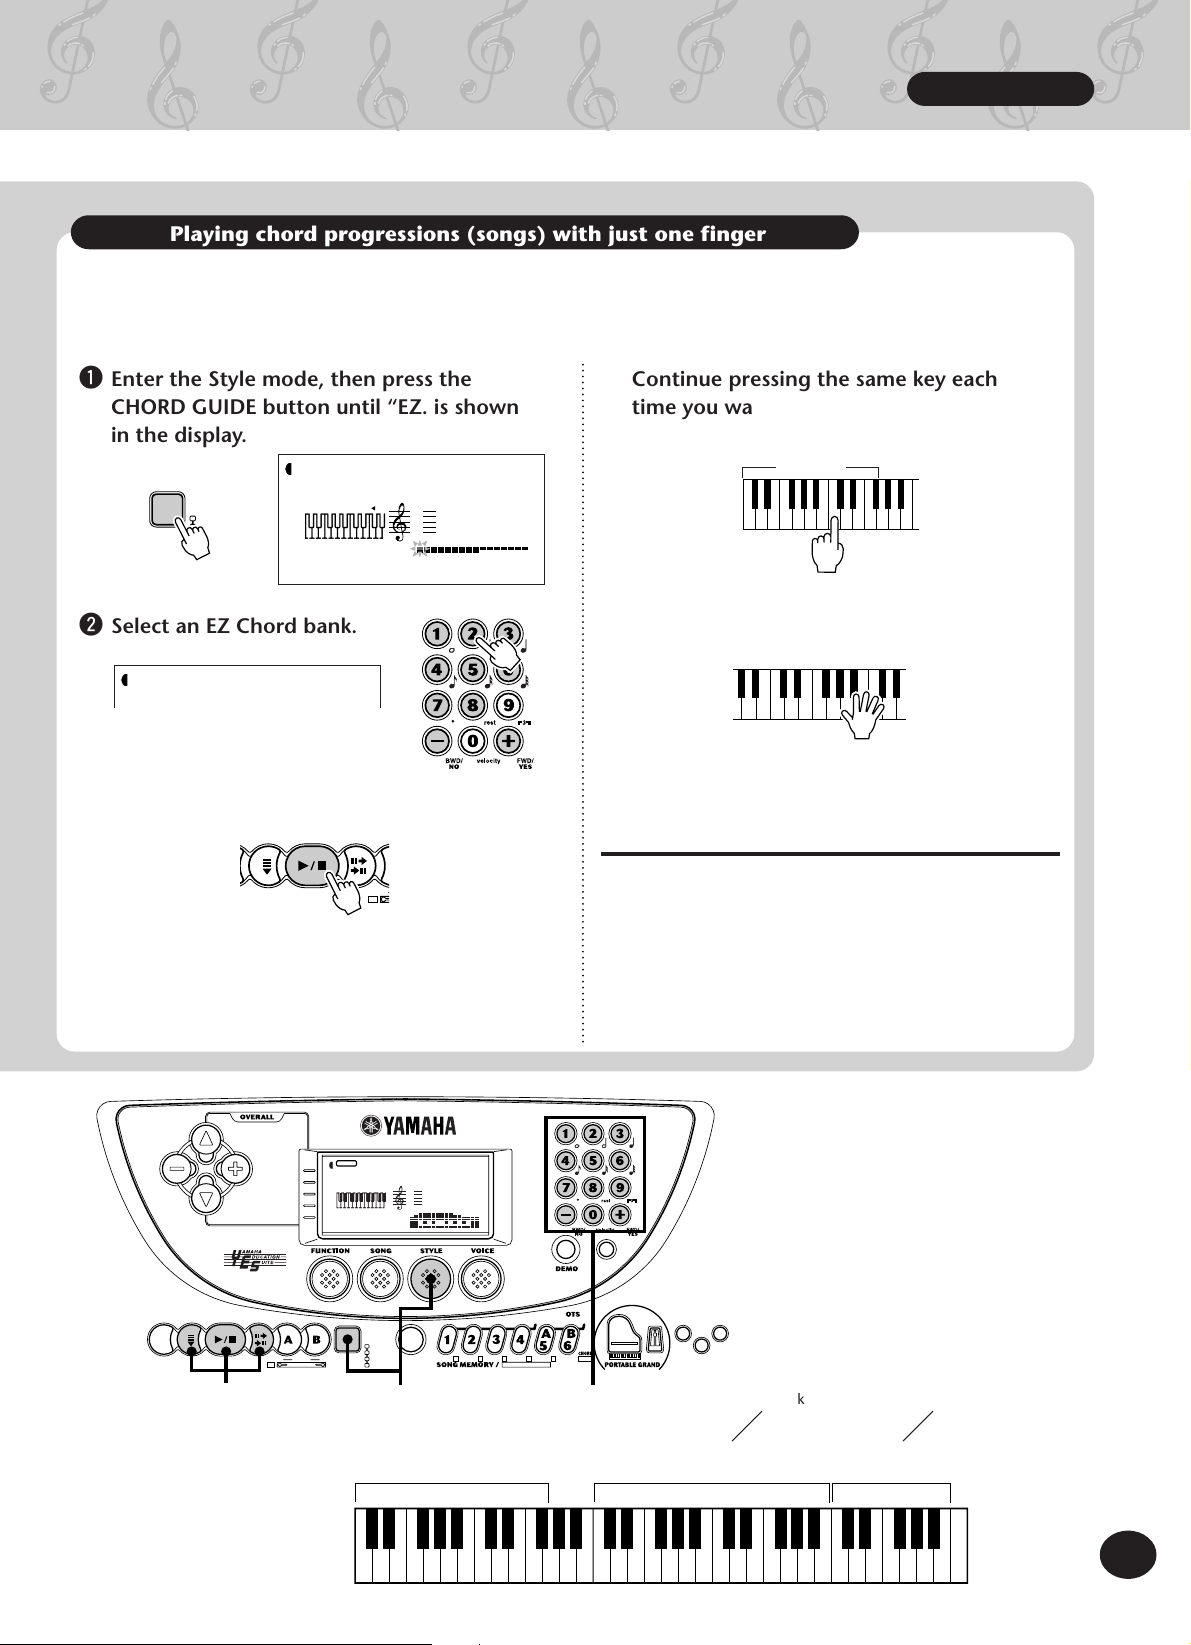
Playing chord progressions (songs) with just one finger
The EZ Chord function gives you an exceptionally easy way to play the chords of a song. Simply press
single keys in succession, and the PortaTone automatically plays the proper chords for you!
q Enter the Style mode, then press the
CHORD GUIDE button until “EZ. is shown
in the display.
CHORD
GUIDE
DICTIONAR
SMART
EZ
OFF
STYLE
001 116
ACMP ON
1
TEMPO
EZ
w Select an EZ Chord bank.
STYLE
EZ
2
e Start the auto accompaniment.
SYNC-
START/
F
START
STOP
Press and release a single note on the key-
r
board to play a chord.
INTRO/
ENDING
A
rit.
Continue pressing the same key each
time you want a new chord to be played.
Accompaniment
section
t Play the melody with your right hand as
the auto accompaniment plays.
Want to find out more? See page 66.
Recording your own EZ Chord banks
You can also create your own custom chord
progressions, and play along with those if you
like.
Want to find out more? See page 68.
VOICE
STYLE
GrandPno
001
MEASURE
TEMPO
001 116
DICTIONARY
SMART
CHORD
GUIDE
EZ
RECORD
OFF
MAINAB
AUTO FILL
Keys for playing the accompaniment
(C1 — F#2)
45321
SONG TRACK
TOUCH
METRO-
PRESETUSER
NOME
6~16
DUALREVERB
HARMONY
xwzzq
Keys for entering the chord type
(C3 — B4)
Use these keys for the Chord Guide Dictionary function.
Keys for entering the chord root
(C5 — B5)
ACMP
ON/OFF
SYNCSTART
ce
START/
STOP
INTRO/
ENDING
TEMPO
TRANSPOSE
TUNING
ACMP/SONG
VOLUME
METRONOME
VOLUME
rit.
15
13
Step 4 Songs
ALL
001 111
MEASURE TEMPO
SONG
1 62 3 4 5
TakeOff!
CCCCCDDDDDDEEEEE
ГГГГГДДДДДДЕЕЕЕЕ
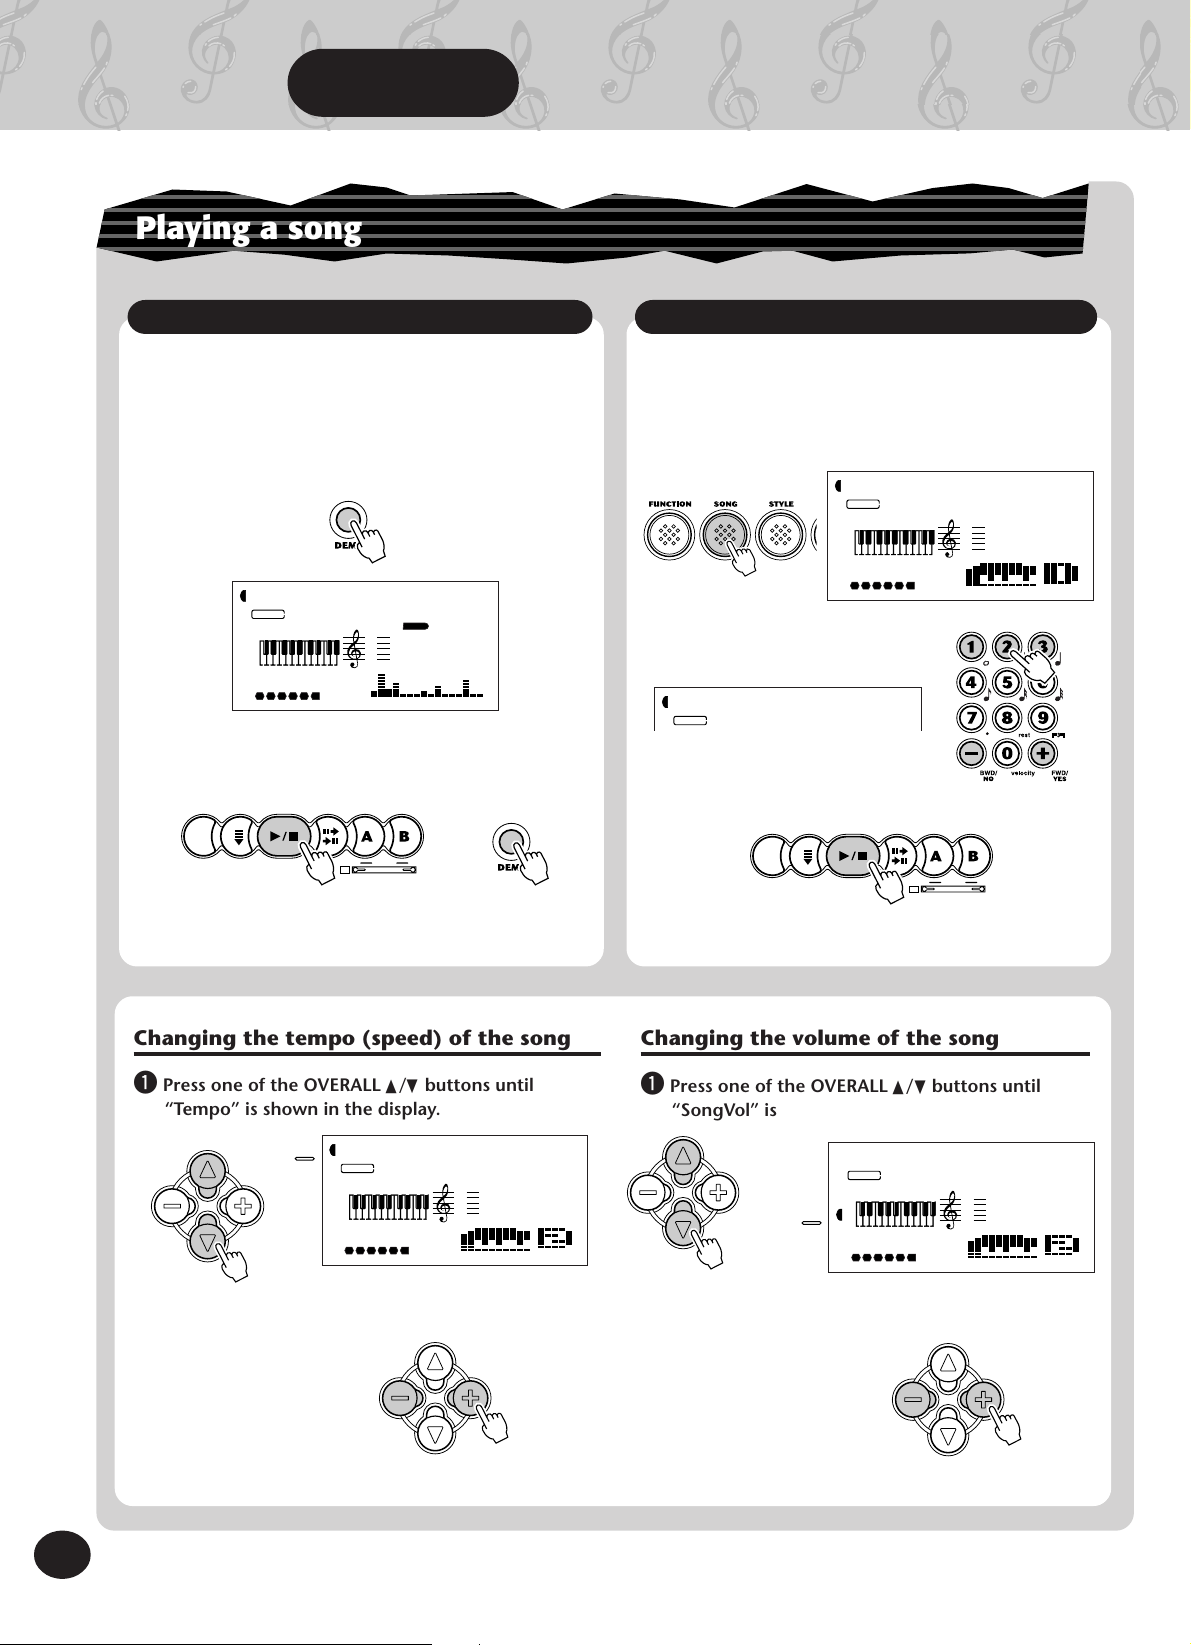
Playing a song
Playing back all three songs
The PSR-270 has three Demo songs that showcase the authentic voices and dynamic accompaniment of the instrument.
z Press the DEMO button.
TakeOff!
ALL
SONG
MEASURE TEMPO
001 111
1 62 3 4 5
x Stop the song.
or
ACMP
ON/OFF
SYNCSTART
START/
STOP
INTRO/
ENDING
MAINAB
rit.
AUTO FILL
Playing back a single song
Naturally, you can also individually select and
play back any of the PortaTone’s songs.
z Enter the song mode.
x Select a song.
c Start (and stop) the song.
ACMP
ON/OFF
SYNCSTART
START/
STOP
INTRO/
ENDING
MAINAB
rit.
AUTO FILL
Want to find out more? See page 75.
Changing the tempo (speed) of the song
q Press one of the OVERALL
“Tempo” is shown in the display.
TEMPO
▲/▼
buttons until
100
SONG
MEASURE TEMPO
001 100
1 62 3 4 5
Tempo
w Press the OVERALL + or — button to speed up or
slow down the tempo.
Want to find out more? See page 76.
Want to find out more? See page 75.
Changing the volume of the song
q Press one of the OVERALL
“SongVol” is shown in the display.
ACMP/SONG
VOLUME
▲/▼
buttons until
100
SONG
MEASURE TEMPO
001 120
1 62 3 4 5
SongVol
w Press the OVERALL + or — button to raise or lower
the volume of the song.
Want to find out more? See page 78.
16
14
Step 4
CCCCCCDDDDD
EEEEE
ГГГГГГДДДДД
ЕЕЕЕЕ
Songs
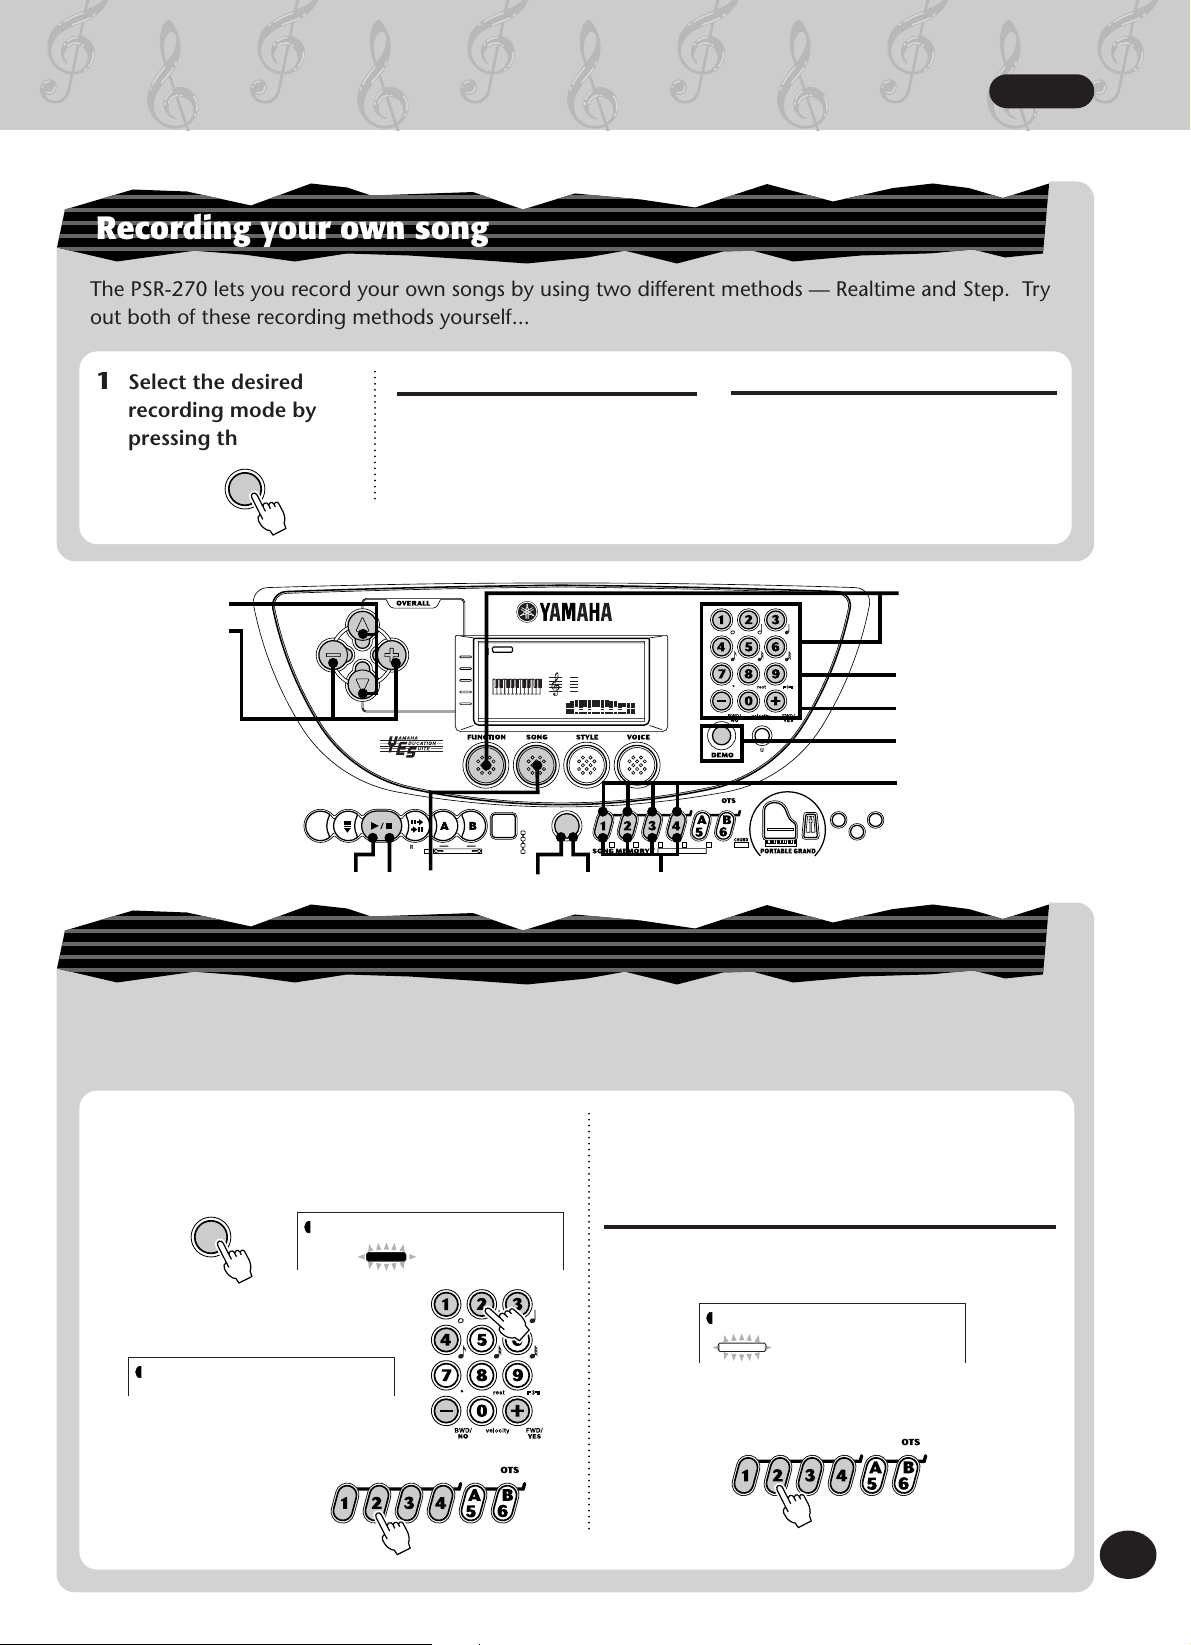
Recording your own song
The PSR-270 lets you record your own songs by using two different methods — Realtime and Step. Try
out both of these recording methods yourself…
1 Select the desired
recording mode by
pressing the RECORD
button.
RECORD
Realtime recording Step recording
This method is much like using a
conventional tape recorder, letting
you play and record the parts of
the song in real time.
This method is similar to using a
pencil and paper to write down each
note, entering the parts of the song
step by step.
Want to find out more? See pages 79-90.
q
w
ACMP
ON/OFF
SYNCSTART
START/
STOP
INTRO/
ENDING
TEMPO
TRANSPOSE
TUNING
ACMP/SONG
VOLUME
METRONOME
VOLUME
rit.
VOICE
STYLE
MEASURE
MAINAB
CHORD
AUTO FILL
GUIDE
GrandPno
001
TEMPO
001 116
DICTIONARY
SMART
EZ
RECORD
OFF
wt
1
rzx c
45321
SONG TRACK
TOUCH
METRO-
PRESETUSER
6~16
Creating your own custom One Touch Settings
NOME
A
e
x
z
B
DUALREVERB
HARMONY
You can also create your own One Touch Settings — letting you completely reconfigure virtually all
PortaTone settings at the touch of a button! Up to 16 settings can be saved (4 User banks x 4 User
buttons).
q Make all desired settings on the PortaTone.
w Select the User One Touch Setting
t Turn off the User One Touch Setting record
mode.
record mode.
Calling up a User One Touch Setting
STYLE
RECORD
OTS User
1
RECORD
A Select Function #41, and select the desired bank
(1 — 4).
e Select the desired User
bank (1 — 4).
STYLE
UserBank
2
r Select the desired User
button (USER 1 — 4).
STYLE
FUNCTION
B Press the appropriate USER button (1 — 4) to
instantly call up your custom panel settings.
PRESETUSER
UserBank
F41
PRESETUSER
Want to find out more? See page 72.
17
15
Step 5 Function Parameters
1
M.Octave
STYLE
FUNCTION
CCCCCDDDDDDEEEEE
ГГГГГДДДДДДЕЕЕЕЕ
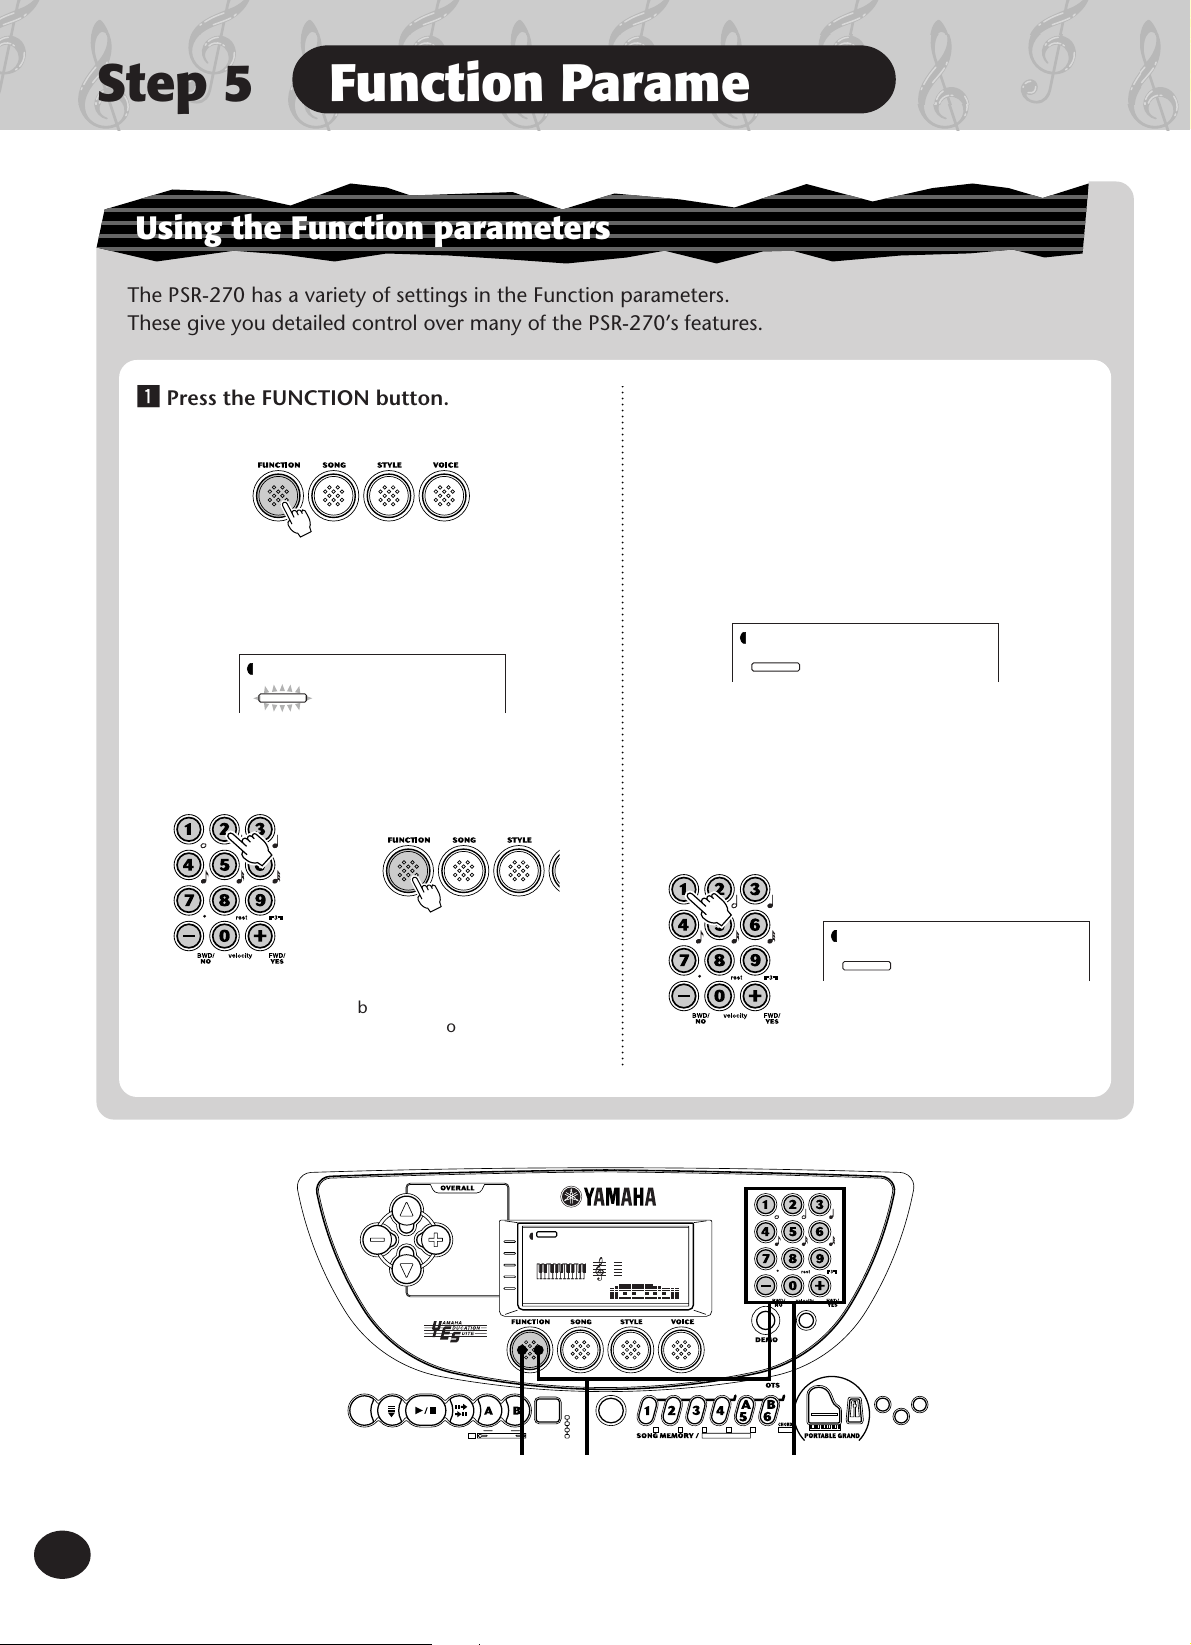
Using the Function parameters
The PSR-270 has a variety of settings in the Function parameters.
These give you detailed control over many of the PSR-270’s features.
z Press the FUNCTION button.
x Select a Function number.
For a list of functions, see page 19.
STYLE
FUNCTION
The Function number can be selected
while the “FUNCTION” indication is
flashing.
Enter the Function
number on the
numeric keypad.
M.Octave
F02
Press the FUNCTION button;
each press advances through
the numbers. Hold down the
button to continuously
advance through the numbers.
c After “FUNCTION” in the display stops
flashing, change the value or setting.
After a couple of seconds, the “FUNCTION”
indication stops flashing and remains lit. At
the same time, the Function number (“F02”
in the example above) changes automatically
to the current value of the Function parameter.
STYLE
FUNCTION
Current value of the selected Function
parameter.
M.Octave
0
v Use the numeric keypad to change the
value or setting. For on/off settings, use
the +/- buttons.
18
ACMP
ON/OFF
SYNCSTART
START/
STOP
INTRO/
ENDING
VOICE
MAINAB
AUTO FILL
MEASURE
CHORD
GUIDE
STYLE
001
001 116
DICTIONARY
SMART
EZ
OFF
GrandPno
TEMPO
RECORD
TEMPO
TRANSPOSE
TUNING
ACMP/SONG
VOLUME
METRONOME
VOLUME
rit.
z x v
45321
SONG TRACK
Want to find out more? See page 30.
TOUCH
METRO-
PRESETUSER
NOME
6~16
DUALREVERB
HARMONY
16
Step 5
CCCCCCDDDDD
EEEEE
ГГГГГГДДДДД
ЕЕЕЕЕ
Function Parameters
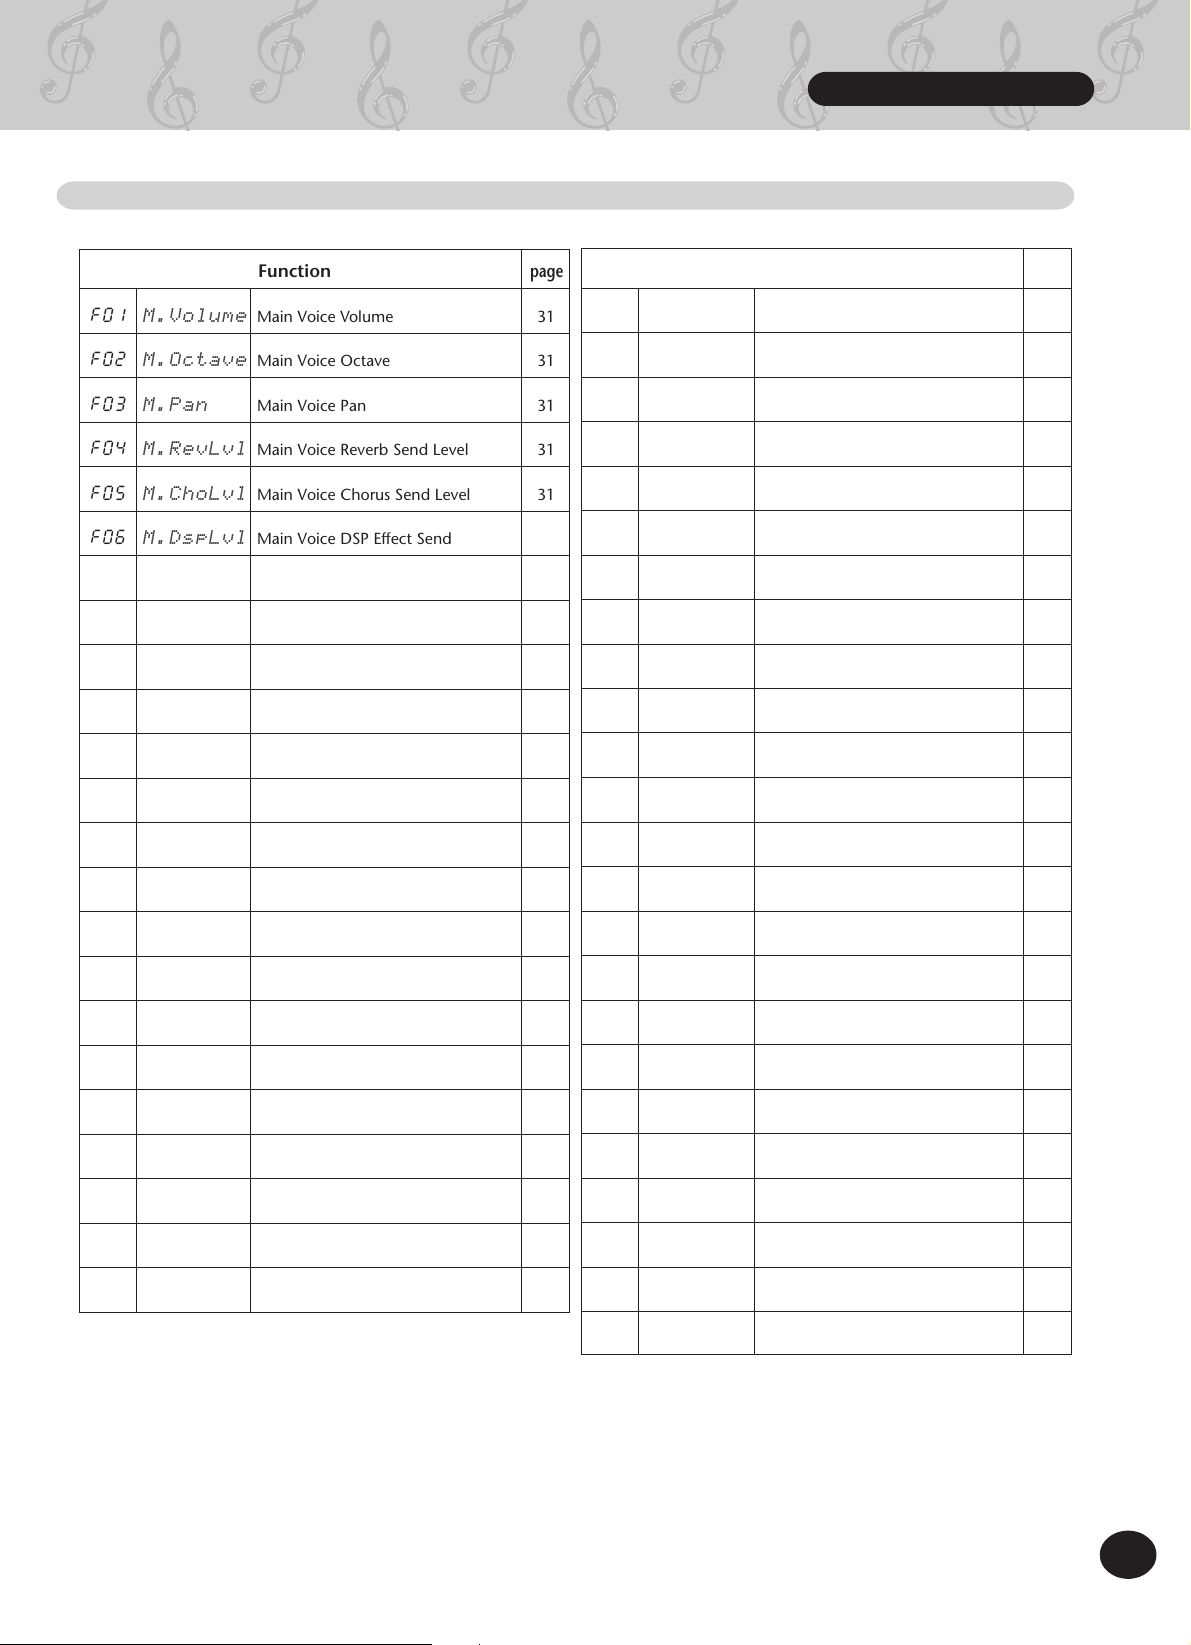
Function Parameters List
Function
page
F01 M.Volume Main Voice Volume 31
F02 M.Octave Main Voice Octave 31
F03 M.Pan Main Voice Pan 31
F04 M.RevLvl Main Voice Reverb Send Level 31
F05 M.ChoLvl Main Voice Chorus Send Level 31
F06 M.DspLvl Main Voice DSP Effect Send Level 31
F11 D.Volume Dual Voice Volume 35
F12 D.Octave Dual Voice Octave 35
F13 D.Pan Dual Voice Pan 35
F14 D.RevLvl Dual Voice Reverb Send Level 35
F15 D.ChoLvl Dual Voice Chorus Send Level 35
F16 D.DspLvl Dual Voice DSP Effect Send Level 35
F17 D.Voice Dual Voice 35
Function
page
F31 Reverb Reverb On/Off 44
F32 RevType Reverb Type 44
F33 Chorus Chorus On/Off 44
F34 ChoType Chorus Type 44
F35 Dsp DSP On/Off 44
F36 DspType DSP Type 44
F37 Harmony Harmony On/Off 44
F38 HarmType Harmony Type 44
F39 HarmVol Harmony Volume 44
F41 UserBank One Touch Setting User Bank 73
F51 AcmpSPnt Accompaniment Split Point 59
F61 USng1Clr User Song 1 Clear 90
F62 USng2Clr User Song 2 Clear 90
F18 Dual Dual On/Off 35
F21 S.Volume Split Voice Volume 37
F22 S.Octave Split Voice Octave 37
F23 S.Pan Split Voice Pan 37
F24 S.RevLvl Split Voice Reverb Send Level 37
F25 S.ChoLvl Split Voice Chorus Send Level 37
F26 S.DspLvl Split Voice DSP Effect Send Level 37
F27 S.Voice Split Voice 37
F28 Split Split On/Off 37
F29 SplitPnt Split Point 37
F63 USng3Clr User Song 3 Clear 90
F71 FootSw Footswitch 92
F72 VoiceSet Voice Set 39
F73 TouchSns Touch Sensitivity 39
F81 RemoteCh Remote Channel 97
F82 KbdOut Keyboard Out 97
F83 AcmpOut Accompaniment Out 97
F84 Local Local On/Off 97
F85 ExtClock External Clock 98
F86 BulkSend Bulk Data Send 98,99
F87 InitSend Initial Data Send
98,102
19
17
Step 6 MIDI
CCCCCDDDDDDEEEEE
ГГГГГДДДДДДЕЕЕЕЕ
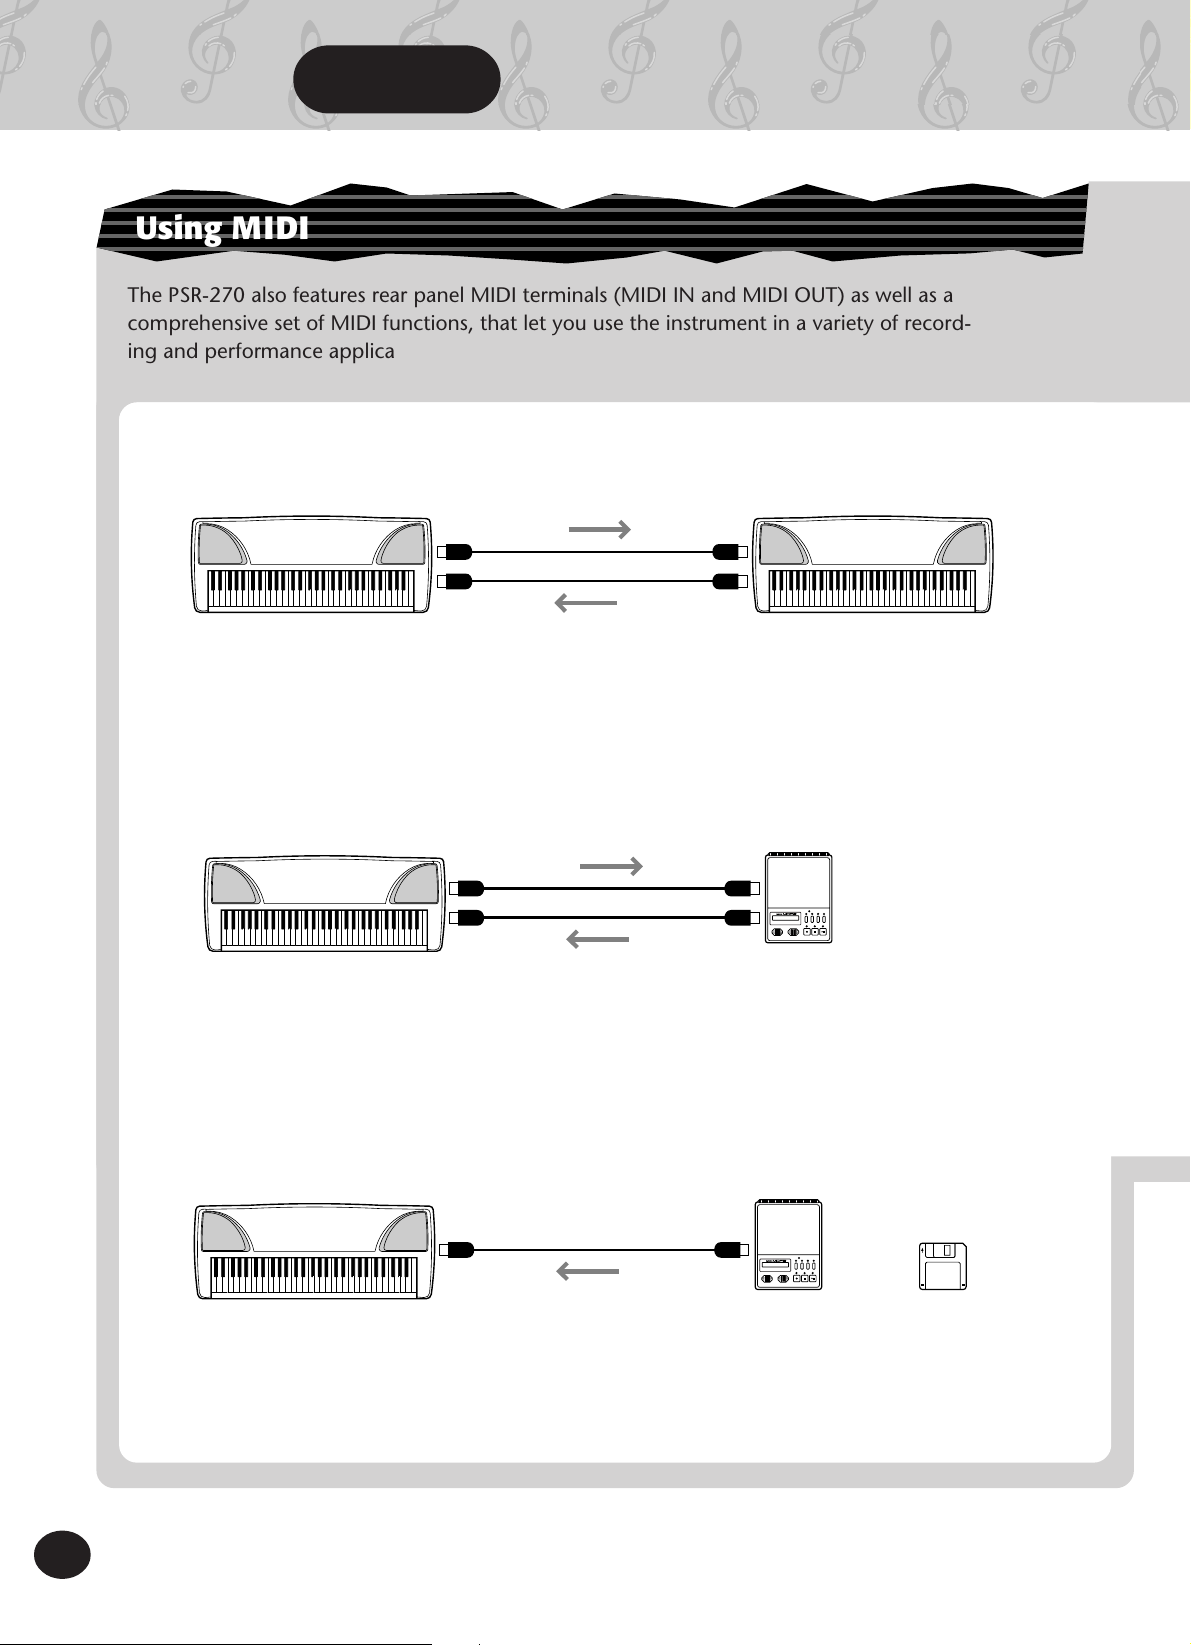
Using MIDI
The PSR-270 also features rear panel MIDI terminals (MIDI IN and MIDI OUT) as well as a
comprehensive set of MIDI functions, that let you use the instrument in a variety of recording and performance applications.
● Sending original song and One Touch Setting data to another PSR-270.
MIDI transmit
PSR-270 PSR-270
MIDI INMIDI OUT
MIDI receive
MIDI OUTMIDI IN
➔ See “Using Bulk Dump Send to Save Data“ on pages 99 — 102.
● Using the MDF3 MIDI Data Filer to store and recall original PSR-270 data.
MIDI transmit
PSR-270
MIDI receive
Save/load data
MIDI INMIDI OUT
MIDI OUTMIDI IN
MDF3
➔ See “Using Bulk Dump Send to Save Data“ on pages 99 — 102.
● Playing back multi-track song data (up to 16 channels) on the PSR-270.
20
Set Remote Channel (page 97) to “off.”
PSR-270
➔ See page 97.
MIDI receive
MIDI OUTMIDI IN
MDF3, QY700,
or computer
with sequencing
software.
Available disks
Floppy disk with GM
song data.
18
Step 6
CCCCCCDDDDD
EEEEE
ГГГГГГДДДДД
ЕЕЕЕЕ
MIDI
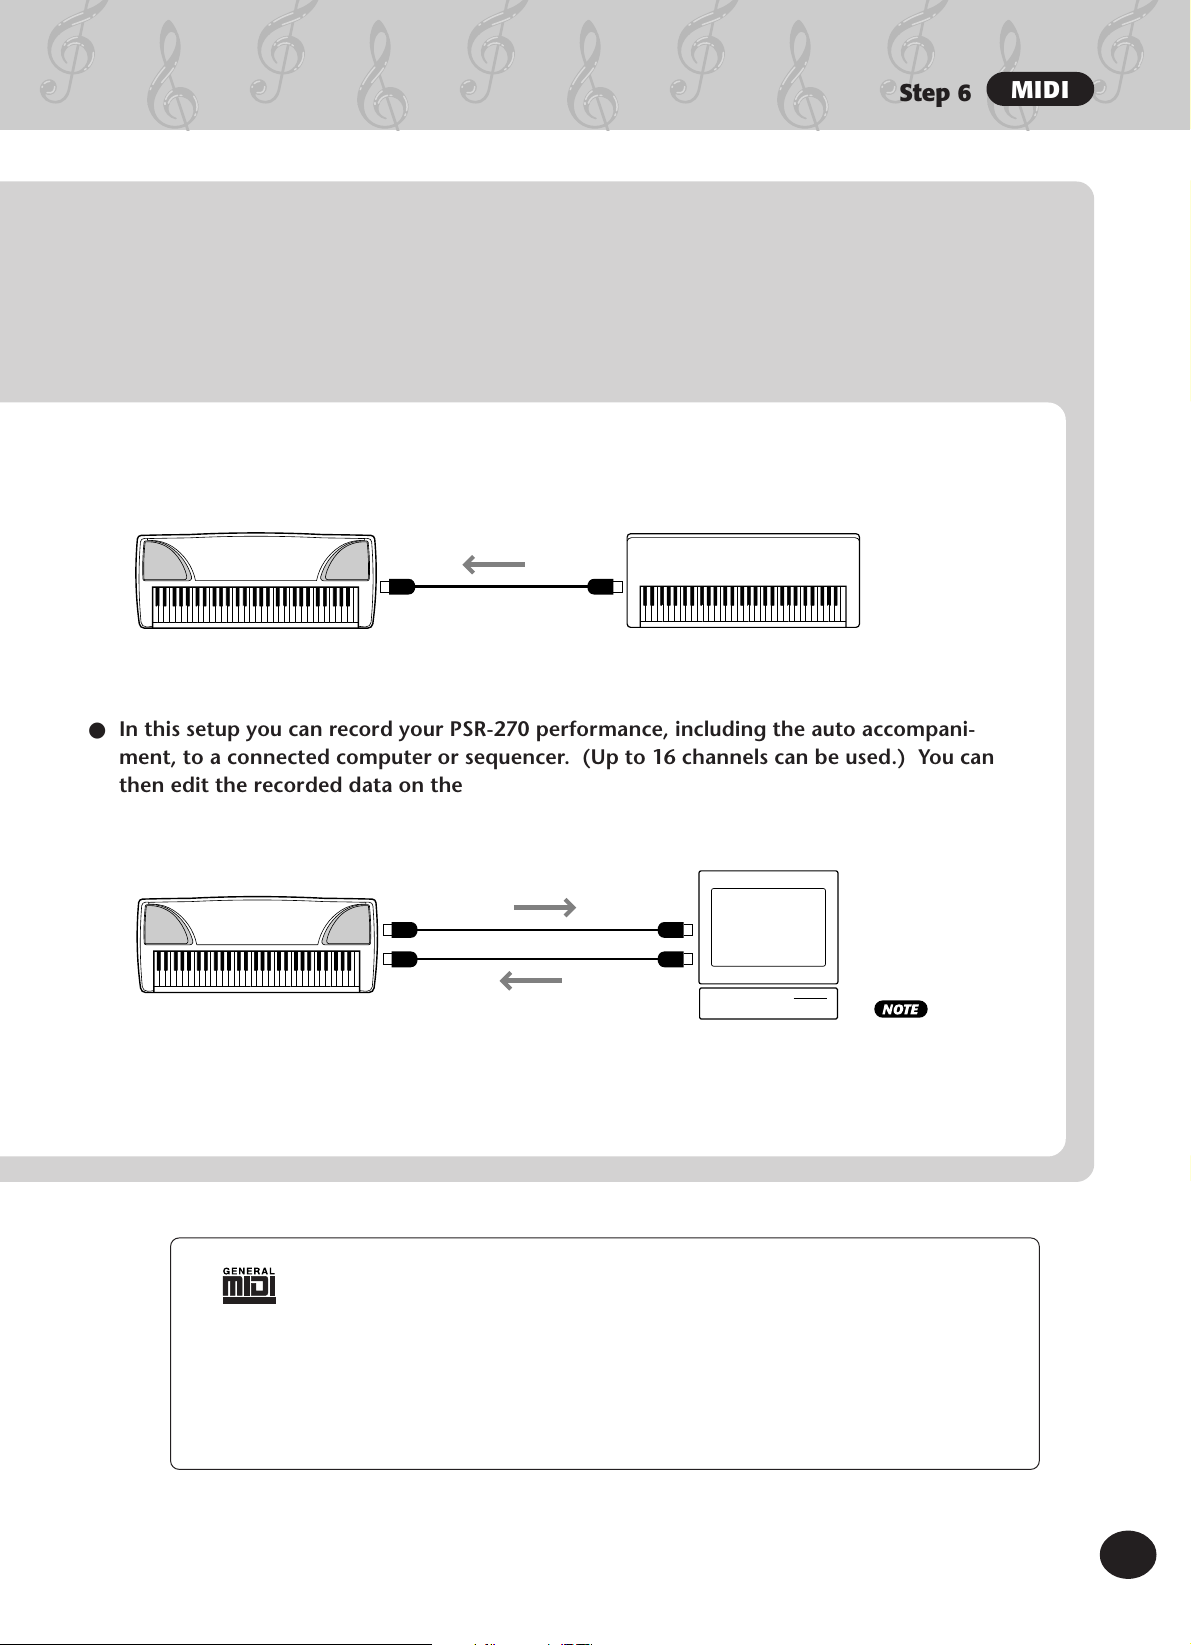
● Controlling the PSR-270 with a MIDI keyboard controller (not having a tone generator)
(Auto accompaniment can also be used in this setup.)
MIDI receive
PSR-270
MIDI OUTMIDI IN
MIDI keyboard with no tone
generator
➔ See page 97.
● In this setup you can record your PSR-270 performance, including the auto accompani-
ment, to a connected computer or sequencer. (Up to 16 channels can be used.) You can
then edit the recorded data on the computer or sequencer, and play it back using the
sounds of the PSR-270.
Arrange and edit the data on the
computer/sequencer.
MIDI transmit
MIDI INMIDI OUT
PSR-270
MIDI OUTMIDI IN
MIDI receive
(playback)
Computer with
sequencing software.
➔ See page 95.
➔ See “Using Initial Setup Send with a Sequencer” on page 102.
When using a personal
computer, special
software (sequencer
software) is needed.
GM System Level 1
“GM System Level 1” is an addition to the MIDI standard which ensures that any GM-
compatible music data can be accurately played by any GM-compatible tone generator,
regardless of manufacturer. The GM mark is affixed to all software and hardware products
that support GM System Level 1. The PSR-270 supports GM System Level 1.
21
19
PANEL DISPLAY INDICATIONS
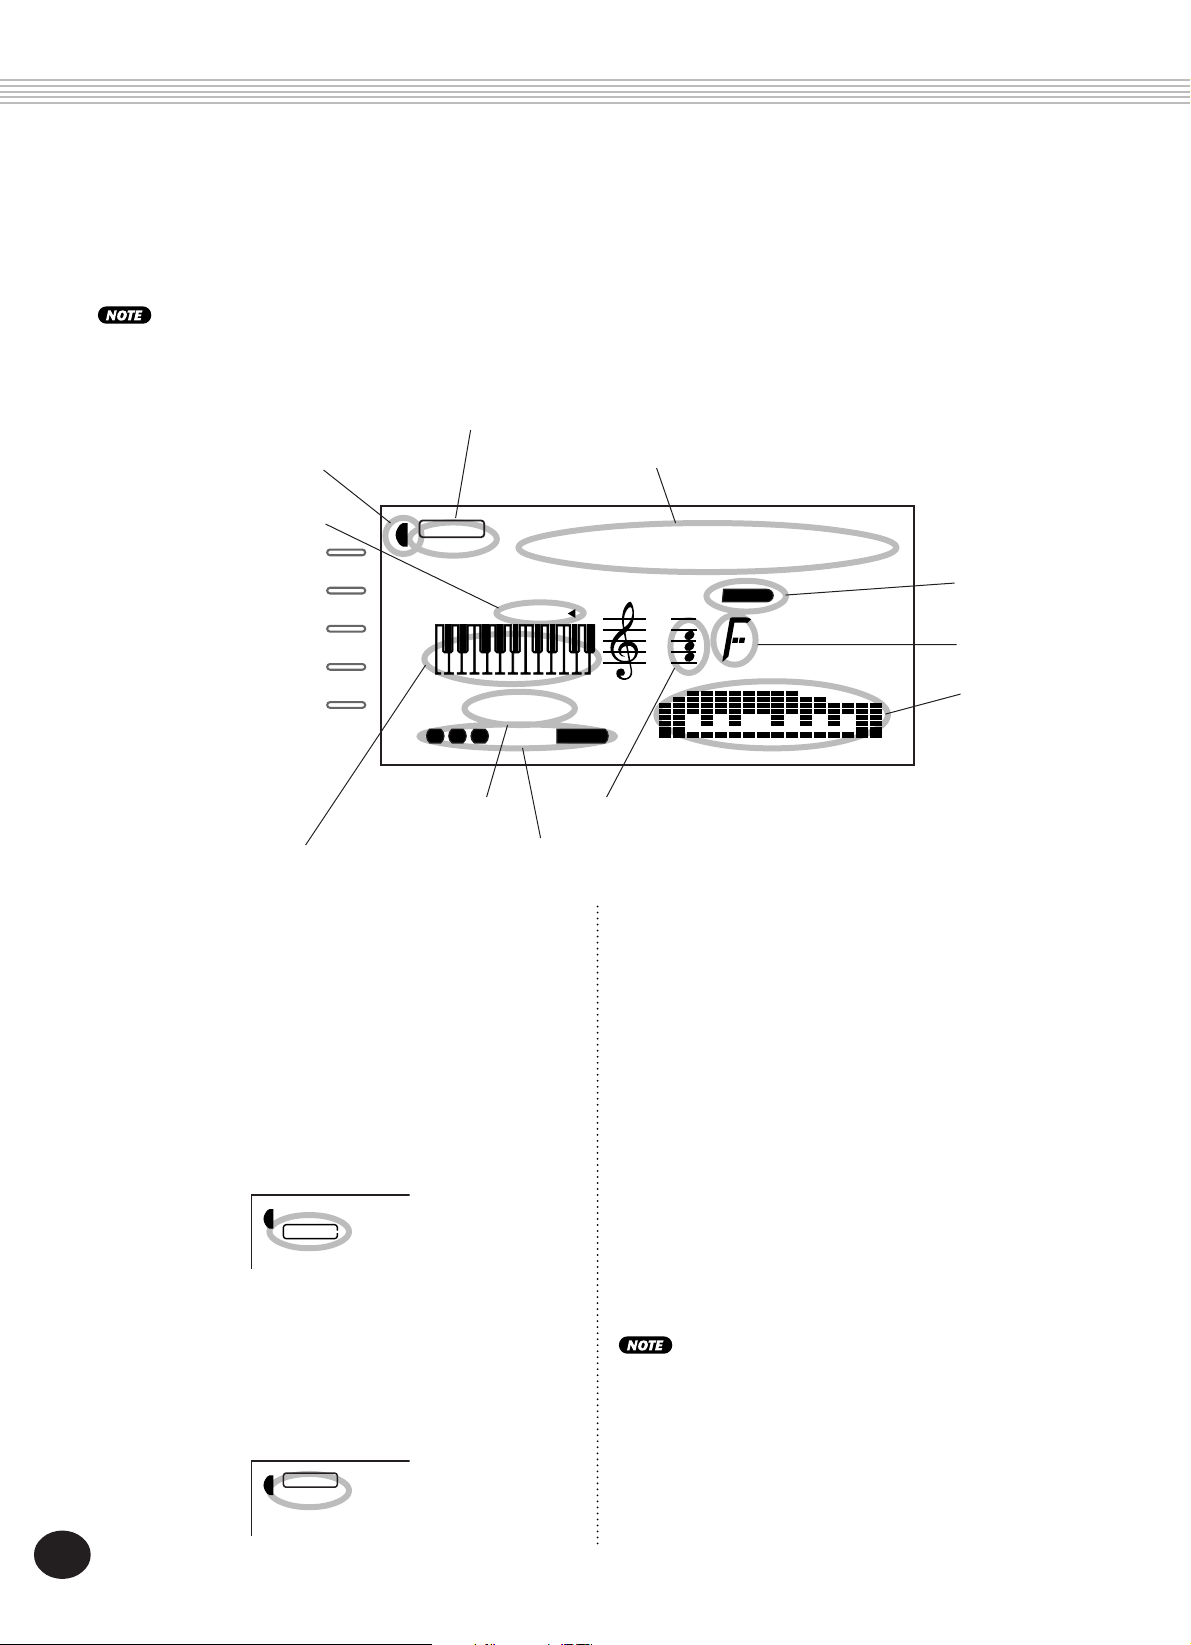
The PortaTone features a large multi-function display that shows all important
settings for the instrument. The section below briefly explains the various icons
and indications in the display.
The LCD’s backlight will gradually dim over a long period of use. When the display becomes dim or hard to read, contact the store
where you purchased the instrument or, Yamaha directly, to have the LCD replaced. A fee will be charged for replacement.
쐃 Mode indicators
쐇 Overall functions bar indicator
쐅 Accompaniment On indicator
TEMPO
TRANSPOSE
TUNING
ACMP/SONG
VOLUME
METRONOME
VOLUME
쐏 Keyboard
쐃 Mode indicators
These indicate the currently selected mode —
Voice, Style, Song, or Function — with the mode
name encircled in a rounded rectangle. When
“STYLE” or “SONG” appear without the rectangle, the corresponding mode is active in the
background.
In the first example, the Style mode is selected.
STYLE
VOICE
STYLE
001
ACMP ON
MEASURE TEMPO
001 116
1 CHORD2 3
쐄 Measure and
Tempo
쐈 Song track indicators
0
In the second example, the Voice mode has
been selected, but the Style mode is still active
in the background. (This means that the style
controls are active and can be used to play the
currently selected style.)
쐊 Song/Voice/Style name and number
GrandPno
쐋 Notation
쐇 Overall functions bar indicator
The PortaTone has five Overall functions or
controls. The currently selected function is
indicated by a dark bar that appears next to its
name (printed on the panel).
쐋 Notation
쐏 Keyboard
These two portions of the display conveniently
indicate notes. When a user song (with chords)
is being played back, they show the chord notes
in succession. When the Style mode and auto
accompaniment are active, the display also
shows the specific notes of the current chord.
For a few specific chords, not all notes may be shown in the
notation section of the display. This is due to space limitations
in the display.
쐂 Beat indicators
쐆 Chord
쐎 Icon window
22
VOICE
STYLE
0
20
PANEL DISPLAY INDICATIONS
쐄 Measure and Tempo
These show the current measure during playback of a song or style, and the currently set
Tempo value for the song or style.
쐂 Beat indicators
These dark bars (one large, three small) flash in
sequence and in time with the song or style.
The large bar indicates the first beat of the
measure. (See page 77.)
쐆 Chord
When a user song (with chords) is being played
back, this indicates the current chord root and
type. It also indicates chords played in the
ACMP section of the keyboard when the Style
mode and auto accompaniment are on.
쐊 Song/Voice/Style name and number
This portion of the display indicates the name
and number of the currently selected song,
voice, or style. It also displays the name and
current value or setting of the Overall functions
and the Function parameters, as well as other
important operation messages.
쐎 Icon window
Depending on the mode or function selected,
this displays various symbols (icons) and other
messages to provide convenient, at-a-glance
information about the PortaTone operation. For
example, when a song or style accompaniment
is playing, this displays the level of each instrumental track.
쐅 Accompaniment On indicator
This appears when the auto accompaniment has
been turned on. (See page 52.)
쐈 Song track indicators
In song recording and playback, these indicate
the status of the tracks. (See pages 75, 83.)
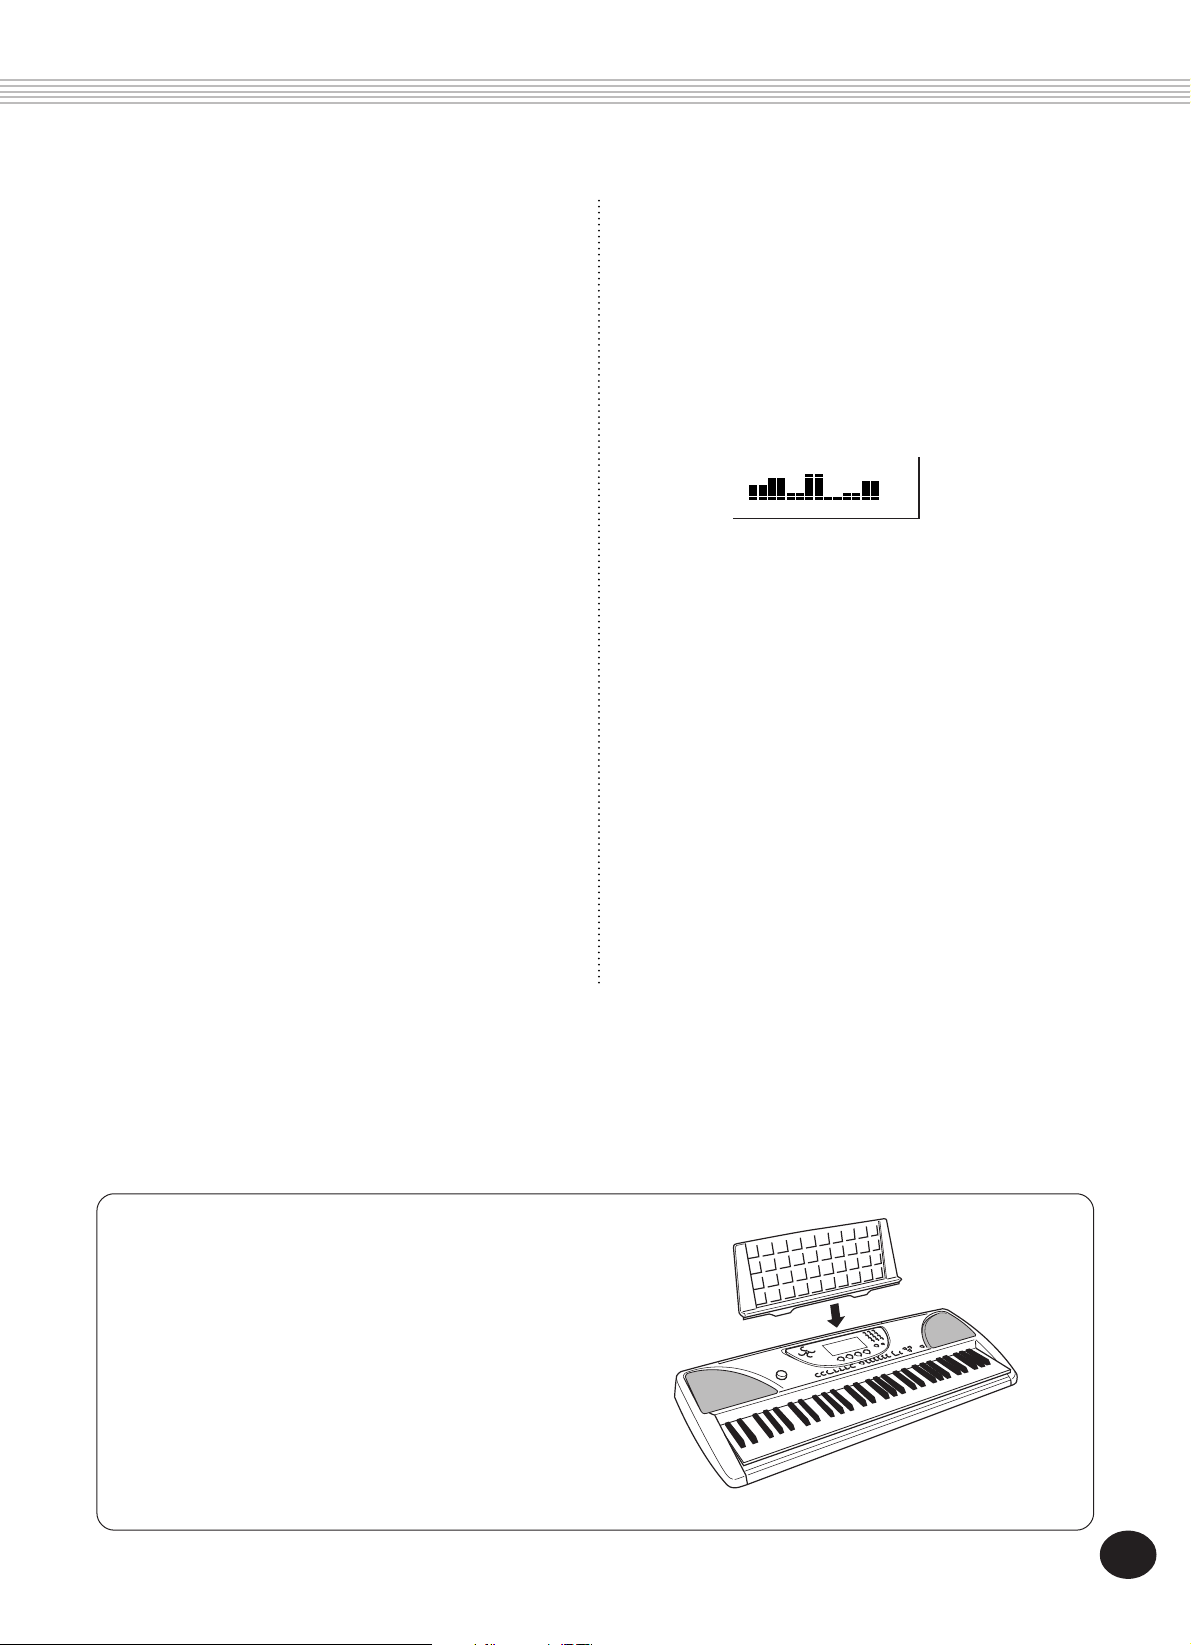
Music Stand
Insert the bottom edge of the included music stand into
the slot located at the top rear of the PortaTone control
panel.
23
21
PORTABLE GRAND
This convenient function lets you automatically exit from any
other mode or function and instantly call up the Grand Piano
voice.
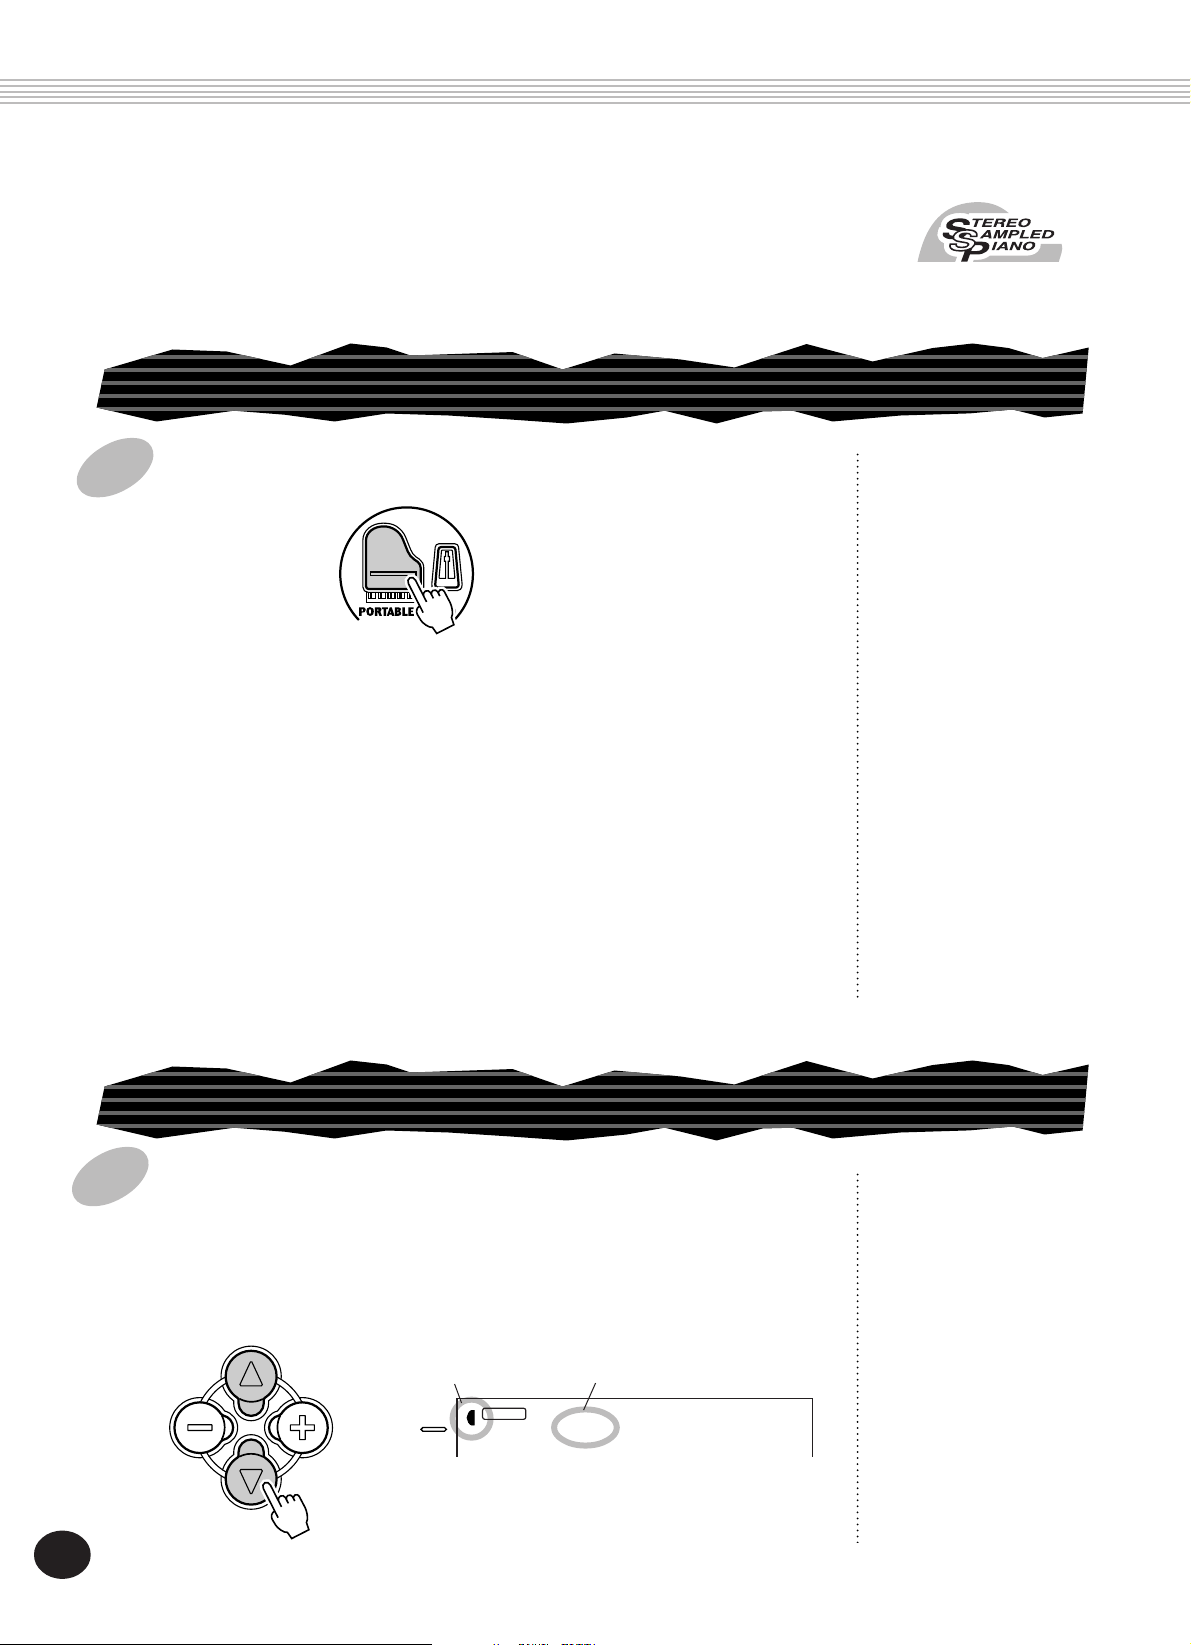
PLAYI NG THE PORTABLE GRAND
Press the PORTABLE GRAND button.
METRO-
NOME
Doing this automatically cancels any other mode or function, and resets
the entire instrument for playing the special “Stereo Sampled Piano” Grand
Piano voice (voice 001). It automatically selects the Voice mode (with the
Style mode active), and calls up style #91 (Rock Ballad). It also resets the
footswitch to Sustain operation.
The Portable Grand setting is designed also for playing with the special
Pianist styles (#91 — #100). When auto accompaniment is turned on, these
provide piano-only accompaniment in a variety of music styles. (See page
52.)
USING THE METRONOME
1 Set the desired tempo with the Tempo function in
the Overall menu.
Press one of the OVERALL ▲/▼ buttons, repeatedly if necessary, until
“Tempo” appears in the display.
Indicates Tempo is
selected
TEMPO
VOICE
STYLE
Current Tempo value
116
Tempo
24
22
PORTABLE GRAN D
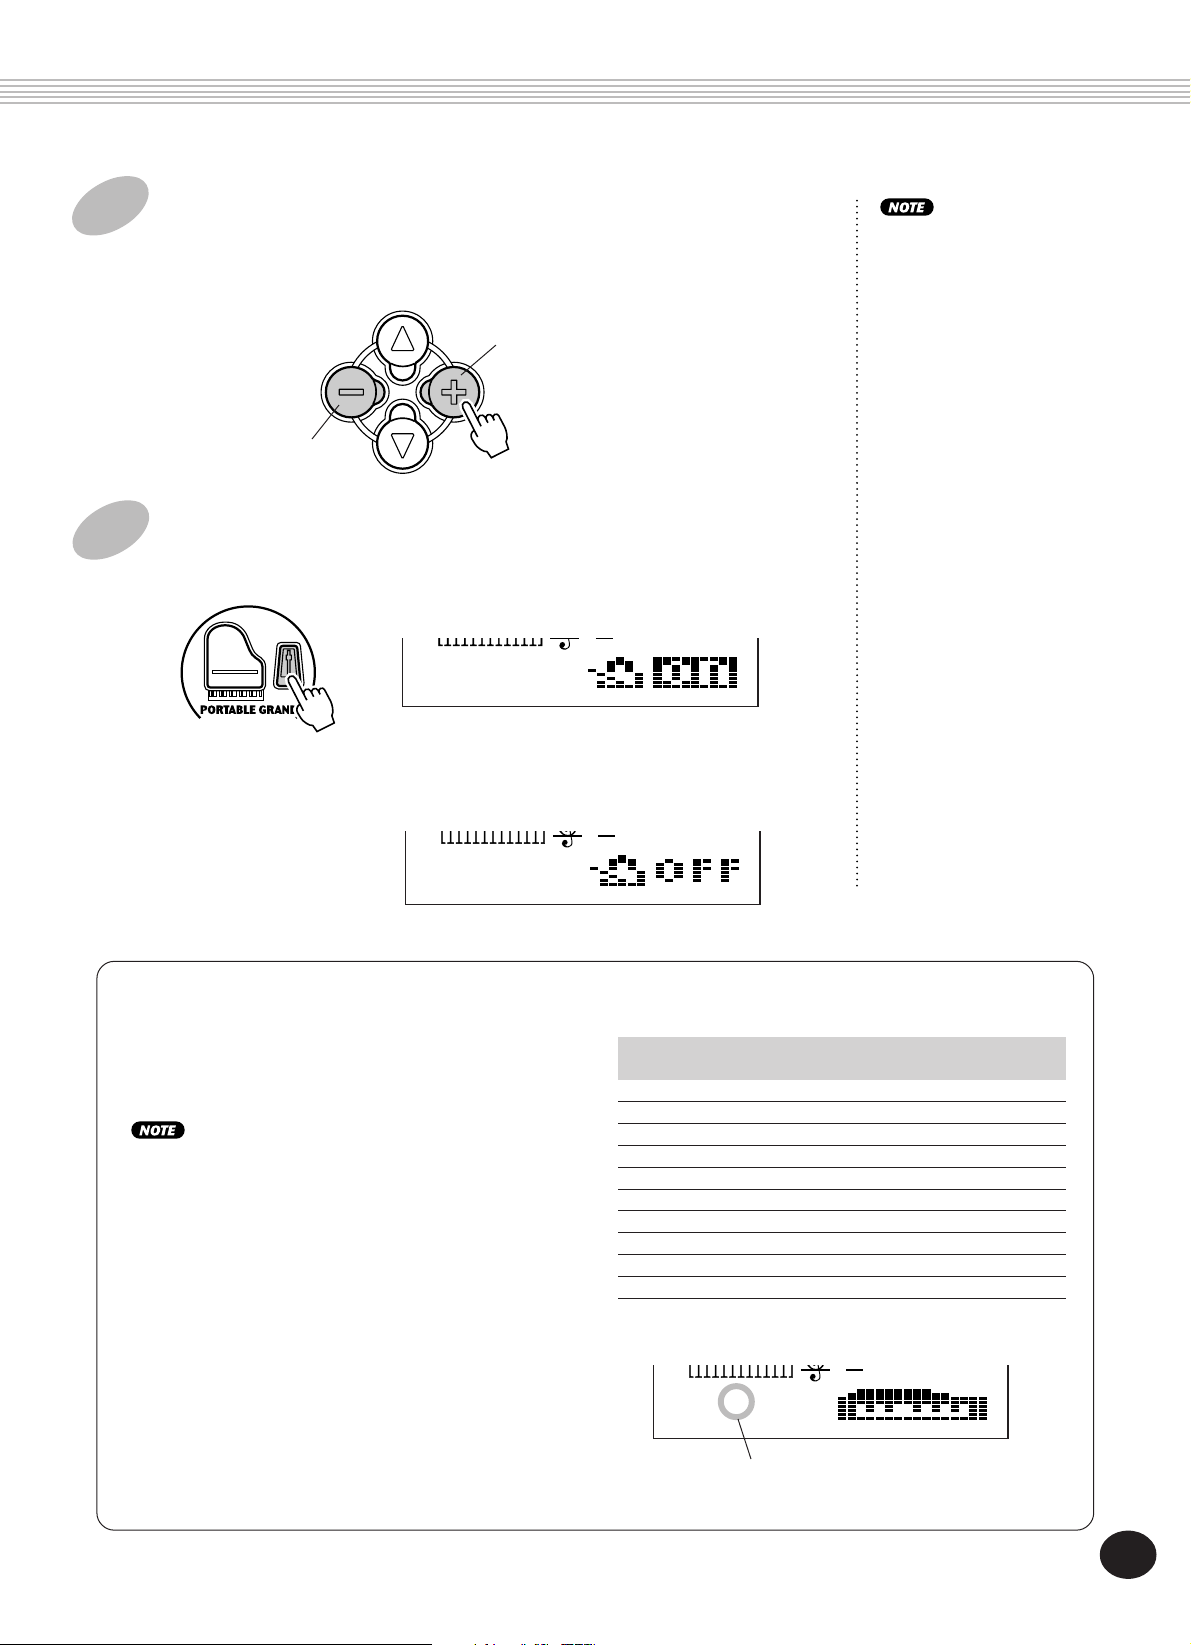
2 Change the value.
Use the OVERALL +/- buttons to increase or decrease the Tempo value.
Holding down either button continuously increases or decreases the value.
Increases Tempo
value
Decreases Tempo
value
3 Turn on the Metronome.
Press the METRONOME button.
METRO-
NOME
TEMPO
3 063
To turn the Metronome off, press the METRONOME button again.
The numeric keypad cannot
be used to change values
for the Overall menu
settings.
TEMPO
3 063
Setting the Metronome Time Signature
The time signature of the Metronome can be set to
various quarter-note based meters.
The time signature changes automatically when a style or
song is selected.
Simultaneously hold down the METRONOME
button and press the button on the numeric
keypad that corresponds to the desired time
signature (see chart at right).
Number Time
button signature
1 1/4 — Plays only “1” beats (all high clicks)
2 2/4
3 3/4
4 4/4
5 5/4
6 6/4
7 7/4
8 8/4
9 9/4
0 Plays no “1” beats (all low clicks)
TEMPO
3 063
Indicates current beat
number
25
23
PORTABLE GRAN D
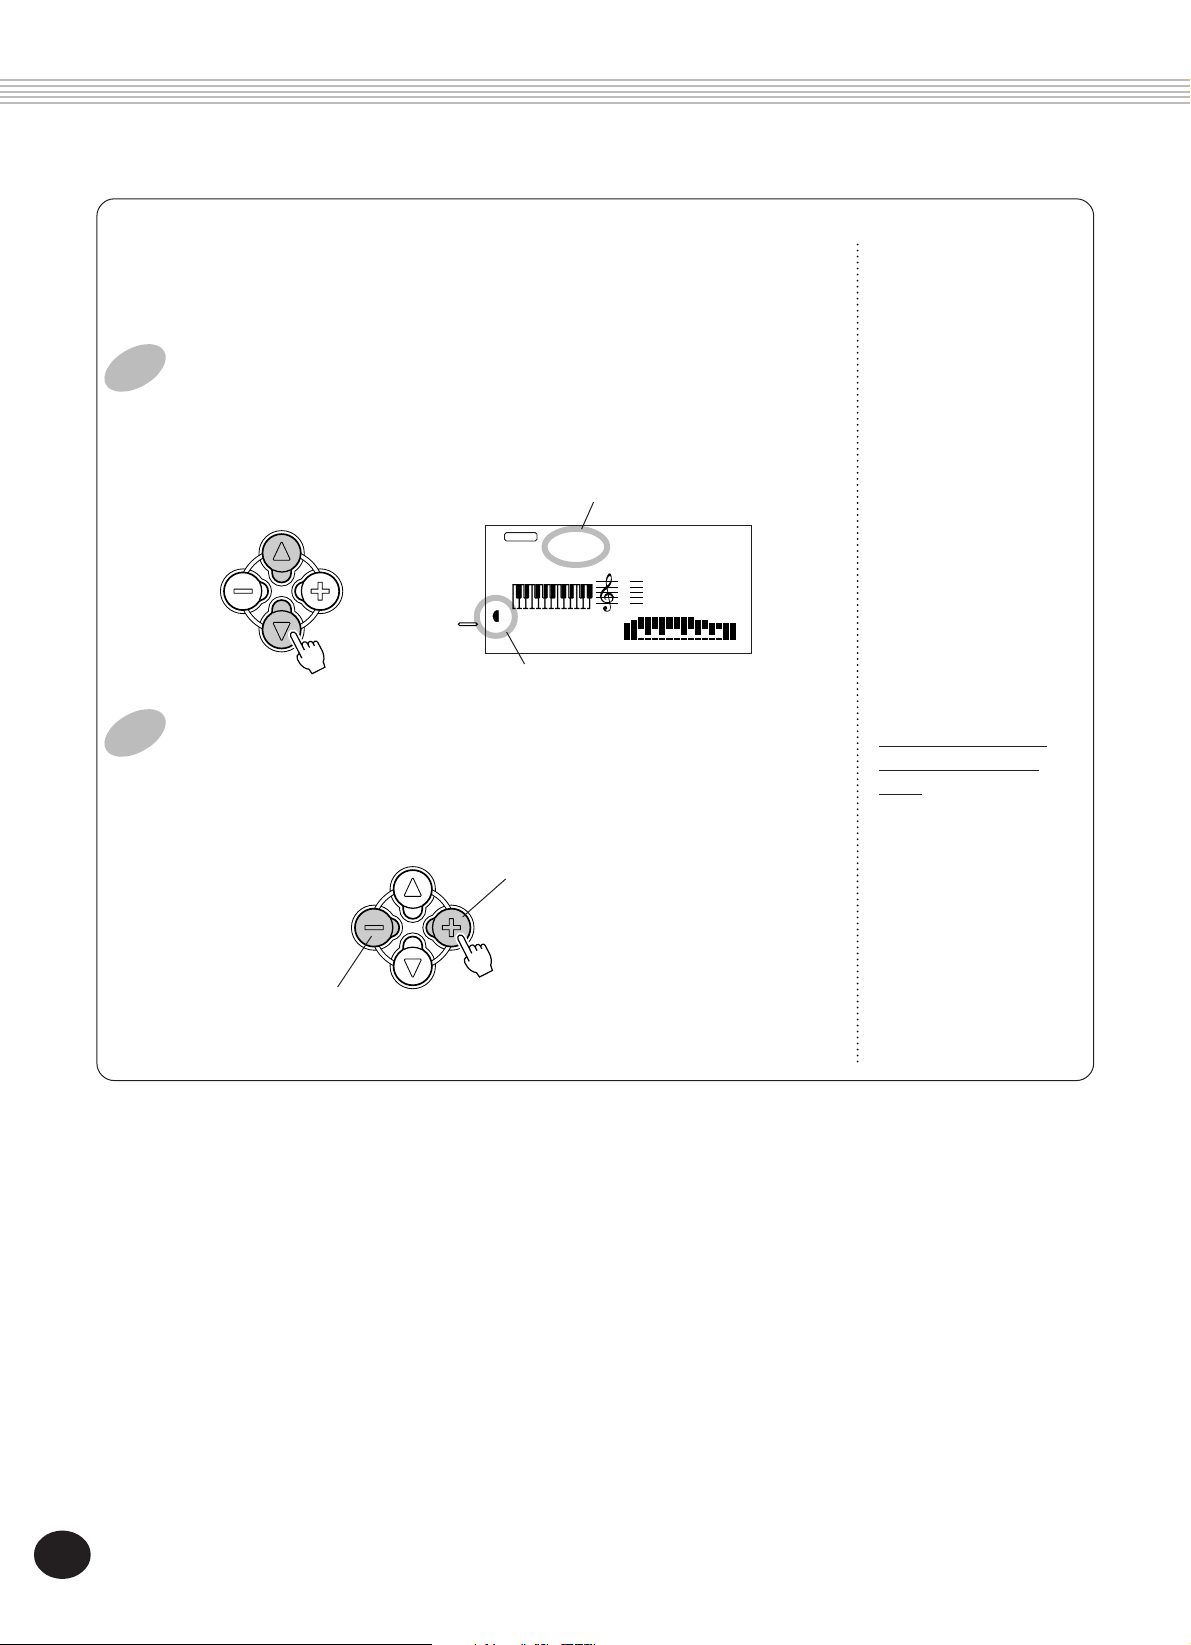
Adjusting the Metronome Volume
You can adjust the volume of the Metronome sound independently of the other
PortaTone sounds. The volume range is 000 — 127.
1 Select the Metronome Volume function in the Overall menu.
Press one of the OVERALL ▲/▼ buttons, repeatedly if necessary, until “MtrVol” appears
in the display.
Current Metronome
Volume value
VOICE
STYLE
MtrVol
100
METRONOME
VOLUME
MEASURE
TEMPO
001 063
Indicates Metronome Volume
is selected
2 Change the value.
Use the OVERALL +/- buttons to increase or decrease the Metronome Volume value.
Holding down either button continuously increases or decreases the value.
Increases Metronome
Volume value
Decreases Metronome
Volume value
Restoring the Default
Metronome Volume
Value
To restore the default
Metronome Volume
value (100), press both
OVERALL +/- buttons
simultaneously (when
Metronome Volume is
selected in the Overall
menu).
26
24
PLAYING VOICES — THE VOICE MODE
The Voice mode features 228 authentic voices (including 128 General MIDI
voices), plus 10 special drum kits — all of which have been created with
Yamaha’s sophisticated AWM (Advanced Wave Memory) tone generation system.
The Voice mode gives you many powerful and versatile tools for playing and
enhancing these Voices.
The voices are divided into various instrument
categories, all of which are printed on the panel
for convenience. For a complete list of the
available voices, see page 109.
The Voice mode is actually divided into three
separate modes: Main, Dual and Split. In the
Main Voice mode (see below), you can play a
single voice over the entire range of the keyboard. The Dual Voice mode (page 34) allows
you to “layer” two different voices together for
rich, complex sounds. The Split Voice mode
(page 36) lets you set up two different voices for
playing from separate sections of the keyboard.
Moreover, each mode features special effect
sections that let you enhance the sound of the
Voice or Voices. These include Reverb, Chorus,
and Harmony, as well as a “DSP” section that
provides miscellaneous effects such as tremolo,
echo, delay, distortion, equalization, and wah.
(See page 40.)
Other voice-related functions include Voice Set
(page 38), which lets you automatically call up
the ideal settings for each voice, and Touch
Sensitivity (page 38), which determines how the
voices respond to your playing technique.
The PortaTone includes special Drum Kit voices
— #101 — #110 — that let you play various drum
and percussion sounds from the keyboard.
(Refer to the Drum Kit Voice chart on page 30.)
Symbols are also printed above the keyboard,
conveniently indicating which sounds are played
from which keys.
PLAYING A VOICE — MAIN VOICE
1 Select the Voice mode.
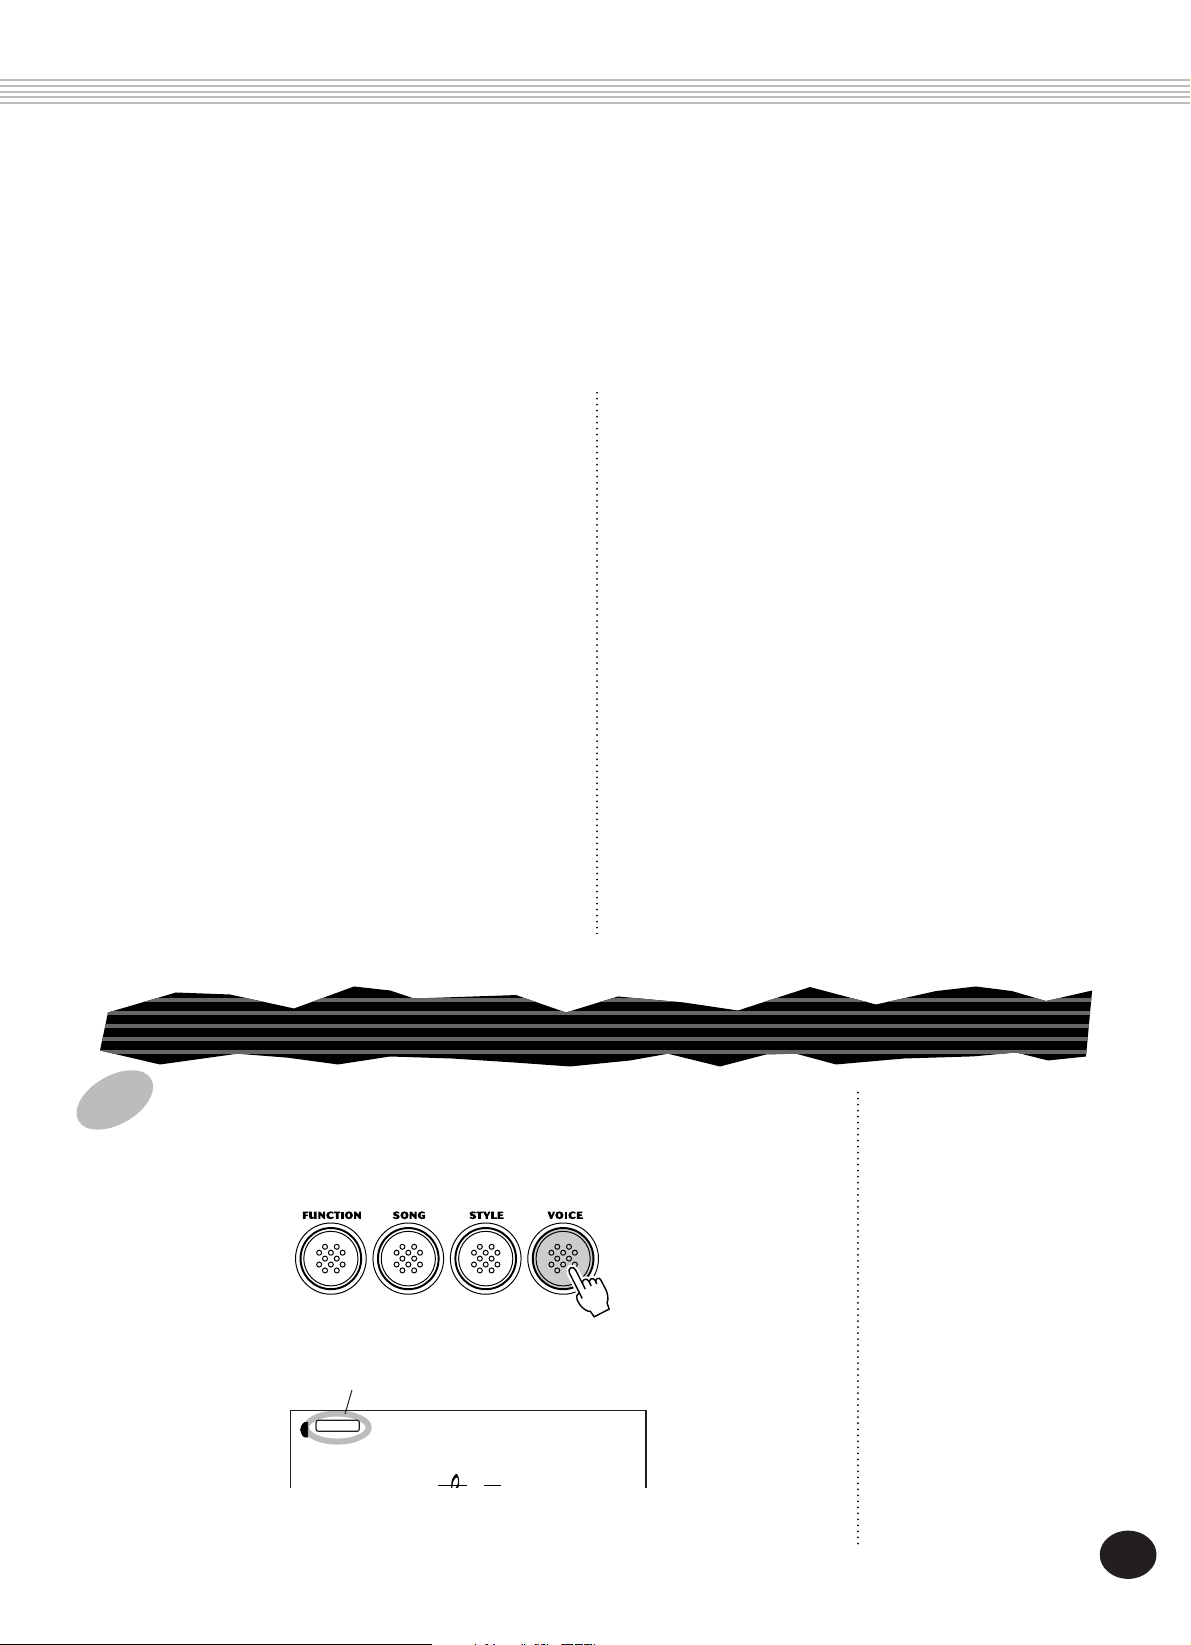
Press the VOICE button.
Indicates Voice mode is selected
VOICE
STYLE
001
GrandPno
27
25
PLAYIN G VOICES — THE VO ICE MODE
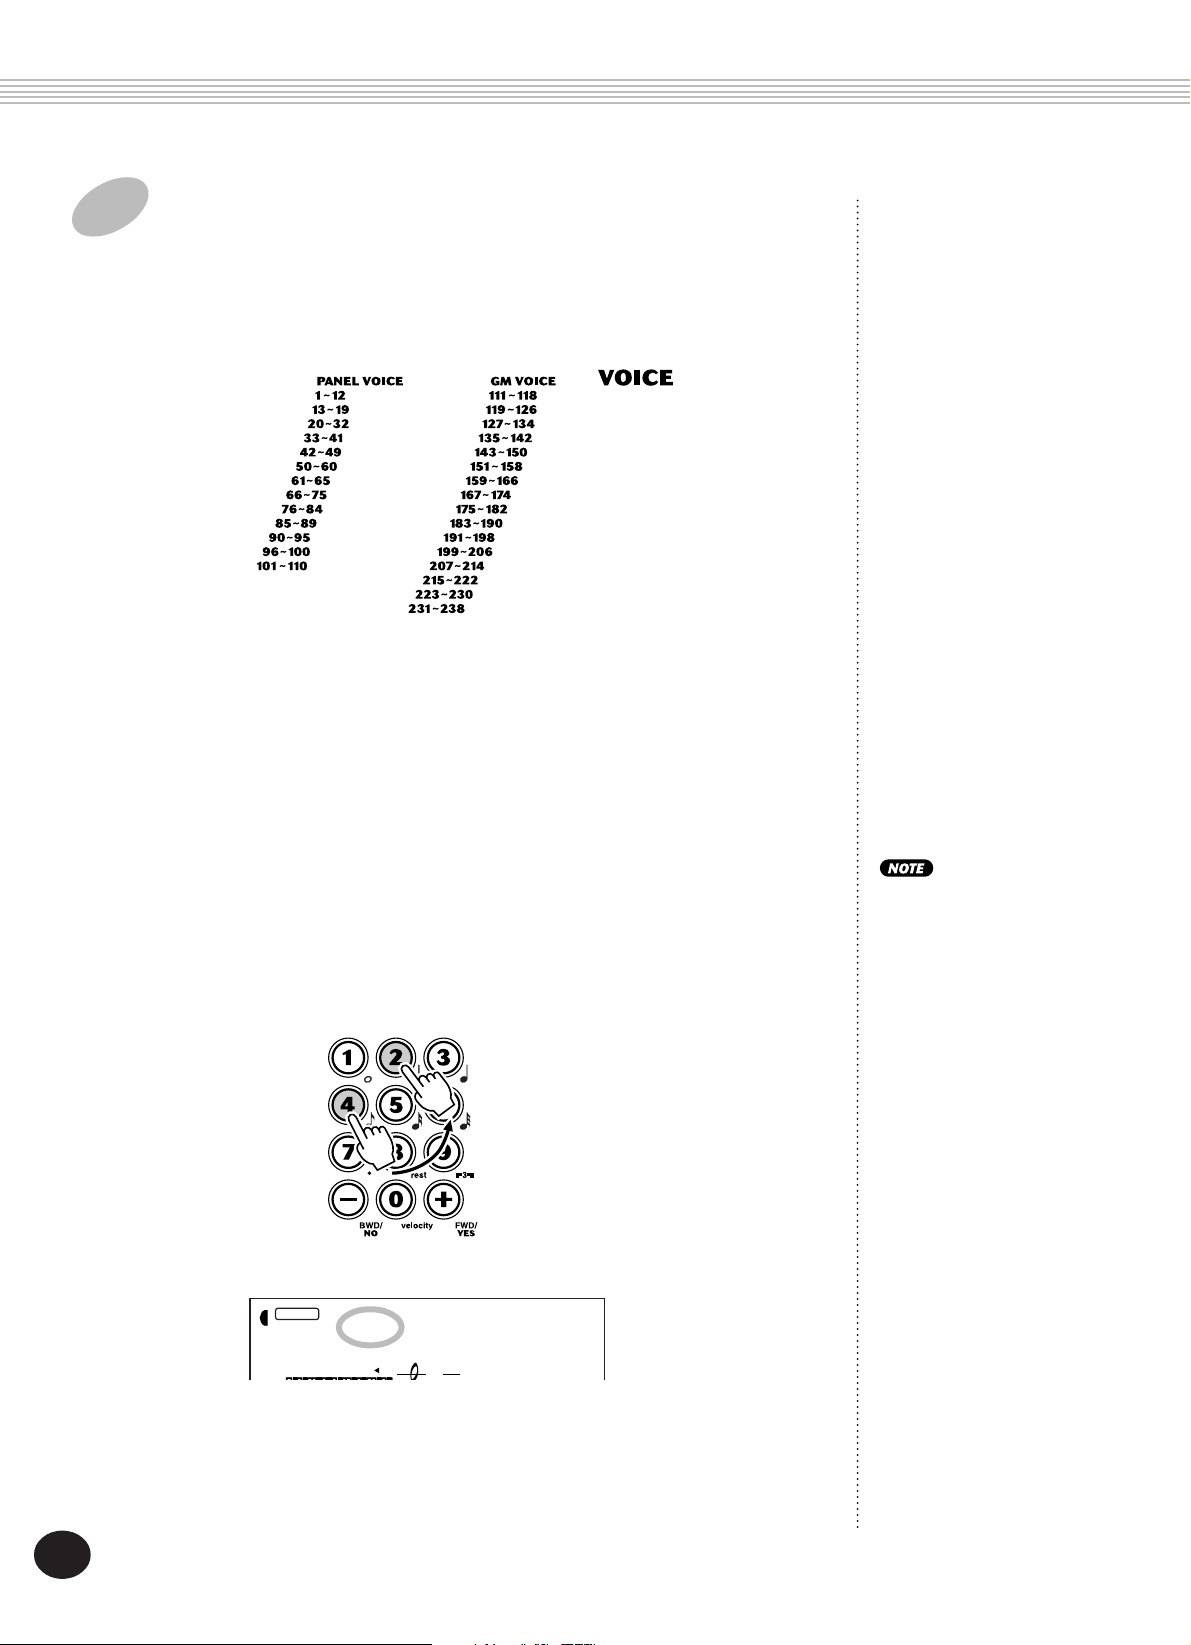
2 Select the desired voice number.
Use the numeric keypad. The basic categories of voices and their numbers
are shown at the right side of the panel. A complete list of the available
voices is given on page 109.
PIANO
CHROMA TIC
ORGAN
GUITAR
BASS
STRINGS
ENSEMBLE
BRASS
REED
PIPE
SYNTH LEAD
SYNTH PAD
BASS
ENSEMBLE
STRINGS
BRASS
REED
PIPE
SYNTH LEAD
SYNTH PAD
DRUM KITS
PIANO
MALLET
ORGAN
GUITAR
SYNTH EFFECTS
ETHNIC
PERCUSSIVE
SOUND EFFECTS
There are three ways to select voices: 1) directly entering the voice number
with the numeric keypad, 2) using the +/- keys to step up and down
through the voices, or 3) pressing the VOICE button to advance through
the voice numbers.
Using the numeric keypad
Enter the digits of the voice number as indicated on the panel. For example, to select voice #42, press “4” on the numeric keypad, then “2.”
All two-digit voice numbers
can be selected without
entering an initial “0.”
However, when selecting
voice numbers 1 — 23, the
PortaTone pauses briefly
before actually calling up
the voice. (This pause
allows for entering threedigit voice numbers, such as
“235.” Entering the
numbers “2” then “4”
immediately calls up voice
#24, since there are no
voices #240 or higher.)
28
VOICE
STYLE
042
ACMP ON
Aco.Bass
If you want to immediately
call up voices #1 — #23,
enter one or two zeros
before the number; for
example, select voice #9 by
pressing “0,” “0,” then
“9.” Pressing only “0” does
not change the voice.
26
PLAYIN G VOICES — THE VO ICE MODE
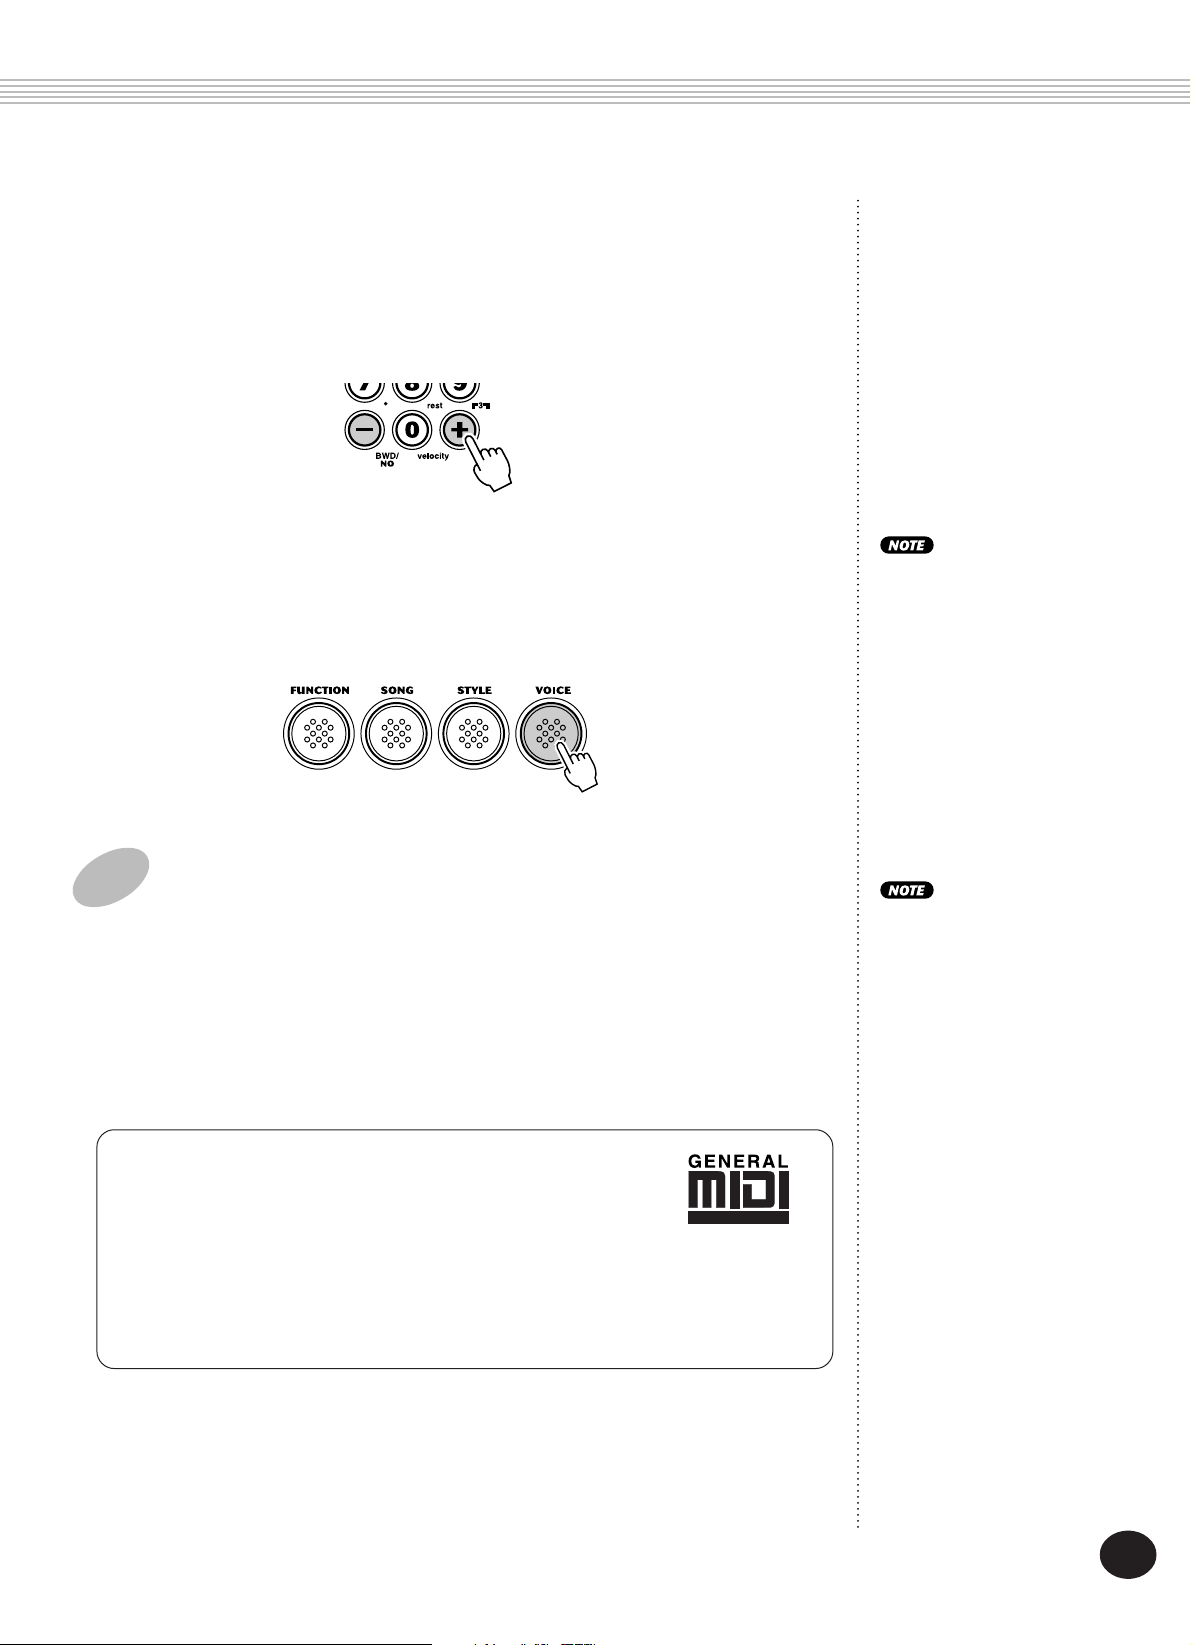
Using the +/- keys
Press the + key to select the next voice number, and press the — key to
select the previous voice. Holding down either key continuously scrolls up
or down through the numbers. The +/- keys have a “wrap around” feature. For example, pressing the + key from voice #238 returns to voice #1.
Using the VOICE button
Press the VOICE button to select the next voice number. (This functions
exactly the same as the + button.)
3 Play the selected voice.
To change to another voice, repeat step 2 above.
Since either the Style or Song mode is active in the background (as indicated by the mode name in the display, without the rectangle), you can
also play styles or songs, respectively, in the Voice mode by simply pressing
the START/STOP button. The last selected style or song will be played.
Each voice is automatically
called up with the most
suitable octave range
setting. Thus, playing
middle C with one voice
may sound higher or lower
than another voice at the
same key.
When you select a voice, the
PortaTone also automatically calls up various
settings that are appropriate for the voice. [This is
true when Voice Set
(Function #72, page 39) is
set to on — the default
setting.]
About Panel Voices and GM Voices
Keep in mind that the PortaTone has two separate sets of voices:
100 Panel voices and 128 GM (General MIDI) Voices. The GM
Voices can also be used for optimum playback of GM-compatible
song data. This means that any GM song data (played from a sequencer or other
MIDI device) will sound just as the composer or programmer intended.
When a GM voice is selected, the General MIDI icon appears at the top left of the
display.
29
27
PLAYIN G VOICES — THE VO ICE MODE
Drum Kit Voice Chart (voices 101 — 110)
When one of the 10 panel Drum Kit voices are selected you can
play different drums and percussion instruments on the keyboard.
The drums and percussion instruments played by the various keys
are marked by symbols above the keys.
VOICE
STYLE
101
Std.Kit1
No. Name LCD
101 Standard Kit 1 Std.Kit1
102 Standard Kit 2 Std.Kit2
103 Room Kit Room Kit
104 Rock Kit Rock Kit
105 Electronic Kit Elct.Kit
106 Analog Kit AnlogKit
107 Dance Kit DanceKit
108 Jazz Kit Jazz Kit
109 Brush Kit BrushKit
110 Symphony Kit SymphKit
Function Parameters — Main Voice
The Function parameters provide additional settings for the Main
voice. These settings are especially useful when using a second voice
in the Dual or Split modes, since they let you change or enhance the
sound of the Main voice separate from the Dual or Split voice. These
settings include:
• Volume
• Octave
• Pan
• Reverb Send Level
• Chorus Send Level
• DSP Effect Send Level
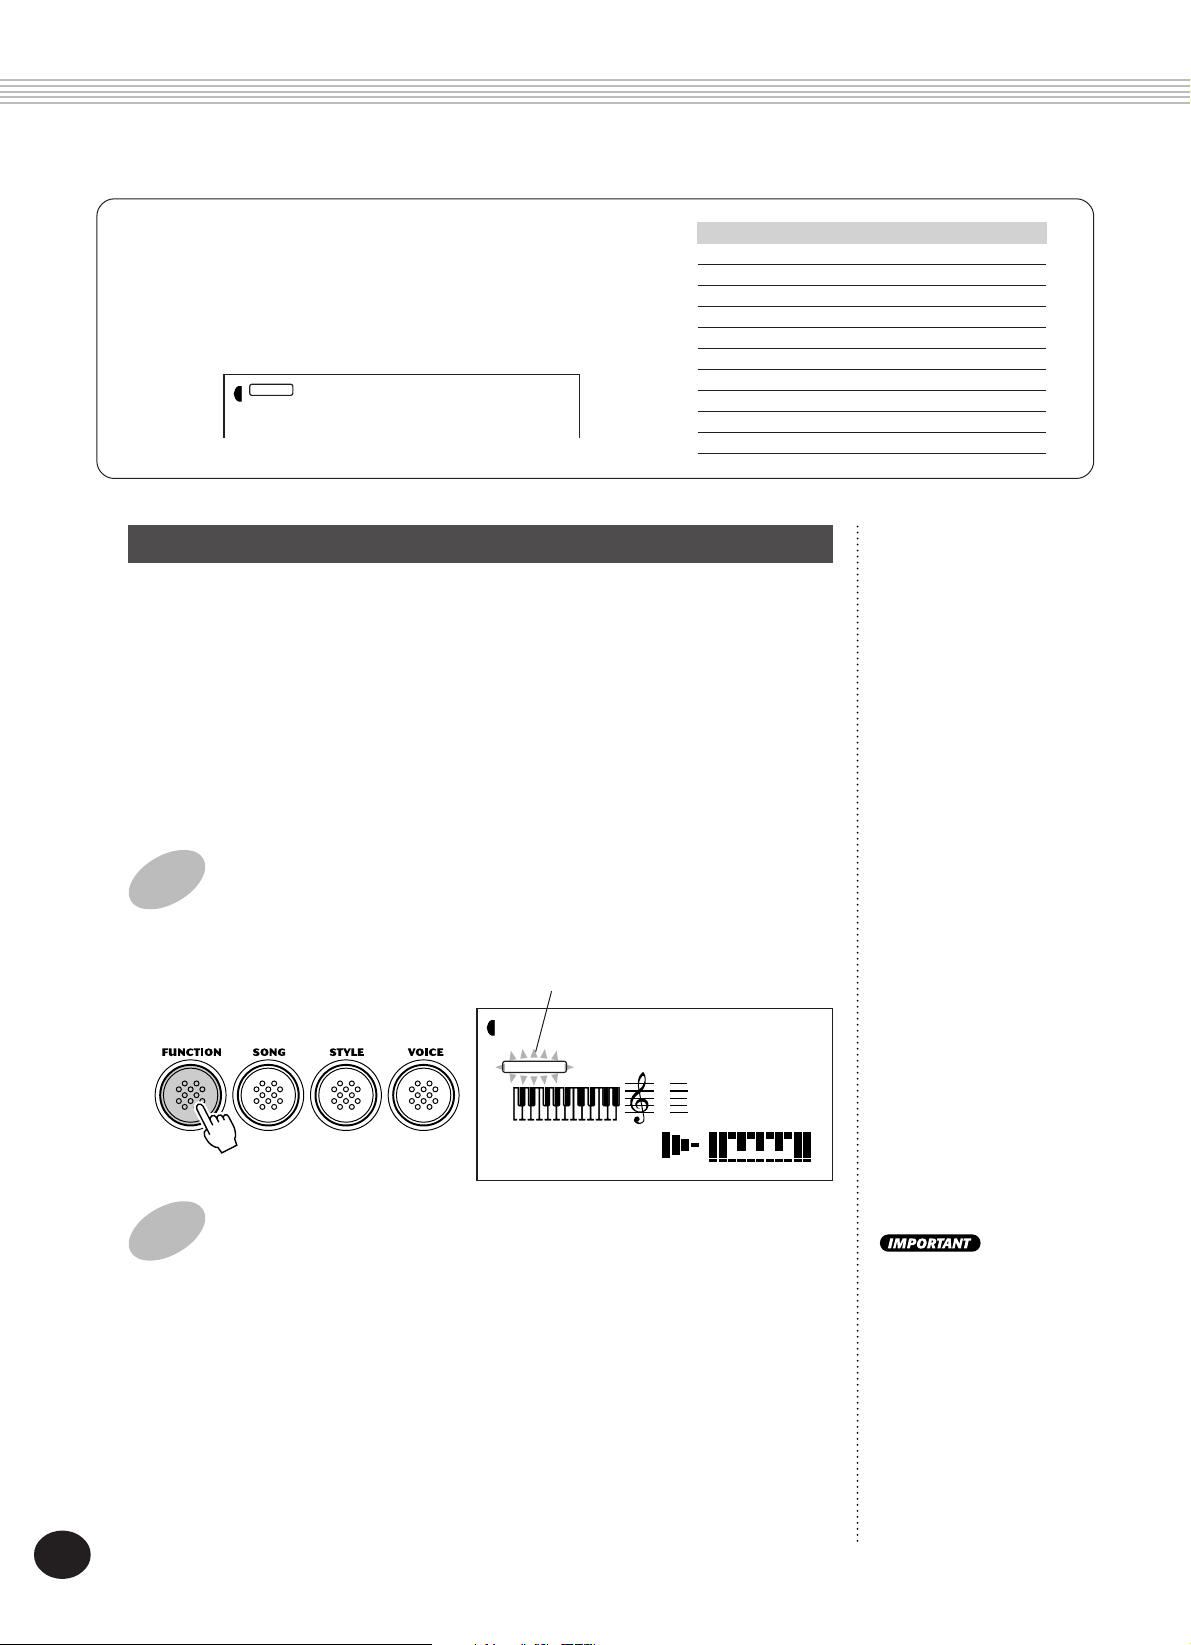
1 Select the Function mode.
Press the FUNCTION button.
Flashes to indicate Function
parameter can be selected.
STYLE
FUNCTION
MEASURE TEMPO
F01
001 116
M.Volume
2 Select the desired Function parameter number.
While the “FUNCTION” indication is flashing, use the numeric keypad to select the desired Main Voice Function parameter number (1 —
6). (See the “Parameters” list below for details.)
Function parameter numbers can be selected in the same way as with
the voices (see page 28). You can use the numeric keypad to directly
enter the number, use the +/- keys to step up and down through the
parameters, or press the FUNCTION button to advance through the
parameter numbers.
Since the “FUNCTION”
indication flashes for only a
couple of seconds, make
sure to select the parameter
quickly after step 1 above.
30
28
Loading…
Найди любой мануал:
Например: Sony VGN-FW460J/T
Вы можете бесплатно скачать Руководство по эксплуатации для Yamaha PSR-270.
Также вы сможете прочесть онлайн этот документ без скачивания.
Скачать Руководство по эксплуатации для Yamaha PSR-270
Тип файла
PDF
Размер
3.67 Mb
Кол-во страниц
120
Просмотров
6326
Читать онлайн Руководство по эксплуатации для Yamaha PSR-270 (Страница 1)

Другие Блоки питания Yamaha PSR-270
Топ Yamaha Блоки питания
Ранее вы смотрели
Эта страница полезна для вас? Поделитесь ссылкой:
Скачать файл PDF «Yamaha PSR-270 Инструкция по эксплуатации» (4.12 Mb)
Популярность:
3985 просмотры
Подсчет страниц:
120 страницы
Тип файла:
Размер файла:
4.12 Mb
Google Ads:
-
Страница 1
[…]
-
Страница 2
This product utilizes batteries or an external power supply (adapter). DO NOT connect this product to any power supply or adapter other than one described in the manual, on the name plate, or specifically recommended by Yamaha. This product should be used only with the components supplied or; a cart, rack, or stand that is recommended by Yamaha. If[…]
-
Страница 3
3 • Do not use the instrument near other electrical products such as televi- sions, radios, or speakers, since this might cause interference which can affect proper operation of the other products. • Do not place the instrument in an unstable position where it might acci- dentally fall over. • Before moving the instrument, remove all connecte[…]
-
Страница 4
Congratulations on your purchase of the Y amaha PSR-270 PortaT one! Y ou now own a portable keyboard that combines advanced func- tions, great sound and exceptional ease-of-use in a highly compact package. Its outstanding features also make it a remarkably ex- pressive and versatile instrument. Read this Owner’ s Manual car efully while playing y[…]
-
Страница 5
5 Contents SELECTING AND PLA YING SONGS — THE SONG MODE 75 SELECTING AND PLA YING A SONG 75 CHANGING THE TEMPO ……………. 76 ABOUT THE BEA T DISPLA Y …………. 77 ADJUSTING THE SONG VOLUME … 78 SONG RECORDING 79 RECORDING A USER SONG — REALTIME RECORDING ……………… 80 • Using the Metronome ………… 81 • Additional Op[…]
-
Страница 6
6 P AN E L CO NTRO L S AN D TE R M I NAL S Front Panel 쐃 MASTER VOLUME dial This determines the overall volume of the PortaT one. 쐇 OVERALL buttons ( ▲ , ▼ , +, -) These are for selecting the various “overall” functions and setting their values. (See pages 22, 24.) 쐋 FUNCTION button This selects the Function mode. (See page 18.) 쐏 S[…]
-
Страница 7
7 씈 INTRO/ENDING button When the Style mode is selected, this is used to control the Intro and Ending functions. (See pages 49, 51.) 씉 MAIN A/B (AUTO FILL) buttons When the Style mode is selected, these are used to change auto accompaniment sections and control the Auto Fill function. (See page 54.) 씊 CHORD GUIDE button When the Style mode is[…]
-
Страница 8
8 SE TT I NG U P This section contains infor mation about setting up your PortaT one for playing. Make sure to read this section carefully before using the instrument. ■ When the Batteries Run Down When the batteries run low and the battery voltage drops below a certain level, the PortaT one may not sound or function pr operly . As soon as this h[…]
-
Страница 9
9 ■ Using the MIDI T erminals • Make sure that the footswitch plug is properly connected to the FOOT SWITCH jack before turning on the power . • Do not press the footswitch while turning the power on. Doing this changes the recognized polarity of the footswitch, resulting in reversed footswitch operation. SE TTI NG UP ACCESSO R Y JACKS ■ Us[…]
-
Страница 10
10 The PSR-270 features a total of 238 high-quality voices. Let’ s tr y a few of them out… Panel voices ……….. 1 — 100 (100 voices) 101 — 110 (10 drum kit voices) GM voices ………….. 111 — 238 (128 voices) Selecting other voices z Enter the V oice mode. x Select a voice. c Play the keyboard. W ant to find out more? See page 27. 002 Br[…]
-
Страница 11
11 Step1 V oices Panel V oice List Changing the Metronome V olume 1 Press one of the OVERALL ▲ / ▼ buttons until “MtrVol” is shown in the display . 2 Press the OVERALL + or — button to raise or lower the value. W ant to find out more? See page 24. W ant to find out more? See page 26. Playing along with the Metronome q Press the METRONOME bu[…]
-
Страница 12
12 Using the auto accompaniment The PSR-270 has powerful and easy-to-use auto accompaniment features. All you have to do is play chords with your left hand — and the PortaT one automatically pr oduces appropriate bass, chord, and rhythm backing for your perfor- mance. Use your right hand to play melodies, and you’ll sound like an entire band! z[…]
-
Страница 13
13 Selecting a complete music style with ideal voice and other settings — One T ouch Setting The PortaT one features 100 different styles in various music genres. W ith the One T ouch Setting function, you can call up voice and other settings that best match the selected style. Each style has been programmed with two Preset One T ouch Settings. z[…]
-
Страница 14
14 Using the Chord Guide function Learning how to play specific chords z Enter the Style mode, then press the CHORD GUIDE button until “Dict.” is shown in the display . x Specify the root note of the chord. v Play the notes of the chord as indicated in the keyboard diagram in the display . c Specify the chord type of the chord. Step 3 Chord Gui[…]
-
Страница 15
15 Playing chord progressions (songs) with just one finger q Enter the Style mode, then press the CHORD GUIDE button until “EZ. is shown in the display . w Select an EZ Chord bank. Continue pressing the same key each time you want a new chord to be played. e Start the auto accompaniment. The EZ Chord function gives you an exceptionally easy way t[…]
-
Страница 16
16 Playing a song Changing the tempo (speed) of the song q Press one of the OVERALL ▲ / ▼ buttons until “T empo” is shown in the display . Changing the volume of the song q Press one of the OVERALL ▲ / ▼ buttons until “SongV ol” is shown in the display . w Press the OVERALL + or — button to raise or lower the volume of the song. w P[…]
-
Страница 17
17 Recording your own song The PSR-270 lets you r ecor d your own songs by using two different methods — Realtime and Step. T r y out both of these recording methods yourself… 1 Select the desired recording mode by pressing the RECORD button. Realtime recording Step recording This method is much like using a conventional tape r ecor der , letti[…]
-
Страница 18
18 Using the Function parameters The PSR-270 has a variety of settings in the Function parameters. These give you detailed control over many of the PSR-270’ s features. z Press the FUNCTION button. Step 5 F unction P arameters x Select a Function number . For a list of functions, see page 19. The Function number can be selected while the “FUNCT[…]
-
Страница 19
19 Function page F01 M.Volume Main Voice V olume 31 F02 M.Octave Main Voice Octave 31 F03 M.Pan Main Voice Pan 31 F04 M.RevLvl Main Voice Reverb Send Level 31 F05 M.ChoLvl Main Voice Chor us Send Level 31 F06 M.DspLvl Main Voice DSP Effect Send Level 31 F11 D.Volume Dual V oice V olume 35 F12 D.Octave Dual V oice Octave 35 F13 D.Pan Dual V oice Pan[…]
-
Страница 20
20 Using M I DI The PSR-270 also features rear panel MIDI terminals (MIDI IN and MIDI OUT) as well as a comprehensive set of MIDI functions, that let you use the instrument in a variety of record- ing and performance applications. Step 6 MI D I ● Sending original song and One T ouch Setting data to another PSR-270. ➔ See “Using Bulk Dump Send[…]
-
Страница 21
21 Step 6 M IDI ● In this setup you can record your PSR-270 perfor mance, including the auto accompani- ment, to a connected computer or sequencer . (Up to 16 channels can be used.) Y ou can then edit the recorded data on the computer or sequencer , and play it back using the sounds of the PSR-270. ➔ See page 95. ➔ See “Using Initial Setup […]
-
Страница 22
22 P A N EL DISPLA Y I N DIC A T IONS The PortaT one features a large multi-function display that shows all important settings for the instrument. The section below briefly explains the various icons and indications in the display . The LCD’ s backlight will gradually dim over a long period of use. When the display becomes dim or hard to read, co[…]
-
Страница 23
23 쐄 Measur e and T empo These show the current measure during play- back of a song or style, and the currently set T empo value for the song or style. 쐂 Beat indicators These dark bars (one large, three small) flash in sequence and in time with the song or style. The large bar indicates the first beat of the measure. (See page 77.) 쐆 Chord W[…]
-
Страница 24
24 PO R T AB LE GR AN D This convenient function lets you automatically exit from any other mode or function and instantly call up the Grand Piano voice. Press the PORT ABLE GRAND button. Doing this automatically cancels any other mode or function, and resets the entire instrument for playing the special “Stereo Sampled Piano” Grand Piano voice[…]
-
Страница 25
25 Decreases T empo value Increases T empo value 2 Change the value. Use the OVERALL +/- buttons to increase or decrease the T empo value. Holding down either button continuously increases or decreases the value. 3 T ur n on the Metronome. Press the METRONOME button. T o tur n the Metronome off, press the METRONOME button again. Setting the Metrono[…]
-
Страница 26
26 Adjusting the Metronome V olume Y ou can adjust the volume of the Metronome sound independently of the other PortaT one sounds. The volume range is 000 — 127. Restoring the Default Metr onome V olume V alue T o restore the default Metronome V olume value (100), press both OVERALL +/- buttons simultaneously (when Metronome Volume is selected in t[…]
-
Страница 27
27 PL A YI N G VO I C ES — TH E VO I C E MO D E The V oice mode featur es 228 authentic voices (including 128 General MIDI voices), plus 10 special drum kits — all of which have been created with Y amaha’ s sophisticated AWM (Advanced W ave Memory) tone generation system. The V oice mode gives you many powerful and versatile tools for playing[…]
-
Страница 28
28 There are three ways to select voices: 1) directly entering the voice number with the numeric keypad, 2) using the +/- keys to step up and down through the voices, or 3) pressing the VOICE button to advance through the voice numbers. 2 Select the desir ed voice number . Use the numeric keypad. The basic categories of voices and their numbers are[…]
-
Страница 29
29 Using the +/- keys Pr ess the + key to select the next voice number , and pr ess the — key to select the previous voice. Holding down either key continuously scrolls up or down through the numbers. The +/- keys have a “wrap around” fea- ture. For example, pressing the + key from voice #238 returns to voice #1. Using the VOICE button Pr ess t[…]
-
Страница 30
30 PL A YI N G VOIC ES — TH E VO ICE MO D E 1 Select the Function mode. Press the FUNCTION button. 2 Select the desir ed Function parameter number . While the “FUNCTION” indication is flashing, use the numeric key- pad to select the desir ed Main V oice Function parameter number (1 — 6). (See the “Parameters” list below for details.) Func[…]
-
Страница 31
31 PLA YI N G VOIC ES — TH E VO ICE MO D E 3 Change the parameter setting or value. After the “FUNCTION” indication stops flashing, use the numeric keypad or +/- buttons to change the value or setting. (The value/ setting is shown to the left of the parameter name.) Restoring the Default V alue If you’ve changed the parameter setting, you c[…]
-
Страница 32
32 PL A YI N G VOIC ES — TH E VO ICE MO D E Y ou can also adjust the tuning and change the transposition (key) of the entir e Por taT one sound with the T ranspose and T uning functions. TR AN SP OSE AN D TU N I N G T ranspose T ranspose deter mines the key of both the main voice and the bass/chord accompaniment of the selected style. It also det[…]
-
Страница 33
33 PLA YI N G VOIC ES — TH E VO ICE MO D E T uning T uning deter mines the fine pitch setting of both the main voice and the bass/chord accompaniment of the selected style. It also determines the pitch of the songs. This allows you to accurately match the tuning with that of other instruments. The T uning settings can be adjusted over a range of […]
-
Страница 34
34 The Dual V oice mode lets you cr eate richly textur ed sounds by “layering” two different voices together — one voice being the Main voice selected in the normal way (page 27), and the other a Dual voice selected as described below . 1 T urn on the Dual V oice mode. Press the DUAL button. When you play the keyboard, both the currently sele[…]
-
Страница 35
35 5 Set other parameters as needed. T o select and set other parameters, repeat steps 2 — 4 above. 6 Exit the Function mode. Once you’ve made all desired settings, press one of the other mode but- tons (SONG, STYLE, or VOICE). 4 Change the parameter setting or value. After the “FUNCTION” indication stops flashing, use the numeric keypad to c[…]
-
Страница 36
36 In the Split V oice mode, you can assign two differ ent V oices to opposite sections of the keyboard, and play one V oice with your left hand while your right plays another . For example, you could play bass with the left hand and play piano with the right. The right-hand (or upper) V oice is selected in the Main V oice mode (page 27), and the l[…]
-
Страница 37
37 PLA YI N G VOIC ES — TH E VO ICE MO D E 5 Exit the Function mode. Once you’ve made all desired settings, press one of the other mode but- tons (SONG, STYLE, or VOICE). Function Parameters — Split V oice The Function parameters provide all settings for the Split voice. Like the similar settings in the Main V oice mode, these settings let yo[…]
-
Страница 38
38 PL A YI N G VOIC ES — TH E VO ICE MO D E V oice Set and T ouch Sensitivity are two important voice-r elated parameters, and are found in the Utility section of the Function parameters. When V oice Set (described in greater detail below) is set to on, you can automatically call up a variety of voice-related settings that best suit the selected […]
-
Страница 39
39 PLA YI N G VOIC ES — TH E VO ICE MO D E No. Parameter Name Display Name Range/Settings F72 V oice Set V oiceSet oFF , on F73 T ouch Sensitivity T ouchSns 1 — 3 Description When this is set to on, selecting a voice also automati- cally calls up special voice-related parameters and values that best suit the voice. The parameters included in V […]
-
Страница 40
40 EF F EC T S The Reverb effect reproduces the natural ambient “wash” of sound that occurs when a instrument is played in a room or concert hall. A total of eight dif ferent Reverb types simulating various different performance environments are available. 1 T ur n on the Reverb effect. Press the REVERB button. Reverb can also be turned on and […]
-
Страница 41
41 4 Exit the Function mode. Once you’ve made all desired settings, press one of the other mode but- tons (SONG, STYLE, or VOICE). The Chorus effect lets you enhance the sound of a voice with through the use of pitch modulation. Two basic types are pr ovided: Chorus and Flanger . Chorus pr oduces a thicker , war mer , and mor e animated sound, wh[…]
-
Страница 42
42 DS P The DSP effect section provides many reverb and chorus effects, plus a wealth of other useful and dynamic effects for enhancing and changing the sound of the voices. Included among these miscellaneous effects are r everse gate r everb, phaser , rotary speaker , tremolo, echo, delay , distor tion, equalization, and wah. A total of thirty-thr[…]
-
Страница 43
43 EFF ECT S HARM O NY The Harmony section featur es a variety of performance effects that enhance the melodies you play when using the accompaniment styles of the PortaT one. A total of twenty-six Harmony types ar e available. T remolo, T rill and Echo effects can be used even if accompaniment is off. There are five dif ferent Harmony T ypes that […]
-
Страница 44
44 3 Exit the Function mode. Once you’ve made all desired settings, press one of the other mode but- tons (SONG, STYLE, or VOICE). Function Parameters — Effects The Effect Function parameters provide all effect-related settings (with the exception of the Send parameters in the Main, Dual, and Split sections). These settings include: • Reverb […]
-
Страница 45
45 EFF ECT S Reverb T ypes No. Reverb Display T ype Name 1 Hall 1 Hall1 2 Hall 2 Hall2 3 Room 1 Room1 4 Room 2 Room2 5 Stage 1 Stage1 6 Stage 2 Stage2 7 Plate 1 Plate1 8 Plate 2 Plate2 9O f f O f f Description Concert hall reverb. Small room reverb. Reverb for solo instruments. Simulated steel plate reverb. No effect. Chor us T ypes No. Chorus Disp[…]
-
Страница 46
46 EFFECT S Harmony T ypes No. Harmony Type Display Name 1 Duet Duet 2 T rio T rio 3 Block Block 4 Country Country 5 Octave Octave 6 T rill 1/4 note T ril1/4 7 T rill 1/6 note T ril1/6 8 T rill 1/8 note T ril1/8 9 T rill 1/12 note T ril1/12 10 T rill 1/16 note T ril1/16 11 T rill 1/24 note T ril1/24 12 T rill 1/32 note T ril1/32 13 T remolo 1/4 not[…]
-
Страница 47
47 AUT O ACCO M P AN I M E NT — TH E ST YLE MO DE The Style mode provides dynamic rhythm/accompaniment patterns — as well as voice settings appropriate for each pattern — for various popular music styles. A total of 100 different styles are available, in several different categories. Each style is made up of separate “sections” — Intro,[…]
-
Страница 48
48 Style numbers can be selected in the same way as with the voices (see page 28). Y ou can use the numeric keypad to dir ectly enter the style number , use the +/- keys to step up and down through the styles, or press the STYLE button to advance through the style numbers. 3 Start the accompaniment. Y ou can do this in one of the following ways: Pr[…]
-
Страница 49
49 AUT O ACCO M P AN IM ENT — TH E ST YLE MODE Starting with an Intro section Each style has its own two- or four-measure Intro section. When used with the auto accompaniment, many of the Intro sections also in- clude special chord changes and embellishments to enhance your performance. T o start with an Intro section: 1) Press the MAIN A or MAIN[…]
-
Страница 50
50 2) Press the INTRO button. 3) Pr ess the SYNC-ST AR T button to enable Sync-Start, and start the Intro section and accompaniment by playing any key on the keyboard. (When auto accompaniment is on, play a key or chord in the auto accompaniment section of the keyboard.) Once the Intro section is finished, the icon section of the display briefly sh[…]
-
Страница 51
51 About the Beat Display The dark bars underneath the style name in the display flash in time with the current tempo during playback (or Sync-Start standby) of the accompaniment. The flashing bars provide a visual indication of both the tempo and time signature of the accompaniment. (For more information, see page 77.) 4 Stop the accompaniment. Y […]
-
Страница 52
52 ACCO M P AN I M E NT CO NTRO LS When the Style mode is active, the panel buttons below the display function as accompaniment controls. US I N G TH E AUT O ACCO M P AN I M E NT FEA TU R ES 1 T urn on the auto accompaniment. Press the ACMP ON/OFF button to turn on (enable) the auto accompani- ment. 2 Select a style and play the accompaniment. Sele[…]
-
Страница 53
53 3 Change chords using the auto ac- companiment feature. T r y playing a few successive single notes with your left hand, and notice how the bass and chord accompaniment change with each key you play . Y ou can also play full chords to control the auto accompaniment. (Refer to page 56 for more infor- mation on how to use auto accompaniment.) • […]
-
Страница 54
54 ACCO M P AN I M E NT SEC TI O N S (MAI N A, MAI N B AN D FI LL-I N S) While the accompaniment is playing, you can add variation in the rhythm/ accompaniment by pressing the MAIN/AUTO FILL A or B button. This automatically plays one of four Fill-in sections, and smoothly leads into the next section — even if it is the same section. Each style h[…]
-
Страница 55
55 ADJ US TI N G TH E ACCO M P AN I M E NT VO LU M E The playback volume of the accompaniment can be adjusted. This volume control affects only the accompaniment volume. The volume range is 000 — 127. 1 Select the Accompaniment V olume function in the Overall menu. Pr ess one of the OVERALL ▲ / ▼ buttons, r epeatedly if necessary , until “Acm[…]
-
Страница 56
56 Fingered Chords Using the key of C as an example, the chart below shows the types of chords that can be recognized in the Fingered mode. * Notes enclosed in parentheses are optional; the chords will be recognized without them. US I N G AUT O ACCO M P AN I M E NT — MU L TI FI N G ER I N G When it is set to on (page 52), the auto accompaniment f[…]
-
Страница 57
57 • Notes in parentheses can be omitted. • Playing two same root keys in the adjacent octaves produces accompaniment based only on the root. • A perfect fifth (1 + 5) produces accompaniment based only on the root and fifth which can be used with both major and minor chords. • The chord fingerings listed are all in “root” position, but […]
-
Страница 58
58 SE T TI N G TH E ACCO M P AN I M ENT SP LIT PO I NT The Accompaniment Split Point determines the highest key for the accom- paniment section. The accompaniment can be played with the keys up to and including the Accompaniment Split Point key . This parameter can be set lower (but not higher) than the Split Point in the Split mode. When set to di[…]
-
Страница 59
59 3 Change the parameter setting or value. After the “FUNCTION” indication stops flashing, use the numeric keypad to change the value or setting. 054 AcmpSPnt STYLE FUNCTION The value can also be set directly by pressing the desired key while this parameter is selected. After setting this, make sure to select a different parameter or exit the […]
-
Страница 60
60 The simple answer: Three or more notes played simultaneously is a chor d. (Two notes played together is an “interval” — an inter val being the distance between two differ ent notes. This is also r eferred to as a “harmony .”) Depending on the intervals between the thr ee or more notes, a chord can sound beautiful or muddy and dissonant[…]
-
Страница 61
61 Knowing how to read and write chord names is an easy yet invaluable skill. Chords are often written in a kind of shorthand that makes them instantly recognizable (and gives you the free- dom to play them with the voicing or inversion that you prefer). Once you understand the basic principles of harmony and chords, it’ s ver y simple to use thi[…]
-
Страница 62
62 CH O R D GU I D E The Chor d Guide functions of the Por taT one provide power ful, easy-to-use tools for learning chords and chord relationships. Chord Guide features three dif fer ent types of operation: Dictionary , Smar t, and EZ Chord. • Pressing the CHORD GUIDE button automatically turns on the auto accompaniment. • When you wish to use[…]
-
Страница 63
63 3 Specify the type of the chord (major , minor , seventh, etc.). Press the key on the keyboard that corresponds to the desired chord type (as printed on the panel). 4 Play the chord. Play the chord (as indicated in the display) in the auto accompani- ment section of the keyboard. The chord name flashes when the correct notes are held down. (Inve[…]
-
Страница 64
64 Smart The Smart type allows you to set the basic key for the chord accompani- ment. Once this is set, you can simply press single keys in the scale and have har monically appr opriate chords played automatically . For example, with the key set to C, playing an D will result in an D minor chord (rather than a harmonically inappropriate D major). […]
-
Страница 65
65 For example, to play the following music score, select number 15 so that the key is set to b =1 (F , or Dm). 4 Play the accompaniment, and play single note chords (root notes) in the auto accompaniment section. Start accompaniment playback in the desired way . (For specific instructions on starting the accompaniment, see page 48.) For example, w[…]
-
Страница 66
66 EZ Chord The EZ Chord function is an exceptionally flexible and easy way to program semi-automatic backing for your performances. It lets you record all necessary chord changes for an entire song, and then allows you to “play” each chord in the sequence you programmed by simply pressing a single key in the auto accompaniment section of the k[…]
-
Страница 67
67 3 Select the desired EZ Chord bank. Use the numeric keypad. Buttons 1 — 8 select EZ Chord banks #1 — #8, respectively . Button 9 selects the bank chain “A-1” bank (see box below). 4 Start the accompaniment. Use any one of the methods described on page 48 to start the ac- companiment. The EZ Chord chords can also be played back without the fu[…]
-
Страница 68
68 EZ Chord — Recording 1 Enable recording. Pr ess the RECORD button, r epeatedly if necessar y , until EZ Chord recording is selected. (“EZ” appears in the display and the “RECORD” indication flashes for a couple of seconds.) 2 Select the desired EZ Chord bank. Use the numeric keypad. Buttons 1 — 8 select EZ Chord banks #1 — #8, respecti[…]
-
Страница 69
69 3) Press the + button in the numeric keypad. This actually records the chord to the selected block and automati- cally moves to the next block. This step is necessary; the chord is not actually recorded until you press the + button. (Pressing the — button will select the previous block without recording the chord.) T o record a sequence of chor […]
-
Страница 70
70 HINT — Using Spaces If your chord progressions are not long and the maximum memory space for chor ds isn’t ver y impor tant to you, you can use the spaces between recorded blocks to good advantage. (Keep in mind that spaces have no effect during playback; the EZ Chord function automatically skips the space or spaces and plays the next chord.[…]
-
Страница 71
71 Clearing an EZ Chord Bank This operation lets you erase (clear) all recorded chords for the se- lected EZ Chord bank. 1 Enable the EZ Chord Record mode. Pr ess the RECORD button, r epeatedly if necessar y , until EZ Chord recording is selected. (“EZ” appears in the display and the “RECORD” indication flashes for a couple of seconds.) 2 S[…]
-
Страница 72
72 ON E TO U C H SE T TI N G — U S E R Four User banks each with four different settings — a total of sixteen — are available for your custom settings. Each of the sixteen User One T ouch Settings can have differ ent settings for the following parameters: • Main voice number • All Main voice settings (Volume, Octave, Pan, Reverb Level, Ch[…]
-
Страница 73
73 ON E TOU CH SETTI NG (OT S) 5 Exit from the Record mode. Press the RECORD button. Recalling a User One T ouch Setting Once you’ve recorded your settings to a User button, you can in- stantly recall those settings any time you want. 1 Call up the Style mode. Press the STYLE button. 2 Press the appropriate ONE TOUCH SETTING USER button. Press th[…]
-
Страница 74
74 Preset One T ouch Settings ar e used in a slightly dif ferent way than the User settings. First, select a style, then select a Preset OTS. The Preset A and B settings have been specially programmed at the factory to match the selected style. This means that you can select the style you want, then choose a Preset that has the best suited voice, e[…]
-
Страница 75
75 SE LEC TI N G AN D PL A YI NG SO N GS — TH E SO N G MO D E SELECTI N G AN D PL A YI N G A SO N G 1 Select the Song mode. Press the SONG button. Indicates Song mode is selected 003 Rockin’ SONG Song name and number The Song mode features six songs — three demo songs that have been created using the rich and dynamic sounds of the PortaT o[…]
-
Страница 76
76 3 Start the selected song. Pr ess the ST ART/STOP button. As the song plays back, the measure num- ber and chords are shown in the display . 4 If you want to change to another song, repeat step 2 above. 5 Stop the song. Pr ess the ST ART/STOP button. If playback was started by pressing the ST AR T/STOP button, the selected song stops automatical[…]
-
Страница 77
77 2 Change the value. Use the OVERALL +/- buttons to increase or decrease the T empo value. Holding down either button continuously increases or decreases the value. Restoring the Default T empo V alue Each song and style has been given a default or standard tempo. If you’ve changed the tempo, you can restore the original default setting by pres[…]
-
Страница 78
78 The playback volume of the song can be adjusted. This volume control affects only the song volume. The volume range is 000 — 127. 1 Select the Song V olume function in the Overall menu. Press one of the OVERALL ▲ / ▼ buttons, repeatedly if necessary , until “SongV ol” appears in the display . AD J U STI N G TH E SO N G VOLU M E 2 Change […]
-
Страница 79
79 SO N G RECO R D I N G The Por taT one featur es powerful and easy-to-use song recording features that let you recor d your keyboard performances — using up to six separate tracks — and cr eate your own complete, fully or chestrated compositions. Up to three User songs can be recorded and saved. There are two record modes: Realtime and Step. […]
-
Страница 80
80 In brief, the basic operation for recording is: 1) Make all desired Por taT one settings. 2) Select the Realtime Record mode. 3) Select a User song for recording. 4) Select a track number . 5) Start recording. 6) Stop recording. 7) Listen to your new recording.
 Record to other tracks as desired. 9) Exit from the Record mode. RECO R D I N G A […]
 -
Страница 81
81 2 Select the Realtime Record mode. Pr ess the RECORD button, r epeatedly if necessar y , until “RealTime” appears at the top of the display . 3 Select a User song for recording. Use the numeric keypad to select the desired song: User 1 (004), User 2 (005), or User 3 (006). User song numbers can be selected in the same way as with the voices […]
-
Страница 82
82 5 Start recording. When the “RECORD“ indication stops flashing and the beat bars and track number start flashing, you can start recording simply by playing the key- board (or by pressing the ST ART/STOP button). Recor ding to the Chord T rack A special Chord track is provided for recording accompaniment data. This is automatically r ecorded […]
-
Страница 83
83 ■ Additional Operations Muting T racks During Playback While recording is enabled, you can selectively mute different tracks. This is useful for when you want to clearly hear certain tracks, and not others, during recording. Muting can also be done “on the fly” during playback. T o use muting, press the corresponding SONG MEMORY button, re[…]
-
Страница 84
84 SONG RECO RD I N G RECO R D I N G A US ER SO N G — STE P RECO RD I N G The basic steps for Step recording are similar to those for Realtime recording. In brief, the basic operation is: 1) Make all desired Por taT one settings. 2) Select the Step Record mode. 3) Select a User song for recording. 4) Select a track number . 5) Start r ecording. E[…]
-
Страница 85
85 SONG RECO RD I N G 3 Select a User song for recording. This operation is the same as that of Realtime recording (page 81). 4 Select a track number . Press the SONG MEMORY button corresponding to the desired track. Recor ding to the Chord T rack A special Chord track is provided for recording accompaniment data. This is automatically r ecorded to[…]
-
Страница 86
86 The beat bars also indicate the current recording position (as the beat of the measure). The note is automatically entered and Step recording moves to the next available position. For example, if a whole note is entered at the beginning of measure 1, the next position is the beginning of mea- sure 2. As mentioned above, you can use the +/- keys […]
-
Страница 87
87 SONG RECO RD I N G =+ Recording T riplets and Dotted Notes: 1) At the desired position, press the corresponding numeric keypad button (“7” for dotted or “9” for triplets). 2) Press the numeric keypad button for the desired note value. ■ Additional Operations Recording Chor ds and Sections to the Chord T rack: 1) Play a chord in the acc[…]
-
Страница 88
88 SONG RECO RD I N G This operation deletes all previously recorded notes that follow the note to be replaced. Make sure you wish to delete any subsequent notes before actually replacing the selected note or rest. Replacing a Note or Rest If you want to change a note or rest you’ve just recorded, you can easily r eplace it with a new one. T o do[…]
-
Страница 89
89 SONG RECO RD I N G Entering V elocity Cur ves In Step r ecording, all notes are recorded at the same velocity or volume. T o make a Step-recorded track sound more natural or to create some dynamic changes in the track, use the V elocity Curve function. 1) Select the first note to be affected by the V elocity Curve (by using the +/- buttons of th[…]
-
Страница 90
90 CLEAR I N G A SO N G The Song Clear operation (of the Function parameters) completely erases all recorded data on all tracks of a selected User song. Use this operation only when you’re sure you want to erase a song and record a new one. 1 Select the Function mode. Press the FUNCTION button. 2 Select the Function parameter (61 — 63) correspond[…]
-
Страница 91
91 FO O T SWIT C H The PortaT one has a footswitch feature that can be used to control a variety of functions and operations. By using your foot to conveniently control these func- tions, you free your hands to concentrate on your per formance. Nor mally , this is used as a damper pedal, producing pedal-controlled sustain for piano and other instru[…]
-
Страница 92
92 Footswitch Assign Functions Function Name Display Name Sustain Sustain EZ Chord Increment EZChdInc Start/Stop StartStp Intro/Ending IntroEnd Main A Main A Main B Main B Harmony On/Off Harmony Dual On/Off Dual Split On/Off Split Reverb On/Off Reverb Chorus On/Off Chorus DSP On/Off Dsp Description Damper pedal or sustain operation. Pressing the fo[…]
-
Страница 93
93 M I D I FU N CTI ON S The Por taT one is MIDI-compatible, featuring MIDI IN and MIDI OUT terminals and providing a variety of MIDI-related controls. By using the MIDI functions you can expand your musical possibilities. This section explains what MIDI is, and what it can do, as well as how you can use MIDI on your PSR-270. WHA T IS M I DI? No do[…]
-
Страница 94
94 MIDI is an acronym that stands for Musical Instrument Digital Interface, which allows electronic musical instruments to communicate with each other , by sending and receiving compatible Note, Control Change, Program Change and various other types of MIDI data, or messages. The PSR-270 can control a MIDI device by transmitting note related data a[…]
-
Страница 95
95 M I DI FU NCTION S CON N EC TI N G T O A PE RSO NAL CO M P UTE R By connecting your PSR-270’s MIDI ter minals to a personal computer , you can have access to a wide variety of music software. When using a MIDI interface device installed in the personal computer , connect the MIDI terminals of the personal computer and the PSR-270. Use only spe[…]
-
Страница 96
96 The Function parameters provide additional, more detailed MIDI settings for the PortaT one. These settings include: • Remote Channel • Keyboard Out • Accompaniment Out • Local Control F UNC T I O N P A R A ME T E R S — MIDI 2 Select the desired Function parameter . While the “FUNCTION” indication is flashing, use the numeric keypad[…]
-
Страница 97
97 M ID I F U NCT ION S Function Parameters No. Parameter Name Display Name Range/Settings This determines how the PortaT one is contr olled by a “remote” (external) MIDI keyboard. Set this to one of the 16 channels (01 — 16) for using an external keyboard to remotely control the PortaT one functions over the selected channel. (The remaining 15[…]
-
Страница 98
98 No. Parameter Name Display Name Range/Settings 85 External Clock ExtClock on/off MI DI F U N CTI ON S This determines whether the style and song playback functions ar e contr olled by the Por taT one’s internal clock (off) or by MIDI clock data from an external sequencer or computer (on). This should be set to “on” when you want to have st[…]
-
Страница 99
99 M ID I F U NCT ION S Saving Bulk Data 1 First, set up the connected MIDI device for re- cording the data. The actual procedure may differ depending on your particular equip- ment and software. For example, if you are using the Y amaha MDF3 MIDI Data Filer: 1) Make the appropriate MIDI connections. 2) Set up the MDF3 for recording MIDI data. (Ref[…]
-
Страница 100
100 As the data is being sent, the display indicates the various stages of data transmission until the operation is complete: When the operation is completed, the following displays appear: 5 Exit from the Bulk Dump Send operation. T o exit fr om Bulk Dump Send, press one of the other mode buttons: SONG, STYLE, or VOICE. 4 At the “Sure?” prompt[…]
-
Страница 101
101 M ID I F U NCT ION S Loading Bulk Data Once you’ve saved PortaT one data as described above, you can easily reload the data back to the PortaT one. 1 Set up the connected MIDI device for sending the appropriate data. The actual procedure may differ depending on your particular equip- ment and software. For example, if you are using the Y amah[…]
-
Страница 102
102 When the operation is completed, the following display briefly ap- pears (before returning to the original operation). The most common use for the Initial Setup Send function is in recording a song on a sequencer that is intended for playback with the PortaT one. Essentially , this takes a “snapshot” of the Por taT one settings and sends th[…]
-
Страница 103
103 M ID I F U NCT ION S 3 At the “InitSnd?” prompt above, set the opera- tion to standby . Press the + button. 4 Start recording on the sequencer , then send the Initial Setup data. Start recording on the sequencer in the normal way , then — with as little delay as possible — press the + button to actually start transmit- ting the data. An[…]
-
Страница 104
104 TRO U B LES H O O TI N G Problem Possible Cause and Solution When the Por taT one is tur ned on or off, a popping sound is temporarily produced. This is normal and indicates that the PortaT one is receiving electrical power . There is no sound even when the keyboard is played or when a song is being played back. Check that nothing is connected […]
-
Страница 105
105 A strange “flanging” or “doubling” sound occurs when using the PortaT one with a sequencer . (This may also sound like a “dual” layered sound of two voices, even when Dual is turned off.) • If you are routing the MIDI OUT on the PortaT one to a sequencer and back to the MIDI IN, you may want to set Local Control (page 97) to “of[…]
-
Страница 106
106 Keyboards • 61 standard-size keys (C1 — C6), with T ouch Response and Dynamic Filter . Display • Large multi-function LCD display (backlit) Setup • ST ANDBY/ON • MASTER VOLUME : MIN — MAX Panel Controls • OVERALL ( ▲▼ , +, -), FUNCTION, SONG, VOICE, STYLE, POR T ABLE GRAND, METRONOME, [0]-[9], [+](YES/FWD), [-](NO/BWD), DEMO, TOUC[…]
-
Страница 107
107 SO N G SCO R ES (EZ Chord banks 1, 2) 105 The Entertainer Style No.93 Swing EZ Chord Bank 2 Menuet Style No.1 8Bea t Pop 1 EZ Chord Bank 1[…]
-
Страница 108
108 ■ Maximum Polyphony The PSR-270 has 32-note maximum polyphony . This means that it can play a maximum of up to 32 notes at once, regardless of what functions are used. Auto Accompaniment uses a number of the available notes, so when Auto Accompani- ment is used the total number of available notes for playing on the keyboard is correspondingly[…]
-
Страница 109
109 VOI CE LIST Panel V oice List Voice Bank Select MIDI Voice Name Number MSB LSB Program Change# Voice Bank Select MIDI Voice Name Number MSB LSB Program Change# PIANO 001 0 112 0 Grand Piano 002 0 112 1 Bright Piano 003 0 112 3 Honky-tonk Piano 004 0 112 4 Funky Electric Piano 005 0 112 5 DX Electric Piano 006 0 112 2 MIDI Grand Piano 007 0 113 […]
-
Страница 110
110 VOICE LI ST GM V oice List Voice Bank Select MIDI Voice Name Number MSB LSB Program Change# Voice Bank Select MIDI Voice Name Number MSB LSB Program Change# 166 0 0 55 Orchestra Hit BRASS 167 0 0 56 Trumpet 168 0 0 57 Trombone 169 0 0 58 Tuba 170 0 0 59 Muted Trumpet 171 0 0 60 French Horn 172 0 0 61 Brass Section 173 0 0 62 Synth Brass 1 174 0[…]
-
Страница 111
111 VOI CE LIST Voice Bank Select MIDI Voice Name Number MSB LSB Program Change# 221 0 0 110 Fiddle 222 0 0 111 Shanai PERCUSSIVE 223 0 0 112 Tinkle Bell 224 0 0 113 Agogo 225 0 0 114 Steel Drums 226 0 0 115 Woodblock 227 0 0 116 Taiko Drum 228 0 0 117 Melodic Tom 229 0 0 118 Synth Drum 230 0 0 119 Reverse Cymbal STYLE LI ST Style Style Name Number[…]
-
Страница 112
112 DRU M KIT LI S T • “<——” indicates that the drum sound is the same as “Standard Kit 1”. • Each percussion voice uses one note. • The MIDI Note # and Note are actually one octave lower than listed. For example, in “101: Standard Kit 1”, the “Seq Click H” (Note# 36/Note C1) corresponds to (Note# 24/Note C0). • Key O[…]
-
Страница 113
113 106 107 108 109 110 127 127 127 127 127 0 000 0 25 27 32 40 48 MIDI Key Alternate Analog Kit Dance Kit Jazz Kit Brush Kit Symphony Kit1 Note# Note off Assign 13 C # -1 *3 <—— <—— <—— <—— <—— 14 D -1 *3 <—— <—— <—— <—— <—— 15 D # -1 <—— <—— <—— <—— […]
-
Страница 114
114 M I D I I M P LE M E NT A TI O N C HAR T [P or tab le K eyboard] Date: 7-Dec-1998 Model: PSR-270 MIDI Implementation Chart V ersion: 1.0 Function T ransmitted Recognized Remarks Basic Def ault 1 — 16 1 — 16 *1 Channel Changed 1 — 16 1 — 16 *1 Def ault 3 3 Mode Messages X X Altered ************** X Note 0 — 127 0 — 127 Number : T rue voice *****[…]
-
Страница 115
115 NOTE: *1 By default (factory settings) the PSR-270 or dinarily functions as a 16- channel multi-timbral tone generator, and incoming data does not af fect the panel voices or panel settings. However , the MIDI messages listed below do affect the panel voices, auto accompaniment, and songs. • MIDI Master Tuning • System exclusive messages fo[…]
-
Страница 116
116 * If the recei ved v alue does not contain an effect type in the TYPE LSB, the LSB will be directed to TYPE 0. * Panel Ef fects are based on the “(Number) Effect Name”. * By using an e xternal sequencer, which is capable of editing and transmitting the system e xc lusiv e messages and parameter changes, you can select the Re verb, Chorus an[…]
-
Страница 117
117 IND E X Misc. +/- keys …………………………………………. 29 A AC adaptor ………………………………………. 8 accessory jacks …………………………………. 9 accompaniment controls ………………….. 52 accompaniment sections ………………….. 54 Accompaniment Split Point …………. 58, 59 Ac[…]
-
Страница 118
L imited W arr ant y 90 DA YS LABOR 1 YEAR P AR TS Yamaha Corporation of America, hereafter referred to as Yamaha, warrants to the original consumer of a product included in the categories listed below, that the product will be free of defects in materials and/or workmanship for the periods indicated. This warranty is applicable to all models inclu[…]
-
Страница 119
For details of products, please contact your nearest Yamaha or the authorized distributor listed below. Pour plus de détails sur les produits, veuillez-vous adresser à Yamaha ou au distributeur le plus proche de vous figurant dans la liste suivante. Die Einzelheiten zu Produkten sind bei Ihrer unten aufgeführten Nie- derlassung und bei Yamaha Ve[…]
-
Страница 120
M.D.G., EMI Division © 1999 Yamaha Corporation V332710 ???PO???.?-01A0 Printed in China[…]
 Record to other tracks as desired. 9) Exit from the Record mode. RECO R D I N G A […]