

CAUTION: To reduce the risk of
electric shock, do not remove
cover (or back).
No User-serviceable parts
inside. Refer servicing to
qualified service personnel.
WARNING: To prevent fire or electric
shock, do not expose this appliance to
rain or moisture.
This symbol indicates that a
dangerous voltage
constituting a risk of electric
shock is present within this
unit.
This symbol indicates that
there are important
operating and maintenance
instructions in the literature
accompanying this unit.
This class B digital apparatus meets all requirements of
the Canadian Interference-Causing Equipment
Regulations.
NOTE: This device complies with part 15 of the FCC
Rules. Operation is subject to the following two
conditions: (1) This device may not cause harmful
interference, and (2) this device must accept any
interference received, including interference that may
cause undesired operation.
This equipment generates, uses and can radiate radio
frequency energy and, if not installed and used in
accordance with the instructions, may cause harmful
interference to radio communications. However, there is
no guarantee that interference will not occur in a
particular installation. If this equipment does cause
harmful interference to radio or television reception,
which can be determined by turning the equipment off
and on, the user is encouraged to try to correct the
interference by one or more of the following measures:
– Reorient or relocate the receiving antenna
– Increase the separation between the equipment and
receiver
– Connect the equipment into an outlet on a circuit
different from that to which the receiver is connected
– Consult the retailer or an experienced radio/TV
technician for help
This product fulfills the conditions stated in the EEU
directives 89/336 and 73/23.
For your safety: Keep the BeoSound 2 player and
docking station away from water and do not place items
on top of them. BeoSound 2 is developed for use in dry
environments only, and for use within a temperature
range of 5–45° C (41–113° F).
Technical specifications, features and the use
thereof are subject to change without notice!

3
Acknowledgements and liability
Product names mentioned in this guide may be
trademarks or registered trademarks of other
companies.
Portions utilize Microsoft Windows Media
Technologies. Copyright © 1999-2002 Microsoft
Corporation. All rights reserved. Microsoft, Windows
Media and the Windows Logo are registered
trademarks of Microsoft Corporation in the United
States and/or other countries.
MicroOS Operating System
(U.S. Patent #5,787,445)
Please note that Bang & Olufsen will, in no event, be
liable for any consequential, incidental or indirect
damages arising out of the use or inability to use the
software.
Mac, the Mac logo and iTunes are trademarks of
Apple Computer, Inc., registered in the U.S. and
other countries.
System requirements – PC
• One free USB port
If you connect the BeoSound 2 docking station to
this port via an external HUB, make sure that your
HUB supports Full Speed Devices.
• 10 MB of available disk space
• Windows 98/ME/2000/XP
You must have administrator privileges on
Windows 2000/XP to install the BeoSound 2
firmware.
System requirements – Macintosh
• One free USB port — 1.1
If you connect the BeoSound 2 docking station to
this port via an external HUB, make sure that your
HUB supports Full Speed Devices.
• MAC OS 9.x and OS X compatible
• iTunes 2 (and newer) compatible
Supported file formats
• MP3
Sampling frequencies: 8, 11.025, 12, 16, 22.05,
24, 32, 44.1, and 48 kHz
Constant or variable bit rates: 8, 16, 24, 32, 40,
48, 56, 64, 80, 96, 112, 128, 160, 192, 256 and
320 Kbps
• WMA
Sampling frequencies: 8, 11.025, 16, 22.050, 32,
44.1 and 48 kHz
Bit rates: 64, 80, 96, 128, 160 and 192 Kbps
• Note that the WMA format is not supported by
iTunes.
Check www.beoplayer.com to see whether new file
formats are supported by BeoSound 2. Updated
BeoSound 2 firmware will also be available on this
website.

4
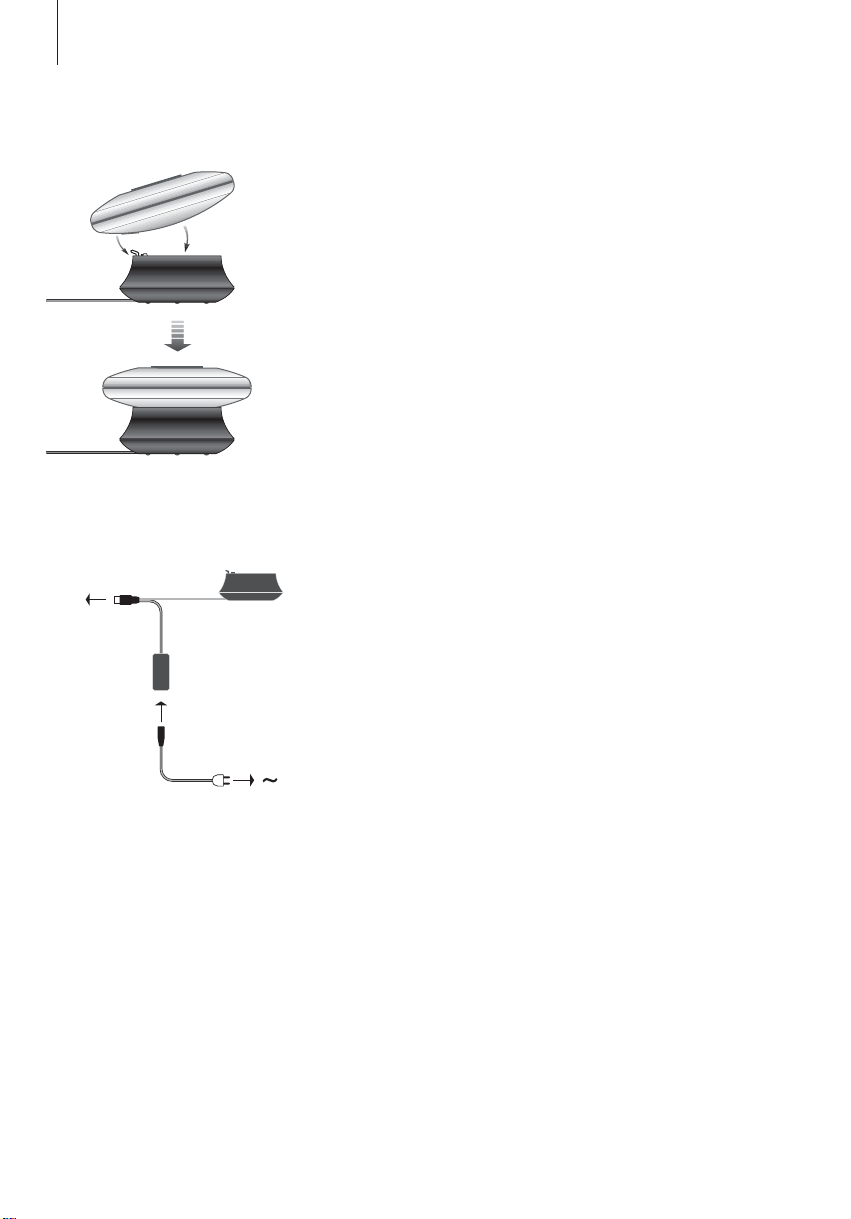
B
A
Place BeoSound 2 on its docking
station as shown above.
USB
English
Setting up BeoSound 2
Follow the sequence below corresponding to your setup, PC or
Macintosh. If your computer is a PC, do not connect the USB cable until
you are specifically prompted to do so on the screen! If you have a
Macintosh computer, it is essential that you change mode, in the exact
fashion and sequence as described below.
Installation and connection (PC use)
1 Insert the included memory card into BeoSound 2.
2 Insert the CD-rom in your computer’s CD drive. If the Setup program starts
automatically, proceed to 5. Otherwise, go to 3.
3 Select your CD drive.
4 Double-click the ‘Setup’ file.
5 Follow the on-screen instructions…
6 When prompted on the screen, connect the USB cable to your computer.
Installation and connection (Macintosh use)
1 Insert the included memory card into BeoSound 2.
2 As BeoSound 2 is in BeoPlayer mode per default, you must change this
setting. Make sure that BeoSound 2 is paused and that the Earphones are
∧
connected. Press and hold
go of the first two buttons. You will receive audible feedback. Your
BeoSound 2 is now in iTunes mode.
3 Connect the USB cable to your computer.
4 Insert the CD-rom in your computer’s CD drive.
5 Select the appropriate folder for your operating system, OS 9 or OS X.
6 Select the install file, and follow the on-screen instructions…
and ss. Then press GO twice, without letting
Connect the USB cable – if your
computer is a PC, wait until you are
prompted.
Configuration and formatting (BeoPlayer use only)
Before you copy music to your BeoSound 2 from BeoPlayer, you may want to
set the copying quality or make other adjustments to the default settings. This
is all done by clicking SETUP on the BeoPlayer on-screen control bar, then
CONFIG – and a configuration menu appears where you can make your
changes. The configuration menu is also where you format a memory card.
Explore the configuration menu for yourself, or access the On-screen Guide
for an in-depth explanation.

5
Get started
Once you have connected and installed BeoSound 2 to your computer,
you can begin using it. To find out how BeoSound 2 works with your
computer and music player, simply proceed to the section on the
following pages, describing the setup you have. Available options are
listed below.
BeoPlayer or BeoLink PC 2 (PC use only)
We recommend using BeoSound 2 with Bang & Olufsen’s own music players:
BeoPlayer or BeoLink PC 2. This Guide describes the basic use on the
following pages. To learn more about advanced use of BeoSound 2 with
BeoPlayer or BeoLink PC 2, refer to the On-screen Guide located at the
bottom of the on-screen control bar in both of these players. Find out for
example how to:
– Move or rename tracks and playlists in BeoSound 2.
– View and edit track INFO.
– Find out more about CDDB music information.
– Alter Configuration settings for a personalised touch.
– Format a memory card.
All future reference to BeoPlayer includes BeoLink PC 2 use, as these two
players work similarly regarding Beosound 2.
iTunes (Macintosh use only)
To learn more about using iTunes, refer to ‘BeoSound 2 with iTunes’ in this
Guide. For further information on iTunes, refer to the iTunes help function.
Other players
It is possible to use other players than the above mentioned with BeoSound 2.
Examples can be found in ‘other players and options’ on the last page of this
Guide.
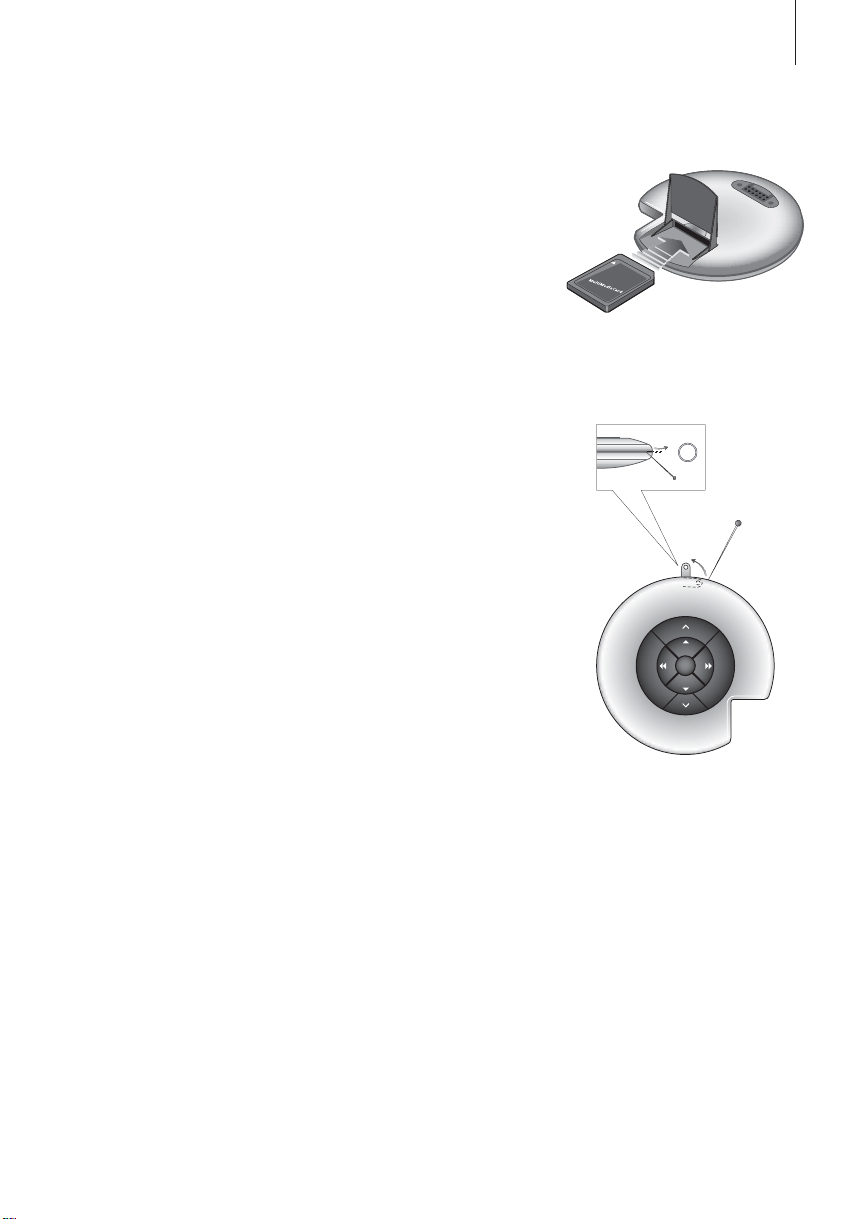
Open the small compartment on the
back of BeoSound 2 to insert the
memory card.
Use a needle to access the key ring
attachment.
GO

6
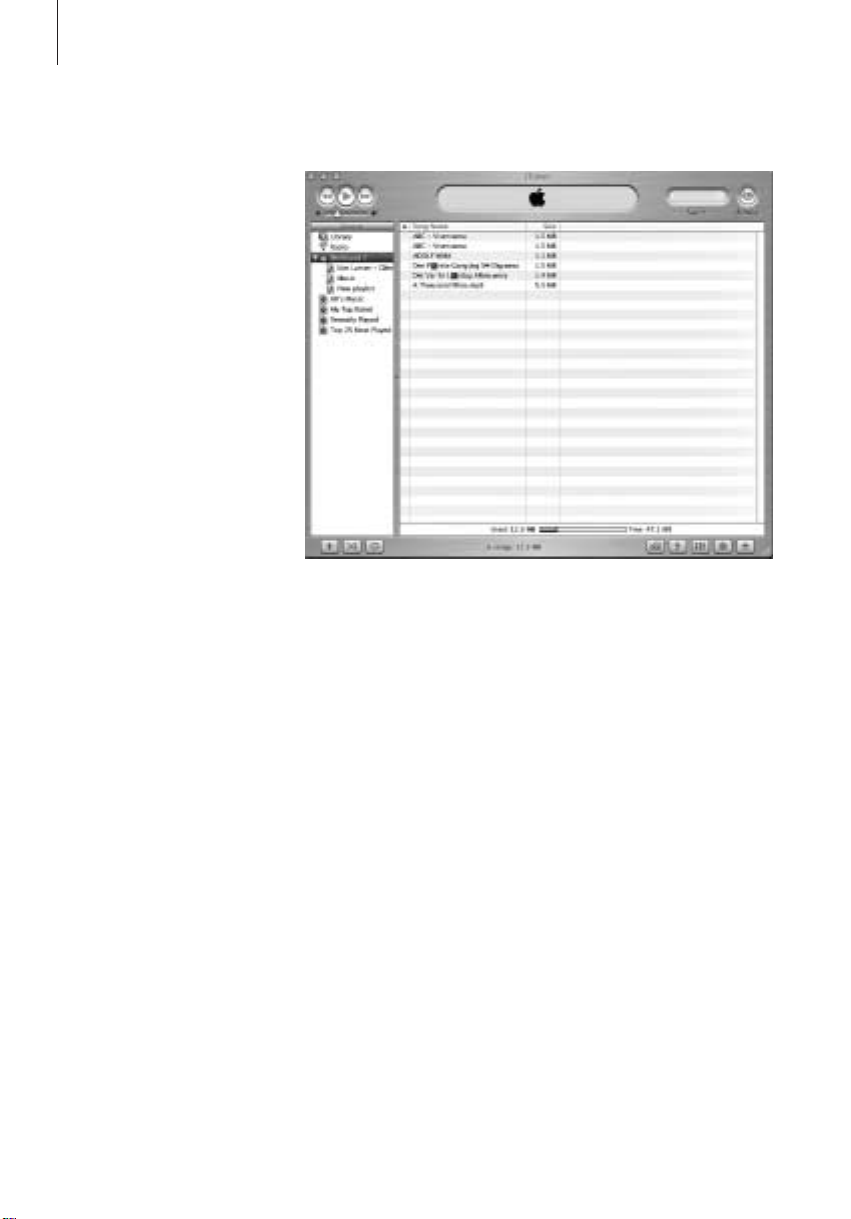
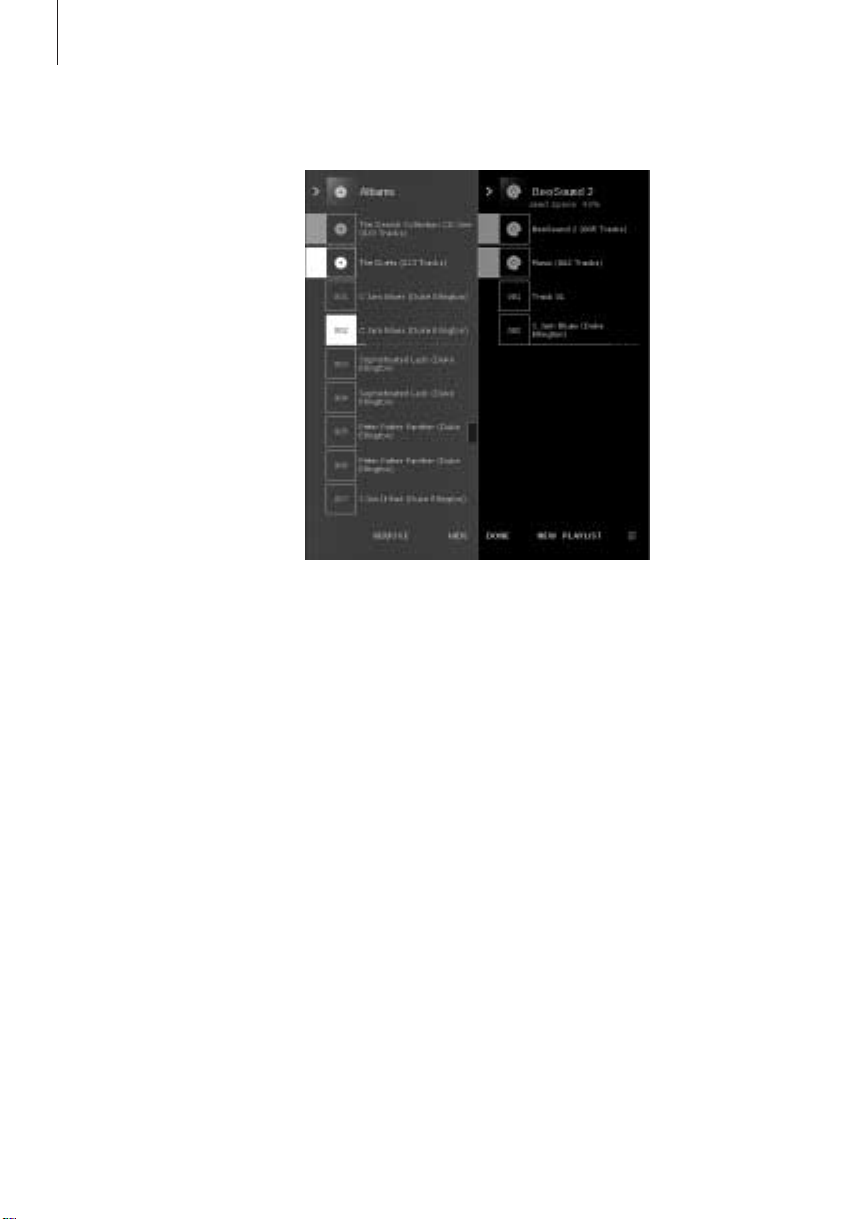
The BeoSound 2 Playlist is open and
a track is being copied from an
Album list to BeoSound 2. Wait for
the progress indicator under the
track to be filled out completely,
before your copy is finished.
>> English
BeoSound 2 with BeoPlayer
About BeoPlayer
A music organiser – N.MUSIC, and a
CD player – PC CD, are some of the
most important features of the
BeoPlayer. On these pages you can
read about basic use of these
features with the BeoSound 2
portable player. To know more about
your options, we recommend that
you access the BeoPlayer On-screen
Guide.
Copy music files to BeoSound 2
The N.MUSIC organiser in BeoPlayer automatically sorts your music tracks by
Genre, Album, Title, Artists and Playlists. If you already have music stored in
N.MUSIC, you can start copying tracks to BeoSound 2.
> Place BeoSound 2 on the docking station.
The docking station must be in USB mode (indicated by red light from the
docking station). If the docking station light is not red, press and hold GO
for 2 seconds to change it, then;
> Access BeoPlayer.
> Click N.MUSIC twice to access your playlists and tracks.
> Click COPY to access the music content on BeoSound 2. A BeoSound 2
Playlist opens containing an overview of music already stored on
BeoSound 2.
> To copy tracks from your lists to BeoSound 2, simply drag and drop a track
from a list to the BeoSound 2 Playlist. An progress indicator below the track
name shows the status of the copying progress.
> To cancel a copy, select the track and delete it, either by dragging it to the
waste basket – or by pressing the DELETE button on your keyboard. A copy
will also be cancelled if you exit BeoPlayer completely, or if you unplug
BeoSound 2.

7
Copy from an audio CD to BeoSound 2
You can copy music directly from an audio CD to BeoSound 2. This is useful
if, for example, you haven’t got any music stored in your BeoPlayer, and you
want to get started playing music on BeoSound 2.
> Insert an audio CD into your PC CD-rom drive.
> Click PC CD to access the PC CD list.
BeoPlayer uses your Internet connection to connect to CDDB in order to
receive information about the CD tracks*.
> Click COPY to gain access to the destination lists, and select the option
‘BeoSound 2’. A BeoSound 2 Playlist opens.
> You can now drag and drop the track or tracks you wish to copy from the
PC CD list into the BeoSound 2 list.
You can use the control bar while copying, but your copying will be disrupted
if you exit the player completely.
*In order to be able to receive CDDB information, you must be registered to
BeoPlayer, the function must be enabled in the Configuration menu (it is as
per default) and your computer must be on-line. If there is no information
available after approximately 10 seconds, your tracks will simply be registered
as ‘unknown’. Refer to the BeoPlayer On-screen Guide for further information
about CDDB.
About audio CD copying
Once a track is copied from a CD
directly to your portable player, it is
stored on your memory card, but not
on your PC. Therefore, if you
subsequently format your card, it will
erase your copy of the track.
Firmware update
Bang & Olufsen firmware updates
can be downloaded from
www.beoplayer.com. Select
‘BeoSound 2 download’ and follow
the on-screen instructions.
8
If you have a Macintosh
computer, you can use
BeoSound 2 with the iTunes
program.
>> English
BeoSound 2 with iTunes
Organising tracks and playlists
iTunes allows you to sort your tracks
by different sorting criteria: Size,
Title, Rating etc. To display the
playback order of BeoSound 2, press
the small arrow on the top-left side
of the list. For further assistance in
the use of iTunes, refer to the help
function.
Get started
Once you have set BeoSound 2 to iTunes mode, as described in the setup
section, you can begin using iTunes:
> Place BeoSound 2 on the docking station.
The docking station must be in USB mode (indicated by red light from the
docking station). If the docking station light is not red, press and hold GO
for 2 seconds to change it, then;
> Access iTunes.
After a few seconds, iTunes detects BeoSound 2. This is shown in the
playlist view and a disc icon appears on your desktop.
> You can now drag and drop tracks from your playlists on to the
BeoSound 2 icon.
It is not possible to place tracks directly into playlists. iTunes creates a
playlist: ‘music’ containing all the tracks you copy. To place a track in
another playlist, you must create a new playlist and move the track after
you have finished copying.
Note that the disc icon must be ejected from the desktop before you either
press GO to playback the music, or remove BeoSound 2 from the docking
station.

9
Other functions
Once you have connected BeoSound 2, iTunes adds on features that were not
previously available. These new features can be found behind buttons located
at the bottom of the playlist, as illustrated to the right.
Create playlists
To create a playlist in BeoSound 2, select the BeoSound 2 icon and click the
button marked [+] shown to the right. For daily BeoSound 2 use, having
multiple playlists is practical. It allows you to easily locate your sorted tracks,
using the next/previous playlist feature, as described on the following page.
Firmware update
Bang & Olufsen firmware updates can be downloaded from
www.beoplayer.com.
– Click the update button shown to the right.
The button appears in the lower right corner of iTunes – only when
BeoSound 2 is on its docking station.
– Click the ‘update firmware’ button, locate the firmware file and select it.
Await on-screen instructions. When you have followed the instructions
on-screen, an audible feedback from your BeoSound 2 will inform you that
the firmware update is completed.
IMPORTANT: BeoSound 2 returns to BeoPlayer mode, after a firmware
update. You must change the mode back, if you want to continue in iTunes
mode. Read more about changing mode on the following pages.
This button gives you access to
erase your memory card.
Create a new playlist by
clicking this button.
This button has a three-fold
purpose: See which firmware
version you currently have,
update your firmware, and
personalise BeoSound 2 by
changing the name at will. –
The button differs in OS 9 and
OS X. The upper button is the
OS X version, the lower the OS
9 version.
10
>> English
Daily use
Keypad functions
Play: Press GO to start playback.
GO
Volume:
Next track: Press
Previous track: Press
Random on/off: To play tracks in random order, press and hold
∧
and ∨adjusts volume.
▲
to step to the next track in a playlist.
▼
to go to the previous track in a playlist.
▲
▼
and
simultaneously for two seconds. Repeat to restore sequential playback.
Pause: To pause playback, press GO a second time.
Next playlist: Press
Previous playlist: Press
Cue: To cue through your tracks, press and hold
tt
to step to the next playlist.
ss
to step to the previous playlist.
ss
or tt. Cueing is not
possible for tracks in the WMA format.
Lock/unlock: To lock or unlock the keypad, press and hold ssand
tt
simultaneously for two seconds.
Standby: To switch BeoSound 2 to standby, press and hold GO for two
seconds.
BeoSound 2 switches to standby after 30 seconds in pause mode.
Format card: BeoSound 2 must be paused and the Earphones connected.
∧
Press and hold
feedback. When the audible feedback stops press and hold
and tt. Then press GO twice. You will get audible
∧
and tt. Then
press GO twice again. You will get audible feedback again.

11
Switch between playback and download: BeoSound 2 must be placed on
the docking station. Press GO to start playback, or press and hold GO for 2
seconds to connect to the computer – enabling you to download to
BeoSound 2. The docking station light changes colour accordingly.
Change mode: Switch between BeoPlayer and iTunes mode. BeoSound 2 is
in BeoPlayer mode per default. To change this setting, make sure that
BeoSound 2 is paused, and that the Earphones are connected.
BeoSound 2 feedback
Audible feedback: BeoSound 2 gives you audible feedback for example
when:
– Battery power is low (beep repeated every 30 seconds)
– Error occurs (beep repeated every 5 seconds)
– Firmware update is completed
– A memory card is formatted
Docking station light feedback: When BeoSound 2 is placed on the
docking station, the docking station lights up to indicate its current status:
Green… Track playback or pause, not connected to the computer.
Red… Download mode, connected to the computer.
Orange… Resetting – continuous orange light feedback indicates error.
Flashing light (red or green)… Battery charging.
Flashing red and green, followed by orange, then red… Updating Firmware.
Go to iTunes mode:
Press and hold
∧
and ss.
Then press GO twice, without
letting go of the first two
buttons. Audible feedback
informs you that BeoSound 2 has
changed to iTunes mode.
Go to BeoPlayer mode:
Press and hold
∨
and ss.
Then press GO twice, without
letting go of the first two
buttons. Audible feedback
informs you that BeoSound 2 has
changed to BeoPlayer mode.
12
>> English
Maintenance, etc.
Recharge battery
When the built-in battery requires recharging, a beep, repeated every 30
seconds, sounds from BeoSound 2. You can silence this signal by pressing GO
on the keypad once.
Place BeoSound 2 on the docking station. Recharging begins. You can leave
BeoSound 2 on the docking station without risk of overcharging the battery.
An 80% battery charge is reached after approximately one and a half hours,
and a full charge is reached after approximately two and a half hours.
Starting from a fully-charged state, the battery in BeoSound 2 will provide
approximately 8 hours of use.
Reset BeoSound 2
∧
If BeoSound 2 doesn’t respond, you can reset it. Press and hold
Then press GO for two seconds. This resets BeoSound 2. No data is lost.
Update BeoSound 2 Firmware
Updates for BeoSound 2 will be available for download via
www.beoplayer.com. Go to the previous pages for instructions.
and ∨.
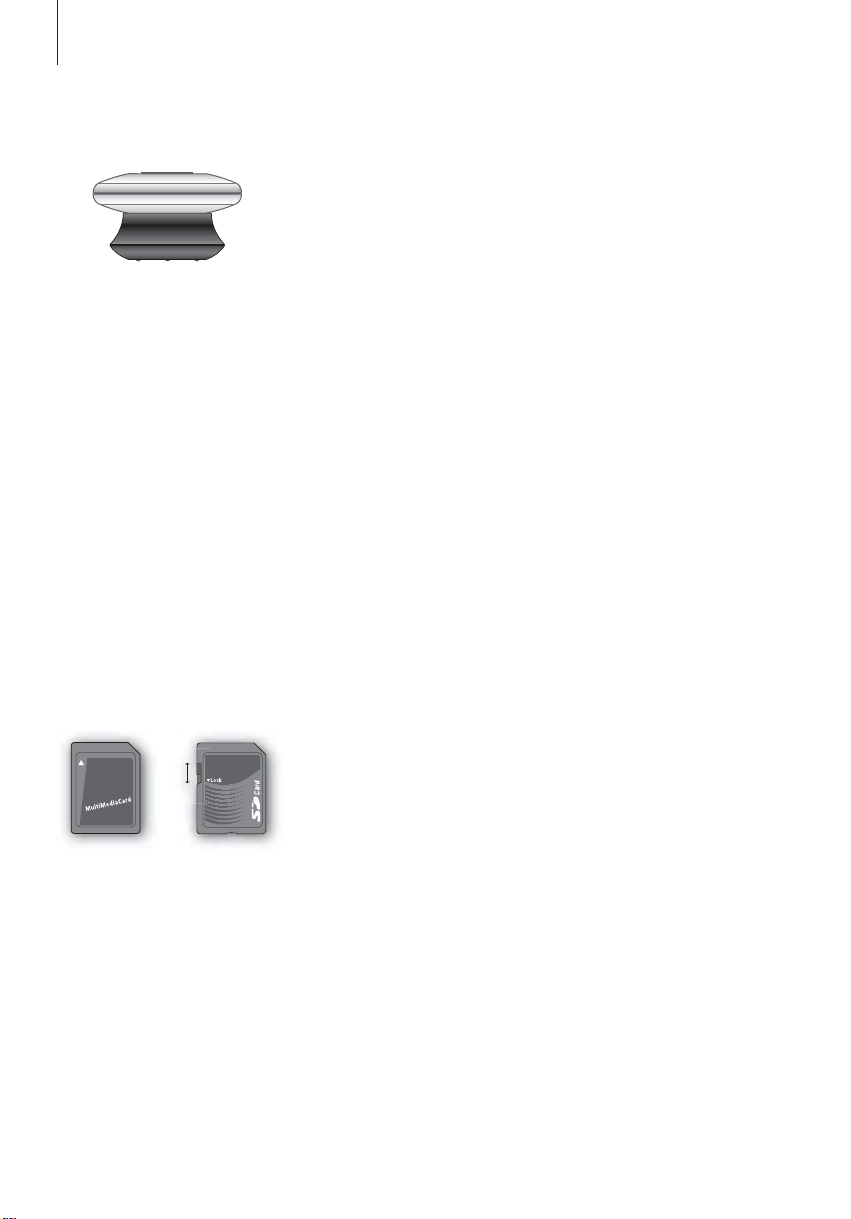
MultiMedia (MMC) and Secure
Digital (SD) cards from SanDisk and
similar products are compatible. You
can write-protect an SD card by
moving the slider down.
Cleaning BeoSound 2
Wipe dust off the surfaces using a dry, soft cloth. Remove grease stains or dirt
with a lint-free, firmly wrung cloth, dipped in a solution of water containing
only a few drops of mild detergent, such as washing-up liquid.
Memory card
To ensure a long lifetime, memory cards must be handled with care. Always
keep the card inside the BeoSound 2, or in the cartridge supplied with the
card. Please note that formatting will not be possible if you have
write-protected the card (formatting will erase all content on the card).
13
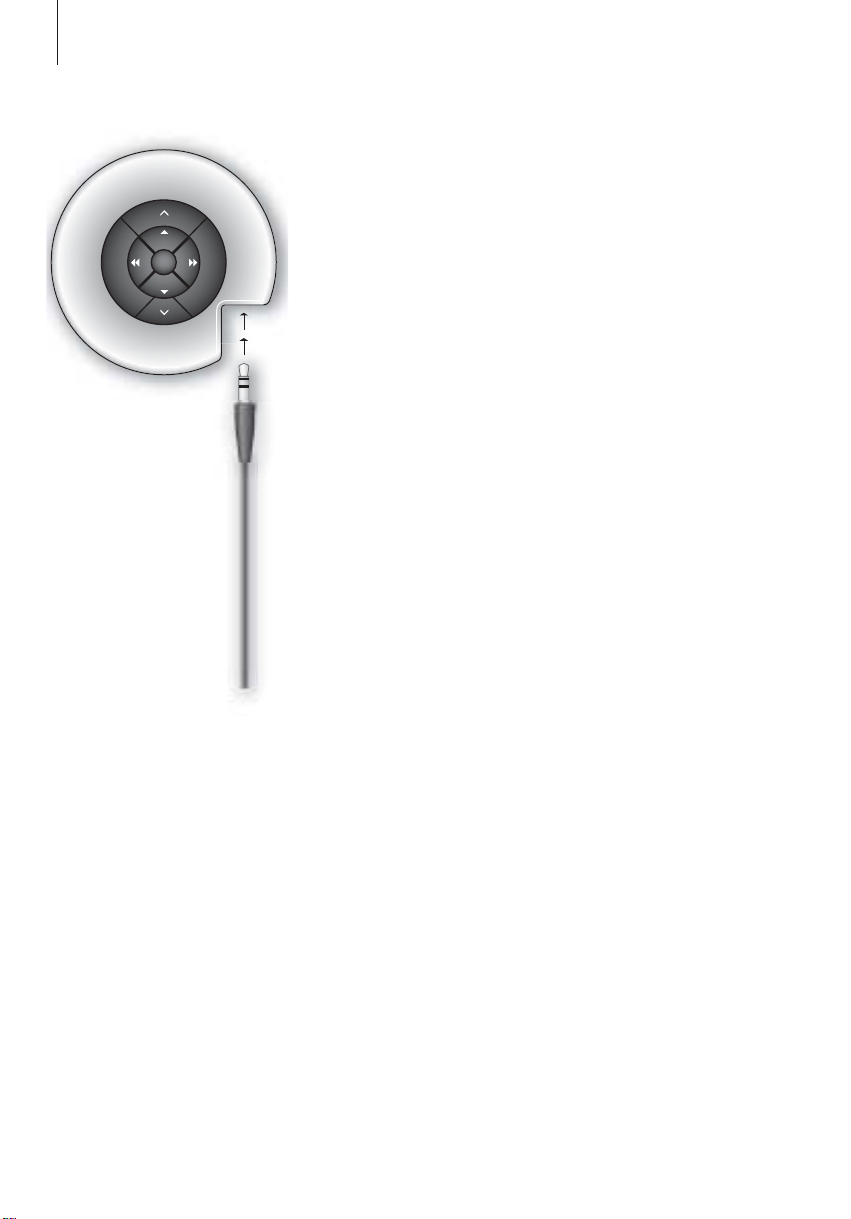
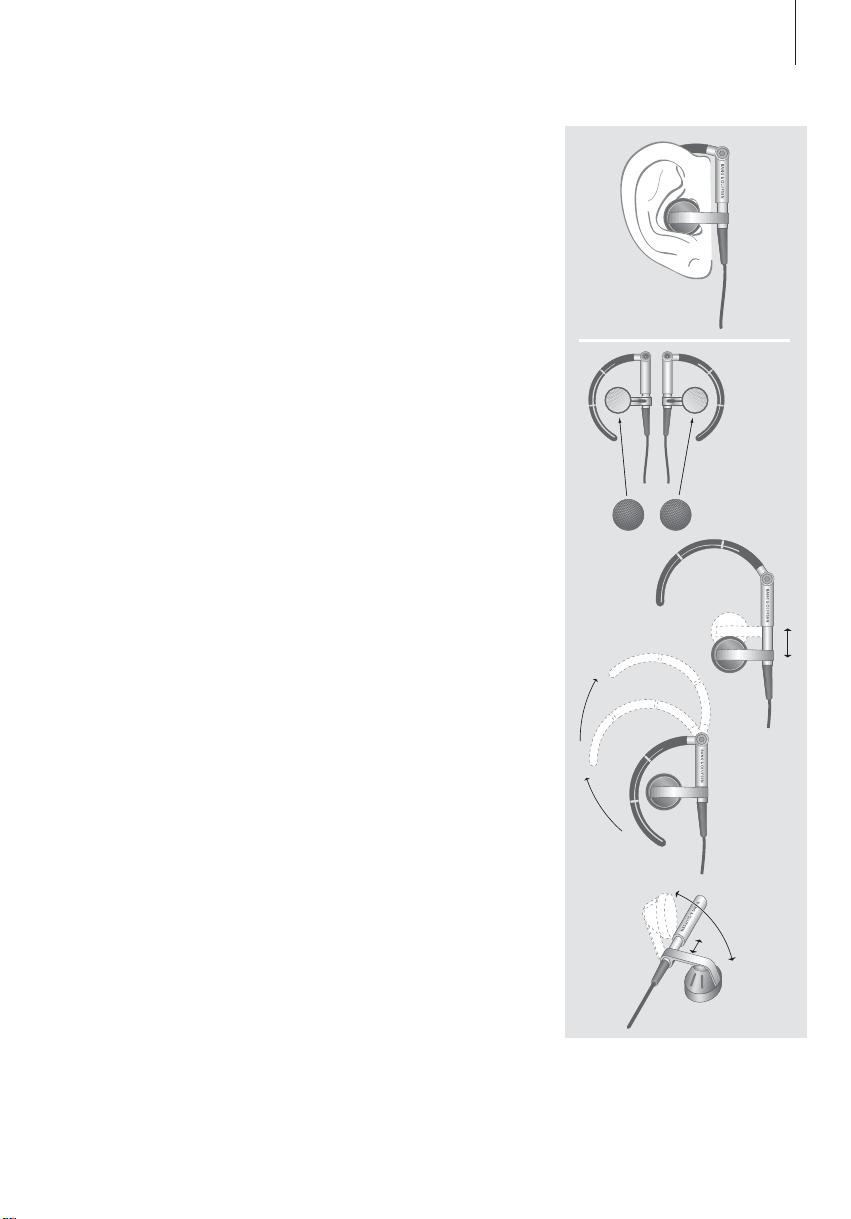
Earphones
For maximum sound quality, assemble, place and adjust the Earphones as
illustrated to the right. BeoSound 2 switches to standby if you disconnect the
Earphones.
WARNING! Prolonged use at high volume may cause hearing damage!
Other players and options
Windows Media Player 7.0 or newer can also be used with BeoSound 2. Refer
to the Windows Media Player help function for further details on device use.
Mass Storage device mode
When BeoSound 2 is in iTunes mode, it will actually work and act as a Mass
Storage device. The Mass Storage device mode will make your BeoSound 2
act as an extra drive on your computer. This allows you to use, for example,
your file explorer to organise your music.
Note that you can only place music in folders when using file explorer. You
cannot use the root or subfolders. Furthermore, to be able to change
between folders as if they were playlists, you must create new folders
yourself.
14
B
A
Sitúe BeoSound 2 en su módulo de
conexiones como se muestra más
arriba.
USB
Español
Configuración de BeoSound 2
Siga los pasos más abajo correspondientes a su configuración, PC o
Macintosh. ¡Si su ordenador es un PC, no conecte el cable USB hasta
que se indique en la pantalla que lo haga! Si tiene un ordenador
Macintosh, deberá cambiar de modo, en la forma y orden que se
describe a continuación.
Instalación y conexión (con PC)
1 Inserte la tarjeta de memoria incluida en BeoSound 2.
2 Introduzca el CD-ROM en la unidad de CD del ordenador. Si el programa de
configuración (Setup) se inicia automáticamente, vaya al paso 5. Si no, vaya
al paso 3.
3 Seleccione su unidad de CD.
4 Haga doble clic en el archivo “Setup”.
5 Siga las instrucciones de la pantalla…
6 Cuando se le indique, conecte el cable USB en el ordenador.
Instalación y conexión (con Macintosh)
1 Inserte la tarjeta de memoria incluida en BeoSound 2.
2 Por defecto, BeoSound 2 está configurado en modo BeoPlayer, así que
deberá cambiar este parámetro. Asegúrese de que BeoSound 2 esté en
∧
pausa y con los auriculares conectados. Mantenga pulsados
Después pulse dos veces GO, sin soltar los otros dos botones. Sonará una
señal acústica. Ahora, su BeoSound 2 está en el modo iTunes.
3 Conecte el cable USB en el ordenador.
4 Introduzca el CD-ROM en la unidad de CD del ordenador.
5 Seleccione la carpeta adecuada para su sistema operativo, OS 9 u OS X.
6 Seleccione el archivo de instalación y siga las instrucciones de la pantalla…
y ss.
Conecte el cable USB – si su
ordenador es un PC, espere hasta
que se le indique.
Configuración y formateo (sólo para BeoPlayer)
Antes de copiar música en BeoSound 2 desde BeoPlayer, quizás quiera definir
la calidad de la copia o realizar otros ajustes en la configuración
predeterminada. Para hacerlo haga clic en SETUP en la barra de control de la
pantalla de BeoPlayer y luego en CONFIG – aparecerá un menú de
configuración donde podrá realizar los cambios. Desde este menú también
puede formatear una tarjeta de memoria. Explore usted mismo el menú de
configuración o acceda a la Guía en pantalla para obtener una explicación
más detallada.
15
Inicio de la operación
Una vez que ha conectado e instalado BeoSound 2 en el ordenador,
puede comenzar a usarlo. Para saber cómo funciona BeoSound 2 con
su ordenador y con su reproductor de audio, consulte la sección
siguiente en la que se describe la configuración del equipo. A
continuación se enumeran las opciones disponibles.
BeoPlayer o BeoLink PC 2 (sólo con PC)
Recomendamos el uso de BeoSound 2 con reproductores de música de
Bang & Olufsen: BeoPlayer o BeoLink PC 2. En las páginas siguientes de esta
Guía se describen las funciones básicas. Para saber más sobre las funciones
avanzadas de BeoSound 2 con BeoPlayer o BeoLink PC 2, consulte la Guía
que aparece en la parte inferior de la barra de control de la pantalla en ambos
reproductores. Sepa, por ejemplo, cómo:
– Trasladar o renombrar las pistas y listas de reproducción de BeoSound 2.
– Consultar y modificar INFO de las pistas.
– Saber más acerca de la información musical de CDDB.
– Modificar los parámetros de configuración con un toque personalizado.
– Formatear una tarjeta de memoria.
Las referencias futuras a BeoPlayer incluyen el uso de BeoLink PC 2, ya que
estos dos reproductores funcionan de forma similar en relación con
BeoSound 2.
iTunes (sólo con Macintosh)
Para saber más acerca de iTunes, consulte “BeoSound 2 con iTunes” en esta
Guía. Si desea más información sobre iTunes, consulte su función de ayuda.
Otros reproductores
Con BeoSound 2 se pueden utilizar otros reproductores que no sean los
mencionados anteriormente.
Abra el pequeño compartimento
situado en la parte trasera de
BeoSound 2 para introducir la tarjeta
de memoria.
Use un alfiler para acceder a la
fijación del llavero.
GO
16
Se abre la lista de reproducción de
BeoSound 2 y se copia una pista
desde una lista Álbum a
BeoSound 2. Para asegurarse de que
la copia ha finalizado, espere a que
el indicador de progreso situado
debajo de la pista esté
completamente lleno.
>> Español
BeoSound 2 con BeoPlayer
Acerca de BeoPlayer
Un organizador de música –
N.MUSIC, y un reproductor de CD –
PC CD, son algunas de las
prestaciones más importantes de
BeoPlayer. En las páginas siguientes
se describe el uso básico de estas
funciones con el reproductor portátil
BeoSound 2. Si desea más
información sobre las opciones, le
recomendamos que acceda a la Guía
en pantalla de BeoPlayer.
Copia de ficheros de música a BeoSound 2
El organizador de música de BeoPlayer, N.MUSIC, clasifica automáticamente
sus pistas de música por Género, Álbum, Título, Artistas y Listas de
reproducción. Si ya tiene música almacenada en N.MUSIC, puede empezar a
copiar pistas a BeoSound 2.
> Sitúe BeoSound 2 en el módulo de conexiones.
El módulo de conexiones debe estar en modo USB (se indica con la luz roja
del módulo). Si el indicador del módulo de conexiones no está iluminado en
rojo, mantenga pulsado GO durante 2 segundos para cambiar de modo;
> Acceda a BeoPlayer.
> Haga doble clic en N.MUSIC para acceder a sus listas de reproducción y
pistas.
> Haga clic en COPY para acceder al contenido musical de BeoSound 2. Se
abrirá una lista de reproducción de BeoSound 2 que contiene una vista
general de la música almacenada en BeoSound 2.
> Para copiar pistas de sus listas a BeoSound 2, simplemente arrastre y suelte
la pista desde su lista a la lista de reproducción de BeoSound 2. Un
indicador situado debajo del nombre de la pista muestra el progreso de la
copia.
> Para cancelar una copia, seleccione la pista y bórrela, arrastrándola a la
papelera – o pulsando el botón DELETE del teclado. También puede
cancelar la copia si sale completamente de BeoPlayer o desconecta
BeoSound 2.

17
Copia desde un CD de audio a BeoSound 2
Puede copiar música directamente desde un CD de audio a BeoSound 2. Esto
es útil si, por ejemplo, no tiene música almacenada en BeoPlayer y quiere
empezar a reproducir música en BeoSound 2.
> Introduzca un CD de audio en la unidad de CD-ROM de su PC.
> Haga clic en PC CD para acceder a la lista PC CD.
BeoPlayer utiliza su conexión a Internet para conectarse a CDDB y recibir
información relativa a las pistas del CD*.
> Haga clic en COPY para acceder a las listas de destino y seleccione la
opción “BeoSound 2”. Se abrirá una lista de reproducción de BeoSound 2.
> Puede arrastrar y colocar la pista o pistas que desee copiar de la lista PC CD
a la lista de BeoSound 2.
Puede usar la barra de control mientras realiza la copia, pero el proceso se
interrumpirá si sale totalmente del reproductor.
*Para poder recibir información de CDDB, debe registrarse en BeoPlayer;
dicha función debe estar activada (opción predeterminada) en el menú
Configuration y el ordenador debe estar conectado. Si transcurridos unos
10 segundos no se encuentra información, las pistas se registrarán como
“unknown” (desconocida). Consulte la Guía en pantalla de BeoPlayer para
obtener más información sobre CDDB.
Acerca de la copia de CDs de
audio
Una vez que una pista se copia
directamente desde un CD al
reproductor portátil, se almacena en
su tarjeta de memoria, pero no en el
PC. Por lo tanto, si formatea
posteriormente la tarjeta, se borrará
la copia de la pista.
Actualización del programa
Puede descargar actualizaciones de
los programas de Bang & Olufsen en
la página www.beoplayer.com.
Seleccione “BeoSound 2 download”
y siga las instrucciones de la pantalla.
Loading…
CAUTION: To reduce the risk of electric shock, do not remove cover (or back). No User-serviceable parts inside. Refer servicing to qualified ser- vice personnel.
WARNING: To prevent fire or electric shock, do not expose this appliance to rain or moisture. Do not expose this equipment to dripping or splash- ing and ensure that no objects filled with liquids, such as vases, are placed on the equipment.
To completely disconnect this equip- ment from the AC Mains, disconnect the power supply cord plug from the AC receptacle.
This symbol indicates that a dangerous voltage constitut- ing a risk of electric shock is present within this unit.
This symbol indicates that there are important operating and maintenance instructions in the literature accompanying this unit.
This class B digital apparatus meets all requirements
of the Canadian Interference-Causing Equipment
Regulations.
NOTE: This device complies with part 15 of the FCC
Rules. Operation is subject to the following two
conditions: (1) This device may not cause harmful
interference, and (2) this device must accept any
interference received, including interference that may
cause undesired operation.
This equipment generates, uses and can radiate radio
frequency energy and, if not installed and used in
accordance with the instructions, may cause harmful
interference to radio communications. However,
there is no guarantee that interference will not occur
in a particular installation. If this equipment does
cause harmful interference to radio or television
reception, which can be determined by turning the
equipment off and on, the user is encouraged to try
to correct the interference by one or more of the
following measures:
Reorient or relocate the receiving antenna
Increase the separation between the equipment
and receiver
Connect the equipment into an outlet on a circuit
different from that to which the receiver is
connected
Consult the retailer or an experienced radio/TV
technician for help
This product fulfills the conditions stated in
the EEU directives 89/336 and 73/23.
For your safety: Keep the BeoSound 2 player and
base away from water and do not place items on top
of them. BeoSound 2 is developed for use in dry
environments only, and for use within a temperature
range of 545C (41113F).
Technical specifications, features and the use thereof are subject to change without notice!
3
Acknowledgements and liability Product names mentioned in this guide may be
trademarks or registered trademarks of other
companies.
Portions utilize Microsoft Windows Media
Technologies. Copyright 1999-2002 Microsoft
Corporation. All rights reserved. Microsoft, Windows
Media and the Windows Logo are registered
trademarks of Microsoft Corporation in the United
States and/or other countries.
MicroOS Operating System
(U.S. Patent #5,787,445)
Please note that Bang & Olufsen will, in no event, be
liable for any consequential, incidental or indirect
damages arising out of the use or inability to use the
software.
Mac, the Mac logo and iTunes are trademarks of
Apple Computer, Inc., registered in the U.S. and
other countries.
System requirements PC One free USB port
If you connect the BeoSound 2 docking station to
this port via an external HUB, make sure that your
HUB supports Full Speed Devices.
10 MB of available disk space
Windows 2000/XP
You must have administrator privileges to install
the BeoSound 2 firmware.
System requirements Macintosh One free USB port 1.1
If you connect the BeoSound 2 docking station to
this port via an external HUB, make sure that your
HUB supports Full Speed Devices.
MAC OS 9.x and OS X compatible
iTunes 2 (and newer) compatible
Supported file formats MP3
Sampling frequencies: 8, 11.025, 12, 16, 22.05,
24, 32, 44.1, and 48 kHz
Constant or variable bit rates: 8, 16, 24, 32, 40,
48, 56, 64, 80, 96, 112, 128, 160, 192, 256 and
320 Kbps
WMA
Sampling frequencies: 8, 11.025, 16, 22.050, 32,
44.1 and 48 kHz
Bit rates: 64, 80, 96, 128, 160 and 192 Kbps
Note that the WMA format is not supported by
iTunes.
Check www.bang-olufsen.com to see whether new
file formats are supported by BeoSound 2. Updated
BeoSound 2 firmware will also be available on this
website.
4 English
Setting up BeoSound 2
Follow the sequence below corresponding to your setup, PC or Macintosh. If your computer is a PC, do not connect the USB cable until you are specifically prompted to do so on the screen! If you have a Macintosh computer, it is essential that you change mode, in the exact fashion and sequence as described below.
Installation and connection (PC use) 1 Insert a memory card (MultiMedia or Secure Digital) into BeoSound 2.
2 Insert the CD-rom in your computers CD drive. If the Setup program starts
automatically, proceed to 5. Otherwise, go to 3.
3 Select your CD drive.
4 Double-click the Setup file.
5 Follow the on-screen instructions…
6 When prompted on the screen, connect the USB cable to your computer.
Installation and connection (Macintosh use) 1 Insert a memory card (MultiMedia or Secure Digital) into BeoSound 2.
2 As BeoSound 2 is in BeoPlayer mode per default, you must change this
setting. Make sure that BeoSound 2 is paused and that the Earphones are
connected. Press and hold and ss. Then press GO twice, without letting
go of the first two buttons. You will receive audible feedback. Your
BeoSound 2 is now in iTunes mode.
3 Connect the USB cable to your computer.
4 Insert the CD-rom in your computers CD drive.
5 Select the appropriate folder for your operating system, OS 9 or OS X.
6 Select the install file, and follow the on-screen instructions
Configuration and formatting (BeoPlayer use only) Before you copy music to your BeoSound 2 from BeoPlayer, you may want to
set the copying quality or make other adjustments to the default settings. This
is all done by clicking SETUP on the BeoPlayer on-screen control bar, then
CONFIG and a configuration menu appears where you can make your
changes. The configuration menu is also where you format a memory card.
Explore the configuration menu for yourself, or access the On-screen Guide
for an in-depth explanation.
B
A
Place BeoSound 2 on its docking
station as shown above.
Connect the USB cable if your
computer is a PC, wait until you are
prompted.
USB
5
Get started
Once you have connected and installed BeoSound 2 to your computer, you can begin using it. To find out how BeoSound 2 works with your computer and music player, simply proceed to the section on the following pages, describing the setup you have. Available options are listed below.
BeoPlayer or BeoLink PC 2 (PC use only) We recommend using BeoSound 2 with Bang & Olufsens own music players:
BeoPlayer or BeoLink PC 2. This Guide describes the basic use on the
following pages. To learn more about advanced use of BeoSound 2 with
BeoPlayer or BeoLink PC 2, refer to the On-screen Guide located at the
bottom of the on-screen control bar in both of these players. Find out for
example how to:
Move or rename tracks and playlists in BeoSound 2.
View and edit track INFO.
Find out more about CDDB music information.
Alter Configuration settings for a personalised touch.
Format a memory card.
All future reference to BeoPlayer includes BeoLink PC 2 use, as these two
players work similarly regarding Beosound 2.
iTunes (Macintosh use only) To learn more about using iTunes, refer to BeoSound 2 with iTunes in this
Guide. For further information on iTunes, refer to the iTunes help function.
Other players It is possible to use other players than the above mentioned with BeoSound 2.
Examples can be found in other players and options on the last page of this
Guide.
Open the small compartment on a
back of BeoSound 2 to insert a
memory card.
Use a needle to pull out the key ring
tag. You may, for example, use the
tag to attach a neck strap.
GO
6 >> English
BeoSound 2 with BeoPlayer
Copy music files to BeoSound 2 The N.MUSIC organiser in BeoPlayer automatically sorts your music tracks by
Genre, Album, Title, Artists and Playlists. If you already have music stored in
N.MUSIC, you can start copying tracks to BeoSound 2.
> Place BeoSound 2 on the docking station.
The docking station must be in USB mode (indicated by red light from the
docking station). If the docking station light is not red, press and hold GO
for 2 seconds to change it, then;
> Access BeoPlayer.
> Click N.MUSIC twice to access your playlists and tracks.
> Click COPY to access the music content on BeoSound 2. A BeoSound 2
Playlist opens containing an overview of music already stored on
BeoSound 2.
> To copy tracks from your lists to BeoSound 2, simply drag and drop a track
from a list to the BeoSound 2 Playlist. An progress indicator below the track
name shows the status of the copying progress.
> To cancel a copy, select the track and delete it, either by dragging it to the
waste basket or by pressing the DELETE button on your keyboard. A copy
will also be cancelled if you exit BeoPlayer completely, or if you unplug
BeoSound 2.
The BeoSound 2 Playlist is open and
a track is being copied from an
Album list to BeoSound 2. Wait for
the progress indicator under the
track to be filled out completely,
before your copy is finished.
About BeoPlayer A music organiser N.MUSIC, and a
CD player PC CD, are some of the
most important features of the
BeoPlayer. On these pages you can
read about basic use of these
features with the BeoSound 2
portable player. To know more about
your options, we recommend that
you access the BeoPlayer On-screen
Guide.
7
Copy from an audio CD to BeoSound 2 You can copy music directly from an audio CD to BeoSound 2. This is useful
if, for example, you havent got any music stored in your BeoPlayer, and you
want to get started playing music on BeoSound 2.
> Insert an audio CD into your PC CD-rom drive.
> Click PC CD to access the PC CD list.
BeoPlayer uses your Internet connection to connect to CDDB in order to
receive information about the CD tracks*.
> Click COPY to gain access to the destination lists, and select the option
BeoSound 2. A BeoSound 2 Playlist opens.
> You can now drag and drop the track or tracks you wish to copy from the
PC CD list into the BeoSound 2 list.
You can use the control bar while copying, but your copying will be disrupted
if you exit the player completely.
*In order to be able to receive CDDB information, you must be registered to
BeoPlayer, the function must be enabled in the Configuration menu (it is as
per default) and your computer must be on-line. If there is no information
available after approximately 10 seconds, your tracks will simply be registered
as unknown. Refer to the BeoPlayer On-screen Guide for further information
about CDDB.
About audio CD copying Once a track is copied from a CD
directly to your portable player, it is
stored on your memory card, but not
on your PC. Therefore, if you
subsequently format your card, it will
erase your copy of the track.
Firmware update Bang & Olufsen firmware updates
can be downloaded from
www.bang-olufsen.com. Select
BeoSound 2 download and follow
the on-screen instructions.
8 >> English
BeoSound 2 with iTunes
Get started Once you have set BeoSound 2 to iTunes mode, as described in the setup
section, you can begin using iTunes:
> Place BeoSound 2 on the docking station.
The docking station must be in USB mode (indicated by red light from the
docking station). If the docking station light is not red, press and hold GO
for 2 seconds to change it, then;
> Access iTunes.
After a few seconds, iTunes detects BeoSound 2. This is shown in the
playlist view and a disc icon appears on your desktop.
> You can now drag and drop tracks from your playlists on to the
BeoSound 2 icon.
It is not possible to place tracks directly into playlists. iTunes creates a
playlist: music containing all the tracks you copy. To place a track in
another playlist, you must create a new playlist and move the track after
you have finished copying.
Note that the disc icon must be ejected from the desktop before you either
press GO to playback the music, or remove BeoSound 2 from the docking
station.
If you have a Macintosh computer, you can use BeoSound 2 with the iTunes program.
Organising tracks and playlists iTunes allows you to sort your tracks
by different sorting criteria: Size,
Title, Rating etc. To display the
playback order of BeoSound 2, press
the small arrow on the top-left side
of the list. For further assistance in
the use of iTunes, refer to the help
function.
9
Other functions Once you have connected BeoSound 2, iTunes adds on features that were not
previously available. These new features can be found behind buttons located
at the bottom of the playlist, as illustrated to the right.
Create playlists To create a playlist in BeoSound 2, select the BeoSound 2 icon and click the
button marked [+] shown to the right. For daily BeoSound 2 use, having
multiple playlists is practical. It allows you to easily locate your sorted tracks,
using the next/previous playlist feature, as described on the following page.
Firmware update Bang & Olufsen firmware updates can be downloaded from
www.bang-olufsen.com.
Click the update button shown to the right.
The button appears in the lower right corner of iTunes only when
BeoSound 2 is on its docking station.
Click the update firmware button, locate the firmware file and select it.
Await on-screen instructions. When you have followed the instructions
on-screen, an audible feedback from your BeoSound 2 will inform you that
the firmware update is completed.
IMPORTANT: BeoSound 2 returns to BeoPlayer mode, after a firmware
update. You must change the mode back, if you want to continue in iTunes
mode. Read more about changing mode on the following pages.
This button gives you access to
erase your memory card.
Create a new playlist by
clicking this button.
This button has a three-fold purpose: See which firmware
version you currently have,
update your firmware, and
personalise BeoSound 2 by
changing the name at will.
The button differs in OS 9 and
OS X.
The upper button is the OS X
version, the lower the OS 9
version.
10 >> English
Daily use
Keypad functions Play: Press GO to start playback.
Pause: To pause playback, press GO a second time.
Volume: and adjusts volume.
Next track: Press to step to the next track in a playlist.
Previous track: Press to go to the previous track in a playlist.
Random on/off: To play tracks in random order, press and hold and
simultaneously for two seconds. Repeat to restore sequential playback.
Next playlist: Press tt to step to the next playlist.
Previous playlist: Press ss to step to the previous playlist.
Cue: To cue through your tracks, press and hold ss or tt. Cueing is not
possible for tracks in the WMA format.
Lock/unlock: To lock or unlock the keypad, press and hold ss and tt
simultaneously for two seconds.
Standby: To switch BeoSound 2 to standby, press and hold GO for two
seconds.
BeoSound 2 switches to standby after 30 seconds in pause mode.
Format card: BeoSound 2 must be paused and the Earphones connected.
Press and hold and tt. Then press GO twice. You will get audible
feedback. When the audible feedback stops press and hold and tt. Then
press GO twice again. You will get audible feedback again.
GO
11
Switch between playback and download: BeoSound 2 must be placed on
the docking station. Press GO to start playback, or press and hold GO for 2
seconds to connect to the computer enabling you to download to
BeoSound 2. The docking station light changes colour accordingly.
Change mode: Switch between BeoPlayer and iTunes mode. BeoSound 2 is
in BeoPlayer mode per default. To change this setting, make sure that
BeoSound 2 is paused, and that the Earphones are connected.
BeoSound 2 feedback Audible feedback: BeoSound 2 gives you audible feedback for example
when:
Battery power is low (beep repeated every 30 seconds)
Error occurs (beep repeated every 5 seconds)
Firmware update is completed
A memory card is formatted
Docking station light feedback: When BeoSound 2 is placed on the
docking station, the docking station lights up to indicate its current status:
Green Track playback or pause, not connected to the computer.
Red Download mode, connected to the computer.
Orange Resetting continuous orange light feedback indicates error.
Flashing light (red or green) Battery charging.
Flashing red and green, followed by orange, then red Updating Firmware.
Go to iTunes mode: Press and hold and ss.
Then press GO twice, without
letting go of the first two
buttons. Audible feedback
informs you that BeoSound 2 has
changed to iTunes mode.
Go to BeoPlayer mode: Press and hold and ss.
Then press GO twice, without
letting go of the first two
buttons. Audible feedback
informs you that BeoSound 2 has
changed to BeoPlayer mode.
12 >> English
Maintenance, etc.
Recharge battery When the built-in battery requires recharging, a beep, repeated every 30
seconds, sounds from BeoSound 2. You can silence this signal by pressing GO on the keypad once.
Place BeoSound 2 on the docking station. Recharging begins. You can leave
BeoSound 2 on the docking station without risk of overcharging the battery.
An 80% battery charge is reached after approximately one and a half hours,
and a full charge is reached after approximately two and a half hours.
Starting from a fully-charged state, the battery in BeoSound 2 will provide
approximately 8 hours of use.
Reset BeoSound 2 If BeoSound 2 doesnt respond, you can reset it. Press and hold and .
Then press GO for two seconds. This resets BeoSound 2. No data is lost.
Update BeoSound 2 Firmware Updates for BeoSound 2 will be available for download via
www.bang-olufsen.com. Go to the previous pages for instructions.
Cleaning BeoSound 2 Wipe dust off the surfaces using a dry, soft cloth. Remove grease stains or dirt
with a lint-free, firmly wrung cloth, dipped in a solution of water containing
only a few drops of mild detergent, such as washing-up liquid.
Memory card To ensure a long lifetime, memory cards must be handled with care. Always
keep the card inside the BeoSound 2, or in the cartridge supplied with the
card. Please note that formatting will not be possible if you have
write-protected the card (formatting will erase all content on the card).
MultiMedia (MMC) and Secure
Digital (SD) cards are available from a
number of suppliers. Memory cards
from SanDisk has been tested and
approved for use in BeoSound 2.
You can write-protect an SD-card by
moving the slider down.
13
Earphones For maximum sound quality, assemble, place and adjust the Earphones as
illustrated to the right. BeoSound 2 switches to standby if you disconnect the
Earphones.
WARNING! Prolonged use at high volume may cause hearing damage!
Other players and options Windows Media Player 7.0 or newer can also be used with BeoSound 2. Refer
to the Windows Media Player help function for further details on device use.
Mass Storage device mode When BeoSound 2 is in iTunes mode, it will actually work and act as a Mass
Storage device. The Mass Storage device mode will make your BeoSound 2
act as an extra drive on your computer. This allows you to use, for example,
your file explorer to organise your music.
Note that you can only place music in folders when using file explorer. You
cannot use the root or subfolders. Furthermore, to be able to change
between folders as if they were playlists, you must create new folders
yourself.
If you use BeoSound 2 in Mass Storage mode, or if you load the SD card in a
PC card reader, the SD card must be scanned in order to create or update the
playlist file. This scan is done automatically if no playlist file is found on the SD
card when you switch on BeoSound 2.
If there is a playlist file on the SD card, but you have not updated it, you can
start the scan manually by pressing and holding the and buttons for
two seconds. During the scan, BeoSound 2 beeps at three-second intervals.
When scanning is complete, playback starts automatically.
You can interrupt the scanning by switching off BeoSound 2. However, this
produces an incomplete playlist file, so only part of the content is played
when you switch on BeoSound 2.
Optional accessories A number of optional accessories are available. The accessories enable the
continued use of the BeoSound 2, for example, when travelling or during
leisure activities. For further information, contact your Bang & Olufsen retailer
or visit www.bang-olufsen.com.
14 Franais
Installation du BeoSound 2
Suivez la squence ci-dessous qui correspond votre installation, PC ou Macintosh. Si vous avez un PC, il ne faut pas connecter le cble USB avant davoir t spcifiquement invit le faire lcran ! Si vous avez un Macintosh, il est indispensable que vous changiez de mode en suivant exactement la description ci-dessous.
Installation et connexion (utilisation avec PC) 1 Introduire une carte mmoire (MultiMedia ou Secure Digital) dans le
BeoSound 2.
2 Mettez le CD-ROM dans le lecteur CD de votre ordinateur. Si le programme
dinstallation dmarre automatiquement, allez au point 5. Sinon, allez 3.
3 Slectionnez votre lecteur CD.
4 Double-cliquez sur le fichier Setup .
5 Suivez les instructions qui saffichent lcran
6 Lorsque vous y tes invit lcran, connectez le cble USB votre
ordinateur.
Installation et connexion (utilisation avec Macintosh) 1 Introduire une carte mmoire (MultiMedia ou Secure Digital) dans le
BeoSound 2.
2 Le BeoSound 2 tant en mode BeoPlayer par dfaut, vous devez modifier ce
rglage. Assurez-vous que le BeoSound 2 est mis sur pause et que les
couteurs sont connects. Appuyez et maintenez enfonces les touches
et ss. Appuyez ensuite deux fois sur GO sans relcher les deux premires
touches. Vous entendrez une raction sonore. Votre BeoSound 2 est
dsormais en mode iTunes.
3 Connectez le cble USB votre ordinateur.
4 Mettez le CD-ROM dans le lecteur CD de votre ordinateur.
5 Slectionnez le dossier correspondant votre systme dexploitation, OS 9
ou OS X.
6 Slectionnez le fichier dinstallation et suivez les instructions qui saffichent
lcran
Configuration et formatage (utilisation du BeoPlayer uniquement) Avant de copier vers votre BeoSound 2 partir du BeoPlayer, peut-tre
souhaitez-vous rgler la qualit de copie ou effectuer dautres rglages par
rapport aux rglages par dfaut. Pour cela, il suffit de cliquer sur SETUP sur la
barre de commande lcran du BeoPlayer, puis sur CONFIG aprs quoi
apparat un menu de configuration qui vous permet deffectuer vos
modifications. Dans le menu de configuration, vous pouvez galement
formater une carte mmoire. Explorez vous-mme le menu de configuration
ou accdez au Manuel en ligne pour des explications approfondies.
B
A
Placez le BeoSound 2 sur sa station
daccueil comme le montre
lillustration ci-dessus.
Connectez le cble USB si vous
avez un PC, il faut attendre dy tre
invit.
USB
15
Commencer
Aprs avoir connect et install votre BeoSound 2 en fonction de votre ordinateur, vous pouvez commencer lutiliser. Afin de savoir comment le BeoSound 2 fonctionne avec votre ordinateur et lecteur de musique, il vous suffit daller au chapitre dans les pages suivantes qui dcrivent votre installation. Les options disponibles figurent ci-dessous.
BeoPlayer ou BeoLink PC 2 (utilisation avec PC uniquement) Nous recommandons lutilisation du BeoSound 2 avec les lecteurs de musique
de Bang & Olufsen : le BeoPlayer ou le BeoLink PC 2. Ce Manuel dcrit les
bases de leur utilisation dans les pages suivantes. Afin de dcouvrir une
mthode avance quant lutilisation du BeoSound 2 avec le BeoPlayer ou le
BeoLink PC 2, prire de vous reporter au Manuel en ligne situ en bas de la
barre de commande lcran dans ces deux lecteurs. Savoir par exemple
comment :
Dplacer ou renommer des pistes et des listes de diffusion dans le
BeoSound 2.
Visualiser et modifier INFO sur les pistes.
En savoir plus sur linformation musicale CDDB.
Modifier des paramtrages afin dapporter une touche personnelle.
Formater une carte mmoire.
Toutes les rfrences faites au BeoPlayer correspondent galement
lutilisation du BeoLink PC 2, tant donn que ces deux lecteurs fonctionnent
de faon similaire en ce qui concerne le Beosound 2.
iTunes (utilisation avec Macintosh uniquement) Afin den savoir plus sur lutilisation diTunes, prire de vous reporter au
chapitre BeoSound 2 avec iTunes dans ce Manuel. Pour plus
dinformations sur iTunes, prire de vous reporter la fonction aide diTunes.
Autres lecteurs Il est possible dutiliser dautres lecteurs que ceux mentionns ci-dessus avec
le BeoSound 2. Vous trouverez des exemples dans Autres lecteurs et
fonctions la dernire page de ce Manuel.
Ouvrez le petit compartiment
larrire du BeoSound 2 afin
dinstaller une carte mmoire.
Extraire l’aide d’une aiguille la
patte de fixation de l’anneau, dans
lequel on peut passer une sangle
des fins de port autour du cou, etc.
GO
16 >> Franais
BeoSound 2 avec BeoPlayer
Copier des fichiers musicaux vers le BeoSound 2 Lorganiseur N.MUSIC dans le BeoPlayer trie automatiquement vos morceaux
de musique par genre, album, titre, artiste et listes de diffusion. Si vous avez
dj mmoris de la musique dans N.MUSIC, vous pouvez commencer
copier des pistes vers le BeoSound 2.
> Placez le BeoSound 2 sur la station daccueil.
La station daccueil doit tre en mode USB (indiqu par le tmoin rouge sur
la station daccueil). Si le tmoin de la station daccueil nest pas rouge,
appuyez et maintenez GO enfonce pendant 2 secondes pour changer de
mode, puis :
> Accdez au BeoPlayer.
> Cliquez deux fois sur N.MUSIC pour accder vos listes de diffusion et
pistes.
> Cliquez sur COPY pour accder au contenu musical du BeoSound 2. Une
liste de diffusion BeoSound 2, contenant une vue densemble de la
musique dj mmorise dans le BeoSound 2, souvre.
> Pour copier des pistes partir de vos listes de diffusion vers le BeoSound 2,
il suffit de cliquer sur une piste et de la faire glisser partir dune autre liste
de diffusion vers celle du BeoSound 2. Un indicateur de progression sous le
nom de la piste montre ltat de progression de la copie.
> Pour effacer une copie, slectionnez la piste et effacez-la, soit en la faisant
glisser vers la corbeille soit en appuyant sur la touche DELETE sur votre
clavier. La copie sannule aussi si vous sortez tout fait du BeoPlayer ou si
vous dbranchez le BeoSound 2.
La liste de diffusion BeoSound 2 est
ouverte et une piste est en cours de
copie de la liste Album vers le
BeoSound 2. Lindicateur de
progression sous la piste doit tre
totalement rempli pour que la copie
soit termine.
Quelques mots sur le BeoPlayer Un organiseur de musique,
N.MUSIC, et un lecteur CD, PC CD,
sont parmi les caractristiques les
plus importantes du BeoPlayer. Ces
pages vous proposent la description
de lutilisation de base de ces
fonctions avec le lecteur portable
BeoSound 2. Afin den savoir plus
sur vos options, nous vous
recommandons daccder au Manuel
en ligne concernant le BeoPlayer.
17
Copier partir dun CD audio vers le BeoSound 2 Vous pouvez copier de la musique directement partir dun CD audio vers le
BeoSound 2. Cela est utile, par exemple, si vous navez pas mmoris de
musique dans votre BeoPlayer et que vous souhaitez commencer couter de
la musique sur le BeoSound 2.
> Mettez un CD audio dans le lecteur CD-ROM de votre PC.
> Cliquez sur PC CD pour accder la liste PC CD.
Le BeoPlayer utilise votre connexion Internet pour se connecter la CDDB
afin dobtenir les informations relatives aux pistes du CD*.
> Cliquez sur COPY pour accder aux listes de destination et slectionnez
loption BeoSound 2 . Une liste de diffusion BeoSound 2 souvre.
> Vous pouvez maintenant faire glisser la ou les pistes que vous souhaitez
copier de la liste de PC CD vers la liste du BeoSound 2.
Vous pouvez utiliser la barre de commande tout en copiant, mais votre copie
sera interrompue si vous quittez le lecteur totalement.
*Afin de pouvoir recevoir des informations sur la CDDB, vous devez tre
enregistr dans le BeoPlayer, la fonction doit tre active dans le menu
Configuration (elle lest par dfaut) et votre ordinateur doit tre en ligne. En
labsence, aprs 10 secondes environ, dinformations disponibles, vos pistes
seront simplement enregistres en tant quinconnues. Prire de vous reporter
au Manuel en ligne concernant le BeoPlayer pour plus dinformations sur la
CDDB.
Quelques mots sur la copie de CD audio Une fois quune piste a t copie
partir dun CD directement vers votre
lecteur portable, elle est mmorise
sur votre carte mmoire, mais pas
dans votre PC. Par consquent, si
vous formatez ensuite votre carte, la
copie de votre piste sera efface.
Mise jour des microprogrammes Les mises jour des
microprogrammes Bang & Olufsen
peuvent tre tlcharges partir de
www.bang-olufsen.com.
Slectionnez BeoSound 2
download et suivez les instructions
lcran.
18 >> Franais
BeoSound 2 avec iTunes
Commencer Aprs avoir rgl le BeoSound 2 sur mode iTunes, selon la description dans le
chapitre sur linstallation, vous pouvez commencer utiliser iTunes :
> Placez le BeoSound 2 sur la station daccueil.
La station daccueil doit tre en mode USB (indiqu par le tmoin rouge sur
la station daccueil). Si le tmoin de la station daccueil nest pas rouge,
appuyez et maintenez GO enfonce pendant 2 secondes pour changer de
mode, puis :
> Accdez iTunes.
Aprs quelques secondes, iTunes dtecte le BeoSound 2. Cela est montr
au niveau de la liste de diffusion et une icne en forme de disque apparat
sur votre bureau.
> Vous pouvez dsormais faire glisser les pistes de vos listes de diffusion vers
licne BeoSound 2.
Il nest pas possible de placer des pistes directement dans des listes de
diffusion. iTunes cre une liste de diffusion music contenant toutes les
pistes que vous copiez. Afin de placer une piste dans une autre liste de
diffusion, vous devez crer une nouvelle liste de diffusion et dplacer la
piste aprs avoir fini la copie.
Prire de noter que licne en forme de disque doit avoir disparu du bureau
avant dappuyer sur GO pour couter de la musique ou de retirer le
BeoSound 2 de la station daccueil.
Si vous avez un Macintosh, vous pouvez utiliser le BeoSound 2 avec le programme iTunes.
Organiser des pistes et listes de diffusion iTunes vous permet de trier vos pistes
selon diffrents critres : taille, titre,
classement, etc. Afin dafficher
lordre de lecture du BeoSound 2,
appuyez sur la petite flche en haut
gauche sur la liste. Pour une
assistance supplmentaire
concernant lutilisation diTunes,
prire de vous reporter la fonction
aide.
19
Autres fonctions Aprs avoir connect le BeoSound 2, iTunes ajoute des fonctions qui ntaient
pas disponibles auparavant. Ces nouvelles fonctions se trouvent derrire des
touches situes en bas de la liste de diffusion comme le montre lillustration
droite.
Crer des listes de diffusion Afin de crer une liste de diffusion dans le BeoSound 2, slectionnez licne
BeoSound 2 et cliquez sur la touche marque [+], montre droite. Pour
lutilisation quotidienne du BeoSound 2, il est pratique davoir plusieurs listes
de diffusion. Cela vous permet de localiser facilement vos pistes tries en
utilisant la fonction suivant/prcdent de la liste de diffusion, comme cela est
dcrit dans la page suivante.
Mise jour des microprogrammes Les mises jour des microprogrammes Bang & Olufsen peuvent tre
tlcharges partir de www.bang-olufsen.com.
Cliquez sur la touche mise jour, montre droite.
La touche apparat dans langle infrieur droit diTunes seulement lorsque
le BeoSound 2 est pos sur sa station daccueil.
Cliquez sur la touche mise jour microprogrammes, localisez le fichier de
microprogramme et slectionnez-le. Attendez les instructions lcran.
Quand vous avez suivi les instructions lcran, une raction sonore de
votre BeoSound 2 vous informera que la mise jour des microprogrammes
est termine.
IMPORTANT : Le BeoSound 2 revient en mode BeoPlayer aprs une mise
jour de microprogrammes. Vous devez changer de mode si vous souhaitez
continuer en mode iTunes. Vous pouvez en lire davantage sur le changement
de mode dans les pages suivantes.
Cette touche vous permet
daccder leffacement de
votre carte mmoire.
Crez une nouvelle liste de
diffusion en cliquant sur cette
touche.
Cette touche a une triple fonction : voir la version
actuelle de votre
microprogramme,
mettre jour votre
microprogramme et
personnaliser le BeoSound 2
en changeant le nom
volont. La touche nest pas
la mme en version OS 9 et
OS X.
La touche suprieure
correspond la version OS X
et la touche infrieure la
version OS 9.
20 >> Franais
Utilisation quotidienne
Fonctions du pav Lecture : Appuyez sur GO pour dmarrer la lecture.
Pause : Pour mettre la lecture sur pause, appuyez sur GO encore une fois.
Volume : et permettent de rgler le volume.
Piste suivante : Appuyez sur pour aller la piste suivante sur une liste de
diffusion.
Piste prcdente : Appuyez sur pour aller la piste prcdente sur une
liste de diffusion.
Alatoire on/off : Pour la lecture de pistes dans un ordre alatoire, appuyez
simultanment sur et et maintenez la pression pendant deux secondes.
Rptez la procdure pour restaurer la lecture squentielle.
Liste de diffusion suivante : Appuyez sur tt pour aller la liste de diffusion
suivante.
Liste de diffusion prcdente : Appuyez sur ss pour aller la liste de
diffusion prcdente.
Recherche : Pour effectuer une recherche parmi les pistes, appuyez et
maintenez ss ou tt. Il nest pas possible de rechercher des pistes en format
WMA.
Verrouiller/dverrouiller : Pour verrouiller ou dverrouiller le pav, appuyez
simultanment sur ss et tt et maintenez la pression pendant deux secondes.
Veille : Pour mettre le BeoSound 2 en veille, appuyez et maintenez GO pendant deux secondes.
Le BeoSound 2 se met en veille aprs 30 secondes en mode pause.
Formater carte : Le BeoSound 2 doit tre sur pause et les couteurs
connects. Appuyez et maintenez enfonces les touches et tt. Appuyez
ensuite sur GO deux fois. Vous entendrez une raction sonore. Lorsque la
raction sonore sarrte, appuyez et maintenez enfonces les touches
et tt. Appuyez ensuite nouveau deux fois sur GO. Vous entendrez
nouveau une raction sonore.
GO
21
Changer entre lecture et tlchargement : Le BeoSound 2 doit tre plac
sur la station daccueil. Appuyez sur GO pour dmarrer la lecture ou appuyez
et maintenez GO enfonce pendant 2 secondes pour se connecter
lordinateur ce qui vous permet de tlcharger vers le BeoSound 2. Le
tmoin de la station daccueil change de couleur en fonction de cela.
Changer de mode : Permet de changer entre les modes BeoPlayer et iTunes.
Le BeoSound 2 est en mode BeoPlayer par dfaut. Pour changer ce rglage,
assurez-vous que le BeoSound 2 est sur pause et que les couteurs sont
connects.
Raction du BeoSound 2 Raction sonore : Le BeoSound 2 vous donne une raction sonore, par
exemple lorsque :
La batterie est faible (bip rpt toutes les 30 secondes)
Des erreurs apparaissent (bip rpt toutes les 5 secondes)
La mise jour de microprogrammes est termine
Une carte mmoire est formate
Raction lumineuse de la station daccueil : Lorsque le BeoSound 2 est
plac sur la station daccueil, celle-ci sclaire pour indiquer son tat actuel :
Vert Lecture de piste ou pause, non connecte lordinateur.
Rouge Mode tlchargement, connecte lordinateur.
Orange Rinitialisation une lumire orange continue indique une erreur.
Lumire clignotante (rouge ou verte) Batterie en charge.
Lumire clignotante rouge ou verte, suivie dorange, puis de rouge Mise
jour de microprogrammes.
Passer en mode iTunes : Appuyez et maintenez enfonces
et ss.
Appuyez ensuite deux fois sur
GO, sans relcher les deux
premires touches. Une raction
sonore vous informe que le
BeoSound 2 a chang pour le
mode iTunes.
Passer en mode BeoPlayer : Appuyez et maintenez enfonces
et ss.
Appuyez ensuite deux fois sur
GO, sans relcher les deux
premires touches. Une raction
sonore vous informe que le
BeoSound 2 a chang pour le
mode BeoPlayer.
22 >> Franais
Maintenance, etc.
Recharger la batterie Si la batterie intgre a besoin dtre recharge, le BeoSound 2 met un bip
rptitif toutes les 30 secondes. Vous pouvez faire cesser ce signal en
appuyant une fois sur GO sur le pav.
Placez le BeoSound 2 sur la station daccueil. Le rechargement commence.
Vous pouvez laisser le BeoSound 2 sur la station daccueil sans risque de
surcharge de la batterie.
Une charge de 80% est atteinte aprs environ une heure et demie et une
charge complte aprs environ deux heures et demie. En dmarrant avec une
batterie totalement charge, la batterie du BeoSound 2 assure environ 8
heures dutilisation.
Rinitialiser le BeoSound 2 Si le BeoSound 2 ne rpond pas, vous pouvez le rinitialiser. Appuyez et
maintenez et . Appuyez ensuite sur GO pendant deux secondes. Cela
rinitialise le BeoSound 2. Aucune donne nest perdue.
Mise jour des microprogrammes BeoSound 2 Des mises jour du BeoSound 2 seront disponibles pour le tlchargement
via www.bang-olufsen.com. Allez aux pages prcdentes pour plus
dinformations.
Nettoyer le BeoSound 2 Retirer la poussire des surfaces laide dun chiffon sec et non abrasif.
Enlever les taches de gras ou de salets plus rsistantes avec un chiffon sans
peluches, tremp dans une solution deau contenant quelques gouttes de
dtergent doux, comme par ex. du liquide vaisselle, puis fermement essor.
Carte mmoire Afin de leur assurer une longue dure de vie, les cartes mmoire doivent tre
traites avec soin. Il faut toujours conserver la carte lintrieur du
BeoSound 2 ou dans la cartouche fournie avec la carte. Prire de noter que le
formatage nest pas possible si vous avez protg la carte en criture (le
formatage effacera tout le contenu de la carte).
Les cartes mmoire MultiMedia
(MMC) et Secure Digital (SD) se
trouvent aisment dans le
commerce. Les cartes fournies par
SanDisk sont testes et agres pour
une utilisation avec le BeoSound 2.
La carte SD est dote d’une glissire
permettant de la verrouiller en
criture (position basse).
23
Ecouteurs Pour une qualit sonore maximale, placez et rglez les couteurs comme le
montre lillustration droite. Le BeoSound 2 se met en veille si vous
dbranchez les couteurs.
AVERTISSEMENT ! Une utilisation prolonge fort volume peut tre
dangereuse pour loue !
Autres lecteurs et options Windows Media Player version 7.0 ou plus rcente peut galement tre utilis
avec le BeoSound 2. Prire de vous reporter la fonction daide de Windows
Medi
Table of Contents
- Beosound 2 3rd Generation
- Specifications
- Product Usage Instructions
- 1. Download the Bang & Olufsen App
- 2. Set Up in the Bang & Olufsen App
- 3. Using Apple Home App for AirPlay Users
- 4. Remote Control for Spotify
- 5. System Software Update
- 6. Log Information
- FAQ
- Q: How can I control Spotify with my Beosound 2 3rd
- Q: How do I update the system software of my Beosound 2 3rd
- References
- Read User Manual Online (PDF format)
- Download This Manual (PDF format)
Beosound 2 3rd Generation
“`html
Specifications
- Product Model: Beosound 2 3rd Generation
- Manufacturer: Bang & Olufsen
Product Usage Instructions
1. Download the Bang & Olufsen App
To set up and control your Beosound 2 3rd Generation, download
the Bang & Olufsen App from on.beo.com/app.
2. Set Up in the Bang & Olufsen App
Follow the instructions in the Bang & Olufsen App to set up
your speaker.
3. Using Apple Home App for AirPlay Users
If you are an AirPlay user, you can set up the speaker using the
Apple Home App. Follow the provided instructions.
4. Remote Control for Spotify
You can use your phone, tablet, or computer as a remote control
for Spotify. Visit spotify.com/connect to learn how to set it
up.
5. System Software Update
To ensure your product has the latest features, automatic system
software updates are enabled by default. You can change this
setting in the UPDATE PRODUCT SOFTWARE menu using the BeoSetup
App.
6. Log Information
Your product may collect performance and usage data to improve
services. You can manage this in the STATUS menu using the BeoSetup
App.
FAQ
Q: How can I control Spotify with my Beosound 2 3rd
Generation?
A: Use your phone, tablet, or computer as a remote control for
Spotify. Visit spotify.com/connect for instructions.
Q: How do I update the system software of my Beosound 2 3rd
Generation?
A: Automatic system software updates are enabled by default. You
can change this setting in the UPDATE PRODUCT SOFTWARE menu using
the BeoSetup App.
“`
Beosound 2 3rd Generation
Quick guide Kort vejledning Snabbguide Kurzanleitung Snelgids Guide rapide
Guía rápida Guida rapida Guia de consulta rápida
(&/24(“VHJOEE
(&/24(“VHJOEE
DOWNLOAD THE BANG & OLUFSEN APP
Bang & Olufsen
on.beo.com/app 3
(&/24(“VHJOEE
1
4
(&/24(“VHJOEE
2
SET UP IN THE BANG & OLUFSEN APP
5 (&/24(“VHJOEE
NEED HELP? CONTACT OUR SUPPORT
on.beo.com/call GLOBAL 24/7 ENGLISH HOTLINE
+44 20 39 36 14 84
2
6
(&/24(“VHJOEE
For user guide, see: Se betjeningsvejledning på: Användarhandledning finns
här: Die Bedienungsanleitung finden Sie unter: Voor de gebruikershandleiding,
zie: Pour accéder au manuel de l’utilisateur, consultez le site: Si desea
descargar la guía de usuario, visite: Per la guida utente, vedere: Para aceder
ao manual do utilizador, visite: : : : : :
Bang & Olufsen App
7 (&/24(“VHJOEE
For AirPlay only users, the speaker can be set up using the Apple Home App.
Kun brugere af AirPlay: Højttaleren kan konfigureres ved brug af Apple Home
App.
För AirPlay endast användare, kan högtalaren ställas in med hjälp av Apple
Home App.
Nur für AirPlay Benutzer – der Lautsprecher kann mit der Apple Home App
eingerichtet werden.
Alleen voor gebruikers van AirPlay: de luidspreker kan worden ingesteld met de
Apple Home-app.
Pour les utilisateurs d’AirPlay uniquement, le haut-parleur peut être
configuré à l’aide de l’Apple Home App.
Únicamente para los usuarios de AirPlay, el altavoz puede configurarse usando
Apple Home App.
Solamente per gli utenti AirPlay: è possibile configurare il diffusore
mediante Apple Home App.
Para utilizadores de apenas AirPlay, é possível configurar a coluna utilizando
a Apple Home App.
Apple Home App ( AirPlay).
8
(&/24(“VHJOEE
Pro uzivatele pouzívající pouze AirPlay: reproduktor lze nastavit pomocí
aplikace Apple Home App.
A csak Airplay-es felhasználók az Apple Home App segítségével állíthatják be a
hangszórókat.
Doar pentru utilizatorii care folosesc AirPlay, difuzorul poate fi configurat
folosind Apple Home App.
AirPlay Apple Home APP AirPlay , Apple Home App .
AirPlay Apple Home App
AirPlay Apple Home App
9 (&/24(“VHJOEE
Use your phone, tablet or computer as a remote control for Spotify. Go to
spotify.com/connect to learn how
Brug din telefon, tablet eller computer som fjernbetjening til Spotify. Gå til
spotify.com/connect for at finde ud af, hvordan du gør
Använd din telefon, surfplatta eller dator som fjärrkontroll för Spotify. Gå
till spotify.com/connect för att ta reda på hur
Verwende dein Smartphone, Tablet oder deinen Computer als Fernbedienung für
Spotify. Auf spotify.com/connect erfährst du mehr.
Gebruik je telefoon, tablet of computer als een afstandsbediening voor
Spotify. Ga naar spotify.com/connect om te leren hoe je dat doet
Utilisez votre téléphone, votre tablette ou votre ordinateur comme une
télécommande pour contrôler Spotify. Accédez à spotify.com/connect pour en
savoir plus.
Usa tu teléfono, tu tablet o tu computadora como control remoto de
Spotify.Para más información, entra a spotify.com/connect
Usa il tuo cellulare, tablet o computer come telecomando remoto per Spotify.
Vai su spotify.com/connect per scoprire come
Usa o teu telemóvel, tablet ou computador como comando do Spotify. Vaia
spotify.com/connect para saberes como
10
(&/24(“VHJOEE
Spotify , . spotify.com/connect.
, Spotify . spotify.com/connect .
Spotify spotify.com/connect
Spotify spotify.com/connect
Spotify spotify.com/connect ‘
.Spotify spotify.com/connect
11 (&/24(“VHJOEE
English Automatic system software update In order to ensure that your products
have the latest features and improvements, automatic system software updates
are enabled by default, and this is the recommended setting. You may change
this at any time in the UPDATE PRODUCT SOFTWARE menu using the BeoSetup App.
Log information To help us improve our range of available products and
services offered to you, we may request certain information from your product
about its performance and usage patterns. The information will at all times be
provided on an anonymous basis only. You can at any time easily disable this
function in the STATUS menu using the BeoSetup App.
Dansk Automatisk softwareopdatering Da vi gerne vil sikre, at du har de
seneste funktioner og forbedringer, er automatisk softwareopdatering slået til
som standard, og dette er den anbefalede indstilling. Du kan til enhver tid
ændre dette i menuen OPDATER PRODUKTSOFTWARE ved hjælp af BeoSetup App.
Logoplysninger For at forbedre vores udbud af produkter og tjenester kan du
blive bedt om bestemte oplysninger vedr. dit produkts ydeevne og din brug af
produktet. Disse oplysninger videregives altid kun anonymt. Det er til enhver
tid muligt at deaktivere denne funktion i menuen STATUS i BeoSetup App.
12
(&/24(“VHJOEE
Svenska Automatisk systemprogramuppdatering För att säkerställa att dina
produkter alltid har de senaste funktionerna och förbättringarna är
automatiska systemprogramu ppdateringar aktiverade som standard och den
inställning som rekommenderas. Du kan när som helst ändra inställningen på
menyn UPPDATERA PRODUKTENS PROGRAMVARA med hjälp av BeoSetup App.
Logga information Vi kan begära viss information från din produkt om dess
prestanda och användningsmönster för att hjälpa oss att förbättra vårt
sortiment av tillgängliga produkter och tjänster som erbjuds. Informationen
ska alltid lämnas anonymt. Du kan när som helst enkelt avaktivera denna
funktion i menyn STATUS med hjälp av BeoSetup App.
Deutsch Automatische Systemsoftware-Aktualisierung Um sicherzustellen, dass
Ihre Geräte über die neuesten Funktionen und Verbesserungen verfügen, sind die
automatischen Aktualisierungen der Systemsoftware standardmäßig aktiviert.
Diese Einstellung wird empfohlen. Sie können diese Einstellung jederzeit über
die BeoSetup-App im Menü PRODUKTSOFTWARE AKTUALISIEREN ändern.
Log-Information Um die von uns angebotenen Produkte und Services zu
verbessern, werden wir ggf. Informationen zur Leistung Ihres Geräts und des
Nutzungsverhaltens abrufen. Die Bereitstellung der entsprechenden Informa-
13
(&/24(“VHJOEE
tionen erfolgt vollständig anonym. Sie haben jederzeit die Möglichkeit, diese
Funktion über die BeoSetup-App im STATUS-Menü zu deaktivieren.
Nederlands Automatische software-update Om ervoor te zorgen dat uw producten
van de laatste kenmerken en verbeteringen genieten, zijn automatische
systeemsoftware-updates standaard ingeschakeld en dit is de aanbevolen
instelling. U kunt dit op elk gewenst moment wijzigen in het menu
PRODUCTSOFTWARE UPDATEN met behulp van de BeoSetup App.
Loginformatie Om ons te helpen ons assortiment beschikbare producten en
diensten te verbeteren, kan het zijn dat we bepaalde informatie over de
prestaties en de gebruikspatronen van uw product vragen. De informatie zal
altijd uitsluitend anoniem worden gegeven, U kan deze functie te allen tijde
uitschakelen in het menu STATUS via de BeoSetup App.
Français Mise à jour automatique du logiciel système Afin de garantir que vos
produits disposent des dernières fonctionnalités et améliorations, les mises à
jour automatiques du logiciel système sont activées par défaut. Il s’agit d’un
paramètre recommandé. Vous pouvez modifier ce paramètre à tout moment dans le
menu METTRE À JOUR LE LOGICIEL DU PRODUIT à l’aide de l’app BeoSetup.
14
(&/24(“VHJOEE
Informations du journal Pour nous aider à améliorer notre gamme de produits et
services mis à votre disposition, nous sommes susceptibles de vous demander
certaines informations sur les performances et l’utilisation de votre produit.
Les informations seront fournies à tout moment de manière anonyme uniquement.
Vous pouvez à tout moment désactiver facilement cette fonction dans le menu
ÉTAT à l’aide de l’app BeoSetup.
Español Actualización automática del software del sistema Para garantizar que
sus equipos cuenten siempre con las funciones y mejoras más recientes, las
actualizaciones automáticas del software del sistema se encuentran habilitadas
de forma predeterminada (esta es la configuración recomendada). Puede
deshabilitarlas en cualquier momento a través del menú ACTUALIZACIÓN DE
SOFTWARE DEL EQUIPO, empleando la aplicación BeoSetup.
Información de registro Con el fin de mejorar la gama de productos y servicios
que ponemos a su disposición, puede que solicitemos al equipo cierta
información acerca de su rendimiento y sus patrones de uso. Tal información
será recopilada en todo momento con carácter anónimo. Puede deshabilitar esta
función cuando lo desee en el menú ESTADO, empleando la aplicación BeoSetup.
Italiano Aggiornamento software di sistema automatico Per assicurare che i
prodotti siano dotati delle ultime funzioni e miglioramenti, gli aggiornamenti
software automatici sono abilitati per
15
(&/24(“VHJOEE
impostazione predefinita e questa è l’impostazione consigliata. È possibile
modificare questa impostazione in qualsiasi momento nel menu AGGIORNA SOFTWARE
PRODOTTO utilizzando l’app BeoSetup.
Informazioni registrate Per aiutarci a migliorare la nostra gamma di prodotti
e servizi offerti, potremmo richiedere determinate informazioni sul prodotto,
le sue prestazioni e l’utilizzo. Le informazioni saranno sempre fornite su
base anonima. È possibile disattivare questa funzione in qualsiasi momento nel
menu STATO utilizzando l’app BeoSetup.
Português Actualização automática do software do sistema Para assegurar que os
seus produtos possuem as mais recentes funcionalidades e melhorias, as
actualizações automáticas de software do sistema estão activadas por defeito e
esta é a definição recomendada. Poderá alterar isto em qualquer momento no
menu ACTUALIZAÇÃO DE SOFTWARE DO PRODUTO da aplicação BeoSetup.
Informações de registo Para nos ajudar a melhorar a gama de produtos e
serviços que colocamos à sua disposição, poderemos pedir ao seu produto
determinadas informações relativas ao respectivo desempenho e padrões de
utilização. Estas informações serão sempre fornecidas em modo anónimo. Poderá
desactivar esta função em qualquer momento através do menu ESTADO da aplicação
BeoSetup.
16
(&/24(“VHJOEE
, . BeoSetup.
, , . . BeoSetup.
BeoSetup App [] BeoSetup App
17
(&/24(“VHJOEE
, , . BeoSetup App .
B&O . . BeoSetup App .
BeoSetup App “”
BeoSetup App ” ”
[] BeoSetup App
18
(&/24(“VHJOEE
[] BeoSetup App,
The Wi-Fi CERTIFIEDTM Logo is a certification mark of Wi-Fi Alliance®.
The Bluetooth® word mark and logos are registered trade-marks owned by
Bluetooth SIG, Inc. and any use of such marks by Bang & Olufsen group is under
license. Other trade-marks and trade names are those of their respective
owners.
The Spotify software is subject to third party licenses found here
http://www.spotify.com/connect/ third-party-licenses
19
(&/24(“VHJOEE
Tilmeld Dig Online Registrieren Sie Sich Online Register Online Registro En
Línea Inscription En Ligne Registrazione On-line Online Registreren Registo
Online Online-registrering
20
(&/24(“VHJOEE
DA
DE
EN
ES
Tilmeld dig online på www.bang-olufsen.com/register-product for at modtage
vigtige oplysninger om produkt- og softwareopdateringer fra BANG & OLUFSEN
Group.
Registrieren Sie sich online unter www.bang-olufsen.com/registerproduct, um
wichtige Informationen zu Produkt- und SoftwareAktualisierungen sowie
interessante Neuigkeiten und Angebote von der BANG & OLUFSEN Gruppe zu
erhalten.
Register online at www.bang-olufsen.com/register-product to receive important
information about product and software updates and to get exciting news and
offers from the BANG & OLUFSEN Group.
Regístrese online en la página web www.bang-olufsen.com/registerproduct para
recibir información importante acerca del productos y de actualizaciones de
software y para conseguir fantásticas noticias y ofertas del Grupo BANG &
OLUFSEN.
Inscrivez-vous en ligne sur www.bang-olufsen.com/register-product pour
recevoir des informations importantes sur les mises à jour de produits et de
logiciels – et pour obtenir des nouvelles et des offres intéressantes du
Groupe BANG & OLUFSEN.
Registrarsi online su www.bang-olufsen.com/register-product per ricevere
importanti informazioni su prodotti e aggiornamenti software,
21
FR
IT
(&/24(“VHJOEE
JA
KO
NL
notizie e le fantastiche offerte del Gruppo BANG & OLUFSEN.
www.bang-olufsen.com/register-product BANG & OLUFSEN Group
BANG & OLUFSEN www.bang-olufsen.com/ register-product .
Registreer online op www.bang-olufsen.com/register-product om belangrijke
informatie te ontvangen over product- en softwareupdates – en om de laatste
nieuwtjes en aanbiedingen van de BANG & OLUFSEN Group te ontvangen.
Registe-se online em www.bang-olufsen.com/register-product para receber
informações importantes sobre atualizações de produtos e software, e para
receber notícias e ofertas entusiasmantes do Grupo BANG & OLUFSEN.
www.bang-olufsen.com/register-product , BANG & OLUFSEN.
22
PT
RU
(&/24(“VHJOEE
SV
ZH
Registrera dig online på www.bang-olufsen.com/register-product för att få
viktig information om produkter och programuppdateringar samt för att få
spännande nyheter och erbjudanden från BANG & OLUFSEN Group.
www.bang-olufsen.com/register-product BANG & OLUFSEN Group
www.bang-olufsen.com/register-product — BANG & OLUFSEN
2 23
(&/24(“VHJOEE
upon appropriate documentation of relocation to the People’s Republic of China
for Bang & Olufsen Products purchased abroad. For Hong Kong and Macau markets
only: The Warranty only applies to Bang & Olufsen Products imported by Bang &
Olufsen Limited and purchased from authorized physical stores located or
authorized online stores hosted in Hong Kong or Macau, or legally imported in
connection with an end-user’s properly documented relocation to Hong Kong or
Macau. Bang & Olufsen Products purchased outside Hong Kong or Macau are
excluded from the Warranty but subject to the applicable legislation in the
relevant market of purchase.
49 (&/NQPSUBOUOGPSNBUJPO”VHDPQZJOEE
For the Australian market only: Bang & Olufsen Products are subject to the
guarantees provided under the Australian Consumer Law. You are entitled to a
replacement or refund for a major problem’ and for compensation for any other reasonably foreseeable loss or damage. You are also entitled to have the Bang & Olufsen Product repaired or replaced if the Bang & Olufsen Product fails to be of acceptable quality and the problem does not amount to amajor problem’.
For the US market only: Some states do not allow the exclusion or limitation
of incidental or consequential damages. Thus, the above limitations or
exclusions may not apply to you. This Warranty gives you specific legal
rights, and you may also have other rights which vary from state to state. For
the People’s Republic of China market only: The Warranty only applies to Bang
& Olufsen Products imported by Bang & Olufsen Enterprise Management (Shanghai)
Co. Ltd. and purchased from Authorised Resellers selling from physical stores
located or authorized online stores hosted in the People’s Republic of China
or legally imported in connection with an end-user’s properly documented
relocation to the People’s Republic of China. Bang & Olufsen Products
purchased in Hong Kong, Macau or Taiwan or elsewhere outside the People’s
Republic of China are excluded from the Warranty but subject to the applicable
legislation in the relevant market of purchase. Import, sale and use of
specific Bang & Olufsen Products in the People’s Republic of China is subject
to China Quality Certification (CQC), obtained from the above mentioned
authorized stores located or hosted in the People’s Republic of China at the
time of purchase or
48
(&/NQPSUBOUOGPSNBUJPO”VHDPQZJOEE
Olufsen Product, whether such third-party software or equipment is included
with the Bang & Olufsen Product distributed by Bang & Olufsen or otherwise.
Responsibility for the quality, capabilities, operations, performance and
suitability of any such third-party software or equipment rests solely with
the user and the direct vendor, owner or supplier of such third-party software
or equipment. Nothing contained in the user manual or any other document shall
be construed to create an express warranty of any kind with respect to the
Bang & Olufsen Product. No agent, employee, dealer, representative or reseller
is authorized to modify or extend this Warranty or to make binding
representations or claims, whether in advertising, presentations or otherwise,
on behalf of Bang & Olufsen regarding the Bang & Olufsen Products or this
Warranty.
Severability If any portion of this Warranty is held to be illegal or
unenforceable, such partial illegality or unenforceability shall not affect
the enforceability of the remainder of the Warranty.
Consumer’s legal rights This Warranty is provided in addition to the rights
and remedies granted by the seller of the Bang & Olufsen Product or granted
under applicable legislation. Any and all remedies (e.g. rectification, claim
for damages, and/or right to terminate the contract) granted by the seller of
the Bang & Olufsen Product or available by law remain unaffected by this
Warranty.
47
(&/NQPSUBOUOGPSNBUJPO”VHDPQZJOEE
strongly recommends customers to ensure that, if possible, all data is backed
up prior to requesting repair services from Bang & Olufsen. The Warranty will
not operate if the serial number has been defaced or altered or if non-
authorized modifications in the software have been made. In countries with
governmental requirements on specifically developed versions of Bang & Olufsen
products, e.g. due to varying transmission systems and approval demands, and
the defect or malfunction is caused by the usage of other versions than
required in the specific country, this Warranty does not apply. To obtain
information about usage of the Bang & Olufsen Product in several countries,
please contact the legal entity stated on the original invoice for the Bang &
Olufsen Product. All implied warranties, including without limitation, implied
warranties of merchantability and fitness for a particular purpose, are
limited to the duration of this Warranty. In no event shall Bang & Olufsen be
liable for damages in excess of the purchase price of the Bang & Olufsen
Product or for, without limitation, commercial loss of any sort; loss of use,
time, data, reputation, opportunity, goodwill, profits or savings;
inconvenience; incidental, special, consequential or punitive damages; or
damages arising from the use or inability to use the Bang & Olufsen Product.
Bang & Olufsen makes no warranties or representations, express or implied,
statutory or otherwise, as to the quality, capabilities, operations,
performance or suitability of any third-party software or equipment used in
conjunction with the Bang & Olufsen Product, or the ability to integrate any
such software or equipment with the Bang &
46
(&/NQPSUBOUOGPSNBUJPO”VHDPQZJOEE
in other locations not experiencing such external effects. To obtain
information about the functionality of specific purposes, please contact Bang
& Olufsen; ·Defects in consumables (i.e. components that are expected to
require regular replacement such as but not limited to batteries) as well as
defects caused by overcharging; ·Unreasonable costs or expenses related to
modifications or demolitions of the space in which the Bang & Olufsen Product
is placed during the process of repair; and/or ·Costs for cleaning the screen
due to external influences. Defects claimed under the Warranty are rectified
at Bang & Olufsen’s discretion within the rules of the marketing and consumer
law. Rectification is ensured by way of (i) repairing the defective Bang &
Olufsen Product, (ii) inserting remanufactured parts into the Bang & Olufsen
Product, and/or (iii) replacing the Bang & Olufsen Product with a new product
equivalent in performance and reliability to the Bang & Olufsen Product.
Replacement of limited or special edition Bang & Olufsen Products depends on
the availability of the Bang & Olufsen Products in question. Where the Bang &
Olufsen Product cannot be repaired (damage is considered as total loss) and
where exchange is not feasible, compensation is offered on a pro-rata basis of
the purchase price. All exchange modules become property of Bang & Olufsen.
Exclusions and limitations Bang & Olufsen is not liable for the damage or loss
of any programs, data and/or media content during the repair process. Bang &
Olufsen
45
(&/NQPSUBOUOGPSNBUJPO”VHDPQZJOEE
suggestions on proper use and maintenance of Bang & Olufsen Products and its
internal components should always be followed. Thus, this Warranty is
conditioned upon proper use of the Bang & Olufsen Product within the Warranty
Period. The Warranty does not cover:
·Defects which have been caused by wrongful use, incorrect and/or unauthorized
installation, incorrect repairs/modifications, or maladjustment of the Bang &
Olufsen Product, or neglect, including but not limited to “burn in” of plasma
or OLED displays, overdriving of speakers and similar wrongful use;
·Defects resulting from usage of the Bang & Olufsen Product in conjunction
with accessories that are not approved by Bang & Olufsen;
·Defects which have been caused by lightning, fire, water, voltage
fluctuations, improper ventilation or other events of force majeure beyond the
control of Bang & Olufsen;
·Consequential damage, indirect or direct loss or any related expenses claimed
under the Warranty, such as but not limited to loss from inability to operate
the Bang & Olufsen Product or costs connected with rent of substitution
products;
·Software and content provided by third parties or problems occurring due to
modifications made by the software provider;
·Field assistance for problems that can be solved with online software
updates. It is the customer’s responsibility to provide network connection for
these updates;
·Problems occurring with network/wireless connection caused by external
effects present locally only and not impacting functionality
44
(&/NQPSUBOUOGPSNBUJPO”VHDPQZJOEE
General Conditions Genuine Bang & Olufsen products (“Bang & Olufsen Products”)
are covered by this limited warranty (the “Warranty”). The terms of this
Warranty apply to Bang & Olufsen Products purchased in or after November 2019.
To claim any rights under this Warranty, the original invoice received at the
time of purchase of the Bang & Olufsen Product must be presented to Bang &
Olufsen. This Warranty covers all defects (relevant to the specification of
the Bang & Olufsen Product in question) that may arise in the Bang & Olufsen
Product within the warranty period. The warranty period commences upon the
date of purchase by the first consumer purchaser and continues for the
following 36 months after that date (the “Warranty Period”). If a defect
covered by the Warranty arises within the Warranty Period and your Bang &
Olufsen Product is applicable for online return, please make your claim at:
https://www.bang-olufsen.com/support If the online return tool is not
available in your country or if the Bang & Olufsen Product is not applicable
for the tool, please contact the legal entity stated on the original invoice
for the Bang & Olufsen Product.
Coverage Bang & Olufsen warrants that the Bang & Olufsen Product is free from
defects in material and workmanship under normal use and service for the
Warranty Period. Bang & Olufsen Products are products of superior design and
craftsmanship and should be treated with care. Procedures and
43
(&/NQPSUBOUOGPSNBUJPO”VHDPQZJOEE
SV
TH
TR
www.bang-olufsen.com/limited-warranty.
B&O-produkter som marknadsförs av Bang & Olufsen A/S och som köps av en
auktoriserad återförsäljare omfattas av en begränsad garanti. Detaljerad
information om den här begränsade garantins omfattning och dess begränsade
giltighetstid finns på www.bang-olufsen.com/limitedwarranty.
B&O Bang & Olufsen A/S www. bang-olufsen.com/limited-warranty.
Bang & Olufsen A/S tarafindan satia sunulan ve yetkili saticidan alinmi olan
B&O ürünleri sinirli garanti kapsamindadir. Bu sinirli garantinin kapsami ve
sinirli süresi hakkinda ayrintili bilgi için www. bang-olufsen.com/limited-
warranty adresini ziyaret edebilirsiniz.
Bang & Olufsen A/S B O www.bang-olufsen.com/limited-warranty
Bang & Olufsen A/S B&O www. bang-olufsen.com/limited-warranty
42
ZH
(&/NQPSUBOUOGPSNBUJPO”VHDPQZJOEE
PL
PT
garantie. Voor meer informatie over deze beperkte garantie en de beperkte duur
ervan, kunt u terecht op www.bang-olufsen.com/limited-warranty. Produkty B&O
wprowadzane do obrotu przez Bang & Olufsen A/S i zakupione od upowanionego
sprzedawcy s objte ograniczon gwarancj. Szczególowe informacje dotyczce
zakresu oraz czasu trwania ograniczonej gwarancji znajduj si na stronie
www.bangolufsen.com/limited-warranty.
Os produtos B&O comercializados pela Bang & Olufsen A/S e comprados a um
revendedor autorizado estão abrangidos por uma garantia limitada. Para obter
informações detalhadas sobre a cobertura desta garantia limitada e a sua
duração limitada, visite www.bang-olufsen.com/limited-warranty.
Os produtos da B&O são comercializados pela Bang & Olufsen A/S e podem ser
comprados de um revendedor autorizado e são cobertos por garantia limitada.
Para obter informações detalhadas sobre a cobertura desta garantia limitada e
sua duração limitada, visite www. bang-olufsen.com/limited-warranty.
B&O, Bang & Olufsen A/S, , .
41
PT-BR
RU
(&/NQPSUBOUOGPSNBUJPO”VHDPQZJOEE
IT
JA
KO
weboldalon: www.bang-olufsen.com/limited-warranty.
I prodotti B&O commercializzati da Bang & Olufsen A/S e acquistati da un
rivenditore autorizzato sono coperti da garanzia limitata. Per informazioni
più dettagliate relative alla copertura di questa garanzia limitata e alla sua
durata, visitare il sito www.bang-olufsen.com/ limited-warranty.
Bang & Olufsen A/S B&O ( ) www.bangolufsen.com/limited-warranty
Bang & Olufsen A/S B&O . www.bang-olufsen.com/limited-warranty .
Produk B&O yang dipasarkan oleh Bang & Olufsen A/S dan dibeli daripada
peruncit sah adalah dilindungi oleh waranti yang terhad. Untuk butiran lanjut
tentang perlindungan jaminan terhad ini dan tempoh terhadnya sila layari www
.bang-olufsen.com/limitedwarranty.
B &O-producten die op de markt worden gebracht door Bang & Olufsen A/S en
worden gekocht bij een erkende verkoper, vallen onder de beperkte
40
MA
NL
(&/NQPSUBOUOGPSNBUJPO”VHDPQZJOEE
ES
FI
FR
Los productos B&O lanzados al mercados por Bang & Olufsen A/S como tales y
adquiridos de un distribuidor autorizado están cubiertos por una garantía
limitaday. Si desea obtener información detallada acerca de la cobertura que
proporciona esta garantía limitada y su duración, también limitada, visite www
.bang-olufsen.com/limitedwarranty.
Bang & Olufsen A/S -yhtiön markkinoimat ja valtuutetulta jälleenmyyjältä
ostetut tuotteet ovat rajoitetun takuun kattamia. Lisätietoja rajoitetun
takuun soveltamisalasta ja rajoitetusta kestosta on osoitteessa www. bang-
olufsen.com/limited-warranty.
Les produits B&O commercialisés par Bang & Olufsen A/S et achetés auprès d’un
revendeur agréé sont couverts par une garantie limitée. Pour de plus amples
informations sur la couverture qu’apporte cette garantie limitée et sur sa
durée, rendez-vous à l’adresse www.bangolufsen.com/limited-warranty.
Bang & Olufsen B&O . www.bang-olufsen.com/limited-warranty ,
A Bang & Olufsen A/S által hirdetett és hivatalos viszonteladótól megvásárolt
B&O termékekre korlátozott garancia érvényes. Ezen korlátozott jótállás
részleteit és idtartamát lásd a következ
39
HE
HU
(&/NQPSUBOUOGPSNBUJPO”VHDPQZJOEE
AR
DA
DE
Bang & Olufsen B&O .
www.bang-olufsen.com/limited-warranty
B&O-produkter, der markedsføres af Bang & Olufsen A/S og købes hos en
autoriseret forhandler, er dækket af en begrænset garanti. Detaljerede
oplysninger om denne begrænsede garanti og garantiens varighed findes på www
.bang-olufsen.com/limited-warranty.
Für B&O Produkte, die von Bang & Olufsen A/S vertrieben und von einem
autorisierten Händler erworben wurden, gilt die beschränkte Garantie. Weitere
Informationen zu den Garantiebestimmungen finden Sie unter www.bang-
olufsen.com/limited-warranty.
B&O Bang & Olufsen A/S . www.bang-olufsen. com/limited-warranty.
B&O products marketed by Bang & Olufsen A/S and purchased from an authorised
retailer are covered by limited warranty. For detailed information on the
coverage of this limited warranty and its limited duration go to www.bang-
olufsen.com/limited-warranty.
38
EL
EN
(&/NQPSUBOUOGPSNBUJPO”VHDPQZJOEE
Begrænset Garanti Beschränkte Garantie Limited Warranty Garantía Limitada
Rajoitettu Takuu Garantie Limitée Korlátozott Jótállás Garanzia Limitata ()
Jaminan Terhad Beperkte Garantie Ograniczona Gwarancja Garantia Limitada
Begränsad Garanti Sinirli Garanti
37
(&/NQPSUBOUOGPSNBUJPO”VHDPQZJOEE
3rd
36 (&/NQPSUBOUOGPSNBUJPO”VHDPQZJOEE
Mexico
La operación de este equipo está sujeta a las siguientes dos condiciones: (1)
es posible que este equipo o dispositivo no cause interferencia perjudicial y
(2) este equipo o dispositivo debe aceptar cualquier interferencia, incluyendo
la que pueda causar su operación no deseada.
100-240VAC 50/60Hz 90W 10/100 Mbps WLAN IEEE 802.11 a/b/g/n/ac/ax, 2.4GHz and
5GHz Bluetooth, BT LE, BT classic
5.25 – 5.3 5
35
(&/NQPSUBOUOGPSNBUJPO”VHDPQZJOEE
· · · · · · · · · · · · / · · · 40ºC · · ·
34
(&/NQPSUBOUOGPSNBUJPO”VHDPQZJOEE
Beosound 2 3rd Generation
33 (&/NQPSUBOUOGPSNBUJPO”VHDPQZJOEE
UK Frequency range (MHz) 2402~2480MHz 2412~2472 MHz 5150~5725 MHz
Max. Transmit Power (dBm) 20 dBm 20 dBm 20 dBm
UK Compliance Information Hereby. Bang & Olufsen A/S. declares that this
device is in compliance with Radio Equipment Regulations 2017. The full text
of the UK Declaration of Conformity is available at the following internet
address: on.beo.com/declarations
The product complies with the PSTI Act 2022 requirements
UK-Importer Company name: Bang & Olufsen UK Ltd Company address: 7 Albemarle
Street, London, W1S 4HQ, United Kingdom
32
(&/NQPSUBOUOGPSNBUJPO”VHDPQZJOEE
· Não coloque quaisquer objetos sobre o produto. · Não sujeite o produto a
humidade elevada, chuva ou fontes de
calor. · O produto destina-se apenas para uso em espaços interiores,
ambientes residenciais. Utilize num intervalo de temperatura entre 10 e 40°C
(50105°F). · Deixe espaço suficiente em torno do produto para possibilitar
uma ventilação adequada. · Não ligue qualquer um dos produtos incluídos no seu
sistema à tomada elétrica antes de ligar todos os cabos. · Não tente abrir o
produto. Essas operações devem ser efetuadas por pessoal de assistência
técnica qualificado. · O produto só pode ser desligado completamente retirando
a ficha da tomada de parede. · A ficha e o cabo de alimentação fornecidos
foram concebidos especificamente para o produto. Não substitua a ficha e, se o
cabo de alimentação ficar danificado, deve comprar um novo através do seu
revendedor da Bang & Olufsen. · AVISO: Para reduzir o risco de incêndio ou
choque elétrico, não exponha o aparelho a chuva ou humidade. Não exponha o
produto a pingos ou salpicos e não coloque objetos com líquidos (por exemplo,
jarras) sobre o equipamento. Para desligar completamente o equipamento da
alimentação de CA, desligue a ficha da tomada de parede. A tomada de parede
deve estar sempre facilmente acessível.
31
(&/NQPSUBOUOGPSNBUJPO”VHDPQZJOEE
O produto vai ser vendido em todos os membros da União Europeia e países EFTA.
A banda 5.15 ~ 5.35 GHz está restrita para utilização em espaços interiores
apenas nos seguintes países: AT, BE, BG, CZ, DK, EE, FR, DE, IS, IE, IT, EL,
ES, CY, LV, LI, LT, LU, HU, MT, NL, NO, PL, PT, RO, SI, SK, TR, FI, SE, CH,
UK, HR.
Português
Equipamentos elétricos e eletrónicos, peças e pilhas/ baterias assinalados com
este símbolo não devem ser eliminados juntamente com resíduos domésticos
normais, mas sim recolhidos e eliminados separadamente para proteger o meio
ambiente.
O revendedor da Bang & Olufsen fornecer-lhe-á informações sobre a forma
correta de eliminar esses resíduos no seu país.
Importante! · Evite colocar o produto sob luz solar direta ou luz artificial
direta (por exemplo, um holofote). · Certifique-se de que o produto seja
instalado, posicionado e ligado em conformidade com as instruções. · Coloque o
produto numa superfície estável ou numa base na qual pretenda colocar o
produto de forma permanente. Utilize apenas bases e suportes de parede
aprovados pela Bang & Olufsen!
30
(&/NQPSUBOUOGPSNBUJPO”VHDPQZJOEE
Pelo presente, a Bang & Olufsen A/S declara que o tipo equipamento de rádio
Beosound 2 3rd Generation está em conformidade com a Diretiva 2014/53/UE. A
Declaração de Conformidade total pode ser encontrada no site Web seguinte:
on.beo.com/beosound-2-support
Em conformidade com 2014/53/UE, Diretiva relativa aos equipamentos de rádio
(RED) De acordo com o Artigo 10.8(a) e 10.8(b) da RED, a tabela seguinte
fornece informações sobre bandas de frequência utilizadas e a potência de
transmissão RF máxima do produto para venda na UE:
Intervalo de frequência (MHz) Potência máx. de transmissão (dBm)
2402~2480MHz
20 dBm
2412~2472 MHz
20 dBm
5150~5725 MHz
20 dBm
O firmware do produto está disponível para transferir a partir da Bang &
Olufsen App.
29
(&/NQPSUBOUOGPSNBUJPO”VHDPQZJOEE
· Non esporre il prodotto a valori elevati di umidità, a pioggia o a fonti di
calore.
· Il prodotto è inteso solo per un uso in ambienti domestici e privi di
umidità. Utilizzare a temperature comprese tra 10° e 40° C.
· Lasciare spazio sufficiente intorno al prodotto per consentirne una
ventilazione adeguata.
· Non collegare nessuno dei singoli dispositivi dell’impianto alla rete di
alimentazione prima di aver collegato tutti i cavi.
· Non tentare di aprire il prodotto. Queste operazioni sono esclusivamente di
competenza del personale tecnico qualificato.
· Il prodotto può essere spento completamente solo scollegandolo dalla presa a
muro.
· Il cavo dell’alimentazione e la relativaw spina in dotazione sono stati
progettati specificamente per il prodotto. Non sostituire la spina e, se il
cavo dovesse subire danni, è necessario acquistarne uno nuovo da un
rivenditore Bang & Olufsen.
· ATTENZIONE: per evitare il rischio di incendi o scariche elettriche, non
esporre questo apparecchio a pioggia o umidità. Non esporre l’apparecchio a
gocciolii o spruzzi e non collocare oggetti contenenti liquidi, ad esempio
vasi, sopra di esso. Per scollegare completamente l’apparecchio
dall’alimentazione CA, scollegare il cavo dell’alimentazione dalla presa a
muro. Il dispositivo scollegato rimarrà pronto per l’uso.
28
(&/NQPSUBOUOGPSNBUJPO”VHDPQZJOEE
Il presente prodotto viene venduto in tutti i Paesi membri dell’Unione Europea
e AELS.
La banda 5,15~5,35 GHz è limitata all’utilizzo esclusivo in interni nei
seguenti Paesi: AT, BE, BG, CZ, DK, EE, FR, DE, IS, IE, IT, EL, ES, CY, LV,
LI, LT, LU, HU, MT, NL, NO, PL, PT, RO, SI, SK, TR, FI, SE, CH, UK, HR.
Italiano
Apparecchiature elettriche ed elettroniche, parti e batterie, contrassegnate
con questo simbolo non devono essere smaltite con i normali rifiuti domestici,
ma devono essere raccolte e smaltite separatamente per proteggere l’ambiente.
Per informazioni sulla procedura di smaltimento corretta per il proprio Paese,
rivolgersi a un rivenditore Bang & Olufsen.
Importante! · Non esporre il prodotto alla luce del sole o artificiale (ad
esempio un faretto) diretta. · Verificare che il prodotto sia stato
installato, posizionato e collegato in conformità con le istruzioni fornite. ·
Posizionare il prodotto su una superficie stabile o altra collocazione
permanente. Utilizzare solo stand e staffe da parete approvati da Bang &
Olufsen. · Non posare oggetti sopra il prodotto.
27
(&/NQPSUBOUOGPSNBUJPO”VHDPQZJOEE
Con la presente Bang & Olufsen A/S dichiara che l’apparecchiatura radio di
tipo Beosound 2 3rd Generation è conforme alla Direttiva 2014/53/UE. Il testo
completo della Dichiarazione di conformità è reperibile al seguente sito web:
on.beo.com/beosound-2-support
Conformità con la Direttiva 2014/53/UE (RED) Ai sensi degli articoli 10.8(a) e
10.8(b) della Direttiva RED, la seguente tabella fornisce informazioni sulle
bande di frequenza utilizzate e sulla potenza massima di trasmissione in
radiofrequenza del prodotti in vendita nell’UE:
Gamma di frequenza (MHz)
Potenza massima di trasmissione (dBm)
2402~2480MHz
20 dBm
2412~2472 MHz
20 dBm
5150~5725 MHz
20 dBm
Il firmware del prodotto è scaricabile dall’app Bang & Olufsen. 26
(&/NQPSUBOUOGPSNBUJPO”VHDPQZJOEE
· No someta el equipo a niveles elevados de humedad, a la lluvia o a fuentes
de calor.
· Este equipo ha sido diseñado exclusivamente para el uso interior en entornos
domésticos secos. El uso debe tener lugar a una temperatura comprendida entre
10 y 40 °C (50 y 105 °F).
· Mantenga el espacio necesario alrededor del equipo para favorecer su
correcta ventilación.
· No conecte ninguno de los equipos del sistema a la red eléctrica hasta que
haya conectado todos los cables.
· No intente abrir el equipo. Este tipo de operaciones debe ser realizado por
personal técnico cualificado.
· El equipo sólo se puede apagar totalmente desconectando el enchufe de la
toma de suministro eléctrico.
· El enchufe y el cable de alimentación suministrados han sido diseñados
especialmente para este equipo. No cambie el enchufe; si el cable de
alimentación resulta dañado, deberá adquirir otro a través de su distribuidor
de Bang & Olufsen.
· ADVERTENCIA: A fin de reducir el riesgo de incendio o descarga eléctrica, no
exponga este aparato a la lluvia ni a la humedad. No exponga este equipo a
goteos o salpicaduras ni coloque ningún objeto que contenga líquido, como un
jarrón, sobre el mismo. Para desconectar completamente este equipo de la red
eléctrica de corriente alterna, desconecte el enchufe de alimentación de la
toma de suministro eléctrico. El dispositivo de desconexión debe encontrarse
en un lugar fácilmente accesible.
25
(&/NQPSUBOUOGPSNBUJPO”VHDPQZJOEE
El producto a la venta en todos los países miembros de la Unión Europea y de
la EFTA.
La banda de 5,15~5,35 GHz está restringida solo al uso en interiores en los
países siguientes: AT, BE, BG, CZ, DK, EE, FR, DE, IS, IE, IT, EL, ES, CY, LV,
LI, LT, LU, HU, MT, NL, NO, PL, PT, RO, SI, SK, TR, FI, SE, CH, UK, HR.
Español
Los equipos, piezas y baterías de tipo eléctrico y electrónico marcados con
este símbolo no deben eliminarse junto con los residuos domésticos habituales;
en su lugar, deben ser recogidos y eliminados de forma independiente para
proteger el medioambiente.
Su distribuidor de Bang & Olufsen le asesorará acerca de los pasos a seguir en
su país para realizar la eliminación de forma correcta.
Importante · Evite colocar el equipo en un lugar expuesto a la luz solar
directa o a luz artificial directa, como la generada por un foco halógeno. ·
Asegúrese de que el equipo permanezca instalado, situado y conectado de
acuerdo con las instrucciones. · Coloque el equipo sobre una superficie firme
o en un soporte apto para su instalación permanente. Use exclusivamente
soportes de pie y de pared homologados por Bang & Olufsen. · No coloque ningún
objeto sobre el equipo.
24
(&/NQPSUBOUOGPSNBUJPO”VHDPQZJOEE
Por la presente, Bang & Olufsen A/S declara que el tipo de equipo de radio
Beosound 2 3rd Generation cumple la directiva 2014/53/EU. Se puede consultar
la declaración de conformidad completa en el sitio web siguiente: on.
beo.com/beosound-2-support
Conformidad con la directiva 2014/53/EU sobre la comercialización de equipos
radioeléctricos (RED) Conforme a los artículos 10.8(a) y 10.8(b) de la RED, la
tabla siguiente proporciona información sobre las bandas de frecuencias
utilizadas y la potencia de RF transmitida máxima del producto a la venta en
la UE.
Intervalo de frecuencias (MHz) Potencia transmitida máxima (dBm)
2402~2480MHz
20 dBm
2412~2472 MHz
20 dBm
5150~5725 MHz
20 dBm
El firmware del producto está disponible para descargar desde la Bang &
Olufsen App.
23
(&/NQPSUBOUOGPSNBUJPO”VHDPQZJOEE
· Laisser suffisamment d’espace autour de l’appareil pour une ventilation
appropriée.
· Ne relier aucun élément de l’installation au secteur avant d’avoir branché
tous les câbles.
· Ne pas tenter d’ouvrir le boîtier de l’appareil. Les opérations de ce type
doivent être confiées à du personnel de maintenance qualifié.
· Pour éteindre complètement l’appareil, la seule possibilité est de
débrancher la prise murale.
· Le câble secteur et la fiche fournis sont spécialement conçus pour cet
appareil. Ne pas changer la fiche. Si le câble secteur est endommagé, en
acheter un autre auprès de votre revendeur Bang & Olufsen.
· AVERTISSEMENT : afin de réduire le risque d’incendie ou d’électrocution, ne
pas exposer cet appareil à la pluie ou à l’humidité. Ne pas exposer l’appareil
à l’écoulement de liquides et aux éclaboussures et s’assurer qu’aucun objet
rempli de liquide, par exemple un vase, n’est placé sur l’appareil. Pour
déconnecter complètement l’appareil du secteur, débrancher le cordon
d’alimentation de la prise secteur. L’appareil débranché reste prêt à
l’emploi.
22
(&/NQPSUBOUOGPSNBUJPO”VHDPQZJOEE
Français
Il n’est pas permis de jeter les équipements, les pièces électriques et
électroniques et les batteries portant ce symbole avec les ordures ménagères ;
ces équipements doivent être collectés et mis au rebut séparément afin de
préserver l’environnement.
Votre revendeur Bang & Olufsen se fera un plaisir de vous conseiller sur la
procédure correcte de mise au rebut dans votre pays.
Important ! · Eviter d’exposer directement l’appareil au soleil ou à la
lumière artificielle (spots, etc.). · Vérifier que l’appareil est installé,
positionné et connecté conformément aux instructions. · Poser l’appareil sur
une surface ferme, de préférence sur une table, un buffet ou un pied, où il
restera en permanence. · N’utiliser que les pieds et les supports muraux
agréés par Bang & Olufsen ! · Ne poser aucun objet sur l’appareil. · Ne pas
exposer l’appareil à un taux d’humidité élevé, à la pluie ou à une source de
chaleur. · Cet appareil est uniquement conçu pour être utilisé à l’intérieur,
dans un lieu sec. Plage de températures acceptable : 10 à 40 °C.
21
(&/NQPSUBOUOGPSNBUJPO”VHDPQZJOEE
Conformité à la directive sur les équipements radio 2014/53/EU (RED)
Conformément à l’article 10.8(a) et 10.8(b) de RED, le tableau suivant fournit
des informations sur les bandes de fréquences utilisées et la puissance de
transmission RF maximale du produit à vendre dans l’UE :
Gamme de fréquences (MHz)
Puissance de transmission max. (dBm)
2402~2480MHz
20 dBm
2412~2472 MHz
20 dBm
5150~5725 MHz
20 dBm
Le firmware du produit est disponible pour téléchargement à partir de Bang &
Olufsen App.
Le produit à vendre dans tous les pays membres de l’Union européenne et de
l’AELE.
La bande 5,15~5,35 GHz est limitée aux opérations intérieures dans les pays
suivants seulement : AT, BE, BG, CZ, DK, EE, FR, DE, IS, IE, IT, EL, ES, CY,
LV, LI, LT, LU, HU, MT, NL, NO, PL, PT, RO, SI, SK, TR, FI, SE, CH, UK, HR.
20
(&/NQPSUBOUOGPSNBUJPO”VHDPQZJOEE
· Schließen Sie keines der Geräte in Ihrem System an das Netz an, bevor Sie
alle anderen Kabel angeschlossen haben.
· Versuchen Sie nicht, das Gerät zu öffnen. Überlassen Sie dies qualifiziertem
Servicepersonal.
· Das Gerät kann nur durch Netztrennung vollständig ausgeschaltet werden.
· Das mitgelieferte Netzkabel samt Stecker wurde speziell für dieses Produkt
entwickelt. Tauschen Sie den Stecker nicht aus. Wenn das Netzkabel beschädigt
wird, müssen Sie bei Ihrem Bang & Olufsen Fachhändler ein neues anfordern.
· ACHTUNG: Um Feuer oder elektrische Schläge zu vermeiden, darf dieses Gerät
weder Regen noch Feuchtigkeit ausgesetzt werden. Setzen Sie dieses Gerät
keinem Tropf- bzw. Spritzwasser aus und stellen Sie keine mit Flüssigkeiten
gefüllten Objekte wie z. B. Vasen darauf ab. Um das Gerät vollständig vom Netz
zu trennen, ziehen Sie den Netzstecker aus der Steckdose. Die Steckdose sollte
frei zugänglich bleiben.
Par la présente, Bang & Olufsen A/S déclare que l’équipement radio de type
Beosound 2 3rd Generation est conforme à la directive 2014/53/EU. La
Déclaration de Conformité complète se trouve sur le site Web suivant :
on.beo.com/beosound-2-support
19
(&/NQPSUBOUOGPSNBUJPO”VHDPQZJOEE
Deutsch
Mit diesem Symbol gekennzeichnete elektrische und elektronische Geräte,
Bauteile und Batterien dürfen nicht in den normalen Haushaltsmüll gegeben,
sondern müssen zum Schutz der Umwelt sämtlich getrennt eingesammelt und
entsorgt werden. Ihr Bang & Olufsen Fachhändler berät Sie bei der
sachgerechten Entsorgung in Ihrem Land.
Wichtiger Hinweis: · Stellen Sie das Gerät nicht in direktem Sonnenlicht oder
nahe an direkten künstlichen Lichtquellen wie Spots auf. · Achten Sie darauf,
dass das Gerät entsprechend diesen Hinweisen platziert, angeschlossen und
eingestellt wird. · Stellen Sie das Gerät auf einer festen Oberfläche oder
einem soliden Standfuß an dem Ort auf, wo es auf Dauer verbleiben soll.
Benutzen Sie nur von Bang & Olufsen zugelassene Standfüße und Wandhalterungen!
· Stellen Sie keine Gegenstände auf das Gerät. · Setzen Sie das Gerät nicht
hoher Feuchtigkeit, Regen und Wärmequellen aus. · Das Gerät ist ausschließlich
für den Gebrauch in trockenen Wohnräumen vorgesehen. Die zulässige
Umgebungstemperatur im Betrieb beträgt zwischen 10 und 40 °C. · Lassen Sie um
das Gerät stets genug Platz für ausreichende Lüftung.
18
(&/NQPSUBOUOGPSNBUJPO”VHDPQZJOEE
und zur maximalen Funkfrequenz-Sendeleistung des Produkts, das in der EU
vertrieben wird:
Frequenzbereich (MHz)
Max. Sendeleistung (dBm)
2402~2480MHz
20 dBm
2412~2472 MHz
20 dBm
5150~5725 MHz
20 dBm
Die Produkt-Firmware steht über die Bang & Olufsen App zum Download bereit.
Das Produkt wird in allen Mitgliedsstaaten der Europäischen Union und in den
EFTA-Staaten vertrieben.
Das Frequenzband von 5,15~5,35 GHz ist in den folgenden Ländern auf Innenräume
beschränkt: AT, BE, BG, CZ, DK, EE, FR, DE, IS, IE, IT, EL, ES, CY, LV, LI,
LT, LU, HU, MT, NL, NO, PL, PT, RO, SI, SK, TR, FI, SE, CH, UK, HR
17
(&/NQPSUBOUOGPSNBUJPO”VHDPQZJOEE
· Slut ikke nogen af produkterne i dit system til lysnettet, før du har
tilsluttet alle kablerne.
· Forsøg aldrig at åbne produktet. Produktet må kun åbnes af uddannede
serviceteknikere.
· Produktet kan kun slukkes helt ved at tage stikket ud af stikkontakten. ·
Den medfølgende netledning og stikket på den er specielt
designet til dette produkt. Stikket må ikke ændres, og hvis netledningen
bliver beskadiget, skal du købe en ny hos din Bang & Olufsen forhandler. ·
ADVARSEL: For at reducere risikoen for brand og elektrisk stød må dette
produkt ikke udsættes for regn eller fugt. Produktet må heller ikke udsættes
for dryp eller stænk, og der må ikke placeres genstande fyldt med væske,
f.eks. vaser, på udstyret. Tag stikket ud af stikkontakten for helt at afbryde
strømmen til produktet. Afbryderen skal altid være nem at komme til.
Hiermit erklärt Bang & Olufsen A/S, dass das Radiogerät vom Typ Beosound 2 3rd
Generation die Richtlinie 2014/53/EU erfüllt. Die vollständige
Konformitätserklärung ist auf der folgenden Website erhältlich:
on.beo.com/beosound-2-support
Erfüllt die Funkgeräterichtlinie 2014/53/EU (RED) In Übereinstimmung mit
Artikel 10.8(a) und 10.8(b) der RED bietet die folgende Tabelle Informationen
zu den verwendeten Frequenzbändern
16
(&/NQPSUBOUOGPSNBUJPO”VHDPQZJOEE
Båndet 5,15~5,35 GHz er begrænset til indendørsbrug i følgende lande: AT, BE,
BG, CZ, DK, EE, FR, DE, IS, IE, IT, EL, ES, CY, LV, LI, LT, LU, HU, MT, NL,
NO, PL, PT, RO, SI, SK, TR, FI, SE, CH, UK, HR.
Dansk
Elektrisk og elektronisk udstyr, reservedele og batterier,
Vigtigt! · Anbring ikke produktet i direkte sollys eller direkte under kunstig
belysning, f.eks. en spot. · Sørg for, at produktet sættes op, placeres og
tilsluttes i overensstemmelse med instruktionerne. · Placer produktet på en
solid overflade eller stand, hvor du ønsker, det skal blive stående. Brug kun
stande og vægbeslag, der er godkendt af Bang & Olufsen. · Anbring ikke
genstande oven på produktet. · Udsæt ikke produktet for høj luftfugtighed,
regn eller varme. · Produktet er udelukkende beregnet til indendørsanvendelse
under tørre forhold inden for et temperaturområde på 10-40 ºC. · Sørg for, at
der er plads nok omkring produktet til at sikre tilstrækkelig ventilation.
15
(&/NQPSUBOUOGPSNBUJPO”VHDPQZJOEE
Bang & Olufsen A/S erklærer hermed, at radioudstyret type Beosound 2 3rd
Generation er i overensstemmelse med direktiv 2014/53/EU. Den fuldstændige
overensstemmelseserklæring fremgår af følgende side:
on.beo.com/beosound-2-support
I overensstemmelse med radioudstyrsdirektivet 2014/53/EU (RED) I
overensstemmelse med paragraf 10.8(a) og 10.8(b) tilhørende RED følgende
tabel indeholder oplysninger om de benyttede frekvensområder og den maksimale
RF-sendeeffekt for produktet, når det sælges i EU:
Frekvensområde (MHz)
Maks. sendeeffekt (dBm)
2402~2480MHz
20 dBm
2412~2472 MHz
20 dBm
5150~5725 MHz
20 dBm
Produktets firmware er tilgængeligt til download fra appen Bang & Olufsen.
Produktet markedsføres til salg i alle EU-medlemsstater og EFTA-lande.
14
(&/NQPSUBOUOGPSNBUJPO”VHDPQZJOEE
RSS-102 statement · English: This equipment complies with Industry Canada
radiation exposure limits set forth for an uncontrolled environment. · French:
Cet équipement est conforme à l’exposition aux rayonnements Industry Canada
limites établies pour un environnement non contrôlé.
Model: Beosound 2 3rd Generation Product Name: Wireless Speaker
Bang & Olufsen A/S Phone number: +45 96841122 www.bang-olufsen.com
Japan
North America 5.15~5.25 GHz band operations in the 5.15~5.25 GHz band are
restricted to indoor ues only.
This equipment is a Class II or double insulated electrical appliance. It has
been designed in such a way that it does not require a safety connection to
electrical earth.
13
(&/NQPSUBOUOGPSNBUJPO”VHDPQZJOEE
FCC RADIATION EXPOSURE STATEMENT This device complies with FCC radiation
exposure limits set forth for an uncontrolled environment. This device should
be Installed and operated with minimum distance 20cm between the radiator &
your body.
CAN ICES-3 (B)/NMB-3(B) IC warning
· English: This device contains licence-exempt transmitter(s)/receiver(s) that
comply with Innovation, Science and Economic Development Canada’s licence-
exempt RSS(s). Operation is subject to the following two conditions: a) this
device may not cause interference, and b) this device must accept any
interference, including interference that may cause undesired operation of the
device.
· French: Cet appareil contient des émetteurs / récepteurs exemptés de licence
conformes aux RSS (RSS) d’Innovation, Sciences et Développement économique
Canada. L’exploitation est autorisée aux deux conditions suivantes : a)
l’appareil ne doit pas produire de brouillage, et b) l ‘utilisateur de
l’appareil doit accepter tout brouillage radioélectrique subi, même si le
brouillage est susceptible d’en compromettre le fonctionnement.”
12
(&/NQPSUBOUOGPSNBUJPO”VHDPQZJOEE
no guarantee that interference will not occur in a particular installation. If
this equipment does cause harmful interference to radio or television
reception, which can be determined by turning the equipment off and on, the
user is encouraged to try to correct the interference by one or more of the
following measures:
· Reorient or relocate the receiving antenna. · Increase the separation
between the equipment and receiver. · Connect the equipment into an outlet on
a circuit different from
that to which the receiver is connected. · Consult the dealer or an
experienced radio/TV technician for help.
Supplier’s Declaration of Conformity 47 CFR § 2.1077 Compliance Information
Unique Identifier: Beosound 2 3rd Generation Responsible Party – U.S. Contact
Information
Bang & Olufsen America Inc. Street Address: 79 Walker Street. 4th Floor City,
State: New York City, New York Zip Code: 10013 Telephone number or internet
contact information: +1 917 810 5557
11
(&/NQPSUBOUOGPSNBUJPO”VHDPQZJOEE
· WARNING: To reduce the risk of fire or electric shock, do not expose this
appliance to rain or moisture. Do not expose this product to dripping or
splashing and ensure that no objects filled with liquids, such as vases, are
placed on the equipment. To completely disconnect this equipment from the AC
Mains, disconnect the mains plug from the wall socket. The wall socket must
always be easily accessible.
Fcc statement · This device complies with Part 15 of the FCC Rules. Operation
is subject to the following two conditions: a) This device may not cause
harmful interference, and b) This device must accept any interference
received, including interference that may cause undesired operation.
· Changes or modifications not expressly approved by the party responsible for
compliance could void the user’s authority to operate the equipment.
NOTE: This equipment has been tested and found to comply with the limits for a
Class B digital device, pursuant to Part 15 of the FCC Rules. These limits are
designed to provide reasonable protection against harmful interference in a
residential installation.
This equipment generates uses and can radiate radio frequency energy and, if
not installed and used in accordance with the instructions, may cause harmful
interference to radio communications. However, there is
10
(&/NQPSUBOUOGPSNBUJPO”VHDPQZJOEE
Important! · Avoid placing the product in direct sunlight or direct artificial
light, such as a spotlight. · Make sure that the product is set up, placed and
connected in accordance with the instructions. · Place your product on a firm
surface or stand where you want it placed permanently. Use Bang & Olufsen
approved stands and wall brackets only! · Do not place any items on top of
your product. · Do not subject the product to high humidity, rain or sources
of heat. · The product is intended for indoor use in dry, domestic
environments only. Use within a temperature range of 10 40°C (50105°F). ·
Leave enough space around the product for adequate ventilation. · Do not
connect any of the products in your system to the mains until you have
connected all the cables. · Do not attempt to open the product. Leave such
operations to qualified service personnel. · The product can only be switched
off completely by disconnecting it from the wall socket. · The supplied plug
and mains cord are specially designed for the product. Do not change the plug
and if the mains cord is damaged, you must buy a new one from your Bang &
Olufsen retailer.
9
(&/NQPSUBOUOGPSNBUJPO”VHDPQZJOEE
Frequency range (MHz) 2402~2480MHz 2412~2472 MHz 5150~5725 MHz
Max. Transmit Power (dBm) 20 dBm 20 dBm 20 dBm
The product firmware is available for download from the Bang & Olufsen App.
The product to be sold in all European Union member and EFTA countries.
5.15~5.35 GHz band is restricted to indoor operations only in the following
countries: AT, BE, BG, CZ, DK, EE, FR, DE, IS, IE, IT, EL, ES, CY, LV, LI, LT,
LU, HU, MT, NL, NO, PL, PT, RO, SI, SK, TR, FI, SE, CH, UK, HR.
WEEE
English
Electrical and electronic equipment, parts and batteries marked with this
symbol must not be disposed of with normal household wastage, it must be
collected and disposed of separately to protect the environment.
Your Bang & Olufsen retailer will advise you of the correct way of disposal in
your country.
8
(&/NQPSUBOUOGPSNBUJPO”VHDPQZJOEE
The product can only be switched off completely by disconnecting it from the
mains socket. The mains socket must always be accessible.
No naked flame sources, such as lighted candles should be placed on the
product.
Follow instructions to ensure correct and safe installation and
interconnection of equipment in multimedia systems.
Make sure the cable connection between the product and the router does not
exit the building to avoid contact with high voltage.
CAUTION
To prevent electric shock hazard, do not connect to mains power supply while
grille is removed. Hereby, Bang & Olufsen A/S declares that the radio
equipment type Beosound 2 3rd Generation is in compliance with Directive
2014/53/EU. The full Declaration of Conformity can be found at the following
web site: on.beo.com/beosound-2-support
Compliance with 2014/53/EU Radio Equipment Directive (RED) In accordance with
Article 10.8(a) and 10.8(b) of the RED, the following table provides
information on the frequency bands used and the maximum RF transmit power of
the product for sale in the EU:
7
(&/NQPSUBOUOGPSNBUJPO”VHDPQZJOEE
use caution when moving the cart/apparatus combination to avoid injury from
tip-over. · Unplug this apparatus during lightning storms or when unused for
long periods of time. · Refer all servicing to qualified service personnel.
Servicing is required when the apparatus has been damaged in any way, such as
power-supply cord or plug is damaged, liquid has been spilled or objects have
fallen into the apparatus, the apparatus has been exposed to rain or moisture,
does not operate normally, or has been dropped. · WARNING: To reduce the risk
of fire or electric shock, do not expose this appliance to rain or moisture.
Do not expose this equipment to dripping or splashing and ensure that no
objects filled with liquids, such as vases, are placed on the equipment.
The lightning flash with arrowhead symbol within an equilateral triangle, is
intended to alert the user to the presence of uninsulated “dangerous voltage”
within the product’s enclosure that may be of sufficient magnitude to
constitute a risk of electric shock to persons.
The exclamation point within an equilateral triangle is intended to alert the
user to the presence of important operating and maintenance (servicing)
instructions in the literature accompanying the product.
6
(&/NQPSUBOUOGPSNBUJPO”VHDPQZJOEE
Important safety instructions · Read these instructions. · Keep these
instructions. · Heed all warnings. · Follow all instructions. · Do not use
this apparatus near water. · Clean only with dry cloth. · Do not block any
ventilation openings. Install in accordance with the manufacturer’s
instructions. · Do not install near any heat sources such as radiators, heat
registers, stoves, or other apparatus (including amplifiers) that produce
heat. · Do not defeat the safety purpose of the polarized or groundingtype
plug. A polarized plug has two blades with one wider than the other. A
grounding type plug has two blades and a third grounding prong. The wide blade
or the third prong are provided for your safety. If the provided plug does not
fit into your outlet, consult an electrician for replacement of the obsolete
outlet. · Protect the power cord from being walked on or pinched particularly
at plugs, convenience receptacles, and the point where they exit from the
apparatus. · Only use attachments/accessories specified by the manufacturer. ·
Use only with the cart, stand, tripod, bracket, or table specified by the
manufacturer, or sold with the apparatus. When a cart is used,
5
(&/NQPSUBOUOGPSNBUJPO”VHDPQZJOEE
Model: BeoSound 2 3rd generation
4 (&/NQPSUBOUOGPSNBUJPO”VHDPQZJOEE
For additional information, see (link provides content with regulatory
conformance guidelines): Se yderligere oplysninger på: Mer information finns
på: Lisätietoja saat seuraavista osoitteista: Für weitere Informationen,
siehe: Pour plus d’informations, visitez (lien fournit du contenu aux
directives de conformité réglementaires): Si desea obtener más información,
visite el sitio web: Per ulteriori informazioni, vedere: Voor meer informatie,
zie: Para obter mais informações, consulte: , : . : : : .
https://www.bang-olufsen.com/support
3
(&/NQPSUBOUOGPSNBUJPO”VHDPQZJOEE
(&/NQPSUBOUOGPSNBUJPO”VHDPQZJOEE
Beosound 2 3rd Generation
Vigtigt Wichtiger Hinweis Important Importante Tärkeää Important Importante
Belangrijk Importante ! Viktigt
(&/NQPSUBOUOGPSNBUJPO”VHDPQZJOEE
References
- Market
- AR App and Bang & Olufsen App — Choose and use B&O products
- Beosound 2 3rd Gen – Bang & Olufsen Support
- Contact us – Bang & Olufsen Support
- Spotify — Connect
- Bang & Olufsen — High-end Headphones, Speakers, and Televisions
- Bang & Olufsen — High-end Headphones, Speakers, and Televisions
- Spotify — Connect
- Bang & Olufsen Support
Read User Manual Online (PDF format)
Read User Manual Online (PDF format) >>
Download This Manual (PDF format)
Download this manual >>
Bang & Olufsen BeoSound 2 MP3 Player PDF User Guides and Manuals for Free Download: Found (5) Manuals for Bang & Olufsen BeoSound 2 Device Model (Manual , Operation & User’s Manual)
The Bang & Olufsen BeoSound 2 is a stunning representation of premium audio engineering. As a product from a brand that has consistently pushed the boundaries of sound quality and design, the BeoSound 2 stands out not only for its exceptional acoustic performance but also for its striking aesthetics. With its elegant form and innovative technology, it promises to deliver a captivating listening experience that is both immersive and sophisticated.
One of the most remarkable features of the BeoSound 2 is its design. Crafted with a sleek aluminum body and available in multiple finishes, it easily complements any modern decor. The crafted shape, reminiscent of a conical form, allows for 360-degree sound dispersion, making it ideal for various room setups. The minimalist approach to design reflects the philosophy of Bang & Olufsen, combining functionality with beauty.
When it comes to sound quality, the Bang & Olufsen BeoSound 2 does not disappoint. Equipped with high-fidelity speakers and a powerful amplifier, this speaker produces a rich and balanced sound profile. Whether you’re listening to music, podcasts, or audiobooks, the clarity and depth of the audio are truly impressive. Highlights include:
- Impressive Bass Response: The BeoSound 2 delivers deep and resonant bass without distortion, enhancing the overall listening experience.
- Wide Sound Stage: The 360-degree sound offers immersive audio that fills the entire room, making it perfect for gatherings.
- Customizable Sound Profiles: Users can tailor their listening experience through the Bang & Olufsen app, adjusting settings to their preferences.
The connectivity options of the BeoSound 2 further enhance its versatility. With options for Bluetooth, Wi-Fi, and even a wired connection, you can easily connect it to a variety of devices. The integration with streaming services like Spotify and Apple Music allows seamless playback, making it perfect for everyday use. Additionally, the speaker supports voice assistance, providing hands-free control for a more convenient experience.
Battery life is another strong point for the Bang & Olufsen BeoSound 2. With an impressive rechargeable battery, it offers up to 15 hours of playtime on a single charge, making it suitable for both indoor and outdoor usage. Whether you’re hosting a garden party or relaxing at home, this speaker is ready to go wherever you need it.
However, it’s worth noting that with premium products like the BeoSound 2, you can expect a premium price point. While it may not be the most budget-friendly option on the market, the investment is justified by its exceptional sound quality and elegant design that elevates any space.
In conclusion, the Bang & Olufsen BeoSound 2 is a superb choice for audiophiles and design enthusiasts alike. With its blend of cutting-edge technology, refined aesthetics, and superior sound quality, it enriches your listening experience. If you’re in the market for a high-end portable speaker that is as beautiful as it is functional, the BeoSound 2 should definitely be at the top of your list.