

uniFLOW Login Device Client Guide
uniFLOW Login Device Client Guide
Please read this guide before operating this product.
After you finish reading this guide, store it in a safe place for future reference.
Lisez ce guide avant d’utiliser ce produit.
Après avoir pris connaissance de son contenu, conservez-le dans un endroit sûr pour pouvoir le
consulter en cas de besoin.
Bitte lesen Sie dieses Handbuch, bevor Sie mit dem Produkt arbeiten.
Nachdem Sie das Handbuch gelesen haben, bewahren Sie es zum Nachschlagen an einem sicheren Ort auf.
Leggere questa guida prima di iniziare ad utilizzare il prodotto.
Terminata la lettura, conservare la guida in un luogo sicuro per eventuali consultazioni.
Por favor, lea esta guía antes de usar este producto.
Después de leer esta guía, guárdela en un lugar seguro para posteriores consultas.

English
imageRUNNER
1133/1133A/1133iF
uniFLOW Login Device
Client Guide

English
To view the manual in PDF format, Adobe Reader/Adobe Acrobat Reader is required. If Adobe Reader/Adobe Acrobat Reader is not installed on your
system, please download it from the Adobe Systems Incorporated website.
Considerable effort has been made to ensure that this manual is free of inaccuracies and omissions. However, as we are constantly improving our
products, if you need an exact specification, please contact Canon.

Contents
English
Preface . . . . . . . . . . . . . . . . . . . . . . . . . . . . . . . . . . . . . . . . . . . . . . . . . . . . . . EN-iv
How to Use This Manual . . . . . . . . . . . . . . . . . . . . . . . . . . . . . . . . . . . . . . . . EN-iv
Symbols Used in This Manual . . . . . . . . . . . . . . . . . . . . . . . . . . . . . . . . . . .EN-iv
Keys Used in This Manual . . . . . . . . . . . . . . . . . . . . . . . . . . . . . . . . . . . . . .EN-iv
Displays Used in This Manual . . . . . . . . . . . . . . . . . . . . . . . . . . . . . . . . . . . EN-v
Trademarks . . . . . . . . . . . . . . . . . . . . . . . . . . . . . . . . . . . . . . . . . . . . . . . . . EN-v
Legal Notices . . . . . . . . . . . . . . . . . . . . . . . . . . . . . . . . . . . . . . . . . . . . . . . . . EN-vi
Copyright . . . . . . . . . . . . . . . . . . . . . . . . . . . . . . . . . . . . . . . . . . . . . . . . . . .EN-vi
Disclaimers. . . . . . . . . . . . . . . . . . . . . . . . . . . . . . . . . . . . . . . . . . . . . . . . . .EN-vi
Managing the Machine with the uniFLOW Integration. . . . . . . . . . . . . . . . . EN-1
What You Can Do with the uniFLOW Integration. . . . . . . . . . . . . . . . . . . . . EN-2
uniFLOW Server-based Authentication Modes and Log-in Methods. . . EN-2
Login and Document Release . . . . . . . . . . . . . . . . . . . . . . . . . . . . . . . . EN-2
Using Cost Centers . . . . . . . . . . . . . . . . . . . . . . . . . . . . . . . . . . . . . . . . EN-2
Activation and Settings of the uniFLOW Integration . . . . . . . . . . . . . . . . . . EN-3
System Environment. . . . . . . . . . . . . . . . . . . . . . . . . . . . . . . . . . . . . . . . EN-3
Settings of the uniFLOW Integration. . . . . . . . . . . . . . . . . . . . . . . . . . . . EN-3
Authentication Modes by the uniFLOW Integration . . . . . . . . . . . . . . . . . . . EN-3
Authentication to the Machine . . . . . . . . . . . . . . . . . . . . . . . . . . . . . . . . EN-3
Authentication to the Login and Document Release Function . . . . . . . . EN-3
Log-in Methods by the uniFLOW Integration . . . . . . . . . . . . . . . . . . . . . . . . EN-4
User ID and Password . . . . . . . . . . . . . . . . . . . . . . . . . . . . . . . . . . . . . . EN-4
PIN Code . . . . . . . . . . . . . . . . . . . . . . . . . . . . . . . . . . . . . . . . . . . . . . . . EN-4
ID Card . . . . . . . . . . . . . . . . . . . . . . . . . . . . . . . . . . . . . . . . . . . . . . . . . . EN-4
Department ID and PIN . . . . . . . . . . . . . . . . . . . . . . . . . . . . . . . . . . . . . EN-4
Settings of Department ID Management for the uniFLOW Integration . . . . EN-5
Operating the Machine As the System Manager . . . . . . . . . . . . . . . . . . . . . EN-6
Resetting the IP Address of the Machine. . . . . . . . . . . . . . . . . . . . . . . . . . . EN-7
Logging in to the Machine . . . . . . . . . . . . . . . . . . . . . . . . . . . . . . . . . . . . . . . EN-8
Entering a User ID and Password . . . . . . . . . . . . . . . . . . . . . . . . . . . . . . . . EN-8
Entering a PIN Code . . . . . . . . . . . . . . . . . . . . . . . . . . . . . . . . . . . . . . . . . EN-10
Using the ID Card. . . . . . . . . . . . . . . . . . . . . . . . . . . . . . . . . . . . . . . . . . . . EN-12
Entering a Department ID and PIN . . . . . . . . . . . . . . . . . . . . . . . . . . . . . . EN-13
Keeping Documents Unprinted Until Logging-In
(Login and Document Release) . . . . . . . . . . . . . . . . . . . . . . . . . . . . . . . . . . EN-15
To log in to the machine first and print your documents: . . . . . . . . . . . EN-15
To log in to the Login and Document Release function:. . . . . . . . . . . . EN-18
EN-iii
Preface
Thank you for purchasing the Canon imageRUNNER 1133/1133A/1133iF. Please read this
manual thoroughly before operating the machine to familiarize yourself with its capabilities,
and to make the most of its many functions. After reading this manual, store it in a safe place
for future reference.
How to Use This Manual
Symbols Used in This Manual
The following symbols are used in this manual to explain procedures, restrictions,
handling precautions, and instructions that should be observed for safety.
English
IMPORTANT
NOTE
Indicates operational requirements and restrictions. Be sure to read
these items carefully to operate the machine correctly, and avoid
damage to the machine or property.
Indicates a clarification of an operation, or contains additional
explanations for a procedure. Reading these notes is highly
recommended.
Keys Used in This Manual
The following table provides a few examples of how keys on the operation panel to
be pressed are expressed in this manual:
Keys Example
[Key icon] + (Key Name) [ ] (Menu)
[Key Name] [OK]
[Key Icon] [ ], [ ], etc.
EN-iv

English
Displays Used in This Manual
Screen shots used in this manual may differ from actual displays depending on the
machine configuration.
Trademarks
uniFLOW and MiCard® are registered trademarks of NT-ware
Systemprogrammierung GmbH.
Other product and company names herein may be the trademarks of their
respective owners.
EN-v

Legal Notices
Copyright
Copyright 2013 Canon Inc. All rights reserved.
No part of this publication may be reproduced or transmitted in any form or by any
means, electronic or mechanical, including photocopying and recording, or by any
information storage or retrieval system without the prior written permission of
Canon Inc.
Disclaimers
The information in this document is subject to change without notice.
CANON INC. MAKES NO WARRANTY OF ANY KIND WITH REGARD TO THIS
MATERIAL, EITHER EXPRESS OR IMPLIED, EXCEPT AS PROVIDED HEREIN,
INCLUDING WITHOUT LIMITATION, THEREOF, WARRANTIES AS TO
MARKETABILITY, MERCHANTABILITY, FITNESS FOR A PARTICULAR
PURPOSE OR USE OR NON-INFRINGEMENT. CANON INC. SHALL NOT BE
LIABLE FOR ANY DIRECT, INCIDENTAL, OR CONSEQUENTIAL DAMAGES OF
ANY NATURE, OR LOSSES OR EXPENSES RESULTING FROM THE USE OF
THIS MATERIAL.
English
EN-vi
Managing the Machine with the uniFLOW Integration
English
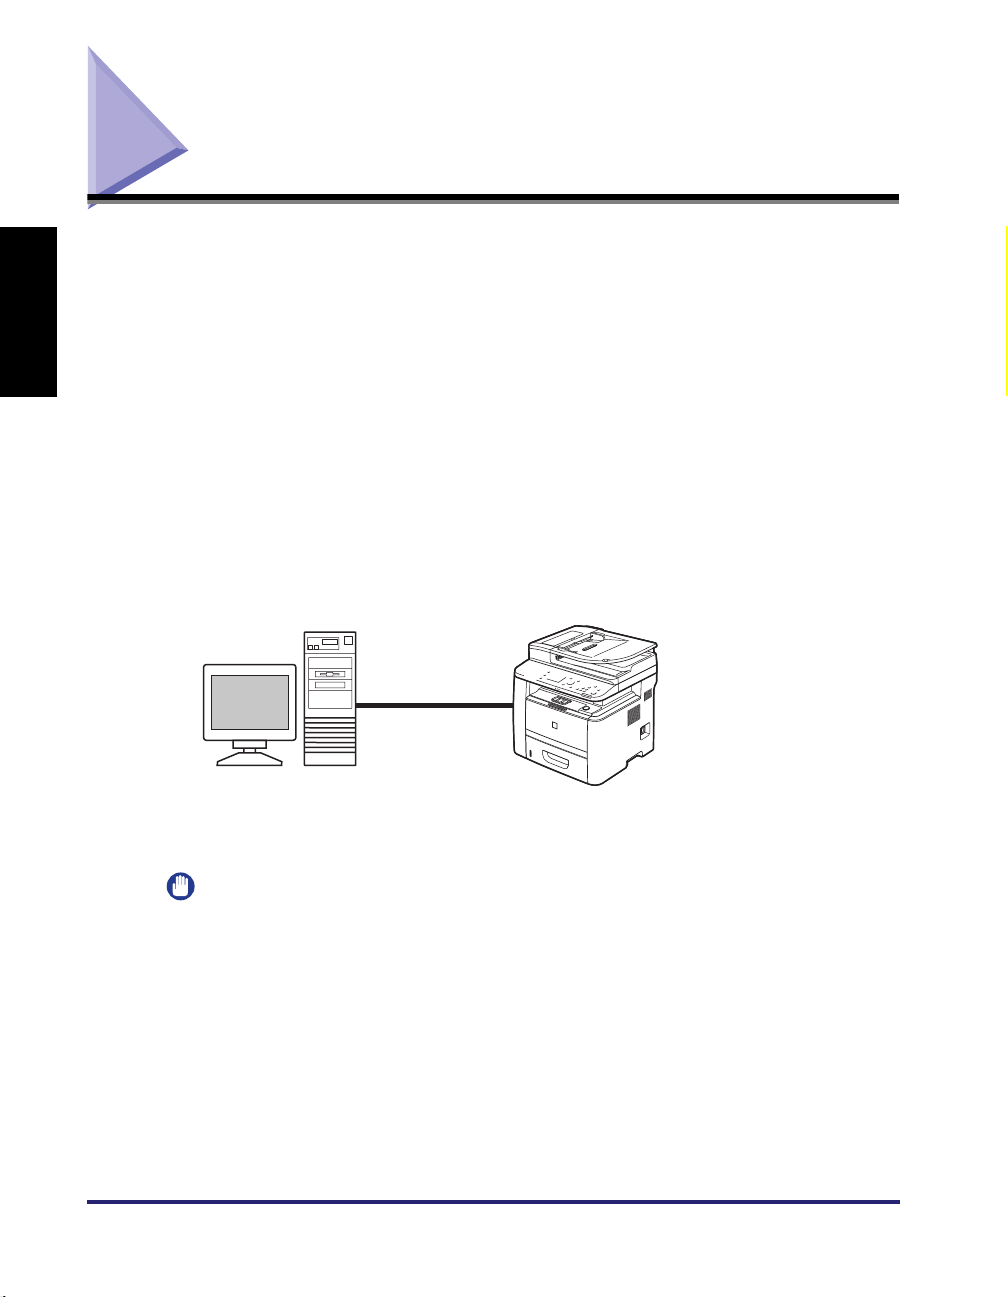
This section provides the overview of the uniFLOW integration.
The uniFLOW server, a server in which the uniFLOW software is installed, detects
the machine in a network and activates the uniFLOW integration in the machine.
The uniFLOW server authenticates users logging in at the machine and provides
the machine with setting information. Once activated, the uniFLOW server and
machine continue communicating to accomplish the uniFLOW integration.
uniFLOW Server
• activates the uniFLOW
integration in the machine
• authenticates users
• provides setting information
uniFLOW Server Machine
Functions with the uniFLOW integration
• uniFLOW server-based Authentication
• Login and Document Release
• Selecting a Cost Center
EN-1
IMPORTANT
The uniFLOW integration is activated only when the machine is connected to the
uniFLOW server over a network. The uniFLOW server is a server in which the optional
uniFLOW software is activated.
Managing the Machine with the uniFLOW Integration

What You Can Do with the uniFLOW Integration
Equipped in the machine are the functions activated by the uniFLOW server. The
major functions are as follows:
uniFLOW Server-based Authentication Modes and Log-in Methods
You can manage the machine by limiting its use only to the users who are
registered in the uniFLOW server. There are two authentication mode options:
authentication to the machine and to the Login and Document Release function,
with various log-in methods such as by an ID card* or by entering a PIN code. (See
«Authentication Modes by the uniFLOW Integration,» on p. EN-3 and «Log-in
Methods by the uniFLOW Integration,» on p. EN-4.)
* Optional NT-ware’s MiCard Reader is required.
Login and Document Release
You can set the machine to keep documents unprinted until the user who sent the
print data logs in to the machine or the Login and Document Release function. You
can also set the machine to allow users to select jobs they want to print. The
documents are printed out only when the user logs in at the machine. This means
the user can securely collect confidential documents and eliminate the problem of
forgotten printouts in the machine’s output tray. This function is made possible by
the uniFLOW server (as a print server) that holds print jobs and wait for the user to
log in. For instructions on how to perform the Login and Document Release
function, see «Keeping Documents Unprinted Until Logging-In (Login and
Document Release),» on p. EN-15.
English
Using Cost Centers
You can register cost centers (accounting tables for counting the costs for
performed jobs) and allot them to users in the uniFLOW server. Examples of cost
centers usage are described below:
■ Selecting a cost center when logging in:
When a user logs in at the machine, a screen prompting the user to select a cost
center may appear on the display. The user selects a cost center so that the
uniFLOW server counts the cost for the user’s job.
■ Displaying the cost for Login and Document Release jobs on the screen:
You can set the machine to display the calculated cost for the job on the display
when a user is performing Login and Document Release at the machine.
For more information on cost centers, see the documentation included with the
uniFLOW software.
Managing the Machine with the uniFLOW Integration
EN-2

English
Activation and Settings of the uniFLOW Integration
The overview of the activation and settings of the uniFLOW integration is provided
below.
System Environment
To activate the uniFLOW integration, the machine must be connected to the
uniFLOW server (a server in which the uniFLOW software is installed) over a
network. For more information, see the documentation included with the uniFLOW
software.
Settings of the uniFLOW Integration
The settings of the uniFLOW integration such as user registration can be made
only on the uniFLOW server. Although no special settings on the machine are
required, be sure to check the Department ID Management settings for a proper
setting combination of the Department ID Management and the uniFLOW
integration. (See «Settings of Department ID Management for the uniFLOW
Integration,» on p. EN-5.)
Authentication Modes by the uniFLOW Integration
The uniFLOW integration provides the following authentication modes:
EN-3
Authentication to the Machine
Users are prompted to log in to the machine. This means that users must
authenticate themselves when they use the machine’s functions such as the Copy
or Scan functions.
Authentication to the Login and Document Release Function
Users are prompted to log in to the Login and Document Release function. This
means that users can use the machine’s functions such as Copy or Scan functions
without logging in at the machine. Instead, users must authenticate themselves
only when they use the Login and Document Release function.
Managing the Machine with the uniFLOW Integration

Log-in Methods by the uniFLOW Integration
The uniFLOW integration provides the following log-in methods:
NOTE
• For instructions on how to log in to the machine as the System Manager, see
«Operating the Machine As the System Manager,» on p. EN-6.
• For instructions on how to log in to the machine with each log-in method, see «Logging
in to the Machine,» on p. EN-8.
User ID and Password
On the machine’s operation panel, users enter their user ID and password.
PIN Code
On the machine’s operation panel, users enter their PIN code.
ID Card
Users hold their ID card over the MiCard Reader attached to the machine.
IMPORTANT
The MiCard Reader is optional.
Department ID and PIN
On the machine’s operation panel, users enter their department ID and PIN.
English
IMPORTANT
The log-in method using the department ID and PIN is available only when
«Authentication to the Machine» (p. EN-3) is applied as the authentication mode.
Managing the Machine with the uniFLOW Integration
EN-4
Settings of Department ID Management for the uniFLOW
Integration
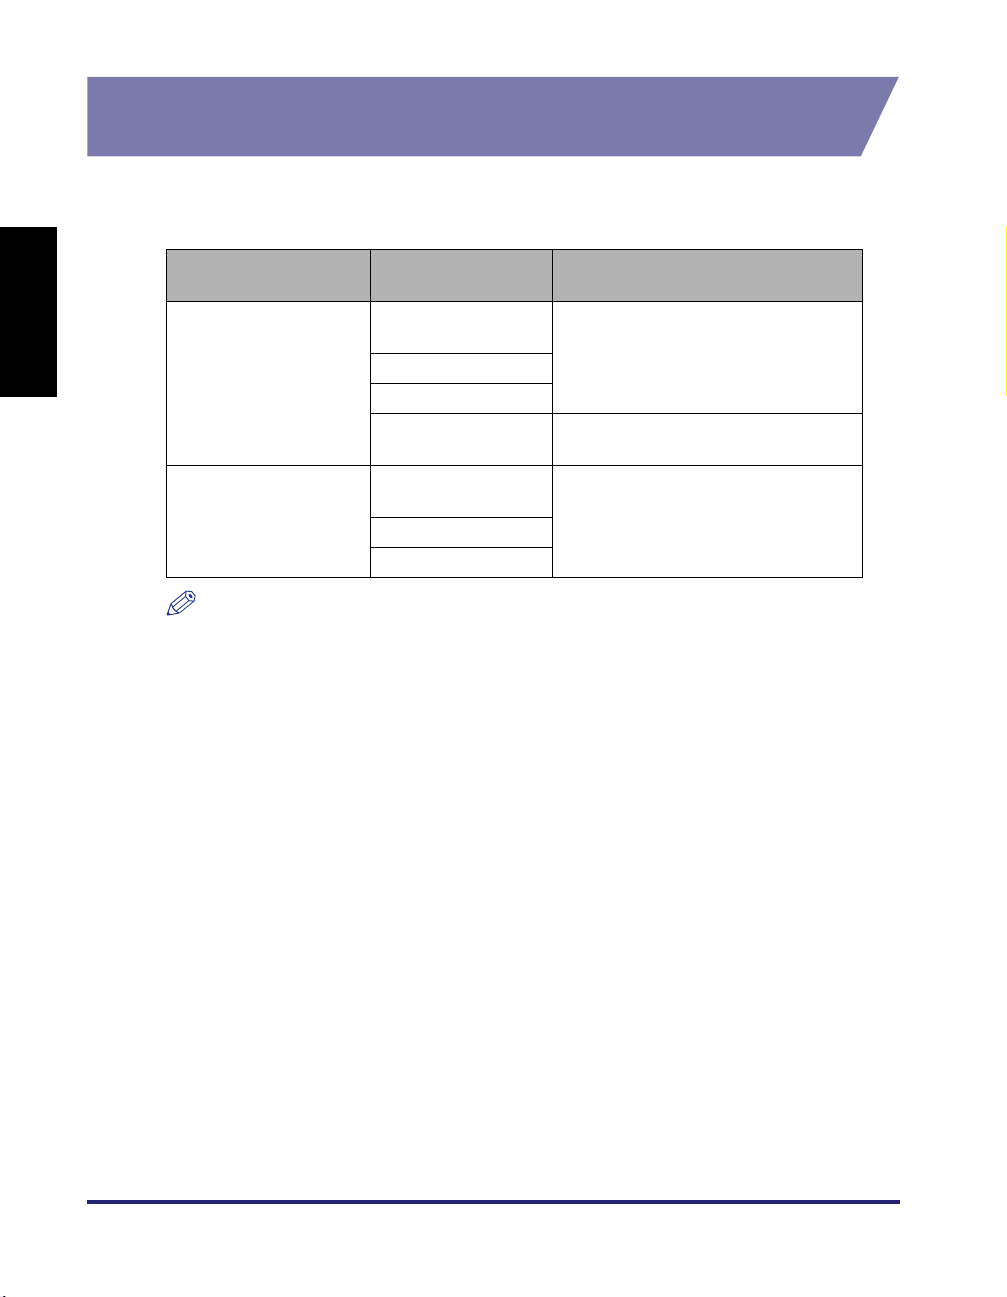
Before you use the uniFLOW integration, be sure to set the Department ID
Management setting as indicated on the table below.
English
Authentication Mode
(See p. EN-3)
Authentication to the
Machine
Authentication to the
Login and Document
Release Function
NOTE
• To use the department ID and PIN as the log-in method, register the System Manager
ID and System Manager PIN (p. EN-6), and department IDs and PINs in the machine.
Setting procedure for registering users is as follows:
— In the machine, register the System Manager ID and System Manager PIN for the
System Manager.
— In the machine, register department IDs and PINs for other users (end users).
— On the uniFLOW server, assign the System Manager ID and System Manager PIN
or a department ID and PIN to the System Manager or other users.
• For more information on how to register users in the uniFLOW server, see the
documentation included with the uniFLOW software.
Log-in Method (See
p. EN-4)
User ID and
Password
PIN Code
ID Card
Department ID and
PIN
User ID and
Password
PIN Code
ID Card
Required Settings of the Department
ID Management on the Machine
ON/OFF
ON
OFF
EN-5
Managing the Machine with the uniFLOW Integration
Operating the Machine As the System Manager
The System Manager log-in procedure varies depending on the applied
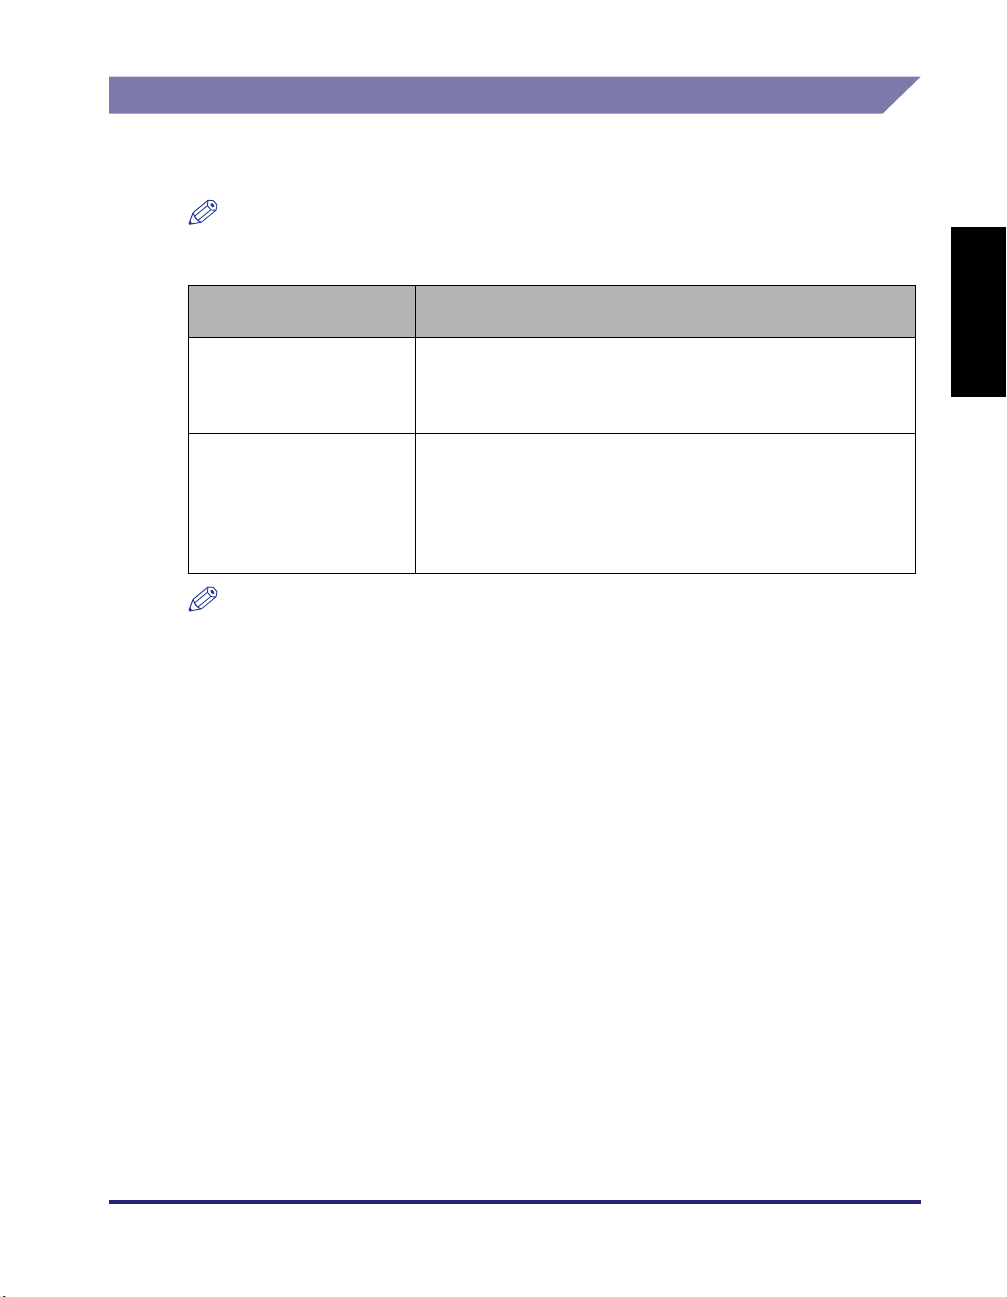
authentication mode provided by the uniFLOW integration. See the table below.
NOTE
The System Manager can set or change the System Settings and other settings
accessible only to the System Manager.
Authentication Mode
(p. EN-3)
Authentication to the
Machine
Authentication to the Login
and Document Release
NOTE
• You can give a user System Manager privileges by the procedures below (The
procedures and the privileges are applicable only when «Authentication to the
Machine» is applied.). For more information, see the documentation included with the
uniFLOW software.
— For the user ID and password/PIN code/ID card, select the user type as the System
Manager when you register the user in the uniFLOW server.
— For the department ID and PIN, assign the System Manager ID and System
Manager PIN registered in the machine to the user when you register in the
uniFLOW server.
• When you log in to the machine as an end user in «Authentication to the Machine
mode», you cannot access the System Settings and other settings accessible only to
the System Manager, and a message such as <System settings is restricted.>
appears. To access these settings, once log out of the machine and again log in as
the System Manager.
Log-in Procedure As the System Manager
Log in to the machine with the user ID and password, PIN
code, ID card, or department ID and PIN for the System
Manager. Otherwise log-in procedures are similar to those for
end users. (See «Logging in to the Machine,» on p. EN-8.)
To access the System Settings and other settings accessible
only to the System Manager, enter the System Manager ID
and System Manager PIN registered in the machine. When
they are not set, any user can log in to the machine as the
System Manager and can access the System Settings and
other settings accessible only to the System Manager.
English
Managing the Machine with the uniFLOW Integration
EN-6

English
Resetting the IP Address of the Machine
If the message <Cannot connect to the server. Contact the system manager.>
persists on the display after the machine is turned ON, the IP address of the
machine may not be properly set. Resume communications between the machine
and the uniFLOW server by resetting the IP address of the machine as described
below.
1
Press (Menu).
2
Press [OK] to open the <Network Settings> menu.
● If a screen prompting you to enter the System Manager ID and System
Manager PIN appears:
❑
Select <Manager ID> using [ ] or [ ] and press [OK].
❑ Enter the System Manager ID using the numeric keys and press [OK].
❑ Select <PIN> using [ ] or [ ] and press [OK].
❑ Enter the System Manager PIN using the numeric keys and press [OK].
❑ Press (Log In/Out).
NOTE
The System Manager ID and System Manager PIN are both set to ‘7654321’ as
default.
EN-7
3
Check the IP address of the machine and set it on <Network
Settings>.
NOTE
Set the IP address of the machine depending on the network environment you are
using.
4
Restart the machine.
Turn OFF the machine and wait at least 10 seconds before turning it back ON.
Managing the Machine with the uniFLOW Integration
Logging in to the Machine
This section describes the operation procedures for the log-in methods provided by
the uniFLOW integration.
NOTE
When the optional MiCard Reader is attached to the machine, you can log in and log
out by holding your ID card over the MiCard Reader, regardless of the applied log-in
method (except when the department ID and PIN is applied as the log-in method).
Entering a User ID and Password
Enter your user ID and password to log in when the screen shown in step 1 is
displayed.
NOTE
To log in to the machine, you must have a valid user ID and password (if set)
registered. For instructions on how to register a user ID and password in the uniFLOW
server, see the documentation included with the uniFLOW software.
English
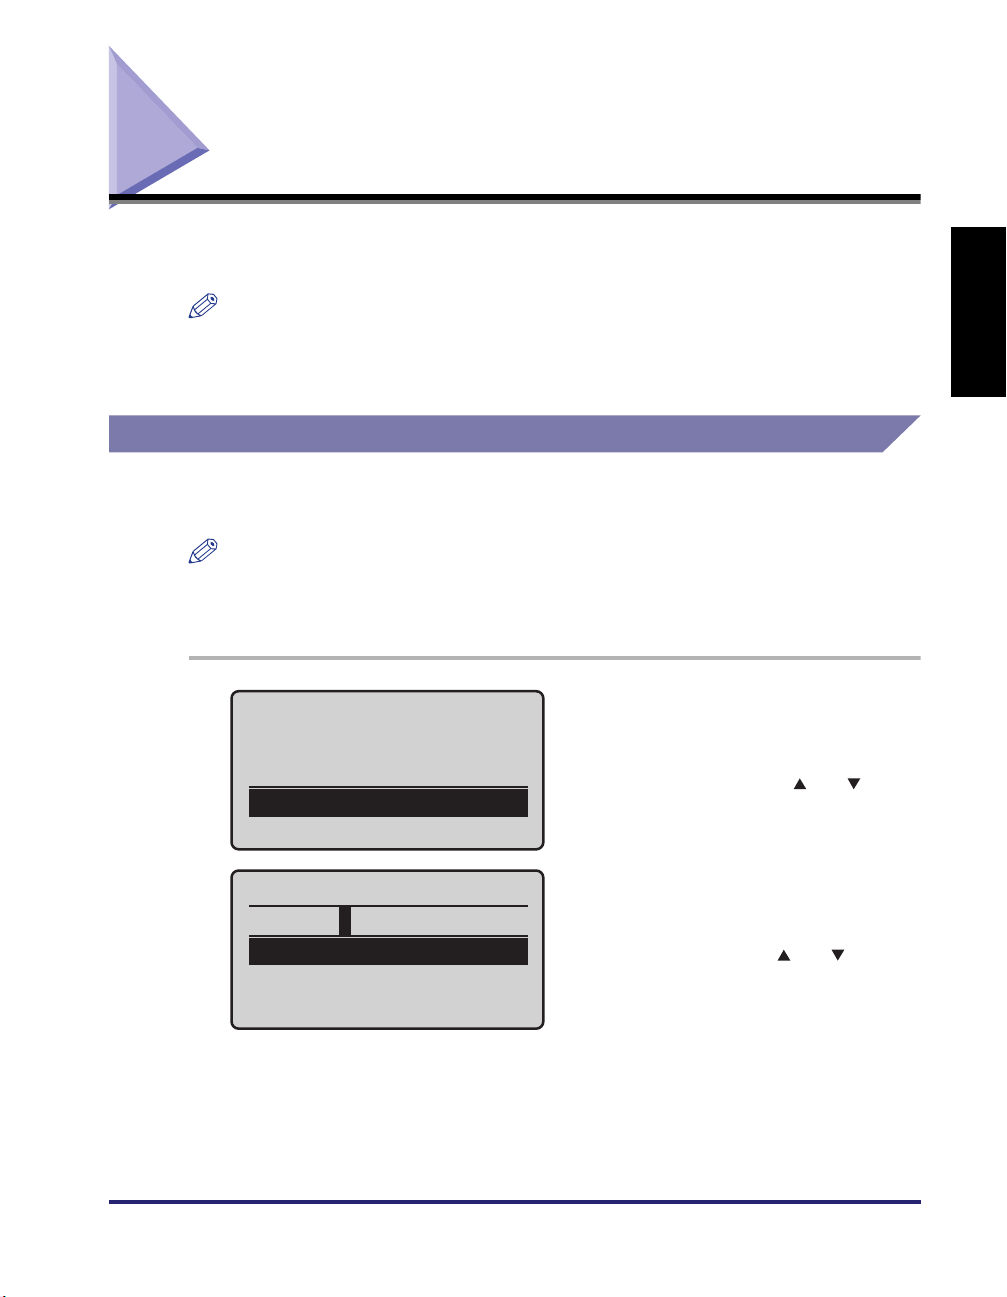
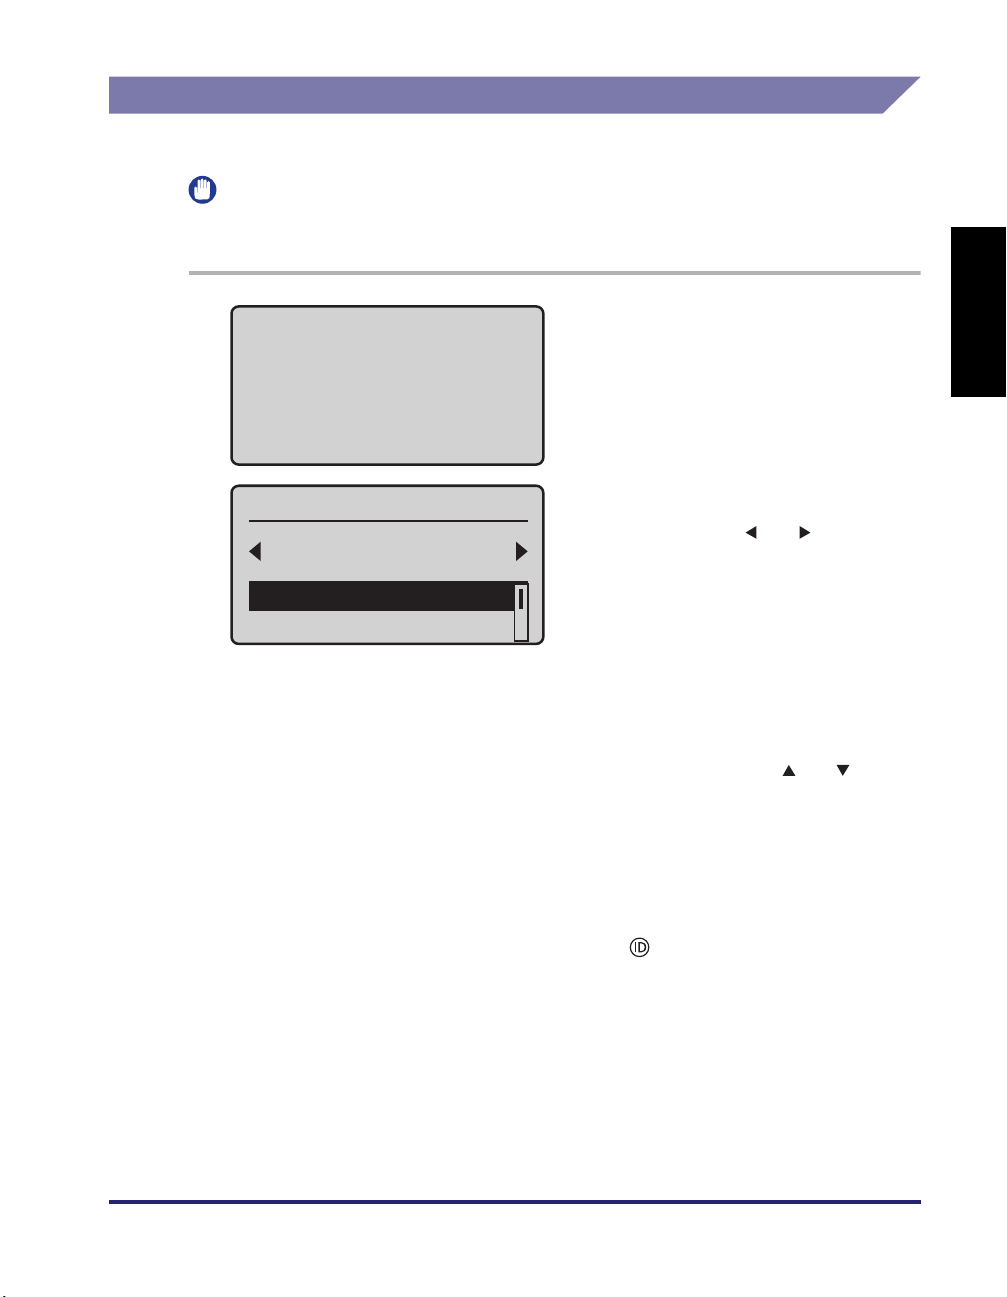
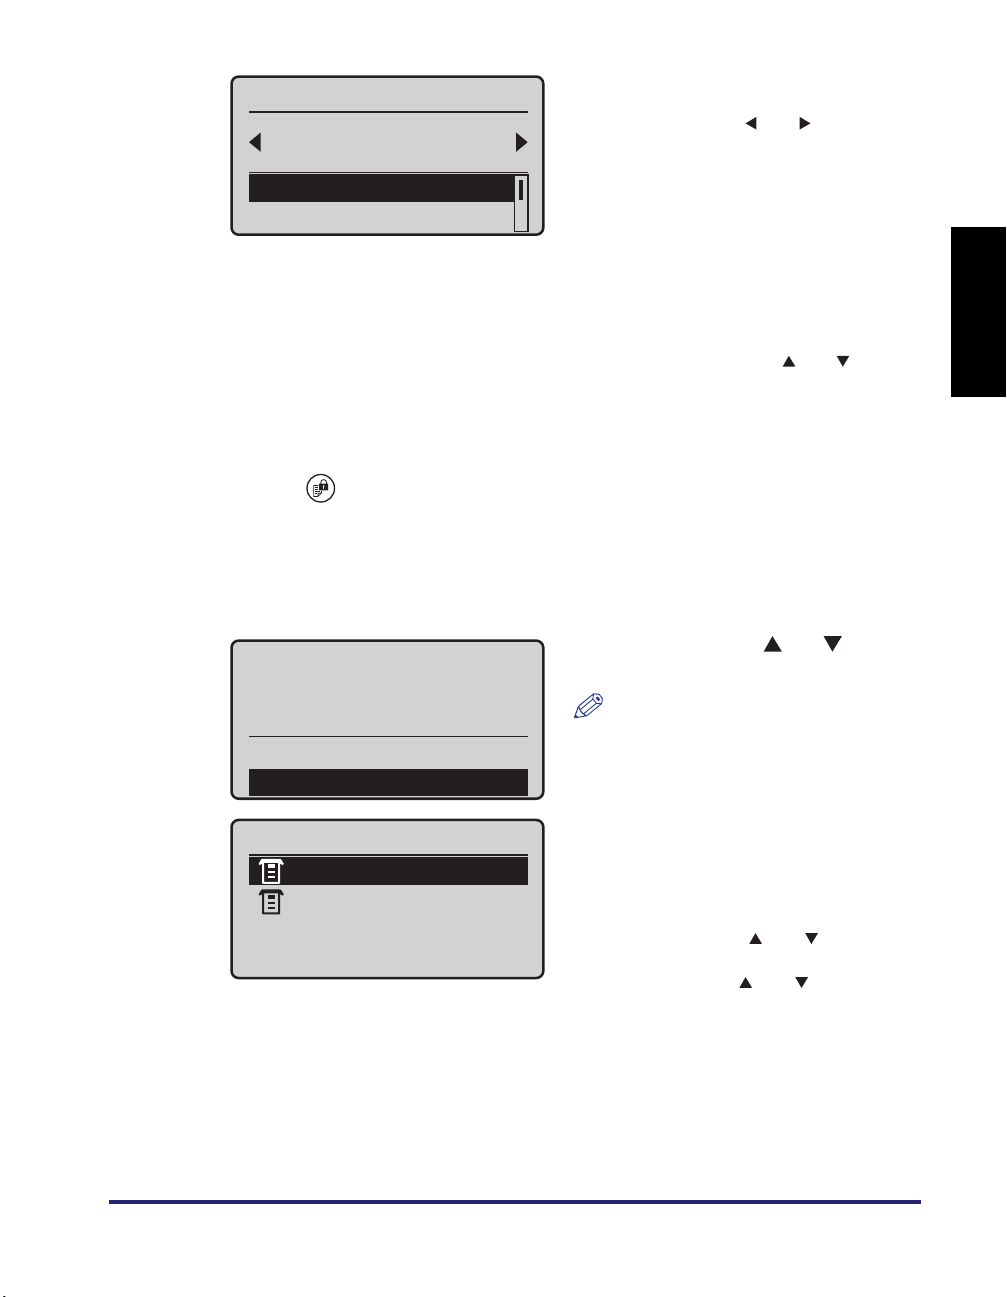
1
Enter User ID & Pswrd
Login: Press ID
Logout: Press ID
User ID:
Password:
User ID
User01
<Apply>
Entry Mode: 12
Enter your user ID and password
(up to 32 characters respectively)
using the numeric keys.
❑ Select <User ID> using [ ] or [ ] and
press [OK].
❑ Enter your user ID.
You can change the text entry mode by
changing <Entry Mode>.
❑ Select <Apply> using [ ] or [ ] and
press [OK].
Logging in to the Machine
EN-8
English
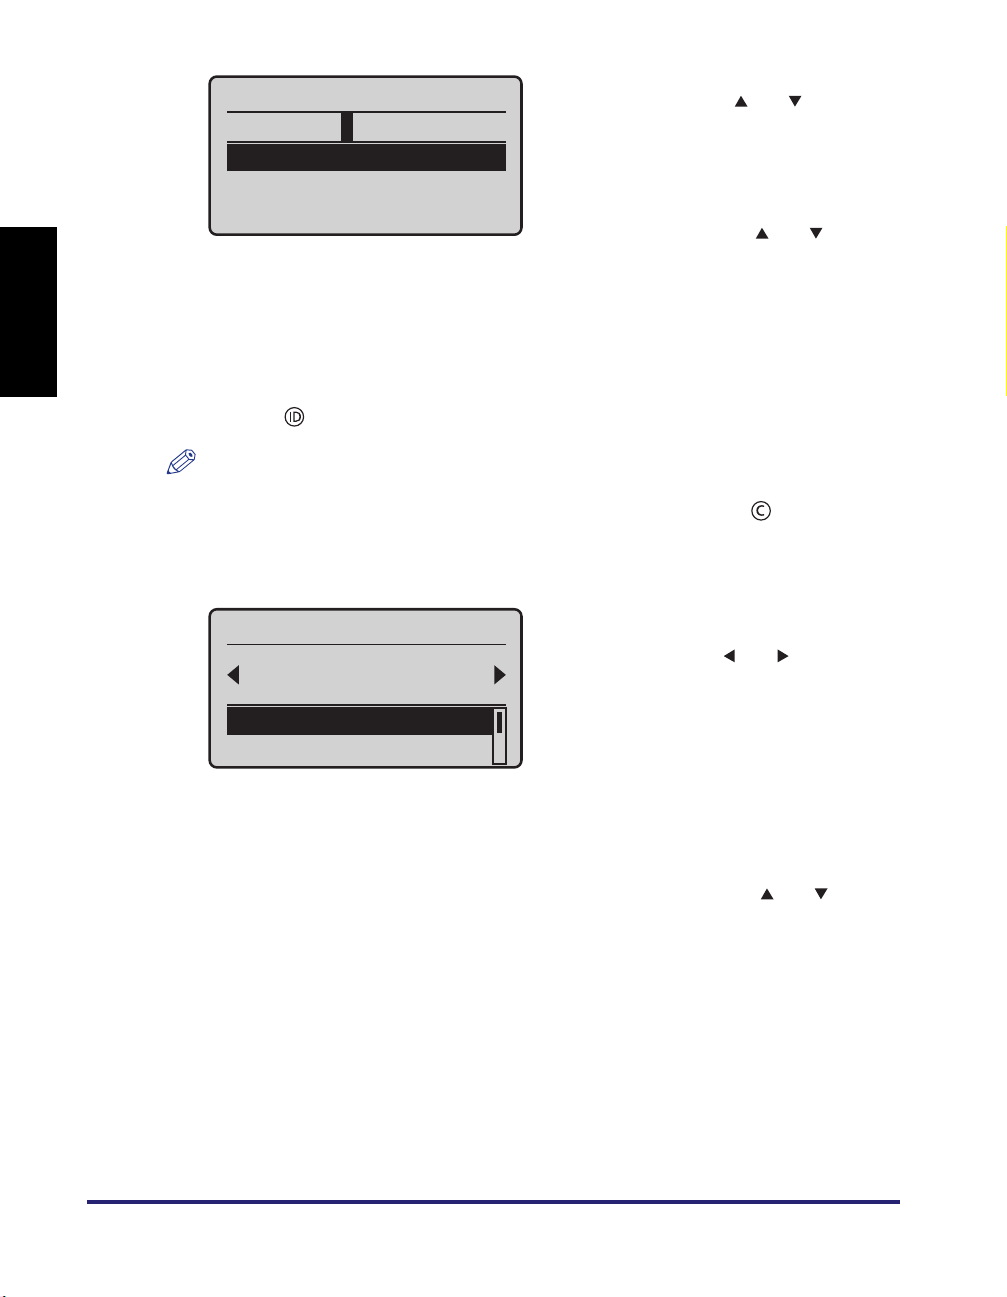
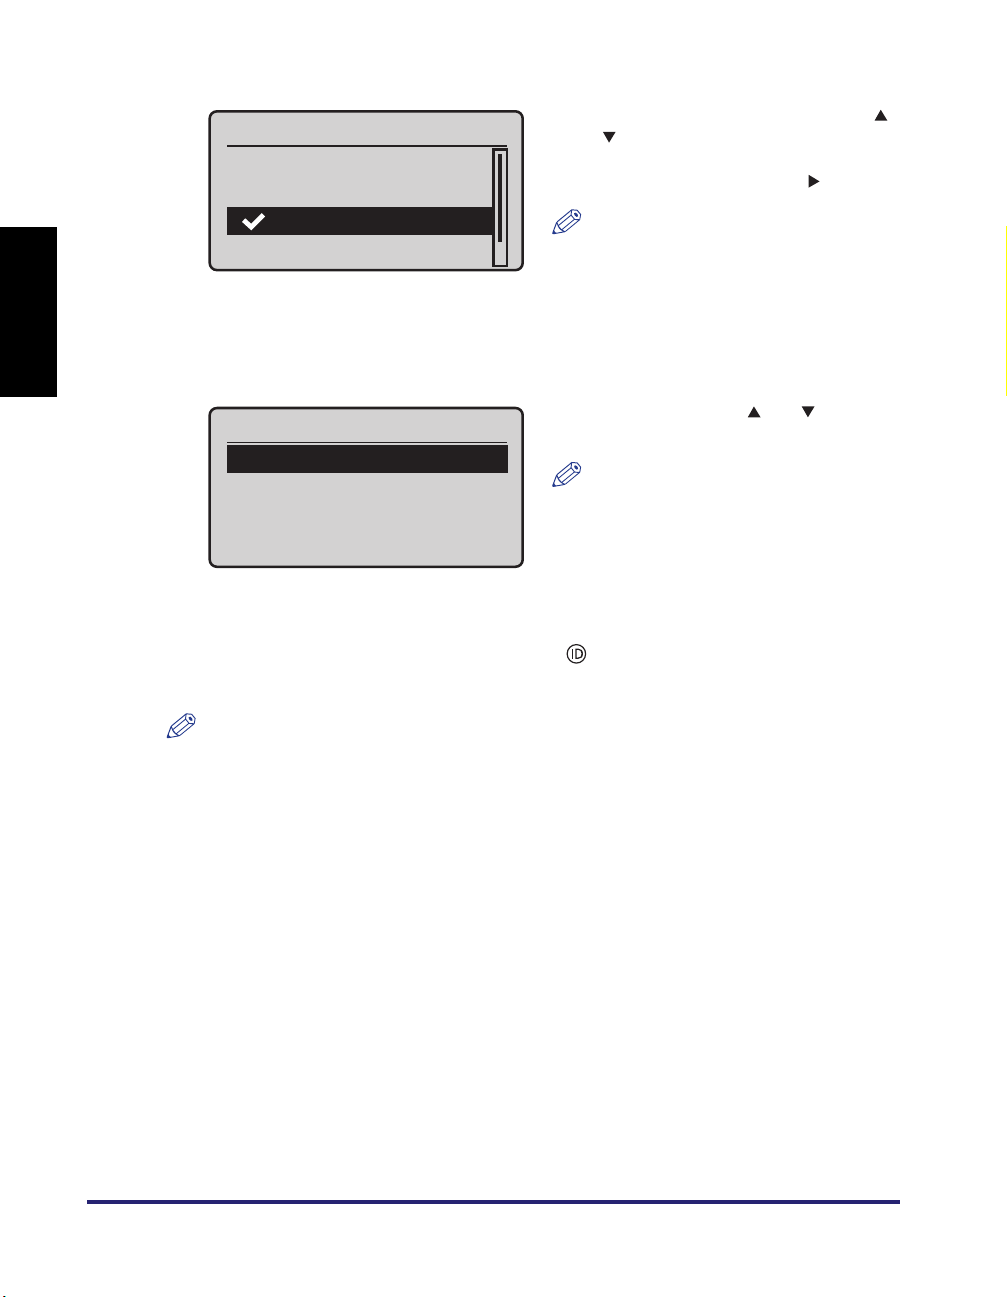
❑ On the screen shown in step 1, select
Password
12345678
<Apply>
Entry Mode: 12
2
Press [ ] (Log In/Out).
NOTE
• If no password is set for the user ID, leave <Password> blank.
• If you make a mistake when entering the user ID/password, press [ ] (Clear) and
enter the correct user ID/password.
• If the user ID/password that you entered is incorrect, an error message will appear.
Select Cost Center
Canon
Group 1
<Log In>
<To Sub Cost Center>
<Password> using [ ] or [ ] and press
[OK].
❑ Enter your password.
You can change the text entry mode by
changing <Entry Mode>.
❑ Select <Apply> using [ ] or [ ] and
press [OK].
The characters that you enter for the
password will be displayed as asterisks
(*******) when the screen returns to the
initial log-in screen.
❑ If a screen prompting you to select a cost
center appears, select the appropriate
cost center using [ ] or [ ].
• Select a cost center in the lower or
upper level by using <To Sub Cost
Center> or <To Parent Cost Center>.
• You can search for cost centers by
using <Search>.
• You can select a cost center from the
history by using <Display History>.
For more information on these search
options, see the note on p. EN-10.
❑ Select <Log In> using [ ] or [ ] and
press [OK].
The standby display appears.
EN-9
Logging in to the Machine
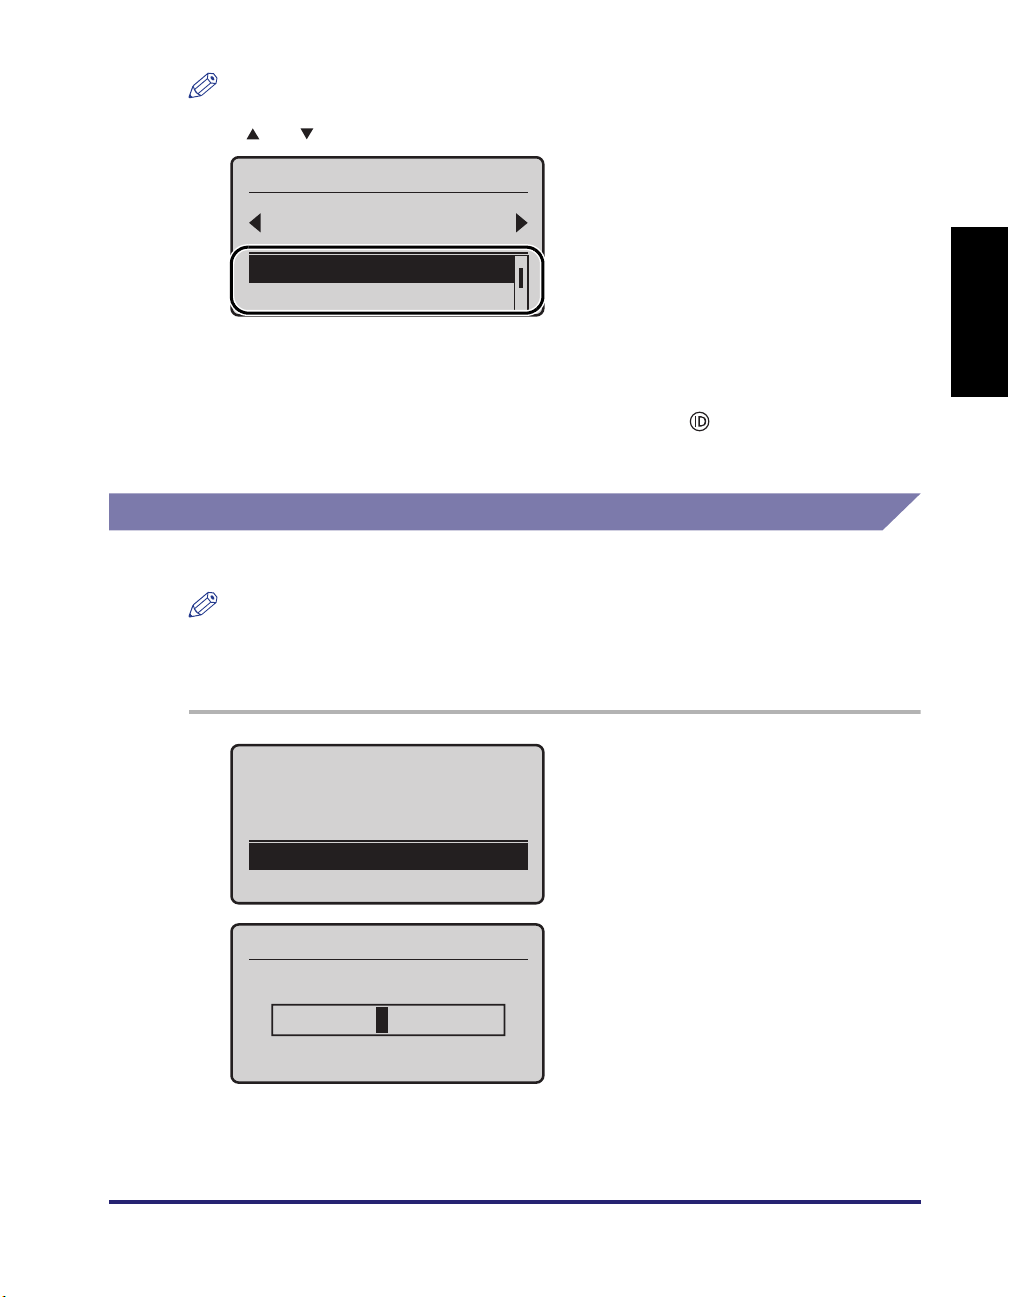
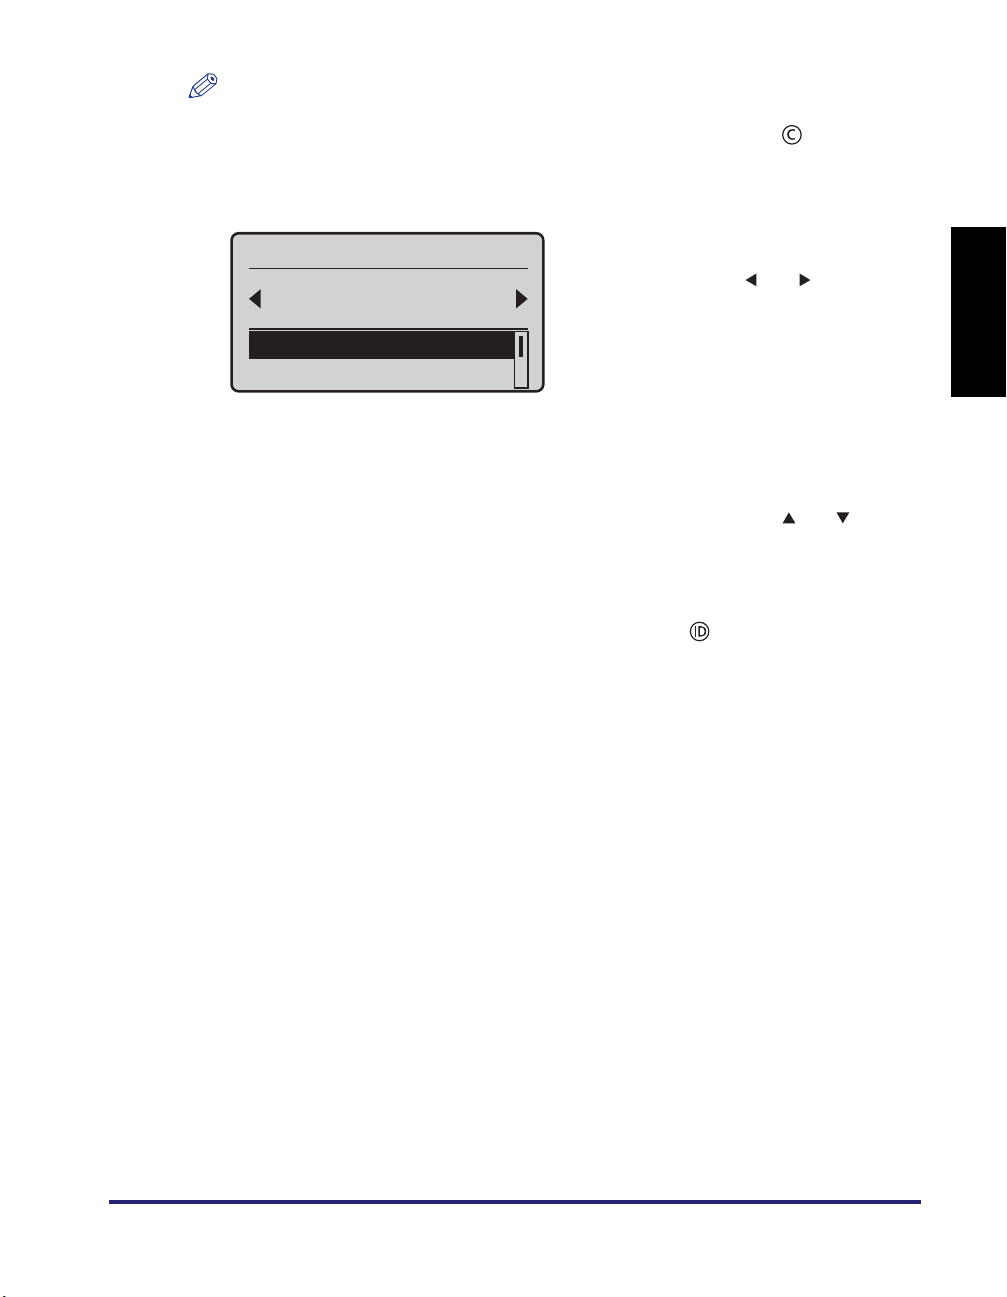
The search options for cost centers are displayed on the bottom of the screen. Use
Select Cost Center
Canon
Group 1
<To Sub Cost Center>
<To Parent Cost Cen
…
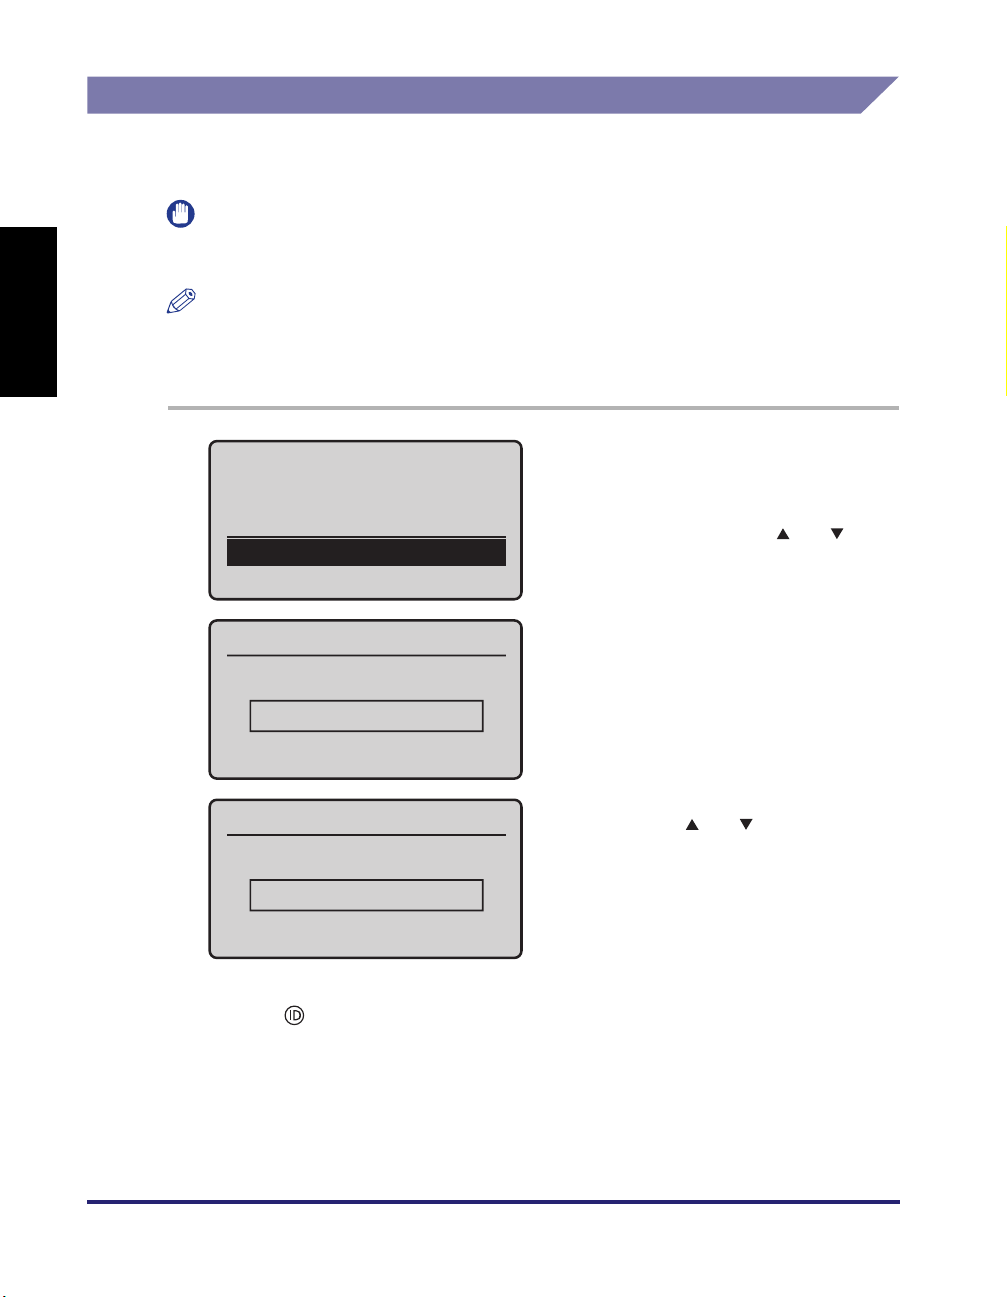
Enter PIN Code
Login: Press ID
Logout: Press ID
PIN Code:
ޓ
PIN Code
ޓ
12345678
(Apply: Press OK)
[ ] or [ ] to select the desired search option and press [OK].
• <To Sub Cost Center>: Use to move to
the cost centers in the lower level.
• <To Parent Cost Center>: Use to move
to the cost centers in the upper level.
• <Search>: Use to search for cost
centers by entering the first several
characters of the cost center name.
• <Display History>: Use to display and
select the cost centers previously
used.
3
When your operations are complete, press [ ] (Log In/Out) to log
out.
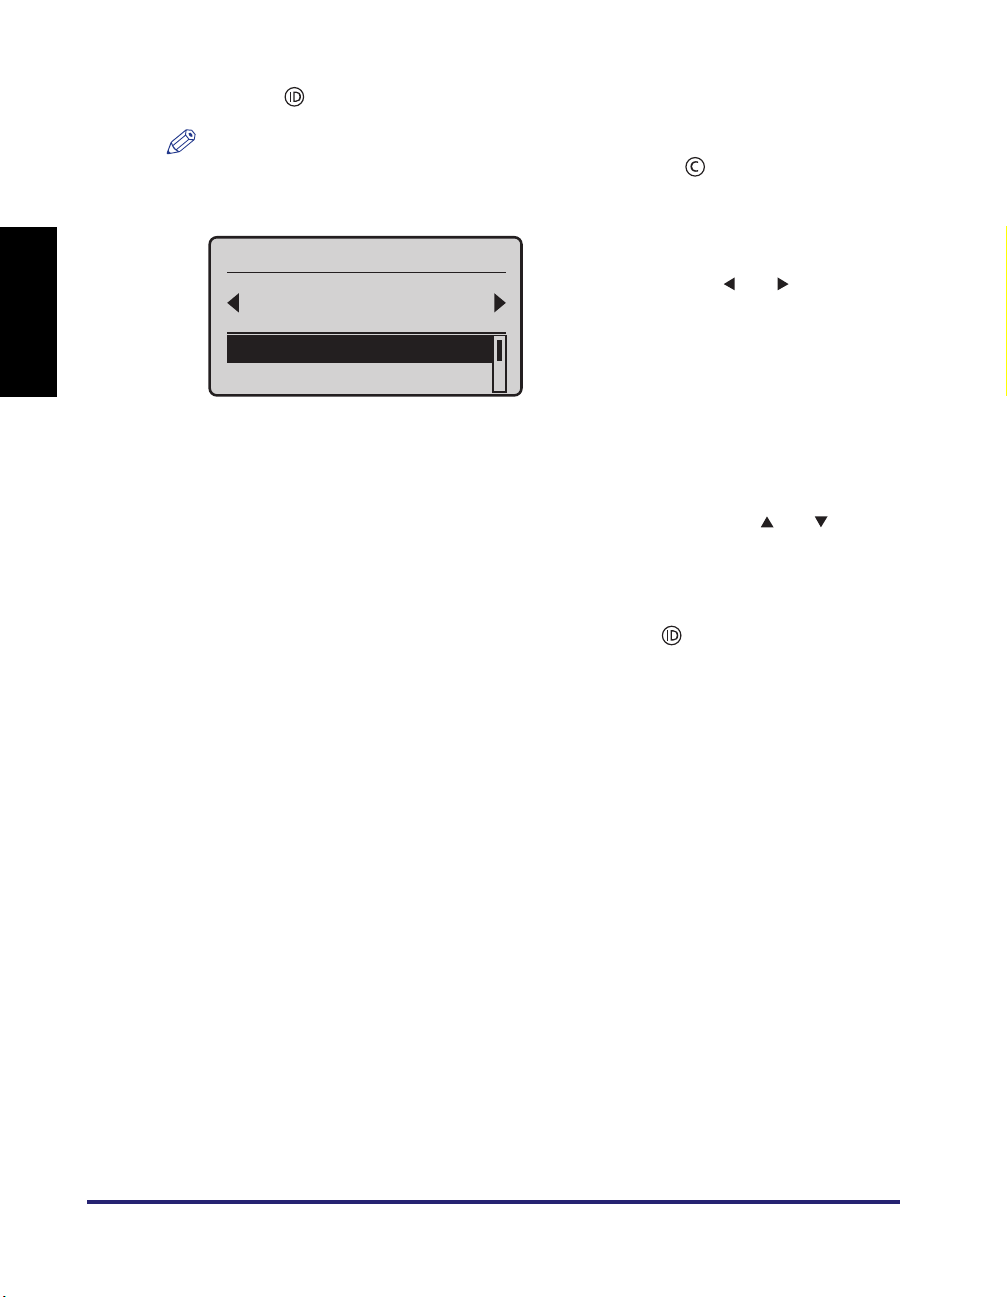
Entering a PIN Code
Enter your PIN code to log in when the screen shown in step 1 is displayed.
To log in to the machine, you must have a valid PIN code registered. For instructions
on how to register a PIN code in the uniFLOW server, see the documentation included
with the uniFLOW software.
English
1
Enter your PIN code (up to 20
digits) using the numeric keys.
❑ Press [OK].
❑ Enter your PIN code and press [OK].
The PIN code that you enter will be
displayed as asterisks (*******) when the
screen returns to the initial log-in
screen.
Logging in to the Machine
EN-10
English
2
Press [ ] (Log In/Out).
NOTE
• If you make a mistake when entering the PIN code, press [ ] (Clear) and enter the
correct PIN code.
• If the PIN code that you entered is incorrect, an error message will appear.
❑ If a screen prompting you to select a cost
Select Cost Center
Canon
Group 1
<Log In>
<To Sub Cost Center>
3
When your operations are complete, press (Log In/Out) to log
center appears, select the appropriate
cost center using [ ] or [ ].
• Select a cost center in the lower or
upper level by using <To Sub Cost
Center> or <To Parent Cost Center>.
• You can search for cost centers by
using <Search>.
• You can select a cost center from the
history by using <Display History>.
For more information on these search
options, see the note on p. EN-10.
❑ Select <Log In> using [ ] or [ ] and
press [OK].
The standby display appears.
out.
EN-11
Logging in to the Machine
Using the ID Card
Use your ID card to log in when the screen shown in step 1 is displayed.
IMPORTANT
Logging-in by using the ID card is available only when the optional MiCard Reader is
attached to the machine.
1
Hold your card over
the reader until you
hear a beep. Press the
Hold your ID card over the
MiCard Reader until the display
switches to the next log-in step
or the standby display.
ID Key to log out
after the operation.
❑ If a screen prompting you to select a cost
Select Cost Center
Canon
Group 1
<Log In>
<To Sub Cost Center>
2
When your operations are complete, hold your ID card over the
MiCard Reader until the log-in screen shown in step 1 appears.
center appears, select the appropriate
cost center using [ ] or [ ].
• Select a cost center in the lower or
upper level by using <To Sub Cost
Center> or <To Parent Cost Center>.
• You can search for cost centers by
using <Search>.
• You can select a cost center from the
history by using <Display History>.
For more information on these search
options, see the note on p. EN-10.
❑ Select <Log In> using [ ] or [ ] and
press [OK].
The standby display appears.
English
You can also log out of the machine by pressing [ ] (Log In/Out).
Logging in to the Machine
EN-12
English
Entering a Department ID and PIN
Enter your Department ID and PIN to log in when the screen shown in step 1 is
displayed.
IMPORTANT
This log-in method is available only when «Authentication to the Machine» (p. EN-3) is
applied as the authentication mode.
NOTE
To log in to the machine, you must have a valid department ID and PIN (if set)
registered. For more information, see the documentation included with the uniFLOW
software.
1
Enter Dept. ID & PIN
Login: Press ID
Logout: Press ID
Dept. ID:
PIN:
Dept. ID
ޓ
0123456
(Apply: Press OK)
PIN
ޓ
*******
(Apply: Press OK)
2
Press [ ] (Log In/Out).
Enter your department ID and
PIN (up to 7 digits respectively)
using the numeric keys.
❑ Select <Dept. ID> using [ ] or [ ] and
press [OK].
❑ Enter your department ID and press
[OK].
❑ On the screen shown in step 1, select
<PIN> using [ ] or [ ] and press [OK].
❑ Enter your PIN and press [OK].
The PIN that you enter for the PIN is
displayed as asterisks (*******).
EN-13
Logging in to the Machine
NOTE
• If no PIN is set for the department ID, leave <PIN> blank.
• If you make a mistake when entering the department ID/PIN, press [ ] (Clear) and
enter the correct department ID/PIN.
• If the department ID/PIN that you entered is incorrect, an error message will appear.
❑ If a screen prompting you to select a cost
Select Cost Center
Canon
Group 1
<Log In>
<To Sub Cost Center>
3
When your operations are complete, press [ ] (Log In/Out) to log
center appears, select the appropriate
cost center using [ ] or [ ].
• Select a cost center in the lower or
upper level by using <To Sub Cost
Center> or <To Parent Cost Center>.
• You can search for cost centers by
using <Search>.
• You can select a cost center from the
history by using <Display History>.
For more information on these search
options, see the note on p. EN-10.
❑ Select <Log In> using [ ] or [ ] and
press [OK].
The standby display appears.
out.
English
Logging in to the Machine
EN-14
Keeping Documents Unprinted Until Logging-In
(Login and Document Release)
English
You can keep your documents unprinted until you log in to the machine or the Login
and Document Release function. Your documents are printed out only when you
log in at the machine. This means you can securely collect confidential documents
and eliminate the problem of forgotten printouts in the machine’s output tray.
The machine prompts you to log in either when you are using the machine or using
the Login and Document Release function, depending on the setting. Follow the
procedure below.
To log in to the machine first and print your documents:
If a log-in screen is displayed when turning on the machine or clearing the Sleep
mode, log in to the machine first to use the Login and Document Release function
by the procedure below.
1
On your computer, perform a command for printing the document
you want to print.
Click [Print] or [OK] on the dialog box of the printer driver. The command name varies
depending on the application software you are using.
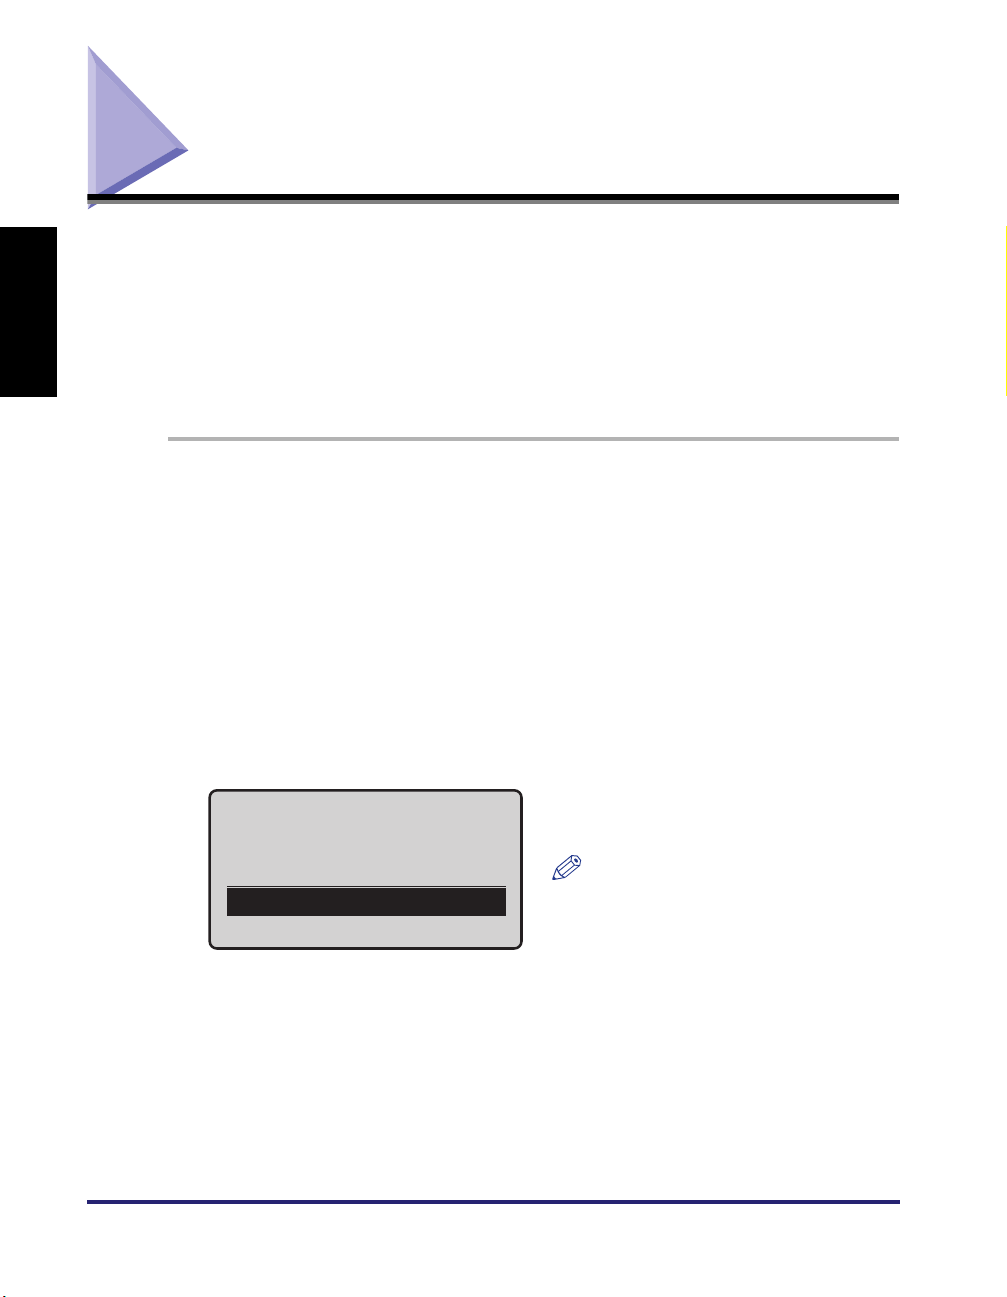
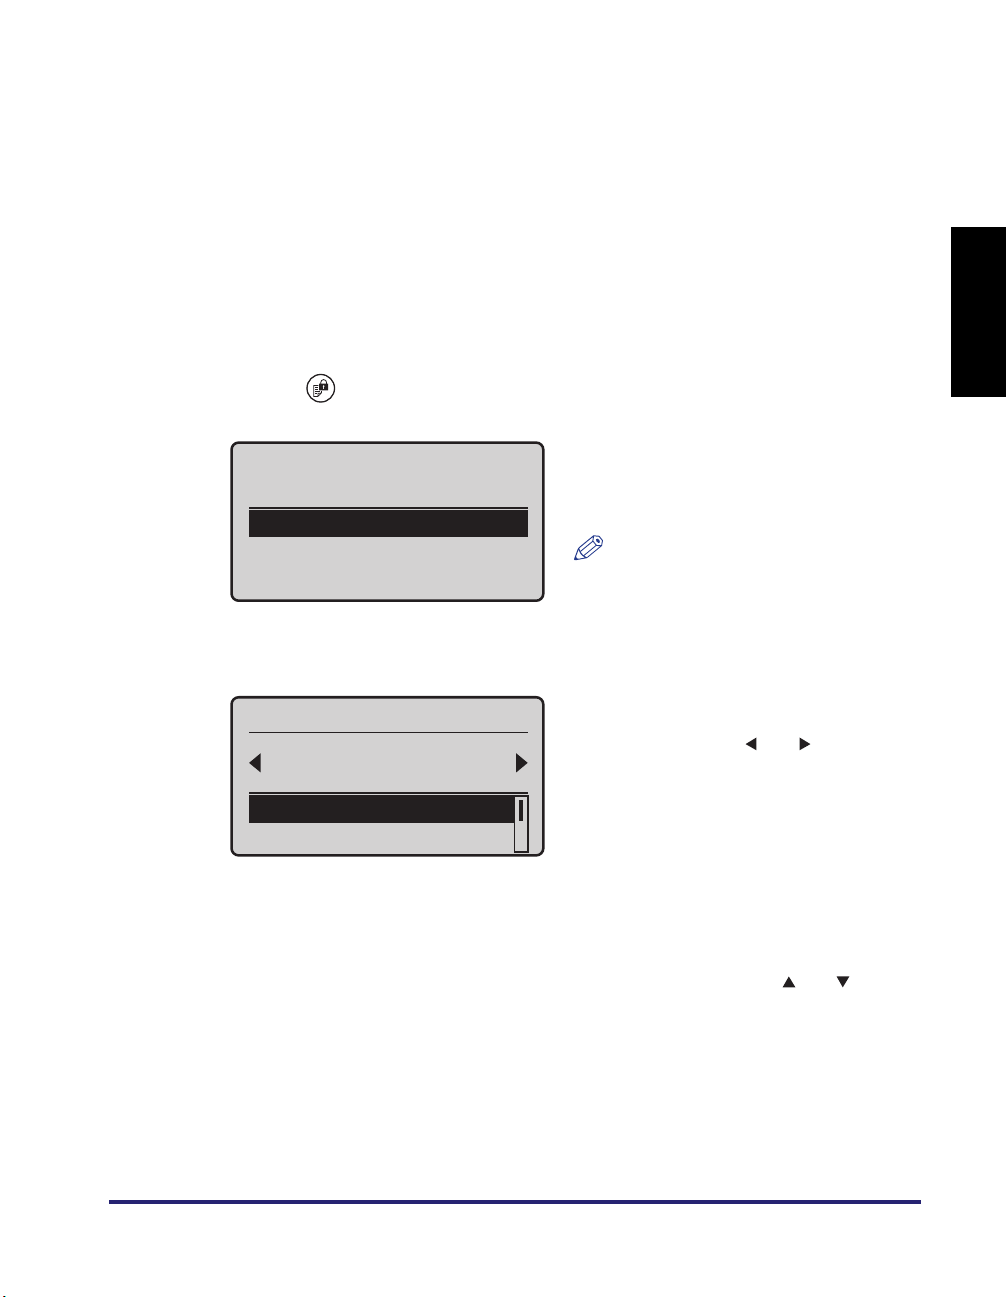
2
Enter User ID & Pswrd
Log in to the machine as
indicated on the screen.
Login: Press ID
Logout: Press ID
User ID:
Password:
NOTE
The screen shown left is an example
of the log-in screens. For more
information on the other log-in
methods, see «Logging in to the
Machine,» on p. EN-8.
EN-15
Keeping Documents Unprinted Until Logging-In (Login and Document Release)
Select Cost Center
Canon
Group 1
<Log In>
<To Sub Cost Center>
3
Press [ ] (Secure Print).
4
Print the document.
● If set to display cost:
Print 2 job(s)?
Total Cost:
$2.00
<No>
<Yes>
If a screen prompting you to select a cost
❑
center appears, select the appropriate
cost center using [ ] or [ ].
• Select a cost center in the lower or
upper level by using <To Sub Cost
Center> or <To Parent Cost Center>.
• You can search for cost centers by
using <Search>.
• You can select a cost center from the
history by using <Display History>.
For more information on these search
options, see the note on p. EN-10.
❑ Select <Log In> using [ ] or [ ] and
press [OK].
The standby display appears.
❑ Select <Yes> using [ ] or [ ] and
press [OK].
NOTE
The total cost for the job(s) may be
displayed depending on the setting.
English
The <Copy/Print Job Status> screen is
Copy/Print Job Status
displayed.
13:30PM Printing
13:30PM Waiting
Keeping Documents Unprinted Until Logging-In (Login and Document Release)
To view the details of the print job status
or cancel the print job, select the
desired job using [ ] or [ ] and press
[OK]. On the <Details> screen, select
<Cancel> using [ ] or [ ] and press
[OK] to cancel the job.
EN-16
● If set to display My Print Jobs:
English
My Print Jobs
<Update>
<Print All>
Canon01.pdf 2013/0
Samplepage.pdf 2
…
Print/Delete
<Print>
<Delete>
5
When printing is complete, press [ ] (Log In/Out) to log out of the
❑ Select the job you want to print using [ ]
or [ ] and press [OK].
Repeat this procedure to select all jobs
you want to print, and press [ ].
NOTE
• If the jobs you want to print are not
displayed, select <Update> and
press [OK]. Jobs will be loaded
again.
• You can print all print jobs by
selecting <Print All> and pressing
[OK].
❑ Select <Print> using [ ] or [ ] and
press [OK].
NOTE
You can delete selected jobs by
selecting <Delete> and pressing [OK].
machine.
EN-17
NOTE
You can also log out of the machine by holding your ID card over the optional MiCard
Reader (except when the department ID and PIN is applied as the log-in method).
Keeping Documents Unprinted Until Logging-In (Login and Document Release)
To log in to the Login and Document Release function:
If a standby display such as for Copy function, instead of a log-in screen, is
displayed when turning on the machine or clearing the Sleep mode, log in to the
Login and Document Release function by the procedure below.
1
On your computer, perform a command for printing the document
you want to print.
Click [Print] or [OK] on the dialog box of the printer driver. The command name varies
depending on the application software you are using.
2
Press [ ] (Secure Print).
English
3
Enter User ID & Pswrd
Login: Press ID
User ID:
Password ID:
Select Cost Center
Canon
Group 1
<Log In>
<To Sub Cost Center>
Log in to the Login and
Document Release function as
indicated on the screen.
NOTE
The screen shown left is an example
of the log-in screens. For more
information on the other log-in
methods, see «Logging in to the
Machine,» on p. EN-8.
❑ If a screen prompting you to select a cost
center appears, select the appropriate
cost center using [ ] or [ ].
• Select a cost center in the lower or
upper level by using <To Sub Cost
Center> or <To Parent Cost Center>.
• You can search for cost centers by
using <Search>.
• You can select a cost center from the
history by using <Display History>.
For more information on these search
options, see the note on p. EN-10.
❑ Select <Log In> using [ ] or [ ] and
press [OK].
Keeping Documents Unprinted Until Logging-In (Login and Document Release)
EN-18

English
4
Print the document.
● If set to display cost:
Print 2 job(s)?
Total Cost:
$2.00
<No>
<Yes>
Copy/Print Job Status
13:30PM Printing
13:30PM Waiting
● If set to display My Print Jobs:
Select <Yes> using [ ] or [ ] and
❑
press [OK].
NOTE
The total cost for the job(s) may be
displayed depending on the setting.
The <Copy/Print Job Status> screen is
displayed.
To view the details of the print job status
or cancel the print job, select the
desired job using [ ] or [ ] and press
[OK]. On the <Details> screen, select
<Cancel> using [ ] or [ ] and press
[OK] to cancel the job.
My Print Jobs
<Update>
<Print All>
Canon01.pdf 2013/0
Samplepage.pdf 2
…
Print/Delete
<Print>
<Delete>
❑ Select the job you want to print using [ ]
or [ ] and press [OK].
Repeat this procedure to select all jobs
you want to print, and press [ ].
NOTE
• If the jobs you want to print are not
displayed, select <Update> and
press [OK]. Jobs will be loaded
again.
• You can print all print jobs by
selecting <Print All> and pressing
[OK].
❑ Select <Print> using [ ] or [ ] and
press [OK].
NOTE
You can delete selected jobs by
selecting <Delete> and pressing [OK].
EN-19
Keeping Documents Unprinted Until Logging-In (Login and Document Release)

English
Keeping Documents Unprinted Until Logging-In (Login and Document Release)
EN-20

imageRUNNER
Français
1133/1133A/1133iF
Guide d’uniFLOW Login
Device Client

Français
Pour visualiser le manuel au format PDF, Adobe Reader/Adobe Acrobat Reader est nécessaire. Si Adobe Reader/Adobe Acrobat Reader n’est pas
installé sur le système, il est possible de le télécharger depuis le site Web d’Adobe Systems Incorporated.
Un soin particulier a été apporté à la rédaction de ce guide afin d’éviter les inexactitudes ou omissions. Toutefois, du fait de notre souci constant
d’amélioration de nos produits, il est possible d’obtenir des spécifications techniques précises auprès de la société Canon.

Table des matières
Français
Préface . . . . . . . . . . . . . . . . . . . . . . . . . . . . . . . . . . . . . . . . . . . . . . . . . . . . . . FR-iv
Présentation du guide . . . . . . . . . . . . . . . . . . . . . . . . . . . . . . . . . . . . . . . . . . FR-iv
Conventions adoptées dans ce guide . . . . . . . . . . . . . . . . . . . . . . . . . . . . . FR-iv
Touches utilisées dans ce guide . . . . . . . . . . . . . . . . . . . . . . . . . . . . . . . . . FR-iv
Affichages utilisées dans ce guide . . . . . . . . . . . . . . . . . . . . . . . . . . . . . . . . FR-v
Marques . . . . . . . . . . . . . . . . . . . . . . . . . . . . . . . . . . . . . . . . . . . . . . . . . . . . FR-v
Mentions légales . . . . . . . . . . . . . . . . . . . . . . . . . . . . . . . . . . . . . . . . . . . . . . FR-vi
Copyright . . . . . . . . . . . . . . . . . . . . . . . . . . . . . . . . . . . . . . . . . . . . . . . . . . . FR-vi
Limites de responsabilité . . . . . . . . . . . . . . . . . . . . . . . . . . . . . . . . . . . . . . . FR-vi
Gestion de l’imprimante avec l’intégration uniFLOW . . . . . . . . . . . . . . . . . FR-1
Intérêts de l’intégration uniFLOW. . . . . . . . . . . . . . . . . . . . . . . . . . . . . . . . . FR-2
Modes d’authentification serveur uniFLOW et méthodes de connexion . . . FR-2
Connexion et publication de documents . . . . . . . . . . . . . . . . . . . . . . . . FR-2
Utilisation des centres de coûts . . . . . . . . . . . . . . . . . . . . . . . . . . . . . . . FR-2
Activation et réglages de l’intégration uniFLOW . . . . . . . . . . . . . . . . . . . . . FR-3
Environnement système . . . . . . . . . . . . . . . . . . . . . . . . . . . . . . . . . . . . . FR-3
Configuration de l’intégration uniFLOW . . . . . . . . . . . . . . . . . . . . . . . . . FR-3
Modes d’authentification par l’intégration uniFLOW. . . . . . . . . . . . . . . . . . . FR-3
Authentification au niveau de l’imprimante . . . . . . . . . . . . . . . . . . . . . . FR-3
Authentification par la fonction de connexion et de publication
de documents . . . . . . . . . . . . . . . . . . . . . . . . . . . . . . . . . . . . . . . . . . . . FR-4
Méthodes de connexion par l’intégration uniFLOW . . . . . . . . . . . . . . . . . . . FR-4
ID utilisateur et mot de passe. . . . . . . . . . . . . . . . . . . . . . . . . . . . . . . . . FR-4
Code PIN . . . . . . . . . . . . . . . . . . . . . . . . . . . . . . . . . . . . . . . . . . . . . . . . FR-4
Carte d’identité. . . . . . . . . . . . . . . . . . . . . . . . . . . . . . . . . . . . . . . . . . . . FR-4
Numéro de service et code PIN. . . . . . . . . . . . . . . . . . . . . . . . . . . . . . . FR-4
Configuration de la gestion des numéros de service en vue
de l’intégration uniFLOW . . . . . . . . . . . . . . . . . . . . . . . . . . . . . . . . . . . . . . . FR-5
Utilisation de l’imprimante comme administrateur système . . . . . . . . . . . . . FR-6
Redéfinition de l’adresse IP de l’imprimante . . . . . . . . . . . . . . . . . . . . . . . . FR-7
Connexion à l’imprimante. . . . . . . . . . . . . . . . . . . . . . . . . . . . . . . . . . . . . . . . FR-8
Saisie d’un ID utilisateur et d’un mot de passe . . . . . . . . . . . . . . . . . . . . . . FR-8
Saisie d’un code PIN . . . . . . . . . . . . . . . . . . . . . . . . . . . . . . . . . . . . . . . . . FR-10
Utilisation de la carte d’identité . . . . . . . . . . . . . . . . . . . . . . . . . . . . . . . . . FR-12
Saisie d’un numéro de service et d’un code PIN . . . . . . . . . . . . . . . . . . . . FR-13
Suspension de l’impression de documents sans connexion
(fonction de connexion et de publication de documents) . . . . . . . . . . . . . FR-15
Pour vous connecter à l’imprimante, puis imprimer
vos documents :. . . . . . . . . . . . . . . . . . . . . . . . . . . . . . . . . . . . . . . . . . FR-15
Pour se connecter à la fonction de connexion et de publication
de documents : . . . . . . . . . . . . . . . . . . . . . . . . . . . . . . . . . . . . . . . . . . FR-18
FR-iii
Loading…
Canon Imagerunner 1133A
Starter Guide
English
Read this guide fi rst.
Please read this guide before operating this product.
After you fi nish reading this guide, store it in a safe place for future reference.
Guide de démarrage
Français
Veuillez d’abord lire ce guide.
Lisez ce guide avant d’utiliser ce produit.
Après avoir pris connaissance de son contenu, conservez-le dans un endroit sûr pour pouvoir le consulter en cas de besoin.
Guida all’avvio
Italiano
Leggere questa guida.
Leggere questa guida prima di iniziare ad utilizzare il prodotto.
Terminata la lettura, conservare la guida in un luogo sicuro per eventuali consultazioni.
Handbuch für Starter
Deutsch
Bitte lesen Sie dieses Handbuch zuerst.
Bitte lesen Sie dieses Handbuch, bevor Sie mit dem Produkt arbeiten.
Nachdem Sie das Handbuch gelesen haben, bewahren Sie es zum Nachschlagen an einem sicheren Ort auf.
Guía de inicio
Español
Lea esta guía primero.
Por favor, lea esta guía antes de usar este producto.
Después de leer esta guía, guárdela en un lugar seguro para posteriores consultas.
View the manual for the Canon Imagerunner 1133A here, for free. This user manual comes under the category printers and has been rated by 3 people with an average of a 6.8. This manual is available in the following languages: English. Do you have a question about the Canon Imagerunner 1133A?
Ask your question here
Product Images (1)
Canon Imagerunner 1133A specifications
Below you will find the product specifications and the manual specifications of the Canon Imagerunner 1133A.
General
| Brand | Canon |
| Model | Imagerunner 1133A |
| Product | printer |
| Language | English |
| Filetype | Manual (PDF) |
Frequently asked questions
Can’t find the answer to your question in the manual? You may find the answer to your question in the FAQs about the Canon Imagerunner 1133A below.
What is the best way to remove jammed paper from my printer?
It is best to gently pull the paper out of the printer. Turn the printer off, and make sure that the printhead is not hanging over the paper and that no paper remains in the printer.
How come my prints are of poor quality?
There can be various reasons for poor print quality. Check if the cartridges or toners are full. If so, inkjet printers often require cleaning the printer, the cartridges have dried out, or the print head is broken. With laser printers, calibrating the laser printer is recommended.
How come my printer does not accept original cartridges?
Non-genuine cartridges may not be recognised by the printer. In that case you will receive a message that the cartridge is empty. The manual of the purchased cartridge usually contains the solution, if this does not work, it is advisable to contact the seller.
How come my inkjet printer has black stripes?
In most cases, the inkjet printer cartridge is broken and the cartridge needs to be replaced.
What is the difference between a laser printer and an inkjet printer?
A laser printer prints with a toner and an inkjet printer prints with ink.
What does DPI stand for?
DPI stands for Dots Per Inch and is the number of ink droplets (per inch) that end up on the paper when printing.
Is the manual of the Canon Imagerunner 1133A available in English?
Yes, the manual of the Canon Imagerunner 1133A is available in English .
Is your question not listed? Ask your question here
25.01.2017
Драйверы принтеров Canon
0
Драйверы для Canon imageRUNNER 1133/1133A/1133iF
Драйверы для Canon imageRUNNER 1133/1133A/1133iF
Скачать бесплатно, без регистрации драйвер для необходимой операционной системы, а также Руководство пользователя принтера Canon imageRUNNER 1133/1133A/1133iF.
Драйвер принтера Canon imageRUNNER 1133/1133A/1133iF PCL6 x86/x64
Версия: 21.85 | Язык: RU | Размер: 46.6 Mb | Дата выпуска: 15 December 2016
Совместимость: Windows 10/10 x64/8.1/8.1 x64/8/8 x64/7/7 x64/Vista/Vista64/XP
Установка: Скачать файл, дважды щелкните по загруженному файлу, следуйте инструкциям мастера установки.
Скачать
Драйвер принтера Canon imageRUNNER 1133/1133A/1133iF Generic Plus PCL6 x86/x64
Версия: 1.10 | Язык: RU | Размер: 50.5 Mb | Дата выпуска: 15 December 2016
Совместимость: Windows 10/10 x64/8.1/8.1 x64/8/8 x64/7/7 x64/Vista/Vista64/XP
Установка: Скачать файл, дважды щелкните по загруженному файлу, следуйте инструкциям мастера установки.
Скачать
MF Toolbox для принтера Canon imageRUNNER 1133/1133A/1133iF
Версия: 4.9.1.1.m | Язык: RU | Размер: 9.9 Mb | Дата выпуска: 14 May 2014
Совместимость: Windows 10/10 x64/8.1/8.1 x64/8/8 x64/7/7 x64/Vista/Vista64/XP
Описание: MF Toolbox представляет собой простое в использовании приложение, которое позволяет сканировать документы с вашего многофункционального принтера к компьютеру. Это интуитивно понятное программное обеспечение позволяет выполнять сложные задачи сканирования всего за несколько кликов. Вы можете использовать MF Toolbox, чтобы сохранить отсканированные изображения в папку на компьютере, пересылать их к указанному приложению, или прикрепить их к электронному сообщению
Установка: Скачать файл, разархивировать. Запустить мастер установки, следовать его инструкциям.
Скачать
Драйвер и утилиты принтера для Canon imageRUNNER 1133/1133A/1133iF Mac OS
Версия: 10.7.0 | Язык: RU | Размер: 47.2 Mb | Дата выпуска: 16 December 2016
Совместимость: Mac OS версии 10.6 – 10.12
Скачать
Драйвер сканера и утилиты для Canon imageRUNNER 1133/1133A/1133iF Mac OS
Версия: 2.8.1 | Язык: RU | Размер: 85.0 Mb | Дата выпуска: 16 December 2016
Совместимость: Mac OS версии 10.6 – 10.12
Скачать
Руководство по использованию драйвера принтера Generic Plus PCL6 для принтера Canon imageRUNNER 1133/1133A/1133iF
Версия: 0302563701 | Язык: RU | Размер: 1.3 Mb | Дата выпуска: 02 December 2016
Руководство по использованию драйвера принтера Generic Plus PCL6 (V1.10) для Canon imageRUNNER 1133/1133A/1133iF.
Скачать
Руководство пользователя для принтера Canon imageRUNNER 1133/1133A/1133iF
Версия: 41661-RU | Язык: RU | Размер: 20.1 Mb | Дата выпуска: 01 July 2015
Электронное руководство пользователя для Canon imageRUNNER 1133/1133A/1133iF.
Скачать
Рекомендуемые товары:
-
В наличии
Код: 00017
Adjustment program Epson L200
150.00 руб.
Купить -
В наличии
Код: 00022
Дамп микросхемы 25Q32 для Canon i-SENSYS MF3010
239.00 руб.
Купить -
7 в наличии
Код: 10153
Микросхема 24C64 для Canon PIXMA MG5540 с сброшенным счетчиком памперса
399.00 руб.
Купить -
3 в наличии
Код: 10225
Микросхема MX29LV160AT для Canon imageRUNNER 1133а
599.00 руб.
Купить
Хорошее руководство по эксплуатации
Законодательство обязывает продавца передать покупателю, вместе с товаром, руководство по эксплуатации Canon Imagerunner 1133A. Отсутствие инструкции либо неправильная информация, переданная потребителю, составляют основание для рекламации в связи с несоответствием устройства с договором. В законодательстве допускается предоставлении руководства в другой, чем бумажная форме, что, в последнее время, часто используется, предоставляя графическую или электронную форму инструкции Canon Imagerunner 1133A или обучающее видео для пользователей. Условием остается четкая и понятная форма.
Что такое руководство?
Слово происходит от латинского «instructio», тоесть привести в порядок. Следовательно в инструкции Canon Imagerunner 1133A можно найти описание этапов поведения. Цель инструкции заключается в облегчении запуска, использования оборудования либо выполнения определенной деятельности. Инструкция является набором информации о предмете/услуге, подсказкой.
К сожалению немного пользователей находит время для чтения инструкций Canon Imagerunner 1133A, и хорошая инструкция позволяет не только узнать ряд дополнительных функций приобретенного устройства, но и позволяет избежать возникновения большинства поломок.
Из чего должно состоять идеальное руководство по эксплуатации?
Прежде всего в инструкции Canon Imagerunner 1133A должна находится:
— информация относительно технических данных устройства Canon Imagerunner 1133A
— название производителя и год производства оборудования Canon Imagerunner 1133A
— правила обслуживания, настройки и ухода за оборудованием Canon Imagerunner 1133A
— знаки безопасности и сертификаты, подтверждающие соответствие стандартам
Почему мы не читаем инструкций?
Как правило из-за нехватки времени и уверенности в отдельных функциональностях приобретенных устройств. К сожалению само подсоединение и запуск Canon Imagerunner 1133A это слишком мало. Инструкция заключает ряд отдельных указаний, касающихся функциональности, принципов безопасности, способов ухода (даже то, какие средства стоит использовать), возможных поломок Canon Imagerunner 1133A и способов решения проблем, возникающих во время использования. И наконец то, в инструкции можно найти адресные данные сайта Canon, в случае отсутствия эффективности предлагаемых решений. Сейчас очень большой популярностью пользуются инструкции в форме интересных анимаций или видео материалов, которое лучше, чем брошюра воспринимаются пользователем. Такой вид инструкции позволяет пользователю просмотреть весь фильм, не пропуская спецификацию и сложные технические описания Canon Imagerunner 1133A, как это часто бывает в случае бумажной версии.
Почему стоит читать инструкции?
Прежде всего здесь мы найдем ответы касательно конструкции, возможностей устройства Canon Imagerunner 1133A, использования отдельных аксессуаров и ряд информации, позволяющей вполне использовать все функции и упрощения.
После удачной покупки оборудования/устройства стоит посвятить несколько минут для ознакомления с каждой частью инструкции Canon Imagerunner 1133A. Сейчас их старательно готовят или переводят, чтобы они были не только понятными для пользователя, но и чтобы выполняли свою основную информационно-поддерживающую функцию.