
-
Страница 1
UX-T151 / T 150 MICRO COMPONENT SYSTEM SISTEMA DE MICROCOMPONENTES SISTEMA A MICROCOMPONENTI UX-T151/T150 MICRO COMPONENT SYSTEM SISTEMA DE MICROCOMPONENTES SISTEMA A MICROCOMPONENTI INSTRUCCIONES MANUALE DI ISTRUZIONI INSTRUCTIONS NEDERLANDS ESPAÑOL DEUTSCH ENGLISH LVT0056-002A [E] UX-T151/T150E 4/7/98, 19:49 37[…]
-
Страница 2
2 ENGLISH ESP AÑOL IT ALIANO Thank you for purchasing this JVC product. Please read these instructions carefully before starting operation to be sure to obtain optimum performance and a longer service life from the unit. Le agradecemos la adquisición de este producto de JVC. Por favor lea detenidamente las instrucciones antes de comenzar la opera[…]
-
Страница 3
3 CLASS 1 LASER PRODUCT Caution: This production contains a laser component of higher laser class than Class 1. Attenzione: Questo prodotto contiene un laser di classe susperiore alla 1. Precaución: Este producto contiene un componente láster de clase superior a la Clase 1. DANGER: Invisible la ser ra diation when o pen a n d interlock f ailed or[…]
-
Страница 4
4 3. When unplugging from the wall outlet, always grasp and pull the plug, not the power cord. 4. Consult your nearest dealer when damage, disconnection, or contact failure affects the cord. 5. Do not bend the cord severely , or pull or twist it. 6. Do not modify the power cord in any manner. 7. T o avoid accidents, do not remove screws to disassem[…]
-
Страница 5
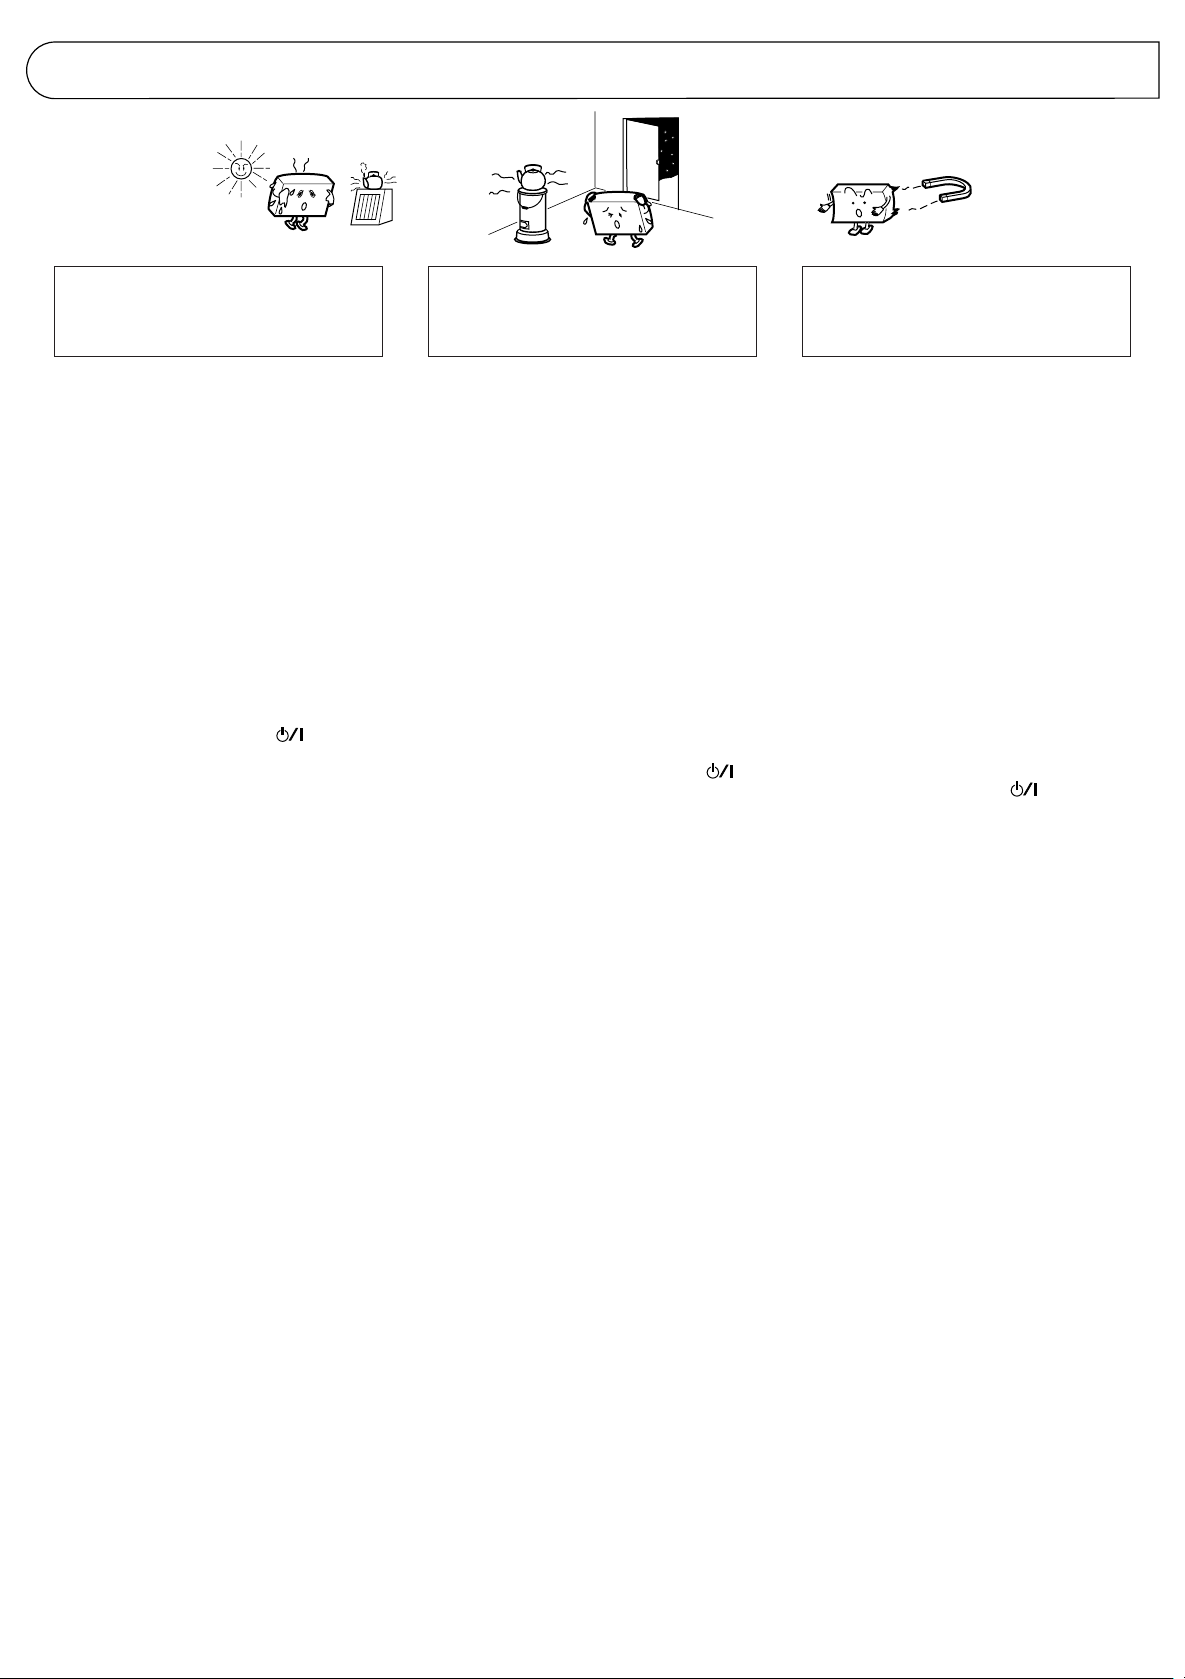
5 HANDLING PRECAUTIONS PRECAUCIONES DE MANIPULACION PRECAUZIONI PER L ’USO Non utilizzare questa unità in luoghi esposti alla luce solare diretta dove la temperatura può superare i 40°C. No utilice esta unidad bajo la luz directa del sol donde podría quedar expuesta a temperaturas superiores a 40°C. Do not use this unit in direct sunlight wh[…]
-
Страница 6
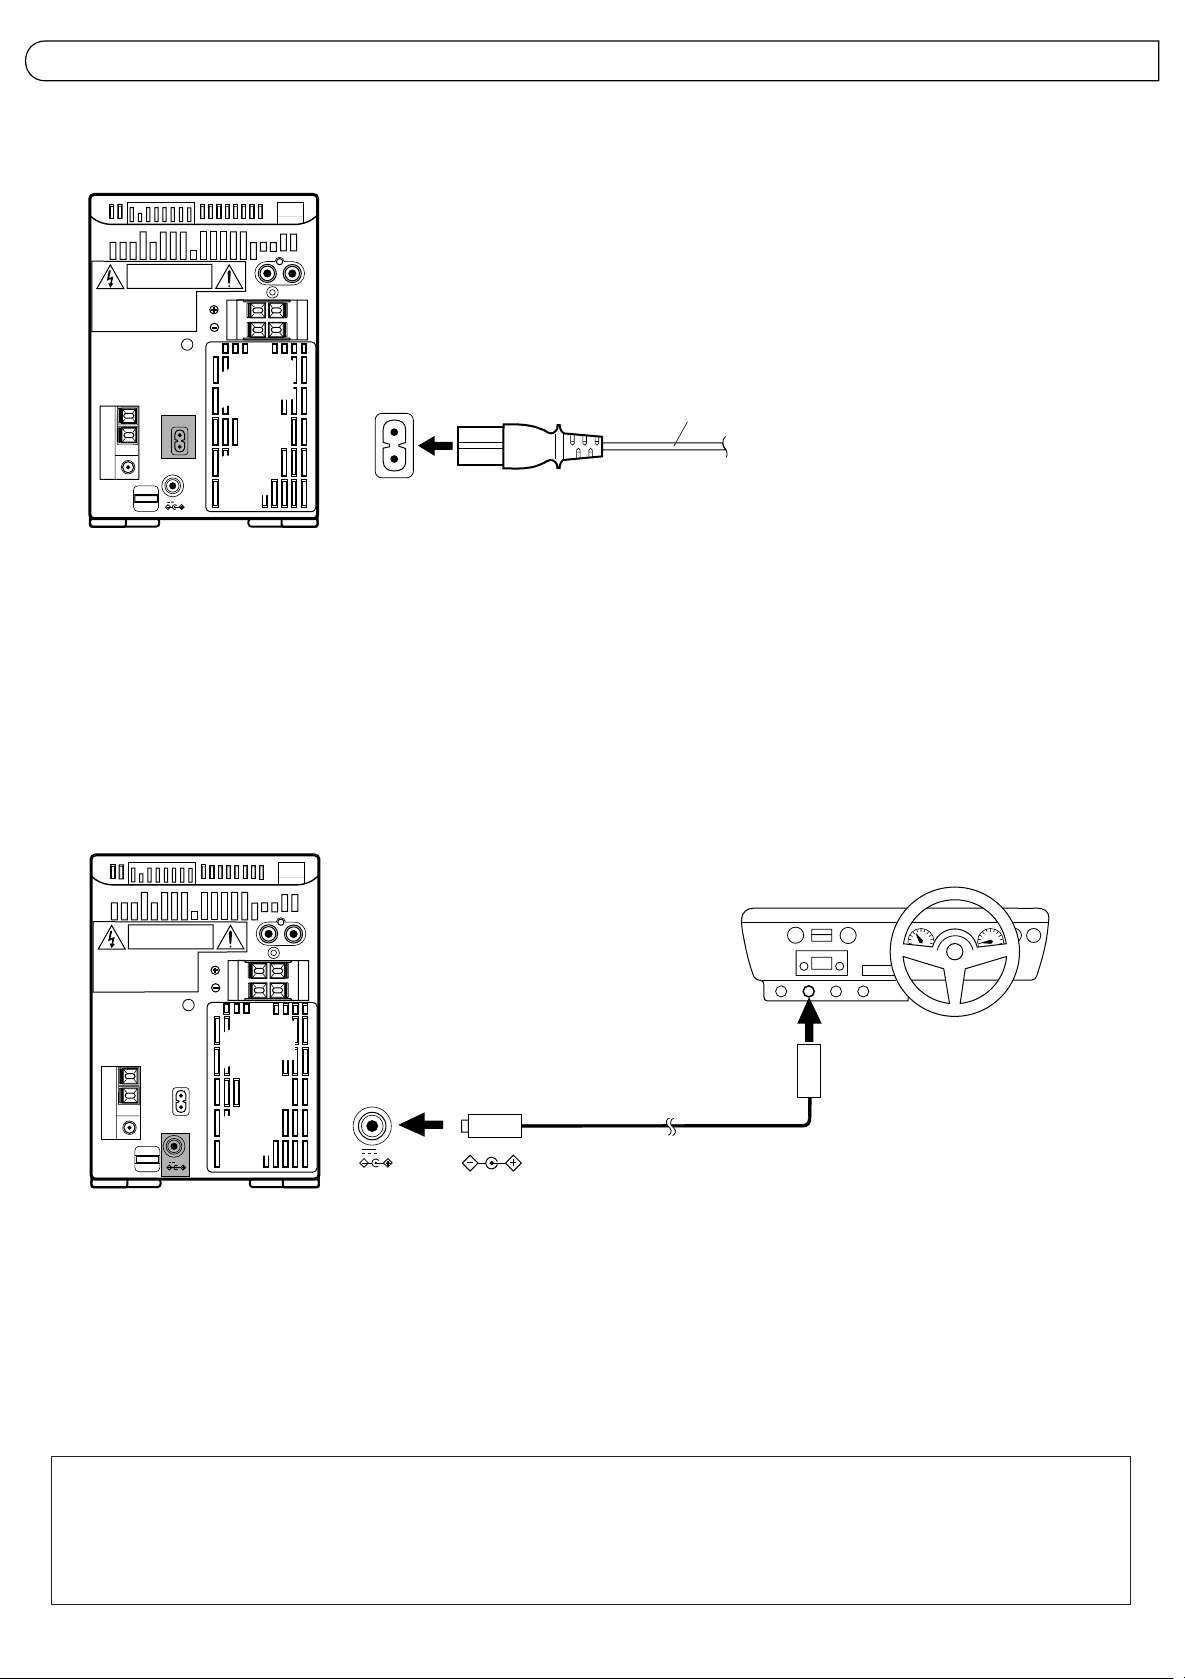
6 ` AC IN RIGHT R L LEFT DC IN 12V — CONNECTIONS CONEXIONES COLLEGAMENTI Notas: ● No coloque la antena de cuadro sobr e un escritorio de metal o cerca de un TV o computador personal. ● La instalación de una antena externa requiere conocimientos; nosotros le r ecomendamos que consulte con su agente de audio. ● Coloque el cable de la antena […]
-
Страница 7
7 ` AC IN R L DC IN 12V — 1 23 RIGHT LEFT RIGHT LEFT Speaker cord connection Conexión de los cordones de los altavoces Collegamento cavi diffusori Connect the Black cord to the œ terminal. Conecte el cordón negr o al terminal œ . Collegare il cavo nero al terminale œ . Notes: ● The polarity of the two connected speakers will be the same if[…]
-
Страница 8
8 ● When connecting the speaker cord make sure that the wire core, not the insulating cover , is connected to the speaker terminal. Otherwise, sound cannot be heard. ● Cuando conecta el cordón del altavoz, asegúrese de que el núcleo del cable, y no la cubierta aislante, quede conectado al terminal del altavoz, de lo contrario no se escuchar?[…]
-
Страница 9
9 ` AC IN RIGHT R L LEFT 12V DC IN DC IN 12V — DC IN 12V — RIGHT R L LEFT AC IN ` ` AC IN Note: ● When there is a power failure or the AC power cord is disconnected, the timer/clock setting is erased from memory . Reset the clock when the power supply is restored. Nota: ● Cuando hay un corte de energía eléctrica o cuando se desconecta el […]
-
Страница 10
10 NAMES OF P ARTS AND THEIR FUNCTIONS NOMBRES DE LAS P ARTES Y SUS FUNCIONES NOMI E FUNZIONI DELLE P ARTI CD player /General section Reproductor de CD/sección general Sezione lettore CD/generale 1 button and power ST ANDBY indicator 2 AUX button 3 Remote sensor section 4 Display window 1 Function/T rack number display 2 Play time display 3 Music […]
-
Страница 11
11 T uner/Deck section Sección del sintonizador/platina Sezione sintonizzatore/registratore 1 Display window 1 Band indicator 2 Radio frequency display 3 MONO indicator 4 STEREO indicator 5 Recording indicator (REC) 6 T ape direction indicator ( 1 , 4 ) 7 Reverse mode indicator ( / / ) 8 T ape (T APE) mode display 2 Cassette holder 3 Cassette hold[…]
-
Страница 12
12 REMOTE CONTROL UNIT UNIDAD DE CONTROL REMOTO UNIT A ’ DI TELECOMANDO Preparation before use ● Installing batteries in the remote control unit 1. Remove the battery cover from the back of the remote control unit. 2. Insert two “R6/AA (15F)” size batteries. ● Insert the batteries with the Œ and œ terminals matching the indication insid[…]
-
Страница 13
13 The following operations can be performed using the remote control unit. ● Check the operation button functions carefully and operate them correctly . Las siguientes operaciones deben ser ejecutadas utilizando la unidad de control remoto. ● Compruebe detalladamente el funcionamiento de los botones de operación y opérelos correctamente. Le […]
-
Страница 14
14 SWITCHING THE POWER ON/OFF CONEXION/DESCONEXION DE LA ALIMENT ACION ACCENSIONE E SPEGNIMENTO AUX button Botón AUX T asto AUX CD play/pause ( $6 ) button Botón de reproducción/pausa de CD ( $6 ) T asto riproduzione/pausa CD ( $6 ) T APE play ( 1 , 4 ) buttons Botones de repr oducción T APE ( 1 , 4 ) T asti di riproduzione T APE ( 1 , 4 ) butt[…]
-
Страница 15
15 BAND TAPE CD TUNER AUX Operación de un solo toque (COMPU PLA Y) Cuando la alimentación está colocada en ST ANDBY , el presionar el botón mostrado abajo conecta la alimentación y selecciona la fuente. Funzionamento ad un solo tocco (COMPU PLA Y) Anche se l’unità si trova nel modo ST ANDBY , premendo uno dei tasti indicati di seguito essa […]
-
Страница 16
16 Since dirty , damaged and warped CDs may damage the unit, take care regarding the following: 1. Usable CDs Use CDs with the mark shown. 2. Notes on handling CDs ● Do not touch the reflective recorded surface. ● Do not stick or write anything on the label side. ● Do not bend CDs. 3. Storage ● After removing a CD from the unit, be sure to […]
-
Страница 17
17 1 2 3 4 5 6 7 8 9 10 11 12 Playing an entire CD The following example of playing an entire CD assumes a CD with 12 tracks and a total playing time of 48 minutes 57 seconds. Operate in the order shown PLA YING CDs REPRODUCCION DE CD Reproducción de un CD completo El siguiente ejemplo de repr oducción de un CD completo supone que se ha colocado […]
-
Страница 18
18 M U L T I J O G 1 Presione el botón CD 4 / 6 para activar el modo de CD 2 Seleccione la pista deseada usando los botones de número de pista. ● Para designar las pistas del número 1 al 10, presione el botón de númer o de pista correspondiente a la misma. 1 Premere il tasto CD 4 / 6 per impostare il modo del lettore CD. 2 Designare il brano[…]
-
Страница 19
19 2 6 PROGRAM C D 2 PROGRAM PROGRAM 2 PROGRAM 2 6 PROGRAM 2 6 12 1 23 4 5 6 C D +10 ● Per designare il numero 1 1 o un numero maggiore, premere il tasto +10 per il numero di volte necessario e quindi un tasto numerico. (Esempio: Per indicare il 20° brano, premere una volta il tasto +10 e quindi il tasto di numero di brano 10.) * T asto +10: Ogn[…]
-
Страница 20
20 Per controllare i dettagli di un programma… Premere il tasto PROGRAM; i brani programmati vengono visualizzati nell’ordine programmato. Para confirmar los detalles de un programa… Presione el botón PROGRAM; las pistas que componen el programa serán indicadas en el orden pr ogramado. T o confirm the details of a program… Press the PROGR[…]
-
Страница 21
21 Cassette loading 1 . Press the eject ( 8 ) button to open the cassette holder . 2. Load a cassette as shown. 3. Close the cassette holder by pressing it gently . Listen for the click indicating that the holder is securely shut. Colocación de cassettes 1. Presione el botón eject ( 8 ) para abrir el portacassette. 2. Extraiga el cassette como se[…]
-
Страница 22
22 CASSETTE PLA YBACK REPRODUCCION DE CASSETTES RIPRODUZIONE DI CASSETTE Operate in the order shown Opere en el orden mostrado Eseguire le operazioni nell’ordine indicato Método para avanzar/rebobinar rápido la cinta 1. Presione el botón T APE ( ;’ ), para activar el modo T APE. 2. Presione el botón ™ o £ . ● La cinta puede ser bobi[…]
-
Страница 23
23 RADIO RECEPTION RADIORRECEPCION RICEZIONE CON LA RADIO Operate in the order shown Opere en el orden mostrado Eseguire le operazioni nell’ordine indicato Notes: ● When seek tuning to the required station is not possible because the broadcast signal is too weak, press the ™ or £ button momentarily to perform manual tuning. ● When the powe[…]
-
Страница 24
24 SLEEP 12 3 4 7 10 8 +10 AUX 9 6 5 AUTO PRESET DISPLAY PROGRAM RANDOM REPEAT BEAT CUT REVERSE MODE STEREO AUTO/MONO MULTI CONTROL REW FF TAPE TUNER BAND C D 3 4 1 2 Auto preset tuning (using the remote control unit) This function scans the current band, detecting frequencies used to broadcast signals, and stores the first 30 FM frequencies and 15[…]
-
Страница 25
25 Preset tuning ● The stations must be preset before this operation can be performed. (Using the main unit) 1 Press the TUNER/BAND button. 2 Select the band using the TUNER/BAND button. 3 T o select the requied preset station, turn the MUL TI JOG dial. Presintonización ● Las estaciones deben ser pr esintonizadas antes de que se pueda ejecutar[…]
-
Страница 26
26 1 Inserire una cassetta col lato A rivolto all’esterno. (Superarne la sezione guida del nastro prima di avviare la registrazione.) 2 Inserire un CD e chiudere il piatto del CD. 3 Impostare il modo del CD. 4 Premere il tasto 5 per impostare il modo di arresto. 5 Selezionare il modo autoreverse desiderato ( o ). ● Per la riproduzione programma[…]
-
Страница 27
27 ● Función de grabación del CD completo (modo de grabación sincronizada exclusivamente) Si la cinta es invertida mientras el CD está siendo repr oducido, la grabación se efectuará en el lado opuesto de la cinta, de la siguiente manera: * Cuando se hayan grabado menos de 12 segundos de la última música en el lado frontal de la cinta, la […]
-
Страница 28
28 BEAT CUT BEA T CUT button (using the remote control unit) When recording an AM broadcast, beats may be produced which are not heard when listening to the broadcast. In such case, set this button after setting the deck to the record mode so that the beats are eliminated. Normally set this button to “CUT -1”. Botón BEA T CUT (utilizando la un[…]
-
Страница 29
29 CLOCK M U L T I J O G CLOCK CLOCK M U L T I J O G CLOCK CLOCK CLOCK CLOCK CLOCK CLOCK 1 2 3 Setting the current time (when this unit is used for the first time) (Example: T o set the clock to 13:15.) Ajuste de la hora actual (Cuando se usa la unidad por primera vez) (Ejemplo: Para ajustar el reloj a las 13:15.) Impostazione orario(Quando l'[…]
-
Страница 30
30 TUNER TUNER REC CD TAPE TIMER/SNOOZE M U L T I J O G 3 Set the stop time. (Example: T o set the timer stop timer to 13: 15.) 3 Ajuste la hora de desactivación. (Ejemplo: Para ajustar el temporizador a las 13:15.) 3 Impostare l’orario di fine. (Esempio: Per impostare il timer su 13:15.) ● Press to set the timer off time. ● Presione para[…]
-
Страница 31
31 Timer recording of broadcast ● The current time must be set before the timer can be used. ● Make sure that the safety tabs of the cassette have not been broken off. Operations Grabación por temporizador de una radiodifusión ● Antes de utilizar el temporizador es necesario ajustar la hora actual. ● Asegúrese de que las lengüetas de se[…]
-
Страница 32
32 Timer playback ● T imer playback of tapes, broadcasts and CDs is possible. Operations Reproducción por temporizador ● La repr oducción por temporizador de cintas, radiodifusiones, y CD es posible. Operaciones Riproduzione col timer ● E’ possibile eseguire la riproduzione col timer di nastri, trasmissioni e CD. Operazioni 1 Set the butt[…]
-
Страница 33
33 Quando si seleziona la ricezione di trasmissioni sia per lo spegnimento automatico che per la riproduzione col timer , comunque, la stazione sintonizzata per lo spegnimento automatico viene sintonizzata anche per la riproduzione col timer . ● Para dormir 5 minutos más…. Cuando se activa la reproducción por temporizador , presione el botón[…]
-
Страница 34
34 ¡La limpieza es importante! Cuando la cinta está girando, el polvo magnético y el polvo se acumulan naturalmente en las cabezas, cabrestante y r odillo de presión. Cuando estén muy sucios… ● La calidad de sonido se deteriora. ● El nivel de salida de sonido se reduce. ● Las cintas grabadas no se borran completamente. ● La grabació[…]
-
Страница 35
35 What appears to be trouble is not always serious. First make sure…. ● Power cannot be turned on. * Is the power cord unplugged? ● No sound from the speakers. * Are headphones connected? CD Player Section ● The CD player does not play . * Is the CD upside down? * Is the CD dirty? ● A certain portion of the CD does not play correctly . *[…]
-
Страница 36
VICTOR COMPANY OF JAPAN, LIMITED U X MIC R SISTE M SISTE M UX-T151/T150 MICRO COMPONENT SYSTEM SISTEMA DE MICROCOMPONENTES SISTEMA A MICROCOMPONENTI Printed in China 0398MNMOZKJSC T ape deck section Track system : 4-track 2-channel stereo Motor : Electronic governor DC motor for capstan Heads : Hard permalloy head for recording/playback, 2 gap ferr[…]
Скачать файл PDF «JVC UX-T150 Инструкция по эксплуатации» (792 Kb)
Популярность:
6062 просмотры
Подсчет страниц:
36 страницы
Тип файла:
Размер файла:
792 Kb
Google Ads:
MICRO COMPONENT SYSTEM
SISTEMA DE MICROCOMPONENTES
SISTEMA A MICROCOMPONENTI
UX-T151/T150
NEDERLANDS ESPAÑOL DEUTSCH ENGLISH
INSTRUCTIONS
INSTRUCCIONES
MANUALE DI ISTRUZIONI
LVT0056-002A
[E]
ENGLISH ESPAÑOL ITALIANO
Thank you for purchasing this JVC product.
Please read these instructions carefully before
starting operation to be sure to obtain optimum
performance and a longer service life from the
unit.
Le agradecemos la adquisición de este producto
de JVC. Por favor lea detenidamente las
instrucciones antes de comenzar la operación
para obtener de esta unidad un rendimiento
óptimo y una vida de servicio más larga.
Grazie per avere acquistato questo prodotto
JVC. Si prega di leggere queste istruzioni con
attenzione prima dell’uso per essere certi di
ottenere prestazioni ottimali ed una lunga durata
dell’unità.
CONTENTS INDICE INDICE
Features ………………………………….. 3
Safety precautions……………………..3
Handling precautions………………….5
Connections …………………………….. 6
Power supply……………………………. 9
Names of parts and their
functions………………………………… 10
Remote control unit …………………. 12
Switching the power on/off ……….. 14
V olume, tone and other controls…15
Handling CDs. ………………………… 16
Playing CDs……………………………. 17
Handling cassette tapes. ………….. 21
Cassette playback …………………… 22
Radio reception ………………………. 23
Recording………………………………. 25
Clock adjustment…………………….. 28
Timer operations …………………….. 29
Maintenance…………………………… 34
Troubleshooting………………………. 35
Specifications …………………………. 35
Características …………………………. 3
Precauciones de seguridad……….. 3
Precauciones de manipulación…… 5
Conexiones ……………………………… 6
Alimentación…………………………….. 9
Nombres de las partes y sus
funciones……………………………….. 10
Unidad de control remoto ………… 12
Conexión/desconexión de la
alimentación…………………………… 14
Volumen, tono y otros controles … 15
Manipulación de CD ……………….. 16
Reproducción de CD ………………. 17
Manipulación de cassettes de
cinta ……………………………………… 21
Reproducción de cassettes ……… 22
Radiorrecepción……………………… 23
Grabación ……………………………… 25
Ajuste del reloj………………………… 28
Operaciones por temporizador …. 29
Mantenimiento………………………… 34
Caratteristiche ………………………….. 3
Precauzioni per la sicurezza……….. 3
Precauzioni per l’uso …………………. 5
Collegamenti ……………………………. 6
Alimentazione…………………………… 9
Nomi e funzioni delle parti ………… 10
Unità di telecomando……………….. 12
Accensione e spegnimento ………. 14
Volume, toni ed altri comandi ……. 15
Maneggio dei CD…………………….. 16
Riproduzione di CD …………………. 17
Maneggio dei nastri a cassetta….. 21
Riproduzione di cassette ………….. 22
Ricezione con la radio ……………… 23
Registrazione …………………………. 25
Regolazione orologio……………….. 28
Funzionamento col timer ………….. 29
Manutenzione…………………………. 34
Diagnostica ……………………………. 35
Dati tecnici……………………………… 35
Detección de problemas………….. 35
Especificaciones …………………….. 35
WARNING:
TO REDUCE THE RISK OF FIRE OR
ELECTRIC SHOCK, DO NOT EXPOSE
THIS APPLIANCE TO RAIN OR
MOISTURE.
CAUTION
RISK OF ELECTRIC SHOCK
DO NOT OPEN
CAUTION: TO REDUCE THE RISK OF ELECTRIC SHOCK.
DO NOT REMOVE COVER (OR BACK).
REFER SERVICING TO QUALIFIED SERVICE PERSONNEL.
NO USER-SERVICEABLE PARTS INSIDE.
IMPORTANT FOR LASER
PRODUCTS
PRECAUTIONS
1.CLASS 1 LASER PRODUCT
2.DANGER: Invisible laser radiation when open
and interlock failed or defeated. Avoid direct
exposure to beam.
3.CAUTION: Do not open the rear cover. There
are no user serviceable parts inside the unit;
leave all servicing to qualified service
personnel.
4.CAUTION: The CD player uses invisible laser
radiation and is equipped with safety switches
which prevent the emission of radiation when
the CD holder or CD tray is open. It is
dangerous to defeat the safety switches.
5.CAUTION: Use of controls for adjustments
and the performance of procedures other than
those specified herein may result in exposure
to hazardous radiation.
2
ADVERTENCIA:
PARA REDUCIR EL RIESGO DE
INCENDIO O DE CHOQUES ELECTRICOS,
NO EXPONGA ESTE APARATO A LA
LLUVIA O A LA HUMEDAD.
The lightning flash with arrowhead symbol, within an
equilateral triangle, is intended to alert the user to the
presence of uninsulated «dangerous voltage» within the
product’s enclosure that may be of sufficient
magnitude to constitute a risk of electric shock to
persons.
The exclamation point within an equilateral triangle is
intended to alert the user to the presence of important
operating and maintenance (servicing) instructions in
IMPORTANTE PARA PRODUCTOS
LASER
PRECAUCIONES
1.PRODUCTO LASER CLASE 1
2.PELIGRO: Radiación láser invisible cuando
se abre, falla o se desactiva el enclavamiento.
Evite la exposición directa al rayo.
3.PRECAUCION: No abra la cubierta trasera.
Dentro de la unidad no hay componentes que
el usuario pueda reparar; deje toda
reparación al personal de servicio cualificado.
4.PRECAUCION: El reproductor de CD utiliza
radiación láser invisible y está equipado con
interruptores de seguridad que evitar la
emisión de radiación cuando se abre el
portadisco de CD o compartimiento del CD.
Es peligroso desactivar los interruptores de
seguridad.
5.PRECAUCION: La utilización de los controles
de ajuste y de procedimientos que no estén
especificados aquí, puede resultar en
exposición a radiación peligrosa.
AVVERTENZA:
NON ESPORRE L’APPARECCHIO A
PIOGGIA O UMIDITA’ ONDE RIDURRE I
RISCHI DI FIAMME O SCOSSE
ELETTRICHE.
Per l’Italia:
“Si dichiara che il questo prodotto di marca
JVC è conforme alle prescrizioni del Decreto
Ministeriale n.548 del 28/08/95 pubblicato
sulla Gazzetta Ufficiale della Repubblica
Italiana n.301 del 28/12/95.”
IMPORTANTI PRECAUZIONI PER
PRODOTTI LASER
PRECAUZIONI
1.
PRODOTTO LASER DI CLASSE 1
2.PERICOLO:
ed i dispositivi di sicurezza non funzionano o
sono stati disattivati, vengono prodotte invisibili
radiazioni laser. Evitare l’esposizione diretta
al raggio.
3.ATTENZIONE:
posteriore. All’interno dell’unità non vi sono
parti che possono interessare l’utente; fare
eseguire qualsiasi intervento a personale di
assistenza qualificato.
4.ATTENZIONE:
laser invisibili ed è fornito di interruttori di
sicurezza per evitare l’emissione di tali
radiazioni quando il piatto del CD è aperto.
Non escludere tali interruttori di sicurezza in
quanto ciò è pericoloso.
5.ATTENZIONE:
diversi da quanto specificato possono risultare
nell’esposizione a radiazioni pericolose.
Quando l’apparecchio è aperto
Non aprire la copertura
Il lettore CD utilizza radiazioni
L’uso di comandi e procedure
REPRODUCTION OF LABELS
AND THEIR LOCA TION
DANGER: Invisible laser
radiation when op en and
interlock failed or defeated.
AVOID DIRECT EXPOSURE
TO BEAM. (e)
ADVARSEL: Usynlig laserstråling ved åbning, når
sikkerh edsafbryd ere e r u de
af funktion. Undgåudsættelse for stråling. (d)
VARNING: Osynlig laser-
strålning när denna del
är öppnad och spärren
urkopplad. Betrakta
strålen. (s)
REPRODUCCION DE ETIQUET AS
Y SU UBICACION
Name/Rating plate
Placa de nombre/especificaciones
Piastrina nome/caratteristiche
VARO: Avattaessa ja suojalukitus ohitettaessa olet
är
alttiina näkymättömälle
ej
lasersäteilylle. Älä katso
säteeseen. (f)
ETICHETTE E LORO POSIZIONE
CLASS 1
LASER PRODUCT
Caution:
This production contains a laser component of higher
laser class than Class 1.
Attenzione:
Questo prodotto contiene un laser di classe
susperiore alla 1.
Precaución:
Este producto contiene un componente láster de
clase superior a la Clase 1.
FEA TURES CARACTERISTICAS CARA TTERISTICHE
● CD-size micro component system consisting
of 3 units
● Active Hyper-Bass PRO circuit for lowfrequency sound reproduction
● One-touch operation (COMPU PLAY)
● 35-key remote control unit operates all CD,
cassette deck and tuner functions
● Multi-function CD player
● Programmed play of up to 20 tracks
● Repeat Play
● Random Play
● U-Turn auto-reverse full-logic mechanism
● Auto tape select mechanism
● Metal (type IV) and CrO2 (type II) tape can be
played back for superior tone quality
● CrO2 (type II) tape recording capability
● 2-band digital synthesizer tuner with 45-station
(30 FM and 15 AM (MW/L W)) preset capability
● Seek/manual tuning
● Auto preset tuning
● Timer/Clock function
● Timer on/off with preset volume function
● Sleep timer can be set for up to 120 minutes
● Sistema de microcomponentes del tamaño
de un CD, consistente de 3 unidades
● Circuito Active Hyper-Bass PRO para
reproducción sonidos de baja frecuencia
● Operación de un solo toque (COMPU PLAY)
● Unidad de control remoto con 35 teclas para
operación del CD, platina de cassette y
funciones del sintonizador
● Reproductor de CD con funciones múltiples
● Reproducción programada hasta 20 pistas
● Repetición de reproducción
● Reproducción aleatoria
● Mecanismo de lógica completa inversión
automática en U
● Mecanismo de selección automática de cinta
● Para obtener una calidad de tono superior
es posible utilizar cintas de metal (tipo IV) y
de CrO2 (tipo II)
● Capacidad para grabación de cintas de CrO2
(tipo II)
● Sintonizador sintetizador digital de 2 bandas
con capacidad para presintonización de 45
estaciones (30 de FM y 15 de AM (OM/OL))
● Sintonización búsqueda/manual
● Sintonización programada automática
● Función de temporizador/reloj
● Activación/desactivación del temporizador
con función de volumen preajustado
● El temporizador despertador puede ser
programado hasta un máximo de 120 minutos
●
Sistema a microcomponenti formato CD
composto da 3 unità
●
Circuito Active Hyper-Bass PRO di nuova
concezione per la riproduzione delle basse
frequenze
●
Funzionamento ad un tocco (COMPU PLAY)
●
L’unità di telecomando da 35 tasti controlla
tutte le funzioni del lettore CD, del registratore
a cassette e del sintonizzatore
●
Lettore CD multifunzione
●
Riproduzione programmata di fino a 20 brani
●
Riproduzione ripetuta
●
Riproduzione casuale
●
Meccanismo U-Turn di inversione automatica
completamente logico
●
Meccanismo per la selezione automatica del
tipo di nastro
●
Possono essere riprodotti nastri Metal (tipo
IV) e CrO2 (tipo II) che forniscono una migliore
qualità musicale
●
Capacità di registrazione su nastri CrO2 (tipo II)
●
Sintonizzatore a sintetizzazione digitale a 2
bande con capacità di preselezione di fino a
45 stazioni (30 FM e 15 AM (MW/LW))
●
Sintonizzazione con ricerca/manuale
●
Sintonizzazione con preselezione automatica
●
Funzione timer/orologio
●
Funzione di attivazione e disattivazione via
timer con preimpostazione del volume
●
Il timer per lo spegnimento automatico può
essere impostato per fino a 120 minuti
SAFETY PRECAUTIONS PRECAUCIONES DE SEGURIDAD PRECAUZIONI PER LA SICUREZZA
Prevention of Electric Shocks, Fire Hazards
and Damage
1. Even when the button is set to
STANDBY, a very small current will flow. To
save power and for safety when not using
the unit for an extended period of time,
disconnect the power cord from the
household AC outlet.
2. Do not handle the power cord with wet hands.
Prevención de choques eléctricos, peligro
de incendio y daños
1. Aunque el botón de alimentación , esté
colocado en espera STANDBY, fluye una
pequeñísima corriente eléctrica. Para
ahorrar energía y por seguridad cuando no
utiliza esta unidad durante un largo período,
desconecte el cordón eléctrico del
tomacorriente de CA.
2. No manipule el cordón eléctrico con las
manos mojadas.
Prevenzione di scosse elettriche, fiamme e
danni
1. Anche quando l’interruttore si trova sulla
posizione STANDBY, una piccola quantità di
corrente continua a fluire. Per risparmiare
energia e per ragioni di sicurezza, scollegare il
cavo dell’alimentazione dalla presa di corrente
CA quando si prevede di non utilizzare l’unità
per un periodo prolungato.
2. Non maneggiare il cavo di alimentazione con
le mani bagnate.
3
3. When unplugging from the wall outlet, always
grasp and pull the plug, not the power cord.
4. Consult your nearest dealer when damage,
disconnection, or contact failure affects the
cord.
5. Do not bend the cord severely , or pull or twist
it.
6. Do not modify the power cord in any manner.
7. To avoid accidents, do not remove screws
to disassemble the unit and do not touch
anything inside the unit.
8. Do not insert any metallic objects into the
unit.
9. Unplug the power cord when there is a
possibility of lightning.
10.If water gets inside the unit, unplug the power
cord from the outlet and consult your dealer.
11.Do not block the unit’s ventilation holes that
allow heat to escape.
Do not install the unit in a badly ventilated
place.
3. Cuando lo desenchufa del tomacorriente de
la pared, sujételo siempre por el enchufe,
nunca por el cordón.
4. En caso de que el cordón sea afectado por
daños, desconexión, o falso contacto,
consulte a su agente más cercano.
5. No doble en ángulo agudo el cordón, no jale
del mismo ni lo retuerza.
6. No modifique el cordón eléctrico de ninguna
manera.
7. Para evitar accidentes, no extraiga los
tornillos para desarmar la unidad y no toque
nada dentro de la misma.
8. No inserte ningún objeto metálico dentro de
la unidad.
9. Desenchufe el cordón eléctrico cuando
haya posibilidad de caída de rayos.
10.Si se introduce agua dentro de la unidad,
desenchufe el cordón eléctrico del
tomacorriente y consulte a su agente.
11.No bloquee los orificios de ventilación de la
unidad que permiten el escape de calor.
No instale la unidad en un lugar mal
ventilado.
3. Per scollegarsi dalla presa di rete, afferrare
sempre la spina e non il cavo
dell’alimentazione.
4. Consultare il rivenditore più vicino quando il
cavo è danneggiato, scollegato o con contatti
scadenti.
5. Non piegare eccessivamente il cavo, non
tirarlo e non torcerlo.
6. Non modificare il cavo di alimentazione in
alcun modo.
7. Per evitare incidenti, non rimuovere viti per
smontare l’unità e non toccare alcun
componente interno.
8. Non inserire alcun oggetto metallico nell’unità.
9. Scollegare il cavo di alimentazione durante
temporali con fulmini.
10.Se dell’acqua dovesse penetrare all’interno
dell’unità, scollegare il cavo dell’alimentazione
dalla presa di rete e consultare il proprio
rivenditore.
11.Non bloccare i fori per la ventilazione dell’unità
che permettono la dissipazione del calore.
Non installare l’unità in un luogo con
ventilazione scadente.
button
When the power cord is connected to a
household AC outlet, the power indicator
lights in red indicating the STANDBY mode.
When the button is pressed, the power
indicator goes out and the display window
lights.
When this unit is plugged into an AC outlet,
it consumes a small current to operate the
remote control and timer, or to back up the
memory of the microprocessor, even when
the button is set to STANDBY.
Caution:
Proper Ventilation
To avoid risk of electric shock and fire, and to
prevent damage, locate the apparatus as
follows:
1. Front:
No obstructions and open spacing.
2. Sides/Top/Back:
No obstructions should be placed in the
areas shown by the dimensions below.
3. Bottom:
Place on a level surface. Maintain an
adequate air path for ventilation by placing
on a table with a height of 10 cm or more.
Front view
Vista frontal
Visione anteriore
Botón
Cuando se conecta el cordón eléctrico al
tomacorriente de CA, el indicador de
alimentación se enciende en rojo
indicando el modo STANDBY. Cuando
presiona el botón , el indicador de
alimentación se apaga y se enciende la
ventanilla de indicación.
Esta unidad consume una pequeña
corriente cuando se la conecta a un
tomacorriente de CA, para hacer funcionar
el controlador remoto y el temporizador, o
para apoyo de la memoria del
microprocesador, aún cuando se haya
colocado el botón en STANDBY.
Precaución:
Ventilación correcta
Para evitar el riesgo de descargas eléctricas e
incendio y prevenir posibles daños, instale el
equipo en un lugar que cumpla los siguientes
requisitos:
1. Parte frontal:
Sin obstrucciones, espacio abierto.
2. Lados/Parte superior/Parte posterior:
No debe haver ninguna obstrucción en las
áreas mostradas por las dimensiones de la
siguiente figura.
3. Parte inferior:
Sitúe el equipo sobre una superficie
nivelada. Mantenga un espacio adecuado
para permitir el paso del aire y una correcta
ventilación, situando el equipo sobre una
mesa de 10 o más cm de altura.
15 cm
Interruttore di accensione ( )
Quando il cavo di alimentazione è collegato
con una presa di rete CA, l’indicatore
dell’alimentazione si illumina in rosso per
indicare il modo STANDBY. Quando il tasto
viene premuto, l’indicatore
dell’alimentazione si spegne ed il display
si illumina.
Quando questa unità è collegata ad una
presa di corrente CA, essa consuma una
piccola quantità di corrente per il
funzionamento del telecomando e del timer
o per il mantenimento della memoria del
microprocessore anche quando il tasto
è impostato su STANDBY.
Attenzione:
Ventilazione corretta
Per evitare rischi di scosse elettriche e fiamme,
installare l’apparecchio come indicato di seguito:
1. Lato anteriore:
Nessun ostacolo e spazio aperto.
2. Lati sinistro e destro/superiore/posteriore:
Nessun ostacolo deve essere posto nell’area
indicata dalle dimensioni riportate in basso.
3. Fondo:
Posizionare su di una superficie a livello.
Mantenere un percorso adeguato per la
ventilazione utilizzando una tavola con
un’altezza di 10 cm o più.
Side view
Vista lateral
Visione laterale
15 cm
15 cm
AUX
1cm
UX-T151/T150
1cm
15 cm
10 cm
15 cm
UX-T151
/T150
4
HANDLING PRECAUTIONS
PRECAUCIONES DE
MANIPULACION
PRECAUZIONI PER L’USO
Do not use this unit in direct sunlight where
it would be exposed to high temperatures
above 40°C (104°F).
1. Avoid installing in the following places
● Where it could be subject to vibrations.
● Where it is excessively humid, such as in
a bathroom.
● Where it could be magnetized by a magnet
or speaker.
2. Pay attention to dust
Be sure to close the CD holder or CD tray so
that dust does not collect on the lens.
3. Condensation
In the following cases, condensation may
occur in the unit, in which case the unit may
not operate correctly.
● In a room where a heater has just been
switched on.
● In a place where there is smoke or high
humidity.
● When the unit is moved directly from a cold
to a warm room.
In these cases, set the button to
STANDBY and wait 1 or 2 hours before use.
4. Volume setting
CDs produce very little noise compared with
analog sources. If the volume level is
adjusted for these sources, the speakers
may be damaged by the sudden increase of
output level. Therefore, lower the volume
before operation and adjust it as required
during play.
5. Safety mechanism
This unit incorporates a safety interlock
mechanism which switches the laser beam
on and off, so that when the CD holder or
CD tray is open, the laser beam stops
automatically.
6. Do not place cassette tapes, etc. near the
speakers
Since there are magnets in the speakers, do
not place tapes or magnetic cards on them
as recorded data could be erased.
7. Keep this unit away from your TV
When this unit is used near a TV, the TV
picture could be distorted. If this happens,
move this unit away from the TV . If this does
not correct the situation, avoid using this unit
when the TV is turned on.
8. Cleaning the cabinet
If the cabinet gets dirty, wipe it with a soft,
dry cloth. Never use benzine or thinner as
these could damage the surface finish.
9. When listening with headphones
● Do not listen at high volumes as this could
damage your hearing.
● For safety, do not drive while listening to
this unit.
No utilice esta unidad bajo la luz directa
del sol donde podría quedar expuesta a
temperaturas superiores a 40°C.
1. Evite instalarla en los siguientes lugares
● Donde pueda ser sujeta a vibraciones.
● Donde haya humedad excesiva, tal como
en un cuarto de baño.
● Donde pueda ser magnetizada por un
imán o altavoz.
2. Preste atención al polvo
Asegúrese de cerrar el portadisco o
compartimiento de CD para que el polvo no
se deposite sobre la lente. No toque la lente.
3. Condensación
En los siguientes casos, puede producirse
condensación dentro de la unidad y en
consecuencia la unidad no funcionará
correctamente.
● En una sala donde haya un calentador
encendido.
● En un lugar donde haya humo o gran
humedad.
● Cuando se traslada rápidamente la
unidad de una sala fría a una templada.
En estos casos, coloque el botón en
ST ANDBY (conectado) y espere 1 o 2 horas
antes de utilizarla.
4. Ajuste del volumen
Los productos de CD producen muy poco
ruido comparados con las fuentes
analógicas. Si ajusta el nivel de volumen
para estas fuentes, es posible que los
altavoces sean dañados por el incremento
brusco del nivel de salida. Por ello, reduzca
el volumen antes de la operación y ajústelo
como desee durante la reproducción.
5. Mecanismo de seguridad
Esta unidad posee un mecanismo de
enclavamiento de seguridad que apaga y
enciende el rayo láser de tal manera que
cuando se abre el portadisco o
compartimiento de CD, el rayo láser se
apaga automáticamente.
6. No coloque cassettes de cinta, etc.,
próximos a los altavoces
Como hay imanes en los altavoces, no
coloque cintas o tarjetas magnéticas sobre
los mismos, ya que los datos grabados
pueden ser borrados.
7. Mantenga esta unidad lejos de su TV
Cuando se usa esta unidad próxima a un
TV, la imagen de éste puede ser
distorsionada. Si ello ocurre, mueva esta
unidad lejos del TV. Si esto no corrige el
problema, evite usar esta unidad cuando el
TV está encendido.
8. Limpieza del gabinete
Si el gabinete se ensucia límpielo con un
paño suave y seco. Nunca utilice bencina o
solventes ya que estos pueden dañar la
terminación de la superficie.
9. Cuando escuche con auriculares
● No escuche con el volumen muy alto
porque podrían dañarse sus oídos.
● Por seguridad, no conduzca cuando esté
escuchando esta unidad.
Non utilizzare questa unità in luoghi esposti
alla luce solare diretta dove la temperatura
può superare i 40°C.
1. Evitare l’installazione nei luoghi seguenti
●
In luoghi dove l’unità può essere soggetta
a vibrazioni.
●
In luoghi eccessivamente umidi come una
stanza da bagno.
●
In luoghi dove l’unità può essere
magnetizzata da un magnete o da un
diffusore.
2. Fare attenzione alla polvere
Accertarsi di chiudere il piatto o caricatore di
CD in modo che la polvere non si raccolga
sulla lente del pickup. Non toccare la lente
del pickup
3. Condensa
Nei casi seguenti della condensa si potrebbe
formare nell’unità impedendo il
funzionamento corretto dell’unità stessa.
●
In una stanza in cui il riscaldamento è
appena stato acceso.
●
In un luogo fumoso o con elevata umidità.
●
Quando l’unità viene spostata direttamente
da una stanza fredda ad una calda.
In questi casi, portare il tasto su ST ANDBY
ed attendere 1 o 2 ore prima di utilizzare l’unità.
4. Impostazione del volume
I CD producono un rumore estremamente
basso se confrontati con fonti analogiche. Se
il livello del volume fosse impostato per tali
fonti, i diffusori potrebbero venire danneggiati
dall’improvviso aumento del livello in uscita.
Abbassare perciò il volume prima dell’uso e
regolarlo quindi durante la riproduzione.
5. Meccanismo di sicurezza
Questa unitá incorpora un meccanismo di
sicurezza che attiva e disattiva il raggio laser
in modo che quando il piatto del CD é aperto
il raggio laser viene disattivato
automaticamente.
6. Non posare nastri a cassetta, ecc., in
prossimità dei diffusori
Dato che i diffusori incorporano dei magneti,
non posare nastri registrati o schede
magnetiche su di essi in quanto i materiali
registrati potrebbero venire cancellati.
7. Tenere l’unità lontana dal televisore
Quando questa unità viene utilizzata in
prossimità di un televisore, l’immagine TV
potrebbe venire distorta. Se ciò dovesse
accadere, allontanare l’unità dal televisore. Se
ciò non fosse sufficiente ad eliminare le
interferenze, evitare di utilizzare questa unità
quando il televisore è acceso.
8. Pulizia dell’esterno dell’unità
Se l’esterno dell’unità fosse sporco, strofinare
con un panno morbido ed asciutto.
Non usare mai benzina o diluente in quanto
essi possono danneggiare la finitura delle
superfici.
9. Ascolto con le cuffie
●
Non ascoltare ad alto il volume in modo
da danneggiare le orecchie.
● Per motivi di sicurezza, non guidare mentre
si ascolta questa unitê.
5
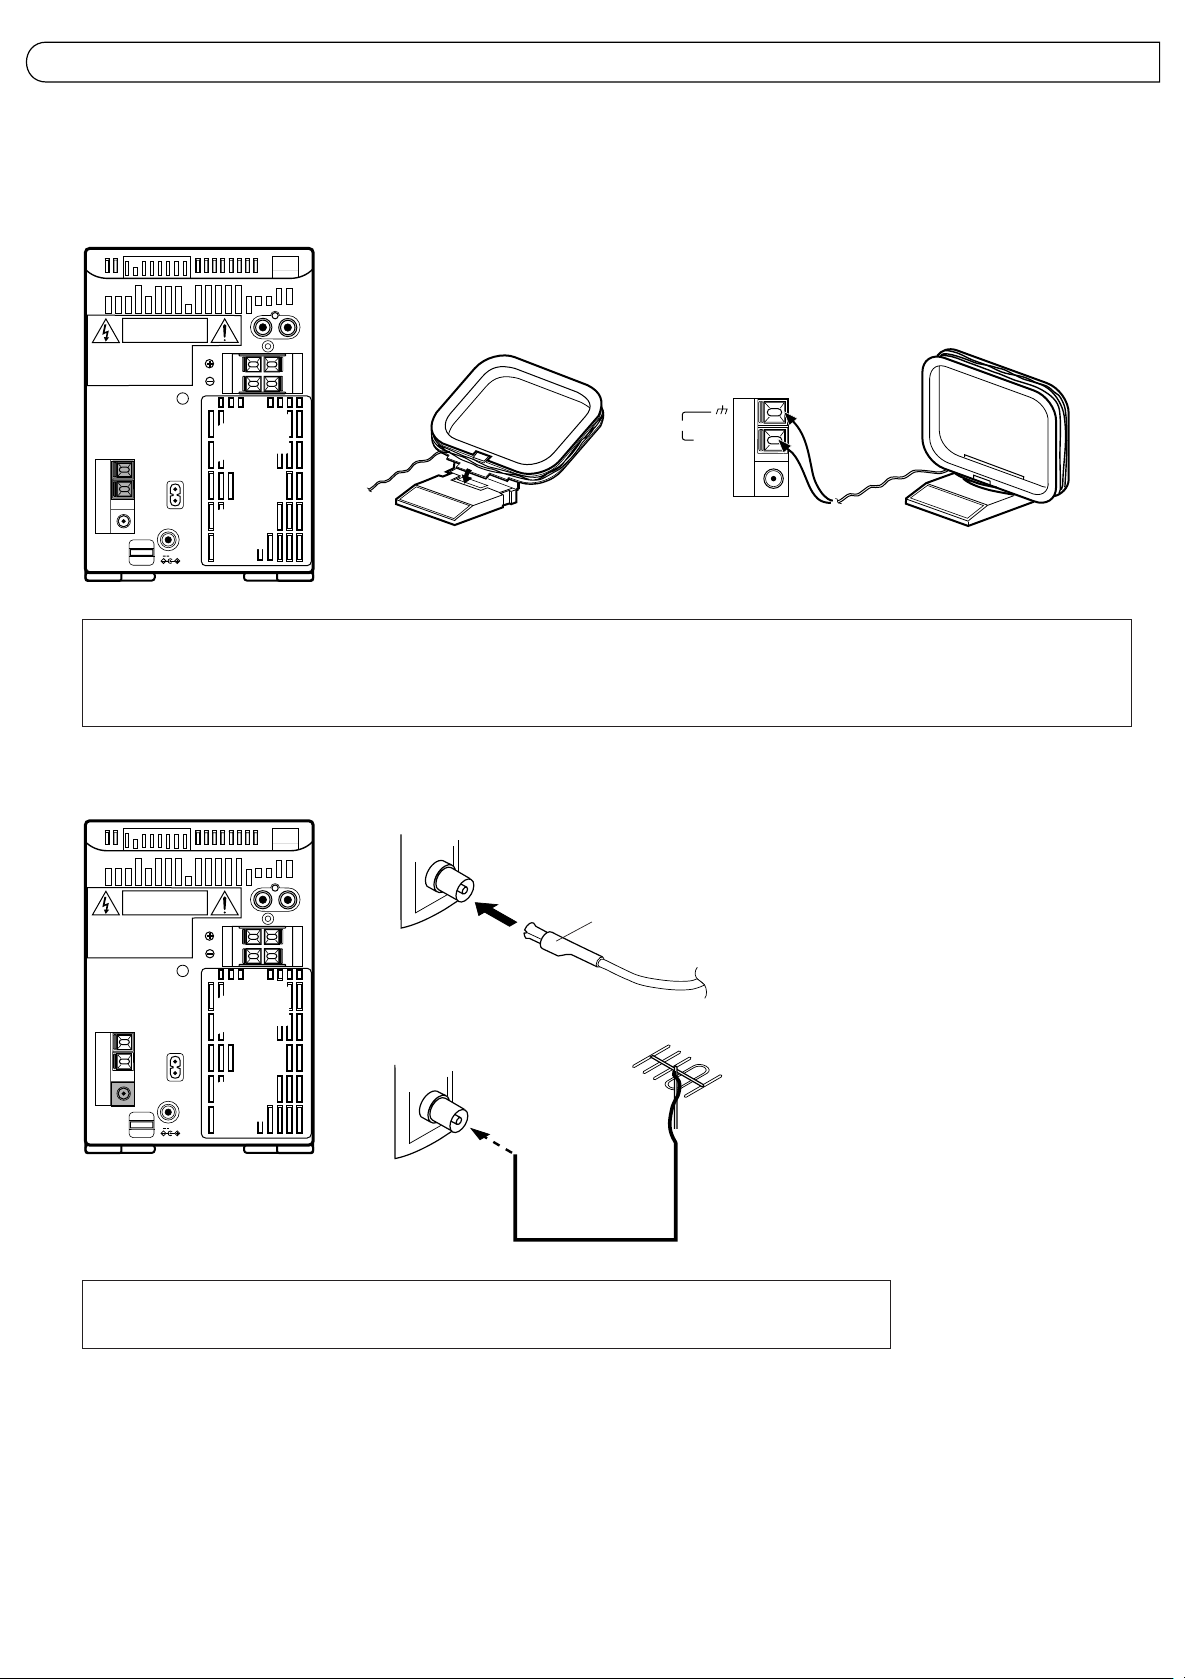
CONNECTIONS CONEXIONES COLLEGAMENTI
● Do not switch the power on until all connections
are completed.
Antenna connection and adjustment
● AM (MW/LW) loop antenna adjustment
● No conecte la alimentación hasta haber
completado todas las conexiones.
Conexión y ajuste de la antena
● Ajuste de la antena de cuadro para AM (OM/
●
Non attivare l’alimentazione prima del
completamento dei collegamenti.
Collegamento e regolazione antenna
●
Regolazione antenna AM ad anello (MW/LW)
OL)
AM (MW/LW)loop antenna (provided)
Antena de cuadro de AM (OM/OL) (suministrada)
Antenna AM (MW/LW) ad anello (in dotazione)
AM LOOP
Insert in the direction of the arrow.
Inserte en la dirección de la flecha.
Inserire nella direzione della freccia.
AM EXT
FM
COAXIAL
75Ω
` AC IN
—
DC IN
R
L
RIGHT
LEFT
12V
● Keep the loop antenna away from the unit and install it so that the best reception is obtained. (Do not leave the antenna wire in a bundle.)
● Conserve la antena de cuadro separada de la unidad e instálela de tal manera que se obtenga la mejor recepción. (No deje arrollado el cable
de la antena.)
●
Tenere l’antenna ad anello lontana dall’unità ed installarla in modo da ottenere la migliore ricezione possibile. (Non lasciare avvolto il filo
dell’antenna).
● FM antenna connections and adjustments ● Conexiones y ajuste de la antena de FM ●
R
L
RIGHT
LEFT
` AC IN
—
12V
DC IN
● Use an outdoor antenna when stable reception cannot be obtained with the provided antenna.
● Cuando no sea posible obtener una recepción estable con la antena suministrada, utilice una antena exterior.
●
Utilizzare un’antenna esterna quando non è possibile ottenere una ricezione stabile per mezzo dell’antenna in dotazione.
FM wire antenna (provided)
Antena de cable FM (suministrada)
Antenna FM a filo (in dotazione)
FM outdoor antenna (option)
Antena exterior de FM (opcional)
Antenna FM esterna (opzionale)
Coaxial cable
Cable coaxil
Cavo coassiale
Raccordements et réglages de l’antenne FM
Notes:
● Do not place the loop antenna on a metal desk
or near a TV or personal computer.
● Installing an outdoor antenna requires
expertise; we recommend that you consult an
audio dealer.
● Install the antenna cord away from the power
and speaker cords as these could generate
noise. Do not install the loop antenna so that
it touches the rear of the unit.
6
Notas:
● No coloque la antena de cuadro sobre un
escritorio de metal o cerca de un TV o
computador personal.
● La instalación de una antena externa requiere
conocimientos; nosotros le recomendamos
que consulte con su agente de audio.
● Coloque el cable de la antena lejos de los
cordones de alimentación y de los altavoces
ya que estos pueden generar interferencia.
Cuando instale la antena de cuadro no
permita que entre en contacto con la parte
trasera de la unidad.
Note:
●
Non installare l’antenna ad anello su di un
tavolo metallico oppure nelle vicinanze di un
televisore o di un personal computer.
●
L’installazione di un’antenna esterna richiede
esperienza; si raccomanda di consultare un
rivenditore di apparecchiature audio.
●
Installare il cavo dell’antenna lontano dal cavo
di alimentazione e dai cavi dei diffusori in
quanto questi potrebbero generare disturbi.
Installare l’antenna ad anello in modo che non
tocchi il retro dell’unità.
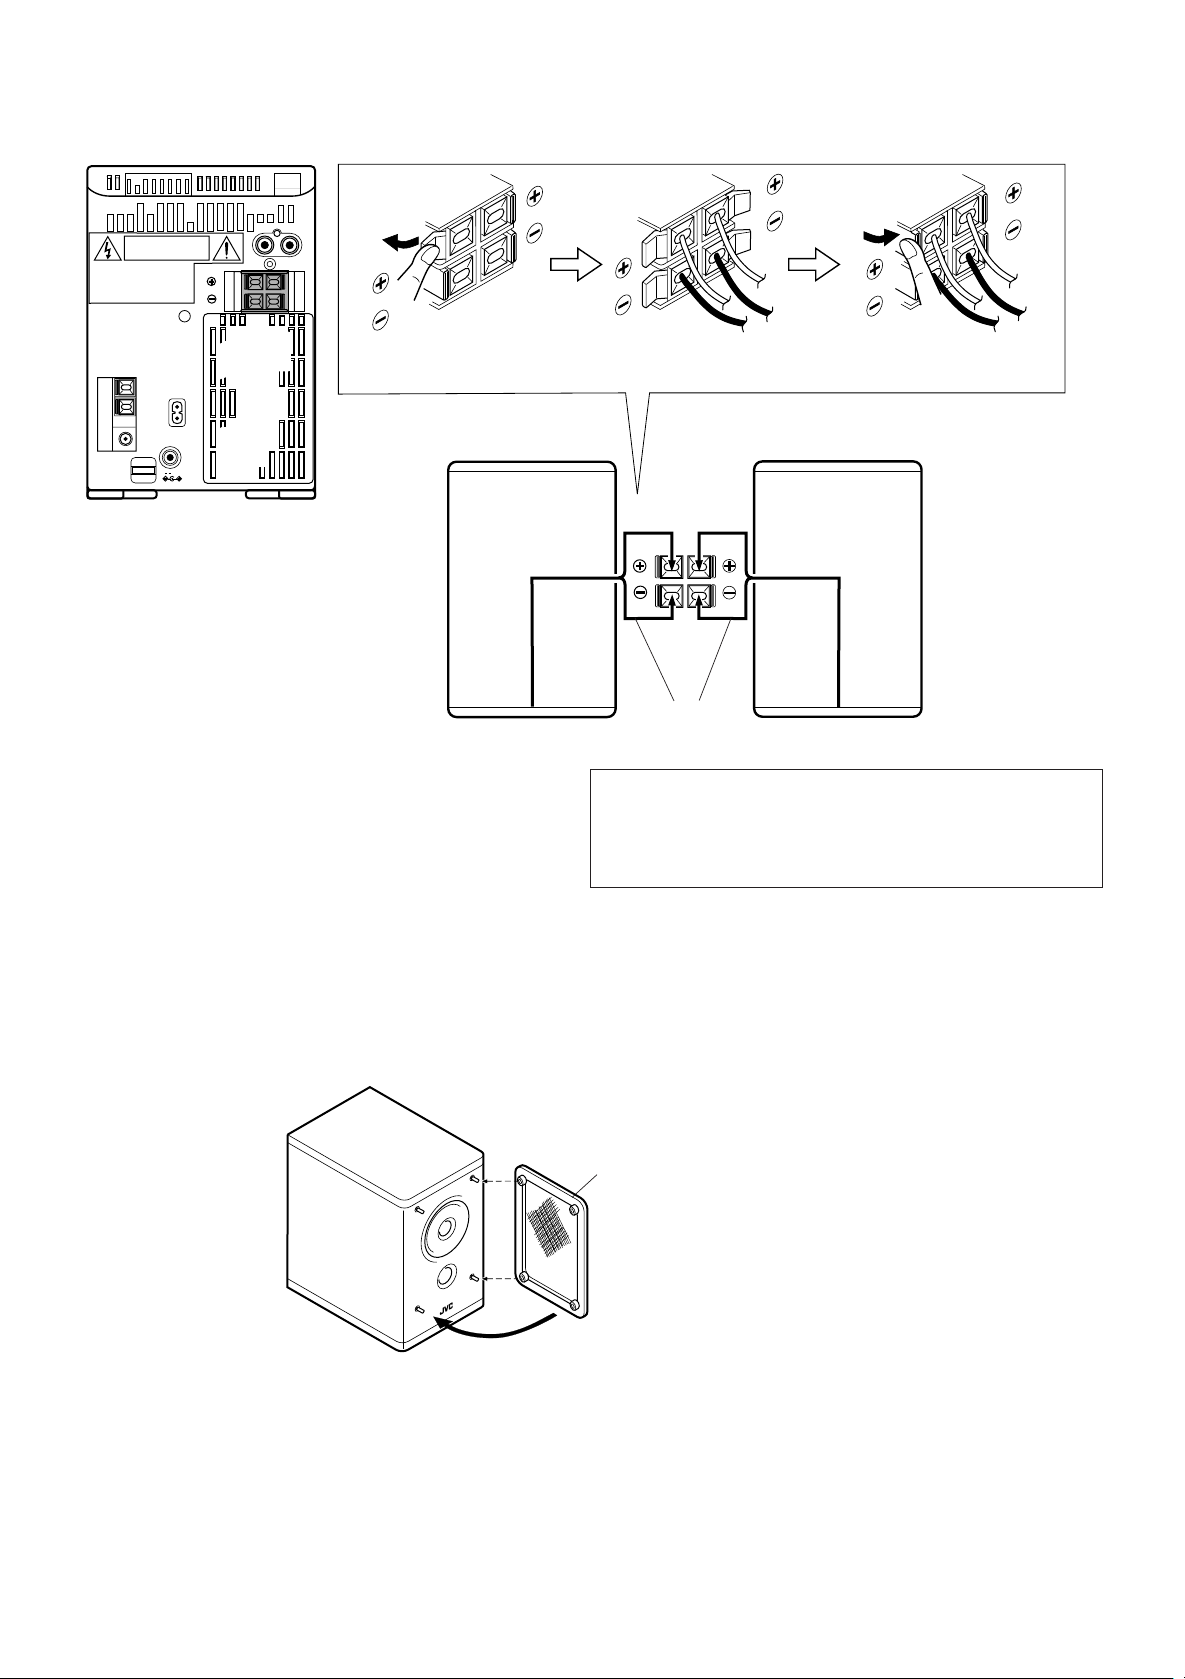
Speaker cord connection Conexión de los cordones de los
altavoces
Collegamento cavi diffusori
` AC IN
—
12V
DC IN
RIGHT
1
R
L
LEFT
Connect the Black cord to the
Conecte el cordón negro al terminal
Collegare il cavo nero al terminale œ.
Right speaker (rear side)
Altavoz derecho (lado posterior)
Diffusore destro (lato posteriore)
23
œ
terminal.
œ.
Left speaker (rear side)
Altavoz izquierdo (lado posterior)
Diffusore sinistro (lato posteriore)
Speaker cord
Cable de altavoz
Cavo diffusorie
RIGHT
LEFT
Black
Negro
Nero
● The speaker grilles can be removed.
● When removing.
1.Insert your fingers at the top and pull towards you.
2.Also pull the bottom towards you.
● Connec the cord from the speaker on the left to the (LEFT) terminal and the
cord from the speaker on the right to the (RIGHT) terminals.
● Conecte el cabel del altavoz de la izquierda a los terminales (LEFT) y el
cabel del altavos de la derecha a ;os terminales (RIGHT).
●
Collegare il cavo del difuscore a sinista con i terminali (LEFT) ed il cavo del
difusore a destra con i terminali (RIGHT).
● Las rejillas de los altavoces pueden ser
extraídas.
● Cuando extrae.
1.Inserte los dedos en la parte superior y tire hacia
usted.
2.También tire el fondo hacia usted
●
Colocación de la rejilla del altavoz● Attaching the speaker grille
Speaker grille
Rejilla del altavoz
Pannello anteriore diffusore
Match the fittings when attaching the grille.
Haga coincidir los encajes cuando coloque la rejilla.
Nell’applicare i pannelli anteriori, badare a che le sporgenze
coincidano con i fori.
●
Il pannello anteriore dei diffusori può venire
tolto.
●
Per toglierlo:
1.Inserire le dita in alto e tirare verso di sé.
2.Tirare anche il fondo verso di sé.
●
Applicazione del pannello anteriore al diffusore
Notes:
● The polarity of the two connected speakers will
be the same if the black speaker cords are
connected to the œ terminals. If the speakers
are connected with polarities reversed, stereo
effect and tone will be degraded.
● The speakers of this unit are not magnetically
shielded. When they are placed directly on or
adjacent to a TV, the TV’s picture could be
distorted. Install the speakers more than 20
cm away from your TV.
Notas:
● La polaridad de los dos altavoces conectados
es la misma si los cables negros son
conectados a los terminales œ. Si se conectan
los altavoces con las polaridades invertidas,
se degradará el efecto estereofónico y el tono.
● Los altavoces de esta unidad no están
blindados magnéticamente. Cuando se los
coloca directamente o adyacentes a un TV,
la imagen de éste puede ser distorsionada.
Instale los altavoces a más de 20 cm. de
distancia de su TV.
Note:
●
La polarità dei diffusori collegati è la stessa
se i loro cavi neri vengono collegati ai terminali
œ
. Se i diffusori vengono collegati con le
polarità invertite, l’effetto stereofonico ed i toni
possono degradarsi.
●
I diffusori di quest’unità non sono
magneticamente schermati. Se vengono
installati vicino o sopra un televisore, l’immagine
di q uest’ultimo può subire distorsioni. Installarli
ad almeno 20 cm di distanza da televisori.
7
● When connecting the speaker cord make sure
that the wire core, not the insulating cover, is
connected to the speaker terminal. Otherwise,
sound cannot be heard.
● Cuando conecta el cordón del altavoz,
asegúrese de que el núcleo del cable, y no
la cubierta aislante, quede conectado al
terminal del altavoz, de lo contrario no se
escuchará sonido.
●
Nel collegare i cavi audio, controllare che il
conduttore in rame, e non il suo isolante, faccia
contatto direttamente con i termi nali. La
riproduzione non può altrimenti avere luogo.
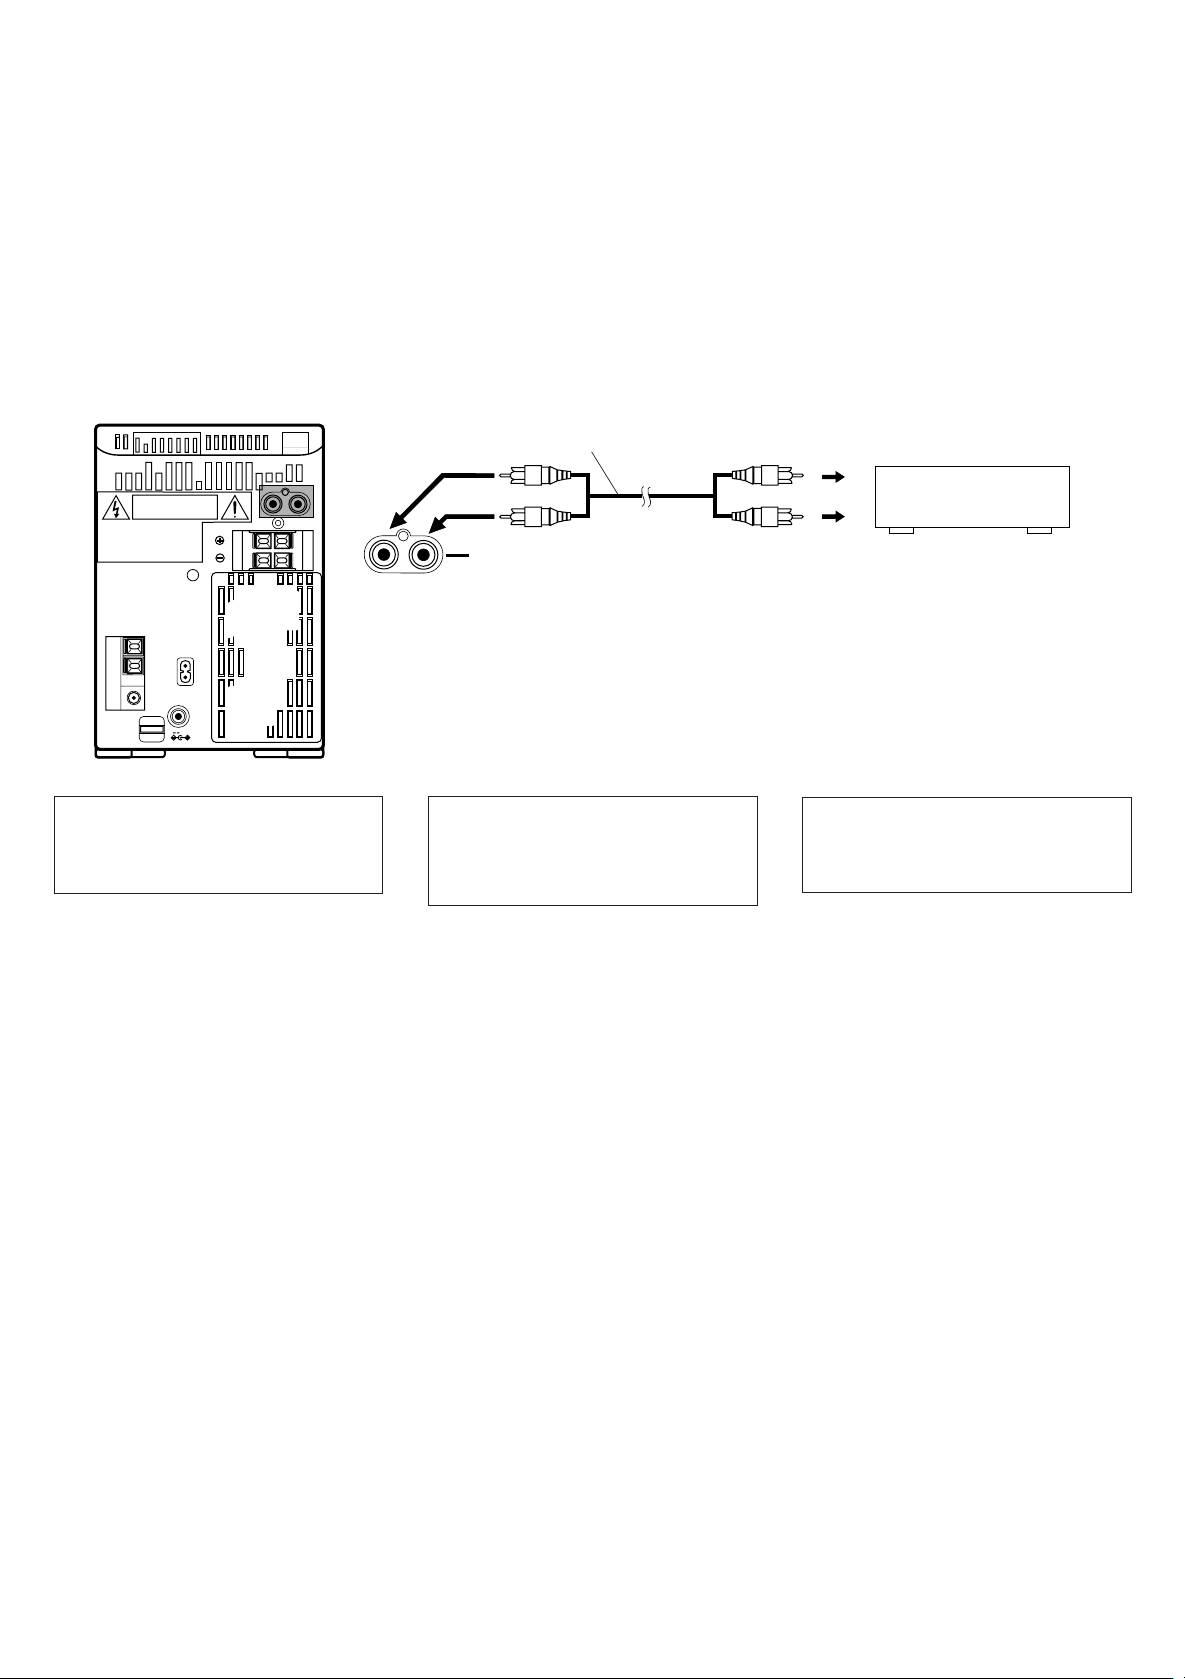
Connection of external audio units
● Connection with a turntable (or MD player)
R
L
RIGHT
LEFT
` AC IN
—
12V
DC IN
Note:
Regarding the connection with external
units and their operations, refer to the
instructions provided with those units.
Conexión de unidades externas de
audio
● Conexión con un tocadiscos
(o reproductor de MD)
Signal cord (optional)
Cordón de señal (opcional)
Cavo collegamento (opzionale)
R
L
Nota:
En relación a la conexión de unidades
externas y sus operaciones, refiérase a las
instrucciones suministradas con esas
unidades.
Pin-plug x 2
AUX
2 clavijas
Spinotto a spillo x 2
Collegamento di componenti esterni
● Collegamento con un giradischi (o lettore
MD)
Pin-plug x 2
2 clavijas
Spinotto a spillo x 2
Nota:
Per il collegamento con unità esterne ed il
loro funzionamento, vedere le istruzioni
fornite in dotazione a tali unità.
Turntable (with built-in equalizer) or MD player
(optional)
Reproductor de discos (con ecualizador
incorporado) o reproductor MD (opcional)
Giradischi (con equalizzatore incorporato)
o lettore MD (opzionale)
8
POWER SUPPLY ALIMENTACION ALIMENTAZIONE
A. Connection of AC power cord
● Connect the AC power cord after all other
connections have been made.
R
L
RIGHT
LEFT
` AC IN
—
12V
DC IN
CAUTIONS:
1. ONLY USE WITH JVC POWER CORD
PROVIDED WITH THIS UNIT TO AVOID
MALFUNCTION OR DAMAGE TO THE
UNIT.
2. BE SURE TO UNPLUG THE POWER CORD
FROM THE OUTLET WHEN GOING OUT
OR WHEN THE UNIT IS NOT IN USE FOR
AN EXTENDED PERIOD OF TIME.
A. Conexión del cordón de CA
● Conecte el cordón de CA después de haber
terminado todas las conexiones.
`
AC IN
PRECAUCIONES:
1. PARA EVITAR FALLAS O DAÑOS EN LA
UNIDAD UTILICE EL CORDON DE
ALIMENTACION DE JVC SUMINISTRADO
CON ESTA UNIDAD.
2. ASEGURESE DE DESENCHUFAR EL
CORDON DE ALIMENTACION DEL
TOMACORRIENTES CUANDO SALGA O
CUANDO NO VAYA A UTILIZAR LA
UNIDAD POR UN LARGO PERIODO.
Power cord
Cordón de alimentación
Cavo alimentazione
A. Collegamento del cavo di alimentazione
CA
●
Collegare il cavo di alimentazione CA dopo
aver eseguito tutti gli altri collegamenti.
PRECAUZIONI:
1. UTILIZZARE SOLO IL CAVO DI
ALIMENTAZIONE JVC IN DOTAZIONE A
QUESTA UNITA’ PER EVITARE
DISFUNZIONI O DANNI ALL’UNITA’
STESSA.
2. ACCERTARSI DI SCOLLEGARE IL CAVO
DI ALIMENTAZIONE DALLA PRESA DI
RETE QUANDO SI ESCE O QUANDO SI
PREVEDE DI NON UTILIZZARE L’UNITA’
PER UN PERIODO PROLUNGAT O.
B. Operation on car battery (DC 12 V)
R
L
RIGHT
LEFT
` AC IN
—
12V
DC IN
● First connect the car adapter to the DC IN 12
V jack, not the cigarette lighter socket,
because shorting of a plug on the car may
cause the fuse to blow out. In addition, be
careful not to make a short-circuit between
the plugs.
● When using a car battery, be sure to use
the specified car adapter (JVC model CAR120E) to prevent mishaps or damage
resulting from different polarity design.
DC IN
B. Funcionamiento con batería de
automóvil (12 V de CC)
1
12V
● Primero conecte el adaptador al jack DC IN
12V, no al enchufe del encendedor de
cigarrillos, porque si pone en cortocircuito
una clavija del automóvil, puede quemarse
un fusible. Además, tenga cuidado de no
producir un cortocircuito entre las clavijas.
● Cuando utilice una batería de automóvil,
emplee el adaptador especificado (JVC
modelo CA-R120E) para evitar fallas o
daños por diferentes tipos de polaridad.
Optional exclusive car adapter (JVC model CA-R120E)
Adaptador exclusivo para automóvil opcional (JVC modelo CA-R120E)
Adattatore esclusivo per automobile opzionale (modello JVC CA-R120E)
B. Funzionamento con la batteria di una
vettura (CC 12 V)
2
To car’s cigarette lighter socket (12 V)
Al enchufe del encendedor de cigarrillos del
automóvil (12 V)
Alla presa dell’accendisigari della vettura (12 V)
●
Collegare prima l’alimentatore alla presa DC
IN 12V e non alla presa dell’accendisigari in
quanto un cortocircuito nella vettura potrebbe
far saltare il fusibile. Inoltre, fare attenzione a
non mettere in cortocircuito le prese.
● Quando si utilizza la batteria di una vettura
per l’alimentazione, accertarsi di utilizzare
l’alimentatore specificato (modello JVC
CA-R120E) onde evitare danni derivanti da
polarità differenti.
Note:
● When there is a power failure or the AC
power cord is disconnected, the timer/clock
setting is erased from memory. Reset the
clock when the power supply is restored.
Nota:
● Cuando hay un corte de energía eléctrica o
cuando se desconecta el cordón de
alimentación CA, el ajuste del temporizador/
reloj se borra de la memoria. Reposicione el
reloj cuando se restaure el suministro eléctrico.
Nota:
●
Quando si verifica un’interruzione di corrente
oppure quando il cavo di alimentazione CA
viene scollegato, l’impostazione del timer/
orologio viene cancellata dalla memoria.
Reimpostare l’orologio quando
l’alimentazione viene riattivata.
9

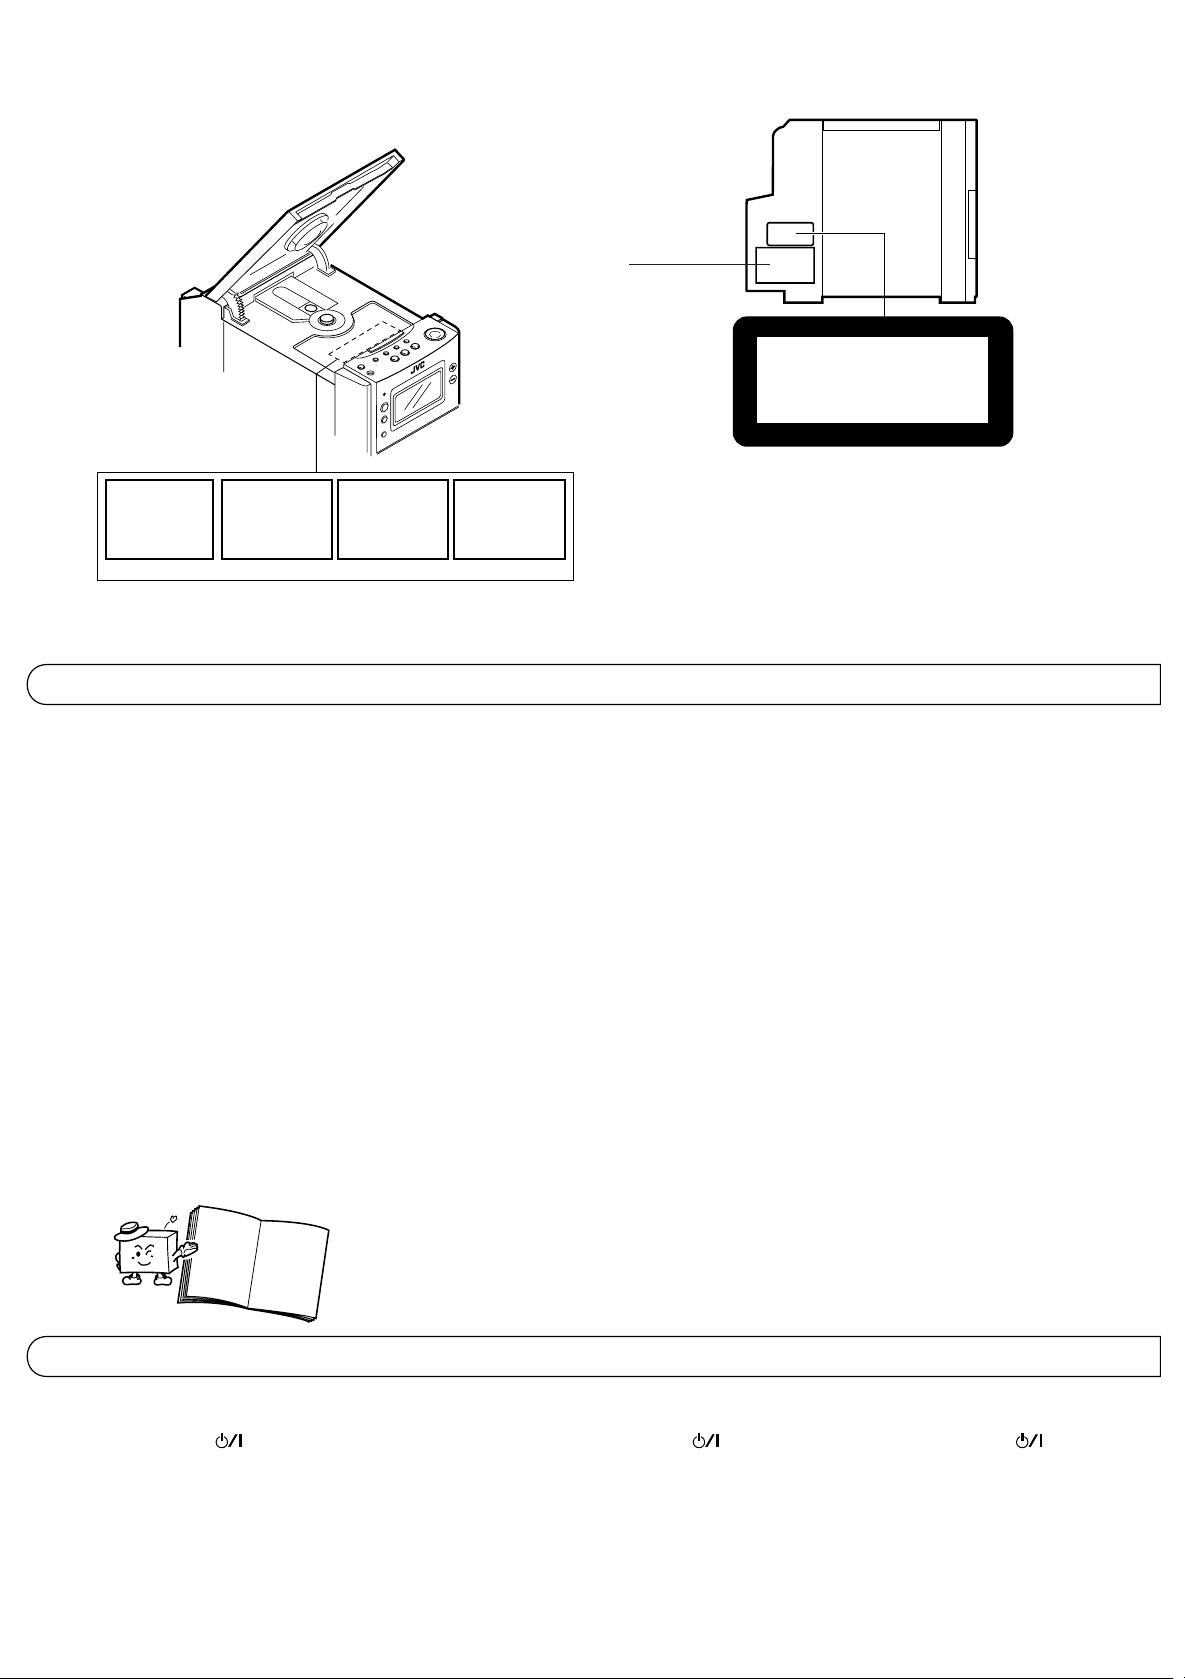
NAMES OF PARTS AND THEIR
FUNCTIONS
NOMBRES DE LAS PARTES Y
SUS FUNCIONES
NOMI E FUNZIONI DELLE PARTI
CD player /General section Reproductor de CD/sección general Sezione lettore CD/generale
Front
Parta
Lato
1
3
24 5
4
STANDBY
VOLUME
AUX
1
2
Top
Frontal
Anteriove
PHONES
6
3
MICRO COMPONENT SYSTEM
AUTO REVERSE
button and power STANDBY indicator
1
2 AUX button
3 Remote sensor section
4 Display window
1 Function/Track number display
2 Play time display
3 Music calendar display
4 Program mode indicator (PROGRAM)
5 RANDOM play indicator
6 Repeat play indicator (∂ALL)
7 OVER indicator
5 VOLUME buttons
+: Use to increase the volume.
— : Use to decrease the volume.
(Control range from VOL. 0 to VOL. 50.)
6 Headphones jack (PHONES) (3.5 mm dia.
stereo mini)
Connect headphones (impedance 16Ω to
1kΩ) to this jack. Speaker sound is
automatically switched off when the
headphones are connected.
7 CD holder
8 ACTIVE HYPER BASS PRO button
9 CD operations buttons
CD search buttons (™, £):
Press to locate the beginning of a track and
to start forward/reverse search operations.
Stop button (5):
Press to stop playing a CD.
CD play/pause button ($6):
Press to play a CD or to stop temporarily.
0 MULTI JOG dial
When the function is CD and the dial is
turned, the beginning of a track can be
searched. (1 track is selected by 2 clicks.)
! CD holder OPEN (8) button
10
234
1
PROGRAM RANDOM
5
9
12 131415
10 11
8
6
7
ALL
OVER
7
4
56 7
8
1 Botón e indicador de alimentación
STANDBY
2 Botón AUX
3 Sección del sensor remoto
4 Ventanilla de indicación
1 Indicación de función/número de pista
2 Indicación de tiempo de reproducción
3 Indicación de calendario musical
4 Indicador de modo de programa
(PROGRAM)
5 Indicador de reproducción RANDOM
6 Indicador de reproducción repetida
(∂ALL)
7 Indicador OVER
5 Botones VOLUME
+: Sirve para aumentar el volumen.
-: Sirve para reducir el volumen.
(Los límites de control van de VOL. 0 a VOL.
50).
6 Jack de auriculares (PHONES) (mini jack
estereofónico de 3,5 mm de diám.)
Conecte los auriculares (impedancia de 16Ω
a 1kΩ), a este jack. El sonido de los
altavoces se desconecta automáticamente
cuando se conectan los auriculares.
7 Portadisco de CD
8 Botón ACTIVE HYPER BASS PRO
9 Botones de operación de CD
Botones (™, £) de búsqueda de CD
Presiónelos para ubicar el principio de una
pista e iniciar las operaciones de búsqueda
hacia adelante/hacia atrás.
Botón de parada (5):
Presiónelo para parar la reproducción de
un CD.
Botón ($6) de reproducción de CD/pausa
Presiónelo para reproducir un CD o para
parar temporariamente.
0 Disco MULTI JOG
Cuando la función está en CD, gire el disco
para iniciar la búsqueda del principio de una
pista. (1 pista es seleccionada con 2
presiones).
! Botón (8 ) de abertura (OPEN) del
portadisco de CD
COMPACT
DIGITAL AUDIO
ACTIVE HYPER
BASS PRO
ONE TOUCH
REC
1
Tasto ed indicatore STANDBY
CLOCK
TIMER/SNOOZE
BAND
TUNER
TAPE
9
I
J
T
O
L
G
U
M
CD
0
alimentazione
2
T asto AUX
3
Sezione sensore telecomando
4
Finestrella display
1
Visualizzazione funzione/numero brano
2
Visualizzazione tempo di riproduzione
3
Visualizzazione tavola musicale
4
Indicatore modo programmazione
(PROGRAM)
5
Indicatore riproduzione casuale
RANDOM
6
Indicatore riproduzione ripetuta (∂ALL)
7
Indicatore OVER
5
Tasti VOLUME
+: Utilizzato per aumentare il volume.
-: Utilizzato per diminuire il volume.
(Gamma di controllo da VOL. 0 a VOL. 50).
6
Presa cuffie (PHONES) (stereo mini da 3,5
mm di diametro)
Collegare le cuffie (impedenza da 16Ω a
1kΩ) a questa presa. Il suono dei diffusori
viene disattivato automaticamente quando
si collegano le cuffie.
7
Piatto CD
8
Tasto ACTIVE HYPER BASS PRO
9
Tasti operazioni lettore CD
Tasti di ricerca CD ™, £):
Premerli per trovare l’inizio di un brano e per
attivare le operazioni di ricerca in avanti ed
all’indietro.
Tasto di arresto (5):
Premerlo per interrompere la riproduzione
del CD.
Tasto riproduzione CD/pausa ($6):
Premere questo tasto per riprodurre un CD
oppure per interrompere temporaneamente
la riproduzione.
0
Manopola MULTI JOG
Ruotando la manopola quando la funzione
selezionata Å CD, Å possibile ricercare
l’inizio di un brano. (1 brano viene selezionato
con 2 scatti).
!
Tasto aperturas (OPEN) piatto CD (8)
OPEN
!
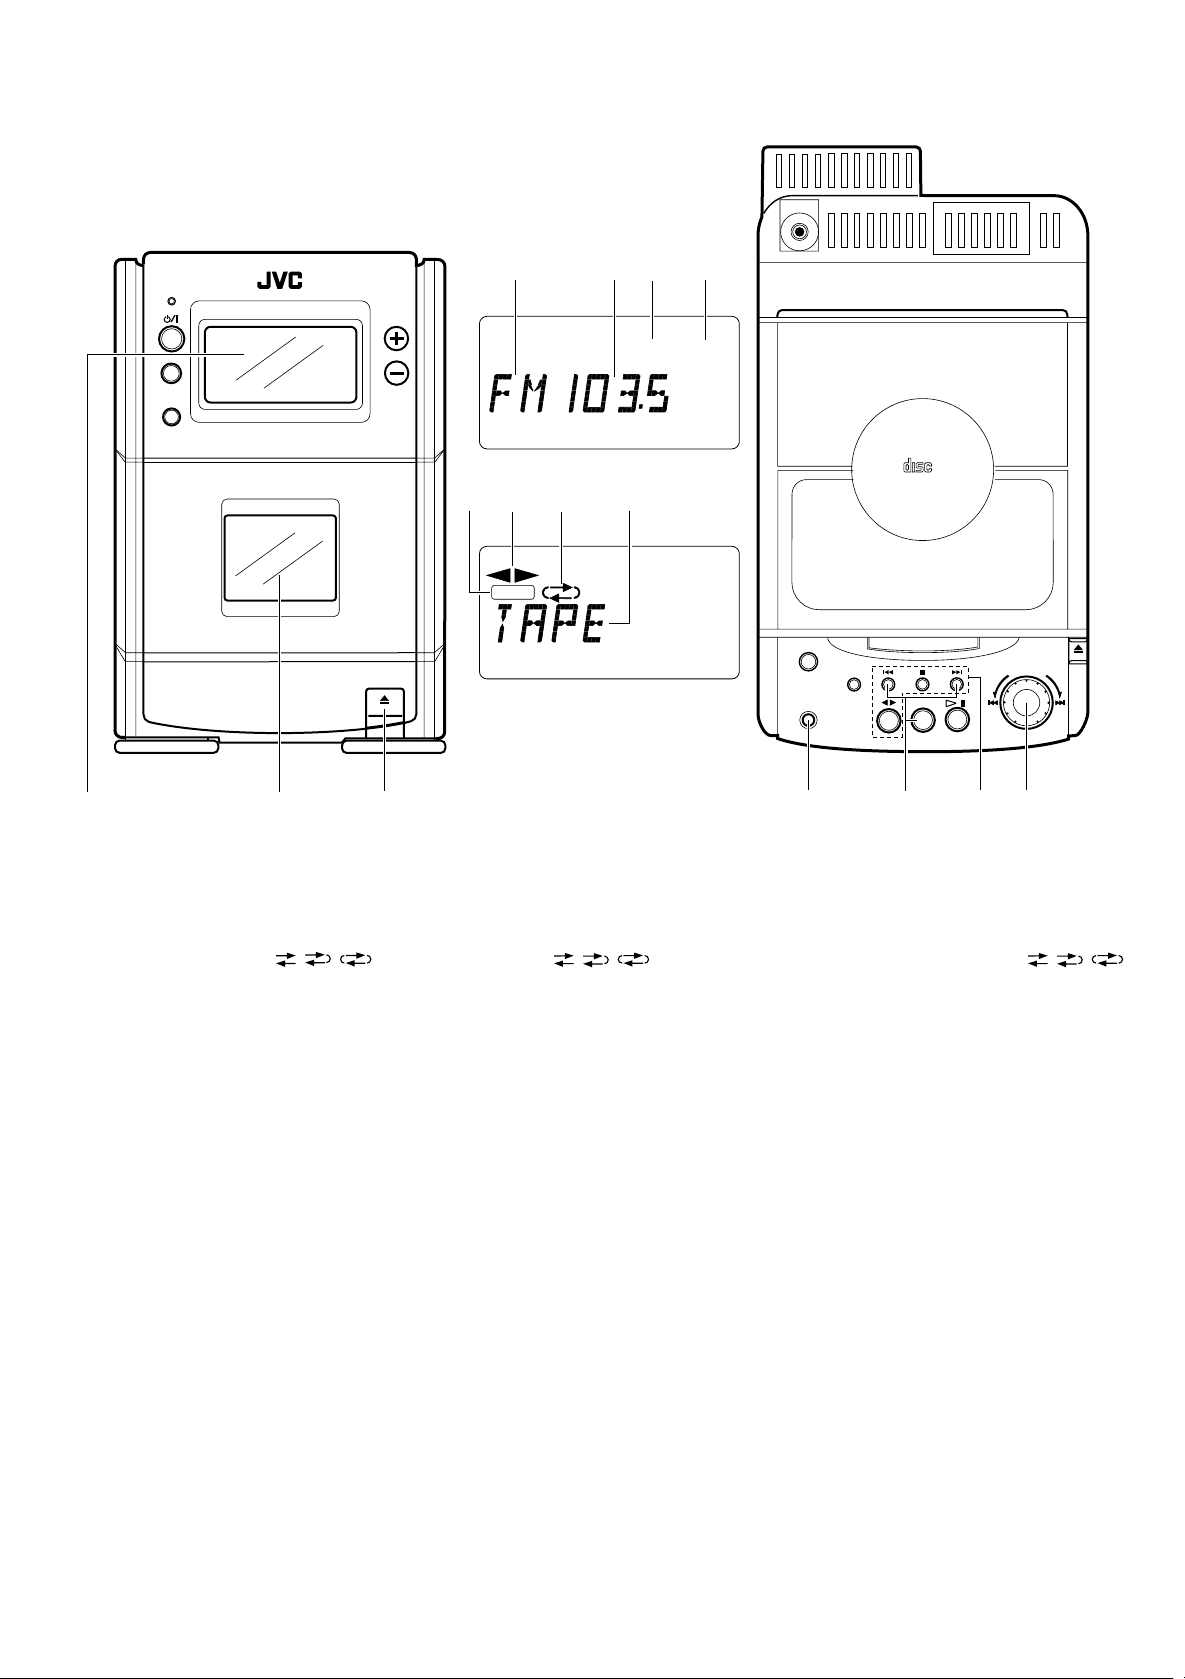
Tuner/Deck section Sección del sintonizador/platina Sezione sintonizzatore/registratore
PHONES
1
STANDBY
AUX
MICRO COMPONENT SYSTEM
AUTO REVERSE
VOLUME
5
1
6
REC
7
23
MONO STEREO
8
4
ACTIVE HYPER
BASS PRO
ONE TOUCH
REC
CLOCK
COMPACT
DIGITAL AUDIO
TIMER/SNOOZE
BAND
TUNER
TAPE
OPEN
I
J
T
O
L
G
U
M
CD
1
23
1 Display window
1 Band indicator
2 Radio frequency display
3 MONO indicator
4 STEREO indicator
5 Recording indicator (REC)
6 Tape direction indicator (1, 4)
7 Reverse mode indicator ( / / )
8 Tape (TAPE) mode display
2 Cassette holder
3 Cassette holder eject (8) button
4 ONE TOUCH REC button
5 TUNER/BAND button
Press to select tuner mode.
Press to select the band.
Tuning buttons (™/£)
6 Cassette operation buttons
™: Press to rewind the tape.
5: Press to stop the tape.
£: Press to fast wind the tape.
TAPE (14): Press to select the T APE mode.
: Press to play back the tape in the
forward direction.
The 4 indicator lights in the display
window.
: Press to play back the tape in the
reverse direction.
The 1 indicator lights in the display
window.
7 MULTI JOG Dial
The preset station can be selected. (1 station
is selected by 2 clicks.)
1 Ventanilla de indicación
1 Indicador de banda
2
Indicación de frecuencia de radio
3
Indicador MONO
4
Indicador STEREO
5
I
ndicador (REC) de grabación
6
Indicador (1 , 4) del sentido de la cinta
7
Indicador ( / / ) del modo de
inversión
8
Indicación (TAPE) del modo de cinta
2 Portacassette
3 Botón (8) de eyección del portacassette
4 Botón ONE TOUCH REC
5 Botón TUNER/BAND
Presiónelo para activar el modo de
sintonizador
Presiónelo para seleccionar la banda.
Botones (™/£) de sintonización
6 Botones de operación del cassette
™: Presiónelo para rebobinar la cinta.
5
:
Presiónelo para parar la cinta.
£: Presiónelo para avanzar rápidamente
la cinta.
TAPE (14): Presiónelo para activar el
modo TAPE.
: Presiónelo para reproducir la cinta
hacia adelante.
El indicador
4 s
e enciende en la
ventanilla de indicación.
: Presiónelo para reproducir la cinta
hacia atrás.
El indicador 1
se enciende en la
ventanilla de indicación.
7 Disco MULTI JOG
Para seleccionar la emisora presintonizada.
(1 estación es seleccionada con 2 presiones)
4
1
Finestrella display
1
2
3
4
5
6
7
8
2
Vano portacassetta
3
Tasto espulsione vano portacassetta (8)
4
Tasto ONE TOUCH REC
5
Tasto TUNER/BAND
5
Indicatore di banda
Visualizzazione frequenza radio
Indicatore MONO
Indicatore STEREO
Indicatore di registrazione (REC)
Indicatore direzione nastro (1, 4)
Indicatore modo reverse ( / / )
Visualizzazione modo registratore (T APE)
67
Premerlo per selezionare il modo del
sintonizzatore.
Premerlo per selezionare la banda.
Tasti di sintonizzazione (™/£)
6
Tasti operazioni registratore a cassette
™
: Premere questo tasto per riavvolgere
il nastro.
5
: Premere questo tasto per fermare il
nastro.
£
: Premere questo tasto per avvolgere il
nastro.
TAPE (14): Premere per selezionare il
modo TAPE.
: Premere per riprodurre il nastro nella
direzione in avanti.
L’indicatore 4 si illumina sul display.
: Premere per riprodurre il nastro nella
direzione all’indietro.
L’indicatore 1 si illumina sul display.
7
Manopola MULTI JOG
E’ possibile selezionare una stazione
preselezionata. (1 stazione viene selezionata
con 2 scatti).
11
Loading…
Русский
- Bedienungsanleitung JVC UX-T150
- JVC UX-T150 User Manual
- Manual Usuario JVC UX-T150
- Mode d’emploi JVC UX-T150
- Istruzioni JVC UX-T150
- инструкция JVC UX-T150
- JVC UX-T150の取扱説明書
- Handleiding JVC UX-T150
- Manual de uso JVC UX-T150
Вам нужна инструкция? Мы поможем Вам ее найти и сэкономить Ваше время.
- 36 stron
- 0.77 mb
Изделие JVC UX-T150, а также другие, которыми Вы пользуетесь ежедневно, наверняка вы получили в комплекте с инструкцией обслуживания. Из опыта наших пользователей мы знаем, что большинство из Вас не уделили этому особого внимания. Большая часть инструкций, сразу же после покупки попадает в корзину для мусора вместе с коробкой — это ошибка. Ознакомьтесь с информацией, касающейся инструкции JVC UX-T150, которая поможет Вам в будущем сэкономить нервы и избежать головной боли.
Важная подсказка — не забывайте хотя бы раз прочитать инструкцию JVC UX-T150
Если вы не хотите каждый раз читать информационные брошюры, касающиеся, тех или JVC UX-T150 иных изделий, достаточно, прочитать их раз — сразу же после покупки устройства. Вы получите основное знания, касающиеся поддержания изделия JVC UX-T150 в хорошем эксплуатационном состоянии, так, чтобы без проблем достигнуть его планируемого цикла работы. Затем инструкцию можно отложить на полку и вернуться к ней только в случае, если вы не уверены, правильно ли проводится техобслуживание изделия. Правильный уход является необходимым элементом Вашего удовольствия JVC UX-T150.
Раз в году пересмотрите шкафчик, в котором держите инструкции для всех устройств, — выбросите те, которыми вы уже не пользуетесься. Это поможет Вам сохранять порядок в своей домашней базе инструкций обслуживания.
Summary of Contents for JVC UX-T150
Что находится в инструкции JVC UX-T150? Почему стоит ее прочитать?
- Гарантия и подробности, касающиеся техобслуживания изделия
Хорошей идеей будет прикрепить чек к странице инструкции. Если что-то плохое случится во время использования JVC UX-T150, у вас будет комплект документов, необходимый для гарантийного ремонта. В этой части инструкции вы найдете информацию об авторизованных сервисных центрахJVC UX-T150 а также, как самостоятельно правильно ухаживать за оборудованием — так, чтобы не потерять гарантийных прав. - Указания по монтажу и Setup
Не терять нервов и времени на самостоятельную попытку установки и первого запуска изделия. Воспользуйтесь рекомендациями производителя JVC UX-T150 чтобы правильно запустить изделие, без лишнего риска повреждения оборудования. - Информация, касающаяся дополнительных запчастей (входящих в комплект а также являющихся опцией)
Пересматривая эту часть документа вы сможете проверить, доставлен ли ваш JVC UX-T150 с полним комплектом аксессуаров. Вы также сможете узнать, какие дополнительные запчасти или аксессуары для JVC UX-T150 Вы сможете найти и докупить к своему устройству. - Troubleshooting
Самые частые проблемы, касающиеся JVC UX-T150 и методы их решения. Это очень полезная часть руководства по обслуживанию — она позволит Вам сэкономить много времени на поиск решений. 90% проблем с JVC UX-T150 повторяется у многих пользователей. - Требования, касающиеся питания и энергетический класс
Информация, касающаяся количества потребляемой энергии, а также рекомендации, касающиеся установки и питания JVC UX-T150. Прочитайте, чтобы оптимально пользоваться JVC UX-T150 и не использовать большего количества ресурсов, нежели это необходимо для правильной работы изделия. - Специальные функции JVC UX-T150
Здесь вы можешь узнать, как персонализировать изделие JVC UX-T150. Вы узнаете, какие дополнительные функции могут помочь Вам удобно использовать продукт JVC UX-T150 а также, какие функции Вашего устройства оптимальны для выполнения конкретной деятельности.
Как видите в инструкции вы найдете информацию, которая реально поможет Вам в использовании Вашего изделия. Стоит с ней ознакомиться, чтобы избежать разочарований, возникающих из более короткого, нежели предусматривалось, периода исправности изделия JVC UX-T150. Если все же вы не хотите копить инструкции в своем доме, наш сайт поможет Вам в этом — вы должны найти у нас руководство по обслуживанию большинства из своих устройств, а также JVC UX-T150.
Комментарии (0)
- Главная
-
JVC
-
Стереосистемы
-
UX-T150
На этой странице вы найдёте полный список документов на Стереосистемы JVC UX-T150.
Выберите необходимый PDF файл.
-
Стереосистемы
JVC UX-T150 Инструкция по эксплуатацииТип файла
PDFРазмер
792 KbКол-во страниц
36Просмотров
6062Download / Read online
- 1
Другие JVC Стереосистемы
-
JVC UX-G68 Инструкция по эксплуатации
PDF файлов
1Просмотров
8625 -
JVC CA-DXT7 Инструкция по эксплуатации
PDF файлов
1Просмотров
8591 -
JVC UX-V5R Инструкция по эксплуатации
PDF файлов
1Просмотров
7741 -
JVC UX-T150 Инструкция по эксплуатации
PDF файлов
1Просмотров
7440 -
JVC MX-GT88 Руководство пользователя
PDF файлов
2Просмотров
5984 -
JVC UX-G45 Инструкция по эксплуатации
PDF файлов
1Просмотров
5970
Другие устройства JVC
-
Автомобильные видеосистемы
JVC KW-NX7000 Руководство пользователяPDF файлов
5Просмотров
36423 -
Цифровые ресиверы
JVC KD-X50BT Руководство пользователяPDF файлов
4Просмотров
32321 -
Ресиверы
JVC KW-NX7000BT Руководство пользователяPDF файлов
4Просмотров
21594 -
Ресиверы
JVC KW-AVX640 Руководство пользователяPDF файлов
5Просмотров
21533 -
Ресиверы
JVC KW-NT300 Руководство пользователяPDF файлов
4Просмотров
21459 -
DVD-плееры
JVC KD-NX5000- Руководство пользователяPDF файлов
3Просмотров
20780
Ранее вы смотрели
Производители
AquaStar
Crayola
EXP Computer
Fujitsu
McDonald’s
Omega Lift
One For ALL
Oreck
Ryobi
X-Micro
Типы устройств
Циклометры
Лазерные указатели
Тепловые пушки
Загрузчик данных
Подводные системы для добычи нефти и газа
Бороскопы (жесткие)
Программное обеспечение Ultrasonic NDT
Домашнее хозяйство
Конфорки
Точки доступа
Устройства
ASA Electronics WTXIR01
Ericsson CDMA2000
Frigidaire FFEC2605LW
Kompernass KH 4418
Pelco WX8000
Suburban Mfg OXYGEN THERAPY DOOR 12155-00-DREPAA
Thermador PCS484WK
Transcend TS8GMP860
Vermont Casting VCPV10TP —
VTech Power Zone Edge
freeuserguide.ru
About Us
Contacts
Disclamers
Privacy Policy
Эта страница полезна для вас? Поделитесь ссылкой: