
Инструкция и руководство для
Sony CDX-GT200E
32 страницы подробных инструкций и пользовательских руководств по эксплуатации на русском на английском
Operating Instructions
Инструкция по эксплуатации
CDX-GT200E
2-651-185-33 (1)
© 2005 Sony Corporation
GB
RU
To cancel the demonstration (DEMO) display, see page 7.
Для отмены демонстрации на дисплее (режим DEMO) см. стр. 9.
FM/MW/LW
Compact Disc Player

2
Welcome !
Thank you for purchasing this Sony Compact
Disc Player. You can enjoy your drive with the
following functions.
• CD playback
You can play CD-DA (also containing CD
TEXT*), CD-R/CD-RW (MP3/WMA files also
containing Multi Session (page 10)) and
ATRAC CD (ATRAC3 and ATRAC3plus
format (page 10)).
• Radio reception
– You can store up to 6 stations per band (FM1,
FM2, FM3, MW and LW).
– BTM (Best Tuning Memory): the unit selects
strong signal stations and stores them.
• Sound adjustment
– EQ3: You can select an equalizer curve for 7
music types.
• Auxiliary equipment connection
An AUX input jack on the front of the unit
allows connection of a portable audio device.
* A CD TEXT disc is a CD-DA that includes
information such as disc, artist and track name.
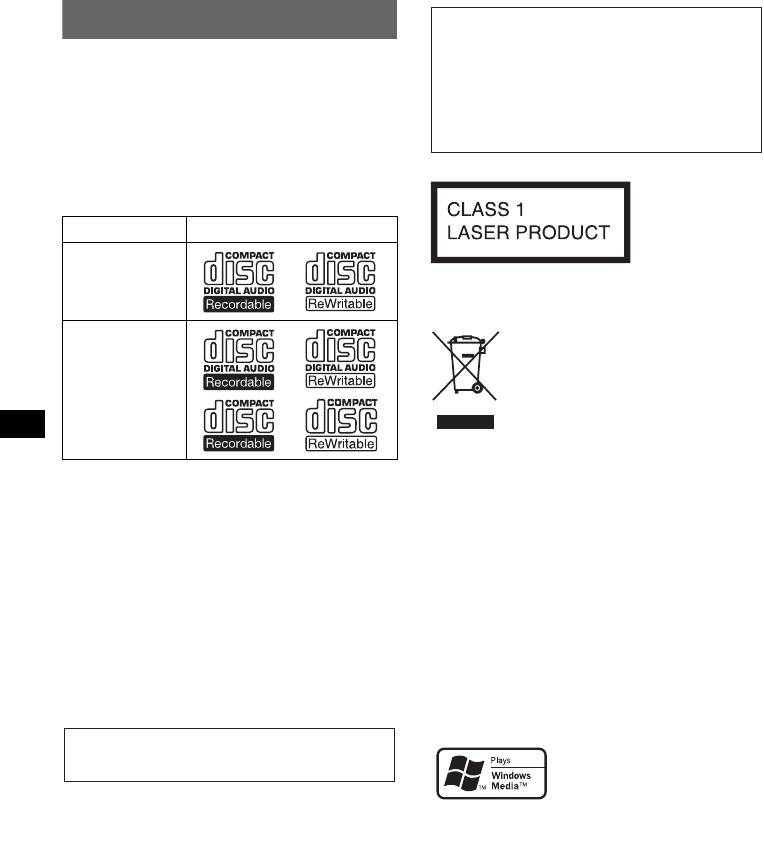
Type of discs
Label on the disc
CD-DA
MP3
WMA
ATRAC CD
For installation and connections, see the
supplied installation/connections manual.
Warning if your car’s ignition has no
ACC position
After turning the ignition off, be sure to press
and hold
(OFF) on the unit until the display
disappears.
Otherwise, the display does not turn off and
this causes battery drain.
This label is located on the bottom of the
chassis.
Disposal of Old Electrical &
Electronic Equipment (Applicable in
the European Union and other
European countries with separate
collection systems)
This symbol on the product or on its
packaging indicates that this product shall not be treated
as household waste. Instead it shall be handed over to the
applicable collection point for the recycling of electrical
and electronic equipment. By ensuring this product is
disposed of correctly, you will help prevent potential
negative consequences for the environment and human
health, which could otherwise be caused by inappropriate
waste handling of this product. The recycling of materials
will help to conserve natural resources. For more detailed
information about recycling of this product, please contact
your local Civic Office, your household waste disposal
service or the shop where you purchased the product.
SonicStage and its logo are trademarks of Sony
Corporation.
ATRAC, ATRAC3, ATRAC3plus and their logos
are trademarks of Sony Corporation.
Microsoft, Windows Media,
and the Windows logo are
trademarks or registered
trademarks of Microsoft
Corporation in the United States and/or other
countries.


Getting started, Resetting the unit, Setting the clock
Detaching the front panel, Attaching the front panel, Getting started resetting the unit Чат поддержки
- Изображение
- Текст
4
Getting Started
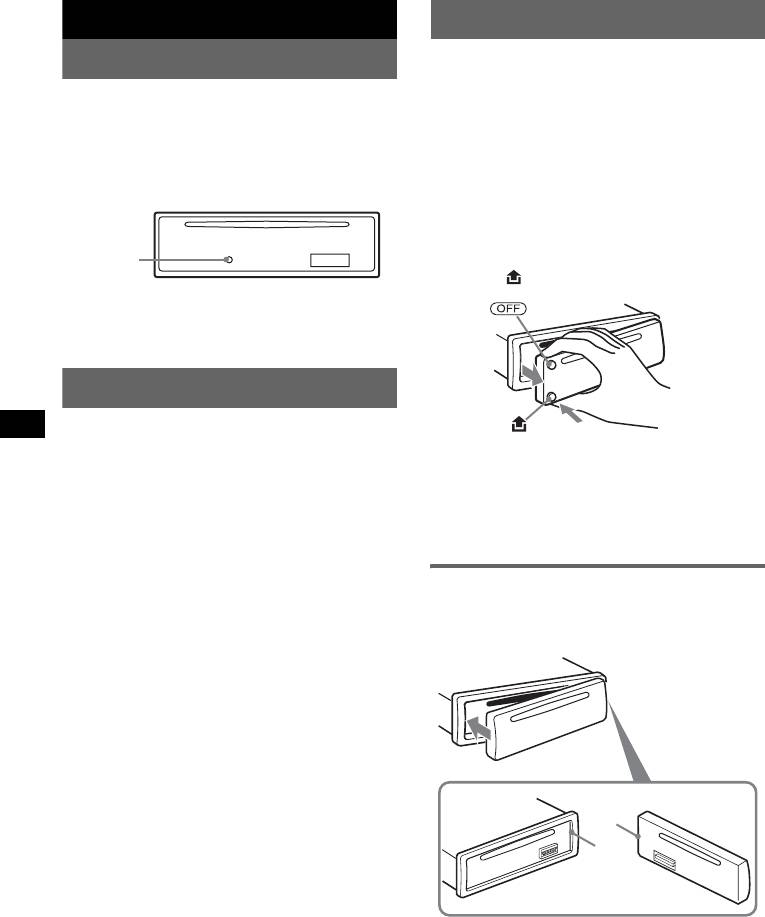
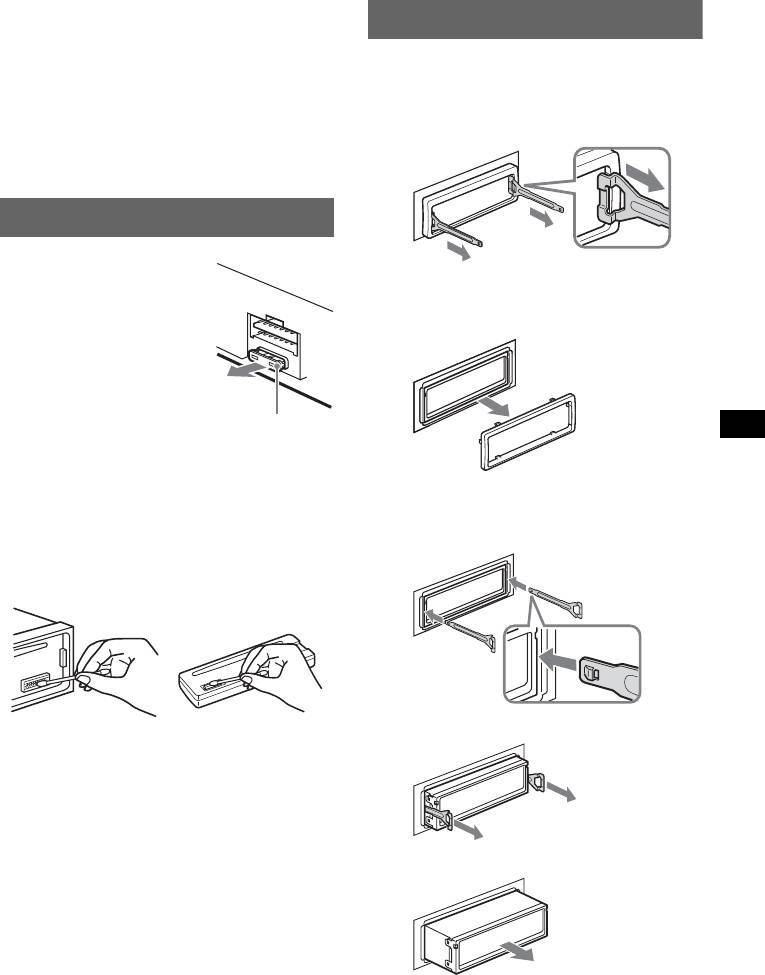
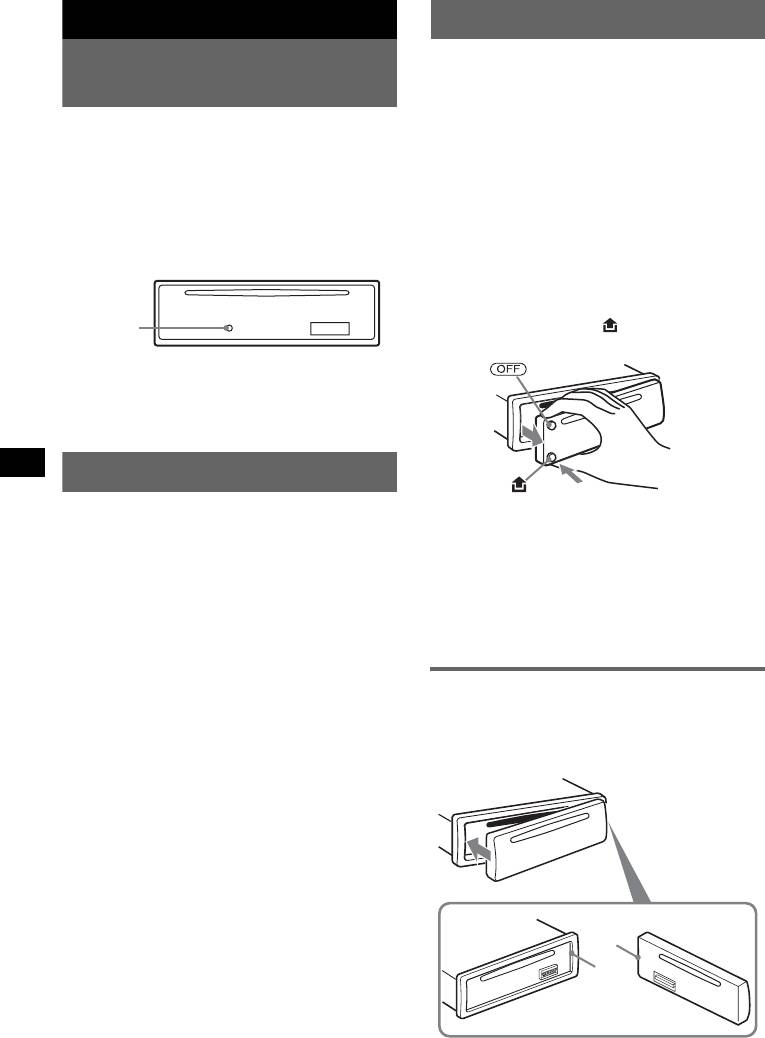
Resetting the unit
Before operating the unit for the first time, or
after replacing the car battery or changing the
connections, you must reset the unit.
Detach the front panel and press the RESET
button with a pointed object, such as a ballpoint
pen.
Note
Pressing the RESET button will erase the clock setting
and some stored contents.
Setting the clock
The clock uses a 24-hour digital indication.
1
Press and hold the select button.
The setup display appears.
2
Press the select button repeatedly
until “CLOCK-ADJ” appears.
3
Press (DSPL).
The hour indication flashes.
4
Rotate the volume control dial to set
the hour and minute.
To move the digital indication, press (DSPL).
5
Press the select button.
The setup is complete and the clock starts.
To display the clock, press (DSPL). Press
(DSPL) again to return to the previous display.
With the card remote commander
In step 4, to set the hour and minute, press
M or m.
Detaching the front panel
You can detach the front panel of this unit to
prevent theft.
Caution alarm
If you turn the ignition switch to the OFF
position without detaching the front panel, the
caution alarm will sound for a few seconds.
The alarm will only sound if the built-in
amplifier is used.
1
Press (OFF).
The unit is turned off.
2
Press
, then pull it off towards you.
Notes
• Do not drop or put excessive pressure on the front
panel and display window.
• Do not subject the front panel to heat/high
temperature or moisture. Avoid leaving it in a parked
car or on a dashboard/rear tray.
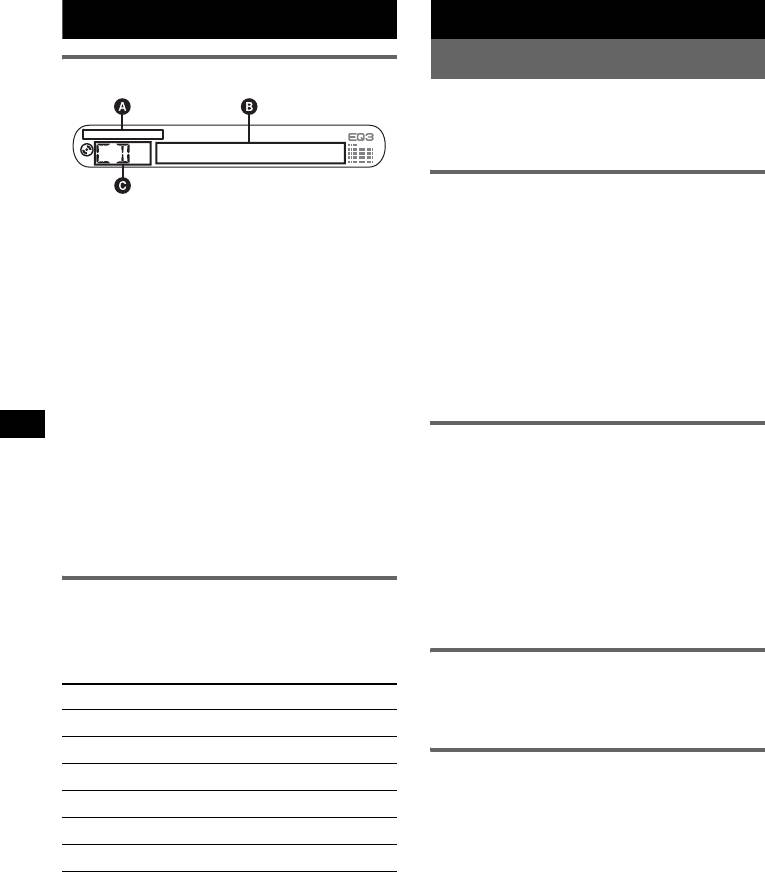
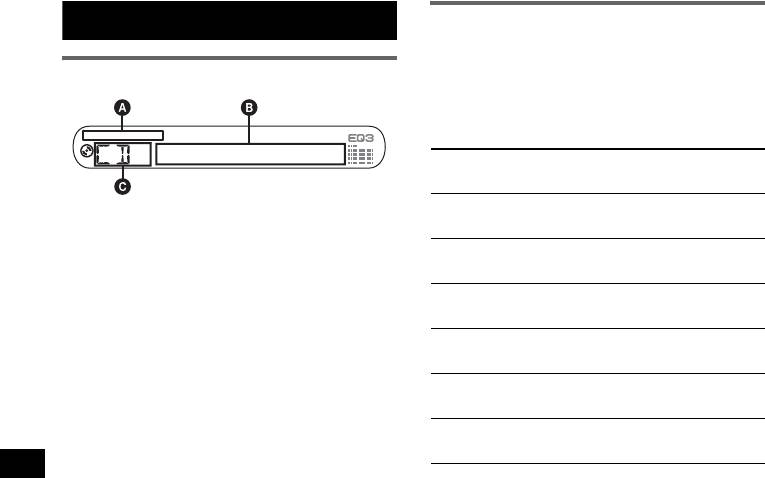
Attaching the front panel
Engage part A of the front panel with part B of
the unit, as illustrated, and push the left side into
position until it clicks.
Note
Do not put anything on the inner surface of the front
panel.
RESET
button
B
A

5
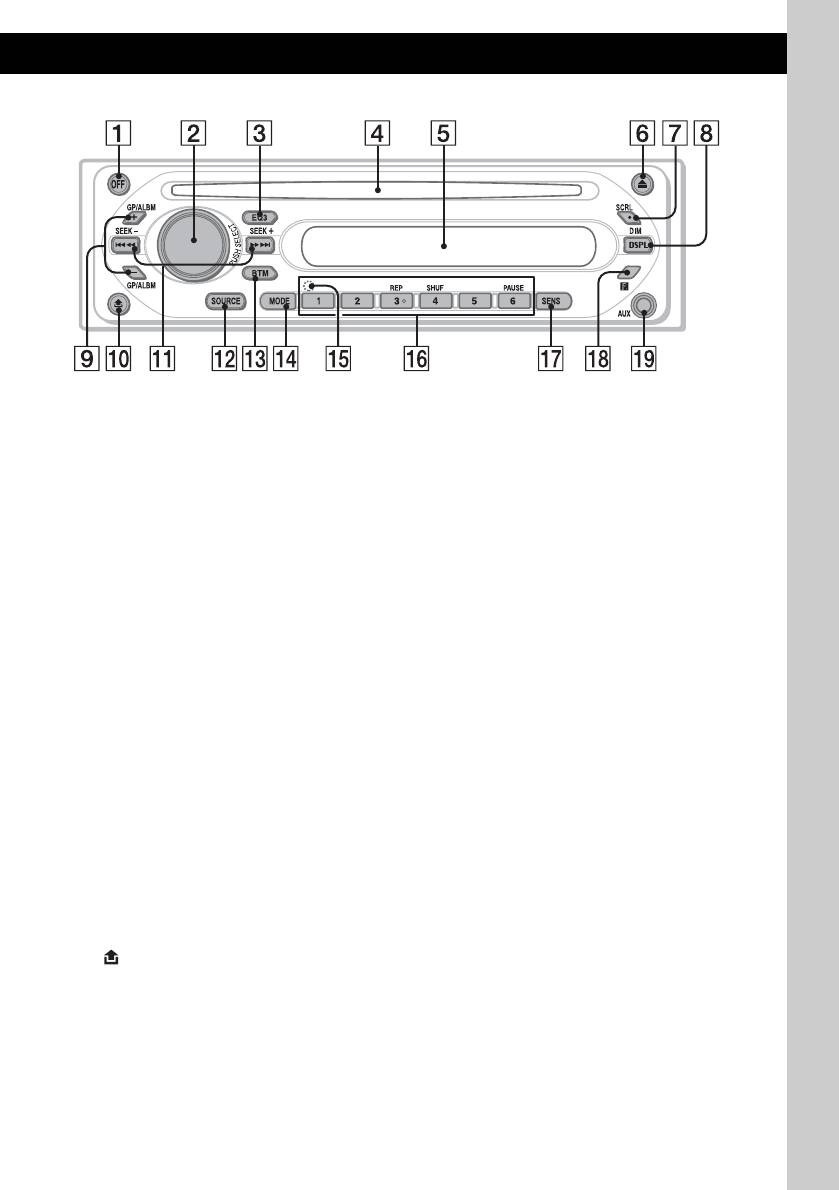
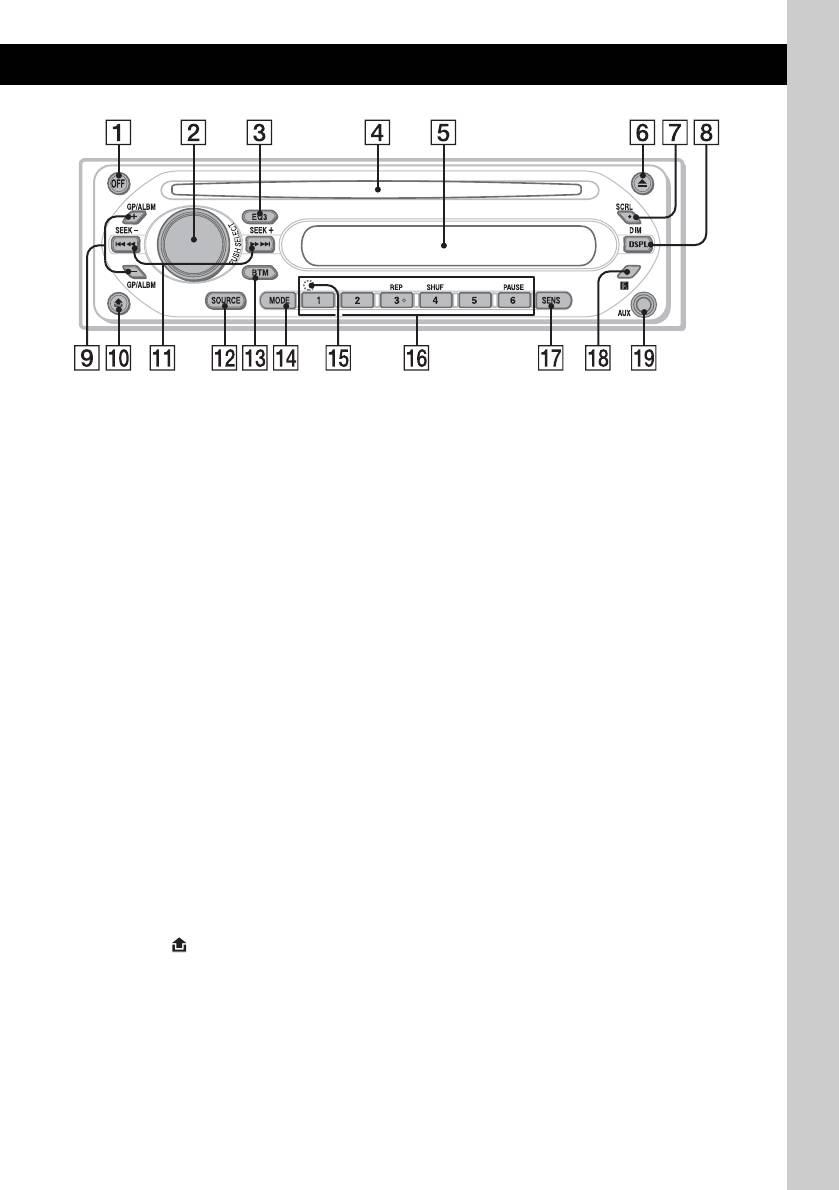
Location of controls and basic operations
Main unit
Refer to the pages listed for details.
A OFF button
To power off; stop the source.
B Volume control dial/select button 7
To adjust volume (rotate); select setup items
(press and rotate).
C EQ3 (equalizer) button 7
To select an equalizer type (XPLOD,
VOCAL, CLUB, JAZZ, NEW AGE, ROCK,
CUSTOM or OFF).
D Disc slot
To insert the disc (label side up), playback
starts.
E Display window
F Z (eject) button
To eject the disc.
G SCRL (scroll) button 6
To scroll the display item.
H DSPL (display)/DIM (dimmer) button
4, 6
To change display items (press); change the
display brightness (press and hold).
I GP*
1
/ALBM*
2
+/– buttons
To skip groups/albums (press); skip groups/
albums continuously (press and hold).
J
(front panel release) button 4
K SEEK –/+ buttons
CD:
To skip tracks (press); skip tracks
continuously (press, then press again within
about 1 second and hold); reverse/fast-
forward a track (press and hold).
Radio:
To tune in stations automatically (press); find
a station manually (press and hold).
L SOURCE button
To power on; change the source (Radio/CD/
AUX).
M BTM button 6
To start the BTM function (press and hold).
N MODE button 6
To select the radio band (FM/MW/LW).
O RESET button (located behind the front
panel) 4
P Number buttons
CD:
(3): REP 6
(4): SHUF 6
(6): PAUSE
To pause playback. To cancel, press
again.
Radio:
To receive stored stations (press); store
stations (press and hold).
Q SENS button
To improve weak reception: LOCAL/
MONO.
R Receptor for the card remote
commander 8
S AUX input jack 8
To connect a portable audio device.
*1 When an ATRAC CD is played.
*2 When an MP3/WMA is played.
CDX-GT200E

Display items, Repeat and shuffle play, Radio
Storing and receiving stations, Storing automatically — btm, Storing manually, Receiving the stored stations, Tuning automatically, Display items repeat and shuffle play, On 6 Чат поддержки
- Изображение
- Текст
6
CD
Display items
A
MP3/ATRAC CD/WMA indication
B
Track number/Elapsed playing time, Disc/
artist name, Album/group number*
1
, Album/
group name, Track name, Text information*
2
,
Clock
C
Source
*1 Album/group number is displayed only when the
album/group is changed.
*2 When playing an MP3, ID3 tag is displayed, when
playing ATRAC CD, text information written by
SonicStage, etc., is displayed, and when playing
WMA, WMA tag is displayed.
To change display items B, press (DSPL);
scroll display items B, press (SCRL) or set
“A.SCRL-ON” (page 7).
Tip
Displayed items will differ, depending on the disc type,
recorded format and settings. For details on MP3/
WMA, see page 10; ATRAC CD, see page 10.
Repeat and shuffle play
1
During playback, press (3) (REP) or
(4) (SHUF) repeatedly until the
desired setting appears.
*1 When an MP3/WMA is played.
*2 When an ATRAC CD is played.
To return to normal play mode, select “REP-
OFF” or “SHUF-OFF.”
Radio
Storing and receiving stations
Caution
When tuning in stations while driving, use Best
Tuning Memory (BTM) to prevent an accident.
Storing automatically — BTM
1
Press (SOURCE) repeatedly until
“TUNER” appears.
To change the band, press (MODE)
repeatedly. You can select from FM1, FM2,
FM3, MW or LW.
2
Press and hold (BTM) until “BTM”
flashes.
The unit stores stations in order of frequency
on the number buttons.
A beep sounds when the setting is stored.
Storing manually
1
While receiving the station that you
want to store, press and hold a
number button ((1) to (6)) until
“MEM” appears.
The number button indication appears in the
display.
Note
If you try to store another station on the same number
button, the previous stored station will be replaced.
Receiving the stored stations
1
Select the band, then press a number
button ((1) to (6)).
Tuning automatically
1
Select the band, then press (SEEK) –/+
to search for the station.
Scanning stops when the unit receives a
station. Repeat this procedure until the
desired station is received.
Tip
If you know the frequency of the station you want to
listen to, press and hold (SEEK) –/+ to locate the
approximate frequency, then press (SEEK) –/+
repeatedly to fine adjust to the desired frequency
(manual tuning).
Select
To play
REP-TRACK
track repeatedly.
REP-ALBM*
1
album repeatedly.
REP-GP*
2
group repeatedly.
SHUF-ALBM*
1
album in random order.
SHUF-GP*
2
group in random order.
SHUF-DISC
disc in random order.

Other functions, Changing the sound settings, Adjusting the sound characteristics — bal/fad/sub
Customizing the equalizer curve — eq3, Adjusting setup items — set, Adjusting the sound characteristics, Bal/fad/sub customizing the equalizer curve, Adjusting setup items — set, Other functions changing the sound settings, Adjusting the sound character Чат поддержки
- Изображение
- Текст
7
Other functions
Changing the sound settings
Adjusting the sound
characteristics — BAL/FAD/SUB
You can adjust the balance, fader, and subwoofer
volume.
1
Press the select button repeatedly
until “BAL,” “FAD” or “SUB” appears.
The item changes as follows:
LOW*
1
t MID*
1
t HI*
1
t
BAL (left-right)
t FAD (front-rear) t
SUB (subwoofer volume)*
2
t AUX*
3
*1 When EQ3 is activated (page 7).
*2 When the audio output is set to “SUB” (page 7).
“ATT” is displayed at the lowest setting, and can
be adjusted up to 20 steps.
*3 When AUX source is activated (page 8).
2
Rotate the volume control dial to
adjust the selected item.
After 3 seconds, the setting is complete and
the display returns to normal play/reception
mode.
With the card remote commander
In step 2, to adjust the selected item, press
<, M, ,
or
m.
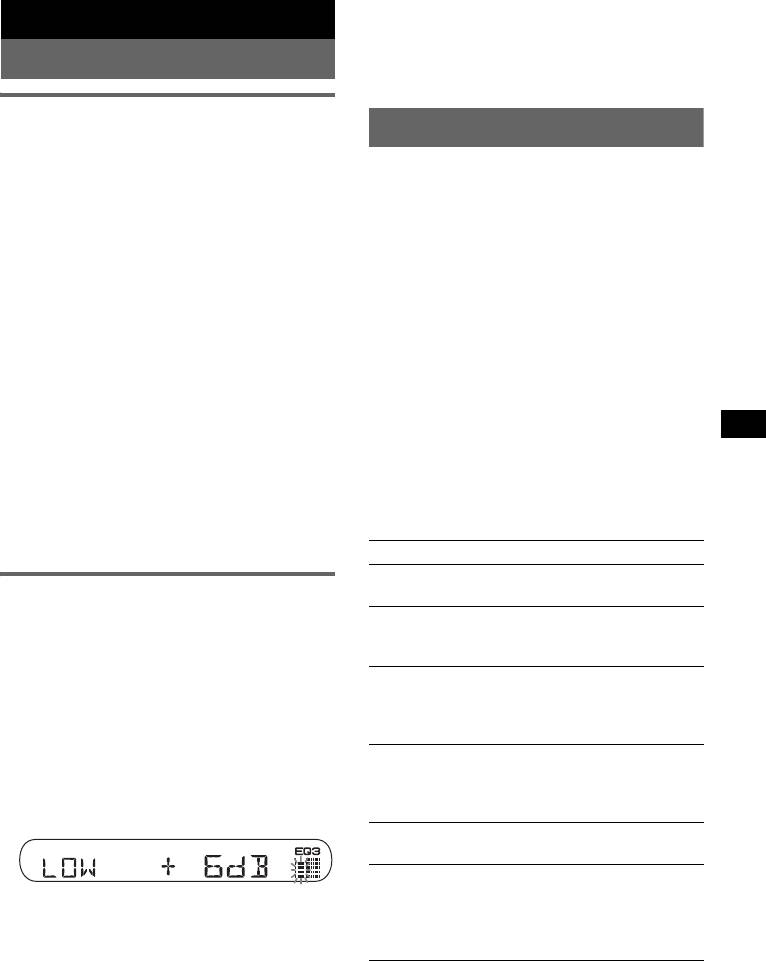
Customizing the equalizer curve
— EQ3
“CUSTOM” of EQ3 allows you to make your
own equalizer settings.
1
Select a source, then press (EQ3)
repeatedly to select “CUSTOM.”
2
Press the select button repeatedly
until “LOW,” “MID” or “HI” appears.
3
Rotate the volume control dial to
adjust the selected item.
The volume level is adjustable in 1 dB steps,
from –10 dB to +10 dB.
Repeat steps 2 and 3 to adjust the equalizer
curve.
To restore the factory-set equalizer curve,
press and hold the select button before the
setting is complete.
After 3 seconds, the setting is complete and
the display returns to normal play/reception
mode.
Tip
Other equalizer types are also adjustable.
With the card remote commander
In step 3, to adjust the selected item, press
<, M, ,
or
m.
Adjusting setup items — SET
1
Press and hold the select button.
The setup display appears.
2
Press the select button repeatedly
until the desired item appears.
3
Rotate the volume control dial to
select the setting (example “ON” or
“OFF”).
4
Press and hold the select button.
The setup is complete and the display returns
to normal play/reception mode.
Note
Displayed items will differ, depending on the source
and setting.
With the card remote commander
In step 3, to select the setting, press
< or ,.
The following items can be set (follow the page
reference for details):
“
z
” indicates the default settings.
CLOCK-ADJ (Clock Adjust) (page 4)
BEEP
To set “BEEP-ON” (
z
) or “BEEP-OFF.”
AUX-A*
1
(AUX Audio)
To turn the AUX source display “AUX-A-ON”
(
z
) or “AUX-A-OFF” (page 8).
SUB/REAR*
1
To switch the audio output.
– “SUB-OUT” (
z
): to output to a subwoofer.
– “REAR-OUT”: to output to a power amplifier.
DIM (Dimmer)
To change the brightness of the display.
– “DIM-ON”: to dim the display.
– “DIM-OFF” (
z
): to deactivate the dimmer.
DEMO*
1
(Demonstration)
To set “DEMO-ON” (
z
) or “DEMO-OFF.”
A.SCRL (Auto Scroll)
To scroll long displayed item automatically
when the disc/group/track/album is changed.
– “A.SCRL-ON”: to scroll.
– “A.SCRL-OFF” (
z
): to not scroll.
continue to next page
t

Using optional equipment, Auxiliary audio equipment, Card remote commander rm-x114
Connecting the portable audio device, Adjusting the volume level, Location of controls Чат поддержки
- Изображение
- Текст
8
*1 When the unit is turned off.
*2 When the audio output is set to “SUB.”
Using optional equipment
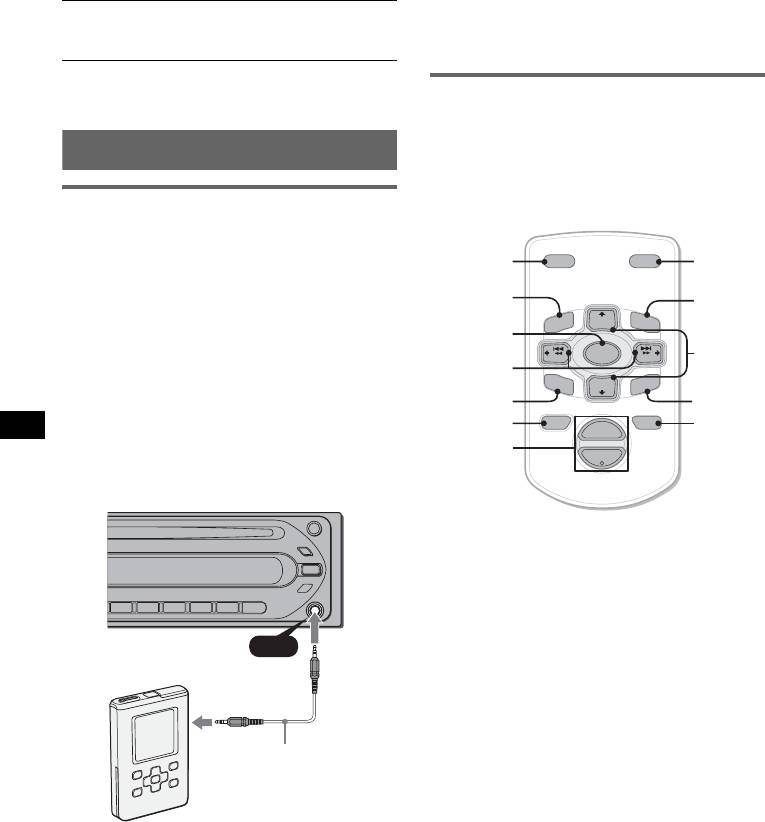
Auxiliary audio equipment
By connecting an optional portable audio device
to the AUX input jack (stereo mini jack) on the
unit and then simply selecting the source, you
can listen on your car speakers. The volume level
is adjustable for any difference between the unit
and the portable audio device. Follow the
procedure below:
Connecting the portable audio
device
1 Turn off the portable audio device.
2 Turn down the volume on the unit.
3 Connect to the unit.
* Be sure to use a straight type plug.
Adjusting the volume level
Be sure to adjust the volume for each connected
audio device before playback.
1 Turn down the volume on the unit.
2 Press (SOURCE) repeatedly until “AUX
FRONT IN” appears.
3 Start playback of the portable audio device at a
moderate volume.
4 Set your usual listening volume on the unit.
5 Press the select button repeatedly until “AUX”
appears, and rotate the volume control dial to
adjust the input level (±6 dB).
Card remote commander
RM-X114
Location of controls
The corresponding buttons on the card remote
commander control the same functions as those
on this unit.
The following buttons on the card remote
commander have also different buttons/functions
from the unit.
• SOUND button
The same as the select button on the unit.
•
</, (SEEK –/+) buttons
To control CD/radio, the same as (SEEK)
–/+ on the unit. (For details of other operations,
see “With the card remote commander” on each
pages.)
•
M/m (DISC*/PRESET +/–) buttons
To control CD, the same as (GP/ALBM) –/+
buttons on the unit. (For details of other
operations, see “With the card remote
commander” on each pages.)
• ATT (attenuate) button
To attenuate the sound. To cancel, press again.
* Not available for this unit.
Note
If the unit is turned off and the display disappears, it
cannot be operated with the card remote commander
unless (SOURCE) on the unit is pressed, or a disc is
inserted to activate the unit first.
LPF*
2
(Low Pass Filter)
To select the subwoofer cut-off frequency: “LPF
OFF” (
z
), “LPF125Hz” or “LPF 78Hz.”
AUX
AUX
Connecting cord*
(not supplied)
DISC
–
ATT
OFF
DSPL
MODE
SOURCE
DISC
+
VOL
+
–
PRESET
+
SEEK
+
SEEK
–
PRESET –
SOUND
ENTE
R
MENU
LIST
MODE
LIST
*
ENTER
*
ATT
DSPL
MENU
*
SOURCE
</,
(SEEK –/+ )
SOUND
OFF
VOL (+/ –)
m/M
(DISC
*
/
PRESET
+/ –)

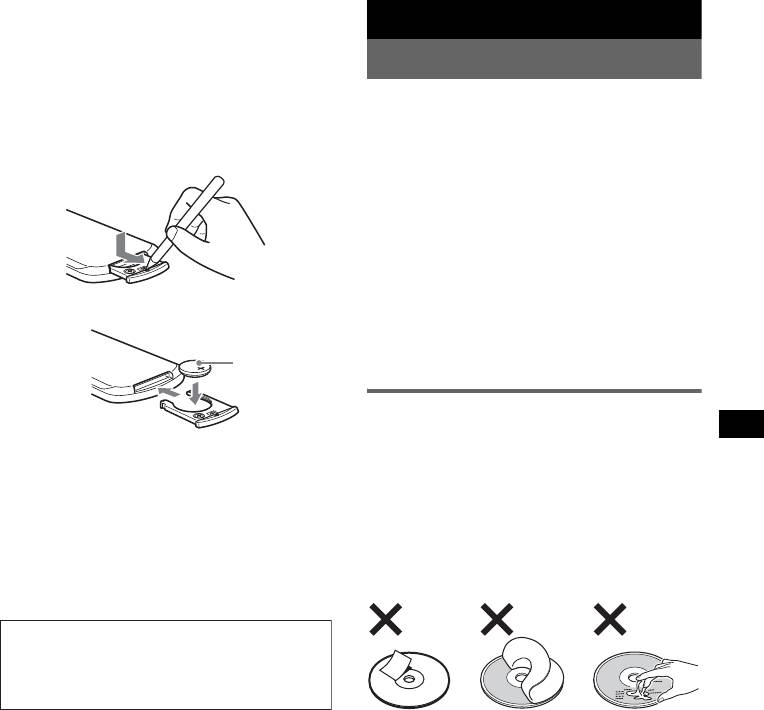
9
Replacing the lithium battery
Under normal conditions, the battery will last
approximately 1 year. (The service life may be
shorter, depending on the conditions of use.)
When the battery becomes weak, the range of the
card remote commander becomes shorter.
Replace the battery with a new CR2025 lithium
battery. Use of any other battery may present a
risk of fire or explosion.
Notes on the lithium battery
• Keep the lithium battery out of the reach of children.
Should the battery be swallowed, immediately
consult a doctor.
• Wipe the battery with a dry cloth to assure a good
contact.
• Be sure to observe the correct polarity when
installing the battery.
• Do not hold the battery with metallic tweezers,
otherwise a short-circuit may occur.
Additional Information
Precautions
• If your car has been parked in direct sunlight,
allow the unit to cool off before operating it.
• Power aerial will extend automatically while the
unit is operating.
Moisture condensation
On a rainy day or in a very damp area, moisture
condensation may occur inside the lenses and
display of the unit. Should this occur, the unit will
not operate properly. In such a case, remove the disc
and wait for about an hour until the moisture has
evaporated.
To maintain high sound quality
Be careful not to splash juice or other soft drinks
onto the unit or discs.
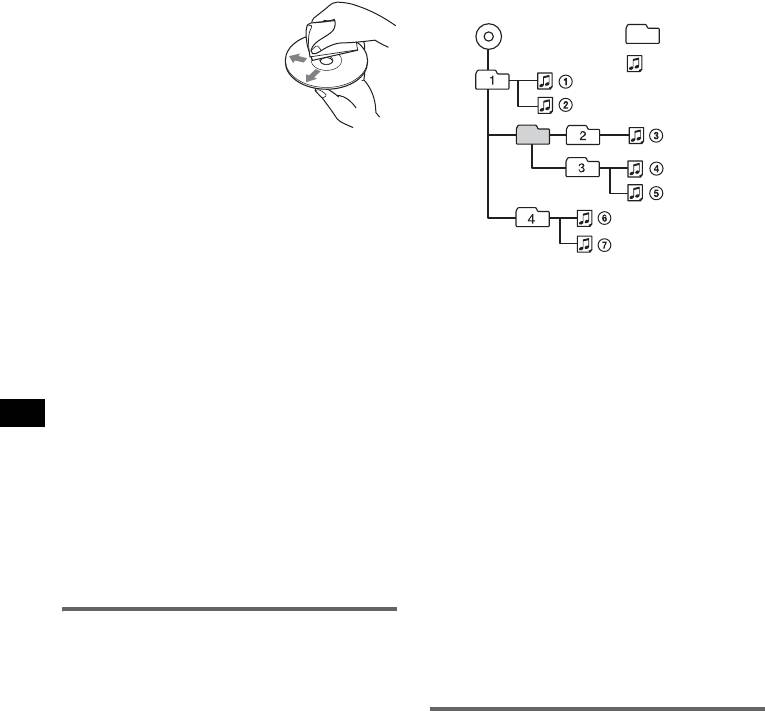
Notes on discs
• To keep a disc clean, do not touch its surface.
Handle the disc by its edge.
• Keep your discs in their cases or disc magazines
when not in use.
• Do not subject discs to heat/high temperature.
Avoid leaving them in a parked car or on a
dashboard/rear tray.
• Do not attach labels, or use discs with sticky ink/
residue. Such discs may stop spinning when used,
causing a malfunction, or may ruin the disc.
• Do not use any discs with labels or stickers
attached.
The following malfunctions may result from using
such discs:
– Inability to eject a disc (due to a label or sticker
peeling off and jamming the eject mechanism).
– Inability to read audio data correctly (e.g.,
playback skipping, or no playback) due to heat
shrinking of a sticker or label causing a disc to
warp.
• Discs with non-standard shapes (e.g., heart,
square, star) cannot be played on this unit.
Attempting to do so may damage the unit. Do not
use such discs.
• You cannot play 8 cm CDs.
+ side up
x
WARNING
Battery may explode if mistreated.
Do not recharge, disassemble, or dispose of
in fire.
continue to next page
t

10
• Before playing, clean the discs
with a commercially available
cleaning cloth. Wipe each disc
from the centre out. Do not use
solvents such as benzine,
thinner, commercially available
cleaners, or antistatic spray
intended for analogue discs.
Notes on CD-R/CD-RW discs
• Some CD-Rs/CD-RWs (depending on the
equipment used for its recording or the condition
of the disc) may not play on this unit.
• You cannot play a CD-R/a CD-RW that is not
finalized.
Music discs encoded with copyright
protection technologies
This product is designed to play back discs that
conform to the Compact Disc (CD) standard.
Recently, various music discs encoded with
copyright protection technologies are marketed by
some record companies. Please be aware that among
those discs, there are some that do not conform to
the CD standard and may not be playable by this
product.
About MP3/WMA files
MP3, which stands for MPEG-1 Audio Layer-3, is a
music file compression format standard. It
compresses audio CD data to approximately 1/10 of
its original size.
WMA, which stands for Windows Media Audio, is
another music file compression format standard. It
compresses audio CD data to approximately 1/22*
of its original size.
* only for 64 kbps
• The unit is compatible with the ISO 9660 level 1/
level 2 format, Joliet/Romeo in the expansion
format and Multi Session.
• The maximum number of:
– folders (albums): 150 (including root and empty
folders).
– MP3/WMA files (tracks) and folders contained
in a disc: 300 (if a folder/file names contain
many characters, this number may become less
than 300).
– displayable characters for a folder/file name is
32 (Joliet), or 64 (Romeo).
• ID3 tag versions 1.0, 1.1, 2.2, 2.3 and 2.4 apply to
MP3 only. ID tag is 15/30 characters (1.0 and 1.1),
or 63/126 characters (2.2, 2.3 and 2.4). WMA tag
is 63 characters.
Playback order of MP3/WMA files
Notes
• When naming an MP3/WMA file, be sure to add the
file expansion “.mp3” / “.wma” to the file name.
• During playback of a VBR (variable bit rate) MP3/
WMA file or fast-forward/reverse, elapsed playing
time may not display accurately.
• When the disc is recorded in Multi Session, only the
first track of the first session format is recognized
and played (any other format is skipped). The
priority of the format is CD-DA, ATRAC CD and
MP3/WMA.
– When the first track is a CD-DA, only CD-DA of the
first session is played.
– When the first track is not a CD-DA, an ATRAC CD
or MP3/WMA session is played. If the disc has no
data in any of these formats, “NO MUSIC” is
displayed.
Notes on MP3
• Be sure to finalize the disc before using on the unit.
• If you play a high-bit-rate MP3, such as 320 kbps,
sound may be intermittent.
Notes on WMA
• Files made with lossless compression are not
playable.
• Files protected by copyright are not playable.
About ATRAC CD
ATRAC3plus format
ATRAC3, which stands for Adaptive Transform
Acoustic Coding3, is audio compression
technology. It compresses audio CD data to
approximately 1/10 of its original size.
ATRAC3plus, which is an extended format of
ATRAC3, compresses the audio CD data to
approximately 1/20 of its original size. The unit
accepts both ATRAC3 and ATRAC3plus format.
ATRAC CD
ATRAC CD is recorded audio CD data which is
compressed to ATRAC3 or ATRAC3plus format
using authorized software, such as SonicStage 2.0 or
later, or SonicStage Simple Burner.
• The maximum number of:
– folders (groups): 255
– files (tracks): 999
• The characters for a folder/file name and text
information written by SonicStage is displayed.
Note on DualDiscs
A DualDisc is a two sided disc product which
mates DVD recorded material on one side with
digital audio material on the other side. However,
since the audio material side does not conform to
the Compact Disc (CD) standard, playback on this
product is not guaranteed.
Folder
(album)
MP3/WMA file
(track)
MP3/WMA

15:21
Ремонтируем автомагнитолу Sony
07:20
AUX выход для магнитолы сони на мой Опелёк
07:07
Управление магнитолой sony
Нажмите на кнопку для помощи
Раздел: Авто, мото оборудование и транспорт
Тип: Автомагнитола
Характеристики, спецификации
Макс. выходная мощность:
4 x 50 Вт
Ном. выходная мощность:
4 x 26 Вт
Воспроизведение CD/-R/-RW:
Да
Фиксированные настройки тюнера:
18 FM/6 MW/LW
Тип дисплея:
текст./символьный
Тип дистанционного управления:
ИК
Тип батарей пульта ДУ:
1 x CR2025
Размер установочного места:
1 DIN
Инструкция к Автомагнитоле Sony CDX-GT200E
2-651-185-33 (1)
FM
/
MW/LW
Compact Disc Player
GB
Operating Instructions
RU
Инструкция по эксплуатации
To cancel the demonstration (DEMO) display, see page 7.
Для отмены демонстрации на дисплее (режим DEMO) см. стр. 9.
CDX-GT200E
© 2005 Sony Corporation
Welcome !
Warning if your car’s ignition has no
ACC position
Thank you for purchasing this Sony Compact
After turning the ignition off, be sure to press
Disc Player. You can enjoy your drive with the
and hold (OFF) on the unit until the display
following functions.
disappears.
• CD playback
Otherwise, the display does not turn off and
You can play CD-DA (also containing CD
this causes battery drain.
TEXT*), CD-R/CD-RW (MP3/WMA files also
containing Multi Session (
page 10)) and
ATRAC CD (ATRAC3 and ATRAC3plus
format (
page 10)).
Type of discs Label on the disc
CD-DA
This label is located on the bottom of the
chassis.
Disposal of Old Electrical &
Electronic Equipment (Applicable in
MP3
the European Union and other
WMA
European countries with separate
ATRAC CD
collection systems)
This symbol on the product or on its
packaging indicates that this product shall not be treated
as household waste. Instead it shall be handed over to the
• Radio reception
applicable collection point for the recycling of electrical
– You can store up to 6 stations per band (FM1,
and electronic equipment. By ensuring this product is
FM2, FM3, MW and LW).
disposed of correctly, you will help prevent potential
– BTM (Best Tuning Memory): the unit selects
negative consequences for the environment and human
health, which could otherwise be caused by inappropriate
strong signal stations and stores them.
waste handling of this product. The recycling of materials
• Sound adjustment
will help to conserve natural resources. For more detailed
– EQ3: You can select an equalizer curve for 7
information about recycling of this product, please contact
music types.
your local Civic Office, your household waste disposal
• Auxiliary equipment connection
service or the shop where you purchased the product.
An AUX input jack on the front of the unit
allows connection of a portable audio device.
SonicStage and its logo are trademarks of Sony
* A CD TEXT disc is a CD-DA that includes
Corporation.
information such as disc, artist and track name.
ATRAC, ATRAC3, ATRAC3plus and their logos
are trademarks of Sony Corporation.
For installation and connections, see the
Microsoft, Windows Media,
supplied installation/connections manual.
and the Windows logo are
trademarks or registered
trademarks of Microsoft
Corporation in the United States and/or other
countries.
2

Table of Contents
Getting Started
Other functions
Resetting the unit. . . . . . . . . . . . . . . . . . . . . . . . 4
Changing the sound settings . . . . . . . . . . . . . . . 7
Setting the clock . . . . . . . . . . . . . . . . . . . . . . . . 4
Adjusting the sound characteristics
Detaching the front panel . . . . . . . . . . . . . . . . . 4
— BAL/FAD/SUB . . . . . . . . . . . . . . . . . . . 7
Attaching the front panel . . . . . . . . . . . . . . . 4
Customizing the equalizer curve
— EQ3 . . . . . . . . . . . . . . . . . . . . . . . . . . . . 7
Adjusting setup items — SET . . . . . . . . . . . . . 7
Location of controls and basic
Using optional equipment. . . . . . . . . . . . . . . . . 8
operations
Auxiliary audio equipment . . . . . . . . . . . . . 8
Card remote commander RM-X114 . . . . . . 8
Main unit . . . . . . . . . . . . . . . . . . . . . . . . . . . 5
Additional Information
CD
Precautions . . . . . . . . . . . . . . . . . . . . . . . . . . . . 9
Display items . . . . . . . . . . . . . . . . . . . . . . . . 6
Notes on discs . . . . . . . . . . . . . . . . . . . . . . . 9
Repeat and shuffle play . . . . . . . . . . . . . . . . 6
About MP3/WMA files . . . . . . . . . . . . . . . 10
About ATRAC CD . . . . . . . . . . . . . . . . . . 10
Radio
Maintenance . . . . . . . . . . . . . . . . . . . . . . . . . . 11
Removing the unit. . . . . . . . . . . . . . . . . . . . . . 11
Storing and receiving stations . . . . . . . . . . . . . . 6
Specifications . . . . . . . . . . . . . . . . . . . . . . . . . 12
Storing automatically — BTM . . . . . . . . . . 6
Troubleshooting . . . . . . . . . . . . . . . . . . . . . . . 12
Storing manually . . . . . . . . . . . . . . . . . . . . . 6
Error displays/Messages . . . . . . . . . . . . . . 13
Receiving the stored stations . . . . . . . . . . . . 6
Tuning automatically . . . . . . . . . . . . . . . . . . 6
3
Getting Started
Detaching the front panel
You can detach the front panel of this unit to
Resetting the unit
prevent theft.
Before operating the unit for the first time, or
after replacing the car battery or changing the
Caution alarm
connections, you must reset the unit.
If you turn the ignition switch to the OFF
Detach the front panel and press the RESET
position without detaching the front panel, the
button with a pointed object, such as a ballpoint
caution alarm will sound for a few seconds.
pen.
The alarm will only sound if the built-in
amplifier is used.
1 Press (OFF).
RESET
The unit is turned off.
button
2 Press , then pull it off towards you.
Note
Pressing the RESET button will erase the clock setting
and some stored contents.
Setting the clock
The clock uses a 24-hour digital indication.
1 Press and hold the select button.
Notes
The setup display appears.
• Do not drop or put excessive pressure on the front
panel and display window.
2 Press the select button repeatedly
• Do not subject the front panel to heat/high
until “CLOCK-ADJ” appears.
temperature or moisture. Avoid leaving it in a parked
car or on a dashboard/rear tray.
3 Press (DSPL).
The hour indication flashes.
4 Rotate the volume control dial to set
Attaching the front panel
the hour and minute.
Engage part A of the front panel with part B of
To move the digital indication, press (DSPL).
the unit, as illustrated, and push the left side into
position until it clicks.
5 Press the select button.
The setup is complete and the clock starts.
To display the clock, press (DSPL). Press
(DSPL) again to return to the previous display.
With the card remote commander
In step 4, to set the hour and minute, press M or m.
A
B
Note
Do not put anything on the inner surface of the front
panel.
4
Location of controls and basic operations
Main unit
CDX-GT200E
Refer to the pages listed for details.
Radio:
To tune in stations automatically (press); find
A OFF button
a station manually (press and hold).
To power off; stop the source.
L SOURCE button
B Volume control dial/select button 7
To power on; change the source (Radio/CD/
To adjust volume (rotate); select setup items
AUX).
(press and rotate).
M BTM button 6
C EQ3 (equalizer) button 7
To start the BTM function (press and hold).
To select an equalizer type (XPLOD,
VOCAL, CLUB, JAZZ, NEW AGE, ROCK,
N MODE button 6
CUSTOM or OFF).
To select the radio band (FM/MW/LW).
D Disc slot
O RESET button (located behind the front
To insert the disc (label side up), playback
panel)
4
starts.
P Number buttons
E Display window
CD:
(3): REP 6
F Z (eject) button
(4): SHUF 6
To eject the disc.
(6): PAUSE
G SCRL (scroll) button 6
To pause playback. To cancel, press
To scroll the display item.
again.
Radio:
H DSPL (display)/DIM (dimmer) button
To receive stored stations (press); store
4, 6
stations (press and hold).
To change display items (press); change the
Q SENS button
display brightness (press and hold).
To improve weak reception: LOCAL/
1
2
I GP*
/ALBM*
+/– buttons
MONO.
To skip groups/albums (press); skip groups/
R Receptor for the card remote
albums continuously (press and hold).
commander 8
J (front panel release) button 4
S AUX input jack 8
K SEEK –/+ buttons
To connect a portable audio device.
CD:
To skip tracks (press); skip tracks
*1 When an ATRAC CD is played.
continuously (press, then press again within
*2 When an MP3/WMA is played.
about 1 second and hold); reverse/fast-
forward a track (press and hold).
5
CD
Radio
Storing and receiving stations
Display items
Caution
When tuning in stations while driving, use Best
Tuning Memory (BTM) to prevent an accident.
Storing automatically — BTM
A MP3/ATRAC CD/WMA indication
1 Press (SOURCE) repeatedly until
B Track number/Elapsed playing time, Disc/
“TUNER” appears.
1
artist name, Album/group number*
, Album/
To change the band, press (MODE)
2
group name, Track name, Text information*
,
repeatedly. You can select from FM1, FM2,
Clock
FM3, MW or LW.
C Source
2 Press and hold (BTM) until “BTM”
*1 Album/group number is displayed only when the
flashes.
album/group is changed.
The unit stores stations in order of frequency
*2 When playing an MP3, ID3 tag is displayed, when
on the number buttons.
playing ATRAC CD, text information written by
SonicStage, etc., is displayed, and when playing
A beep sounds when the setting is stored.
WMA, WMA tag is displayed.
To change display items B, press (DSPL);
Storing manually
scroll display items B, press (SCRL) or set
“A.SCRL-ON” (
page 7).
1 While receiving the station that you
want to store, press and hold a
Tip
number button ((1) to (6)) until
Displayed items will differ, depending on the disc type,
recorded format and settings. For details on MP3/
“MEM” appears.
WMA, see
page 10; ATRAC CD, see page 10.
The number button indication appears in the
display.
Note
Repeat and shuffle play
If you try to store another station on the same number
button, the previous stored station will be replaced.
1 During playback, press (3) (REP) or
(4) (SHUF) repeatedly until the
desired setting appears.
Receiving the stored stations
Select To play
1 Select the band, then press a number
button ((1) to (6)).
REP-TRACK track repeatedly.
1
REP-ALBM*
album repeatedly.
Tuning automatically
2
REP-GP*
group repeatedly.
1
1 Select the band, then press (SEEK) –/+
SHUF-ALBM*
album in random order.
to search for the station.
2
SHUF-GP*
group in random order.
Scanning stops when the unit receives a
station. Repeat this procedure until the
SHUF-DISC disc in random order.
desired station is received.
*1 When an MP3/WMA is played.
Tip
*2 When an ATRAC CD is played.
If you know the frequency of the station you want to
listen to, press and hold (SEEK)
–/+ to locate the
To return to normal play mode, select “REP-
approximate frequency, then press (SEEK)
–/+
OFF” or “SHUF-OFF.”
repeatedly to fine adjust to the desired frequency
(manual tuning).
6
Tip
Other functions
Other equalizer types are also adjustable.
With the card remote commander
Changing the sound settings
In step 3, to adjust the selected item, press <, M, ,
or m.
Adjusting the sound
Adjusting setup items — SET
characteristics — BAL/FAD/SUB
You can adjust the balance, fader, and subwoofer
1 Press and hold the select button.
volume.
The setup display appears.
1 Press the select button repeatedly
2 Press the select button repeatedly
until “BAL,” “FAD” or “SUB” appears.
until the desired item appears.
The item changes as follows:
3 Rotate the volume control dial to
1
1
1
LOW*
t MID*
t HI*
t
select the setting (example “ON” or
BAL (left-right) t FAD (front-rear) t
“OFF”).
2
3
SUB (subwoofer volume)*
t AUX*
4 Press and hold the select button.
*1 When EQ3 is activated (page 7).
The setup is complete and the display returns
*2 When the audio output is set to “SUB” (page 7).
to normal play/reception mode.
“ATT” is displayed at the lowest setting, and can
be adjusted up to 20 steps.
Note
*3 When AUX source is activated (page 8).
Displayed items will differ, depending on the source
and setting.
2 Rotate the volume control dial to
adjust the selected item.
With the card remote commander
After 3 seconds, the setting is complete and
In step 3, to select the setting, press < or ,.
the display returns to normal play/reception
The following items can be set (follow the page
mode.
reference for details):
With the card remote commander
“z” indicates the default settings.
In step 2, to adjust the selected item, press <, M, ,
or m.
CLOCK-ADJ (Clock Adjust) (page 4)
BEEP
Customizing the equalizer curve
To set “BEEP-ON” (z) or “BEEP-OFF.”
— EQ3
1
AUX-A*
(AUX Audio)
“CUSTOM” of EQ3 allows you to make your
To turn the AUX source display “AUX-A-ON”
own equalizer settings.
(
z) or “AUX-A-OFF” (page 8).
1
1 Select a source, then press (EQ3)
SUB/REAR*
repeatedly to select “CUSTOM.”
To switch the audio output.
– “SUB-OUT” (
z): to output to a subwoofer.
2 Press the select button repeatedly
– “REAR-OUT”: to output to a power amplifier.
until “LOW,” “MID” or “HI” appears.
DIM (Dimmer)
3 Rotate the volume control dial to
To change the brightness of the display.
adjust the selected item.
– “DIM-ON”: to dim the display.
The volume level is adjustable in 1 dB steps,
– “DIM-OFF” (
z): to deactivate the dimmer.
from –10 dB to +10 dB.
1
DEMO*
(Demonstration)
To set “DEMO-ON” (z) or “DEMO-OFF.”
A.SCRL (Auto Scroll)
Repeat steps 2 and 3 to adjust the equalizer
To scroll long displayed item automatically
curve.
when the disc/group/track/album is changed.
To restore the factory-set equalizer curve,
– “A.SCRL-ON”: to scroll.
press and hold the select button before the
– “A.SCRL-OFF” (
z): to not scroll.
setting is complete.
After 3 seconds, the setting is complete and
the display returns to normal play/reception
mode.
continue to next page t
7
2
5 Press the select button repeatedly until “AUX”
LPF*
(Low Pass Filter)
appears, and rotate the volume control dial to
To select the subwoofer cut-off frequency: “LPF
adjust the input level (±6 dB).
OFF” (
z), “LPF125Hz” or “LPF 78Hz.”
*1 When the unit is turned off.
Card remote commander
*2 When the audio output is set to “SUB.”
RM-X114
Using optional equipment
Location of controls
The corresponding buttons on the card remote
commander control the same functions as those
Auxiliary audio equipment
on this unit.
By connecting an optional portable audio device
to the AUX input jack (stereo mini jack) on the
unit and then simply selecting the source, you
DSPL
DSPL MODE
MODE
can listen on your car speakers. The volume level
is adjustable for any difference between the unit
MENU
*
PRESET
+
LIST
*
and the portable audio device. Follow the
LIST
MENU
DISC
+
m/M
procedure below:
SOURCE
(DISC
*
/
SOURCE
SEEK
–
SEEK
+
</,
PRESET
Connecting the portable audio
(SEEK –/+ )
SOUND
E
R
+/ –)
DISC
–
E
N
T
device
SOUND
PRESET –
ENTER
*
1 Turn off the portable audio device.
OFF
+
ATTOFF
ATT
VOL
2 Turn down the volume on the unit.
VOL (+/ –)
–
3 Connect to the unit.
The following buttons on the card remote
commander have also different buttons/functions
from the unit.
• SOUND button
AUX
The same as the select button on the unit.
• </, (SEEK –/+) buttons
AUX
To control CD/radio, the same as (SEEK)
–/+ on the unit. (For details of other operations,
see “With the card remote commander” on each
pages.)
• M/m (DISC*/PRESET +/–) buttons
To control CD, the same as (GP/ALBM) –/+
Connecting cord*
buttons on the unit. (For details of other
(not supplied)
operations, see “With the card remote
commander” on each pages.)
• ATT (attenuate) button
To attenuate the sound. To cancel, press again.
* Be sure to use a straight type plug.
* Not available for this unit.
Note
Adjusting the volume level
If the unit is turned off and the display disappears, it
cannot be operated with the card remote commander
Be sure to adjust the volume for each connected
unless (SOURCE) on the unit is pressed, or a disc is
audio device before playback.
inserted to activate the unit first.
1 Turn down the volume on the unit.
2 Press (SOURCE) repeatedly until “AUX
FRONT IN” appears.
3 Start playback of the portable audio device at a
moderate volume.
4 Set your usual listening volume on the unit.
8
Replacing the lithium battery
Under normal conditions, the battery will last
Additional Information
approximately 1 year. (The service life may be
shorter, depending on the conditions of use.)
Precautions
When the battery becomes weak, the range of the
card remote commander becomes shorter.
• If your car has been parked in direct sunlight,
Replace the battery with a new CR2025 lithium
allow the unit to cool off before operating it.
battery. Use of any other battery may present a
• Power aerial will extend automatically while the
unit is operating.
risk of fire or explosion.
Moisture condensation
On a rainy day or in a very damp area, moisture
condensation may occur inside the lenses and
display of the unit. Should this occur, the unit will
not operate properly. In such a case, remove the disc
and wait for about an hour until the moisture has
evaporated.
x
To maintain high sound quality
Be careful not to splash juice or other soft drinks
+ side up
onto the unit or discs.
Notes on discs
• To keep a disc clean, do not touch its surface.
Handle the disc by its edge.
Notes on the lithium battery
• Keep your discs in their cases or disc magazines
• Keep the lithium battery out of the reach of children.
when not in use.
Should the battery be swallowed, immediately
• Do not subject discs to heat/high temperature.
consult a doctor.
• Wipe the battery with a dry cloth to assure a good
Avoid leaving them in a parked car or on a
contact.
dashboard/rear tray.
• Be sure to observe the correct polarity when
• Do not attach labels, or use discs with sticky ink/
installing the battery.
residue. Such discs may stop spinning when used,
• Do not hold the battery with metallic tweezers,
causing a malfunction, or may ruin the disc.
otherwise a short-circuit may occur.
WARNING
Battery may explode if mistreated.
Do not recharge, disassemble, or dispose of
in fire.
• Do not use any discs with labels or stickers
attached.
The following malfunctions may result from using
such discs:
– Inability to eject a disc (due to a label or sticker
peeling off and jamming the eject mechanism).
– Inability to read audio data correctly (e.g.,
playback skipping, or no playback) due to heat
shrinking of a sticker or label causing a disc to
warp.
• Discs with non-standard shapes (e.g., heart,
square, star) cannot be played on this unit.
Attempting to do so may damage the unit. Do not
use such discs.
• You cannot play 8 cm CDs.
continue to next page t
9
• Before playing, clean the discs
Playback order of MP3/WMA files
with a commercially available
Folder
cleaning cloth. Wipe each disc
MP3/WMA
(album)
from the centre out. Do not use
solvents such as benzine,
MP3/WMA file
thinner, commercially available
(track)
cleaners, or antistatic spray
intended for analogue discs.
Notes on CD-R/CD-RW discs
• Some CD-Rs/CD-RWs (depending on the
equipment used for its recording or the condition
of the disc) may not play on this unit.
• You cannot play a CD-R/a CD-RW that is not
finalized.
Music discs encoded with copyright
Notes
protection technologies
• When naming an MP3/WMA file, be sure to add the
This product is designed to play back discs that
file expansion “.mp3” / “.wma” to the file name.
conform to the Compact Disc (CD) standard.
• During playback of a VBR (variable bit rate) MP3/
WMA file or fast-forward/reverse, elapsed playing
Recently, various music discs encoded with
time may not display accurately.
copyright protection technologies are marketed by
• When the disc is recorded in Multi Session, only the
some record companies. Please be aware that among
first track of the first session format is recognized
those discs, there are some that do not conform to
and played (any other format is skipped). The
the CD standard and may not be playable by this
priority of the format is CD-DA, ATRAC CD and
product.
MP3/WMA.
– When the first track is a CD-DA, only CD-DA of the
Note on DualDiscs
first session is played.
A DualDisc is a two sided disc product which
– When the first track is not a CD-DA, an ATRAC CD
or MP3/WMA session is played. If the disc has no
mates DVD recorded material on one side with
data in any of these formats, “NO MUSIC” is
digital audio material on the other side. However,
displayed.
since the audio material side does not conform to
the Compact Disc (CD) standard, playback on this
Notes on MP3
product is not guaranteed.
• Be sure to finalize the disc before using on the unit.
• If you play a high-bit-rate MP3, such as 320 kbps,
sound may be intermittent.
About MP3/WMA files
Notes on WMA
MP3, which stands for MPEG-1 Audio Layer-3, is a
• Files made with lossless compression are not
music file compression format standard. It
playable.
compresses audio CD data to approximately 1/10 of
• Files protected by copyright are not playable.
its original size.
WMA, which stands for Windows Media Audio, is
About ATRAC CD
another music file compression format standard. It
compresses audio CD data to approximately 1/22*
ATRAC3plus format
of its original size.
ATRAC3, which stands for Adaptive Transform
* only for 64 kbps
Acoustic Coding3, is audio compression
technology. It compresses audio CD data to
• The unit is compatible with the ISO 9660 level 1/
approximately 1/10 of its original size.
level 2 format, Joliet/Romeo in the expansion
ATRAC3plus, which is an extended format of
format and Multi Session.
ATRAC3, compresses the audio CD data to
• The maximum number of:
approximately 1/20 of its original size. The unit
– folders (albums): 150 (including root and empty
accepts both ATRAC3 and ATRAC3plus format.
folders).
– MP3/WMA files (tracks) and folders contained
ATRAC CD
in a disc: 300 (if a folder/file names contain
ATRAC CD is recorded audio CD data which is
many characters, this number may become less
compressed to ATRAC3 or ATRAC3plus format
than 300).
using authorized software, such as SonicStage 2.0 or
– displayable characters for a folder/file name is
later, or SonicStage Simple Burner.
32 (Joliet), or 64 (Romeo).
• The maximum number of:
• ID3 tag versions 1.0, 1.1, 2.2, 2.3 and 2.4 apply to
– folders (groups): 255
MP3 only. ID tag is 15/30 characters (1.0 and 1.1),
– files (tracks): 999
or 63/126 characters (2.2, 2.3 and 2.4). WMA tag
• The characters for a folder/file name and text
is 63 characters.
information written by SonicStage is displayed.
10
For details on ATRAC CD, see the SonicStage or
SonicStage Simple Burner manual.
Removing the unit
Note
1 Remove the protection collar.
Be sure to create the ATRAC CD using authorized
software, such as SonicStage 2.0 or later, or
1 Detach the front panel (page 4).
SonicStage Simple Burner 1.0 or 1.1.
2 Engage the release keys together with the
If you have any questions or problems concerning
protection collar.
your unit that are not covered in this manual, consult
your nearest Sony dealer.
Maintenance
Fuse replacement
Orient the release
When replacing the fuse, be
keys as shown.
sure to use one matching the
3 Pull out the release keys to remove the
amperage rating stated on the
protection collar.
original fuse. If the fuse blows,
check the power connection and
replace the fuse. If the fuse
blows again after replacement,
there may be an internal
malfunction. In such a case,
Fuse (10A)
consult your nearest Sony
dealer.
Cleaning the connectors
2 Remove the unit.
The unit may not function properly if the connectors
between the unit and the front panel are not clean. In
1 Insert both release keys simultaneously
order to prevent this, detach the front panel (page 4)
until they click.
and clean the connectors with a cotton swab dipped
in alcohol. Do not apply too much force. Otherwise,
the connectors may be damaged.
Hook facing
inwards.
2 Pull the release keys to unseat the unit.
Main unit
Back of the front
panel
Notes
• For safety, turn off the ignition before cleaning the
connectors, and remove the key from the ignition
switch.
• Never touch the connectors directly with your fingers
or with any metal device.
3 Slide the unit out of the mounting.
11
MPEG Layer-3 audio coding technology and
Specifications
patents licensed from Fraunhofer IIS and
Thomson.
CD Player section
Signal-to-noise ratio: 120 dB
Design and specifications are subject to change
Frequency response: 10 – 20,000 Hz
without notice.
Wow and flutter: Below measurable limit
Tuner section
FM
Tuning range: 87.5 – 108.0 MHz
• Lead-free solder is used for soldering certain parts.
Aerial terminal: External aerial connector
(more than 80 %)
Intermediate frequency: 10.7 MHz/450 kHz
• Halogenated flame retardants are not used in the
Usable sensitivity: 9 dBf
certain printed wiring boards.
Selectivity: 75 dB at 400 kHz
• Halogenated flame retardants are not used in
Signal-to-noise ratio: 67 dB (stereo), 69 dB (mono)
cabinets.
Harmonic distortion at 1 kHz: 0.5 % (stereo),
• VOC (Volatile Organic Compound)-free vegetable
0.3 % (mono)
oil based ink is used for printing the carton.
Separation: 35 dB at 1 kHz
• Packaging cushions do not use polystyrene foam.
Frequency response: 30 – 15,000 Hz
MW/LW
Tuning range:
Troubleshooting
MW: 531 — 1,602 kHz
LW: 153 — 279 kHz
The following checklist will help you remedy
Aerial terminal: External aerial connector
problems you may encounter with your unit.
Intermediate frequency: 10.7 MHz/450 kHz
Before going through the checklist below, check the
Sensitivity: 30 µV
connection and operating procedures.
Power amplifier section
General
Outputs: Speaker outputs (sure seal connectors)
Speaker impedance: 4 – 8 ohms
No power is being supplied to the unit.
Maximum power output: 50 W × 4 (at 4 ohms)
• Check the connection. If everything is in order, check
the fuse.
General
• If the unit is turned off and the display disappears, it
cannot be operated with the remote commander.
Outputs:
Audio outputs terminal (sub/rear switchable)
t Turn on the unit.
Power aerial relay control terminal
The power aerial does not extend.
Power amplifier control terminal
The power aerial does not have a relay box.
Inputs:
No sound.
Aerial input terminal
• The volume is too low.
AUX input jack (stereo mini jack)
• The ATT function is activated.
Tone controls:
Low: ±10 dB at 60 Hz (XPLOD)
• The position of the fader control “FAD” is not set for
Mid: ±10 dB at 1 kHz (XPLOD)
a 2-speaker system.
High: ±10 dB at 10 kHz (XPLOD)
No beep sound.
Power requirements: 12 V DC car battery
• The beep sound is cancelled (page 7).
(negative earth)
• An optional power amplifier is connected and you are
Dimensions: Approx. 178 × 50 × 179 mm (w/h/d)
not using the built-in amplifier.
Mounting dimensions: Approx. 182 × 53 × 161 mm
(w/h/d)
The contents of the memory have been erased.
Mass: Approx. 1.2 kg
• The RESET button has been pressed.
Supplied accessory:
t Store again into the memory.
Parts for installation and connections (1 set)
• The power connecting lead or battery has been
Optional accessory:
disconnected.
Card remote commander: RM-X114
• The power connecting lead is not connected properly.
Stored stations and correct time are erased.
Your dealer may not handle some of the above
The fuse has blown.
listed accessories. Please ask the dealer for
Makes noise when the position of the ignition
detailed information.
key is switched.
The leads are not matched correctly with the car’s
US and foreign patents licensed from Dolby
accessory power connector.
Laboratories.
12
The display disappears from/does not appear
Radio reception
in the display window.
The stations cannot be received.
• The dimmer is set “DIM-ON” (page 7).
The sound is hampered by noises.
• The display disappears if you press and hold (OFF).
• Connect a power aerial control lead (blue) or
t Press and hold (OFF) on the unit until the
accessory power supply lead (red) to the power
display appears.
supply lead of a car’s aerial booster (only when your
• The connectors are dirty (page 11).
car has built-in FM/MW/LW aerial in the rear/side
glass).
• Check the connection of the car aerial.
CD playback
• The auto aerial will not go up.
The disc cannot be loaded.
t Check the connection of the power aerial control
• Another disc is already loaded.
lead.
• The disc has been forcibly inserted upside down or in
• Check the frequency.
the wrong way.
Preset tuning is not possible.
The disc does not playback.
• Store the correct frequency in the memory.
• Defective or dirty disc.
• The broadcast signal is too weak.
• The CD-Rs/CD-RWs are not for audio use (page 10).
Automatic tuning is not possible.
MP3/WMA files cannot be played back.
• Setting of the local seek mode is not correct.
The disc is incompatible with the MP3/WMA format
t Tuning stops too frequently:
and version (page 10).
Press (SENS) until “LOCAL-ON” appears.
MP3/WMA files take longer to play back than
t Tuning does not stop at a station:
others.
Press (SENS) repeatedly until “MONO-ON” or
The following discs take a longer time to start
“MONO-OFF” (FM), or “LOCAL-OFF” (MW/
playback.
LW) appears.
– a disc recorded with a complicated tree structure.
• The broadcast signal is too weak.
– a disc recorded in Multi Session.
t Perform manual tuning.
– a disc to which data can be added.
During FM reception, the “ST” indication
The ATRAC CD cannot play.
flashes.
• The disc is not created by authorized software, such
• Tune in the frequency accurately.
as SonicStage or SonicStage Simple Burner.
• The broadcast signal is too weak.
• Tracks that are not included in the group cannot be
t Press (SENS) to set the monaural reception
played.
mode to “MONO-ON.”
The display items do not scroll.
An FM programme broadcast in stereo is heard
• For discs with very many characters, those may not
in monaural.
scroll.
The unit is in monaural reception mode.
• “A.SCRL” is set to “OFF.”
t Press (SENS) until “MONO-OFF” appears.
t Set “A.SCRL-ON” (page 7) or press (SCRL).
The sound skips.
Error displays/Messages
• Installation is not correct.
t Install the unit at an angle of less than 45° in a
sturdy part of the car.
ERROR
• Defective or dirty disc.
• The disc is dirty or inserted upside down.
t Clean or insert the disc correctly.
The operation buttons do not function.
• A blank disc has been inserted.
The disc will not eject.
• The disc cannot play because of some problem.
Press the RESET button (page 4).
t Insert another disc.
FAILURE
The connection of speaker/amplifier is incorrect.
t See the supplied installation/connections manual to
check the connection.
L.SEEK +/–
The local seek mode is on during automatic tuning.
NO ID3
ID3 tag information is not written in the MP3 file.
NO INFO
Text information is not written in the ATRAC3/
ATRAC3plus or WMA file.
continue to next page t
13
NO MUSIC
The disc is not a music file.
t Insert a music CD.
NO NAME
A track/album/group name is not written in the track.
OFFSET
There may be an internal malfunction.
t Check the connection. If the error indication
remains on in the display, consult your nearest
Sony dealer.
READ
The unit is reading all track and group information on
the disc.
t Wait until reading is complete and playback starts
automatically. Depending on the disc structure, it
may take more than a minute.
RESET
The unit cannot be operated because of some problem.
t Press the RESET button (page 4).
“ ” or “ ”
During reverse or fast-forward, you have reached the
beginning or the end of the disc and you cannot go any
further.
“ ”
The character cannot be displayed with the unit.
If these solutions do not help improve the situation,
consult your nearest Sony dealer.
If you take the unit to be repaired because of CD
playback trouble, bring the disc that was used at the
time the problem began.
14
Поздравляем с покупкой!
Благодарим Вас за то, что Вы остановили
свой выбор на проигрывателе компакт-
дисков Sony. В поездке Вы сможете
использовать следующие функции
проигрывателя.
• Воспроизведение компакт-дисков
Можно воспроизводить диски CD-DA
(содержащие также CD TEXT*), CD-R/
CD-RW (с файлами MP3/WMA и диски в
формате Multi Session (стр. 12 )), а также
диски ATRAC CD (форматы ATRAC3 и
ATRAC3plus (стр. 13 )).
Тип диска Метка на диске
CD-DA
MP3
WMA
ATRAC CD
• Прием радиостанций
– Можно хранить в памяти до 6 станций в
каждом диапазоне (FM1, FM2, FM3,
MW и LW).
– BTM (Память оптимальной настройки):
устройство выбирает радиостанции с
наиболее сильным сигналом и
сохраняет их в памяти.
• Настройка звучания
– EQ3: кривую эквалайзера можно
выбрать для 7 музыкальных типов.
• Подключение дополнительной
аппаратуры
Входное гнездо AUX на передней панели
проигрывателя позволяет подсоединять
переносное аудиоустройство.
* Диск с CD TEXT — это компакт-диск CD-DA,
содержащий такую информацию, как название
компакт-диска, имя исполнителя и названия
композиций.
Проигрыватель компакт-
дисков с диапазоном FM/AM
Сделано в Китае
2
Содержание
Начало работы
Другие функции
Сброс параметров устройства . . . . . . . . . . 4
Изменение настроек звука . . . . . . . . . . . . . 8
Установка часов . . . . . . . . . . . . . . . . . . . . . . 4
Подстройка характеристик звука
Снятие передней панели . . . . . . . . . . . . . . . 4
— BAL/FAD/SUB . . . . . . . . . . . . . . . . . . 8
Установка передней панели . . . . . . . . . . 4
Настройка кривой эквалайзера
— EQ3. . . . . . . . . . . . . . . . . . . . . . . . . . . . . 8
Настройка параметров установки
Расположение органов
— SET . . . . . . . . . . . . . . . . . . . . . . . . . . . . . . . 8
управления и основные
Использование дополнительного
операции
оборудования. . . . . . . . . . . . . . . . . . . . . . . . . 9
Вспомогательное
Основное устройство . . . . . . . . . . . . . . . . 5
аудиооборудование . . . . . . . . . . . . . . . . . 9
Пульт дистанционного управления
Компакт-диск
RM-X114 . . . . . . . . . . . . . . . . . . . . . . . . . 10
Дополнительная информация
Индикация на дисплее . . . . . . . . . . . . . . . 6
Повторное и перетасованное
Меры предосторожности . . . . . . . . . . . . . 11
воспроизведение . . . . . . . . . . . . . . . . . . . . 6
Примечания относительно компакт—
дисков . . . . . . . . . . . . . . . . . . . . . . . . . . . . 11
Радиоприемник
О файлах MP3/WMA . . . . . . . . . . . . . . 12
О компакт-дисках ATRAC CD. . . . . . 13
Сохранение и прием радиостанций . . . . . . 7
Уход за устройством . . . . . . . . . . . . . . . . . 14
Автоматическое сохранение
Извлечение устройства . . . . . . . . . . . . . . . 14
— BTM (Память оптимальной
Технические характеристики. . . . . . . . . . 15
настройки) . . . . . . . . . . . . . . . . . . . . . . . . . 7
Поиск и устранение неисправностей . . . 15
Сохранение вручную . . . . . . . . . . . . . . . . 7
Индикация/сообщения
Прием радиостанций, сохраненных в
об ошибках . . . . . . . . . . . . . . . . . . . . . . . 17
памяти . . . . . . . . . . . . . . . . . . . . . . . . . . . . . 7
Автоматическая настройка . . . . . . . . . . 7
SonicStage и ее логотип являются
товарными знаками корпорации Sony.
ATRAC, ATRAC3, ATRAC3plus и их
логотипы являются товарными знаками
корпорации Sony.
3
Начало работы
Снятие передней панели
Во избежание кражи устройства можно
Сброс параметров
снять с него переднюю панель.
устройства
Предупреждающий сигнал
Перед первым включением устройства
Если до поворота ключа зажигания в
или после замены автомобильного
положение OFF с устройства не была
аккумулятора, а также после изменения
снята передняя панель, то в течение
схемы подключения следует
нескольких секунд будет слышен
переустановить параметры устройства.
предупредительный звуковой сигнал.
Снимите переднюю панель и нажмите
Звуковой сигнал будет слышен только в
кнопку RESET с помощью заостренного
том случае, если используется встроенный
предмета, например шариковой ручки.
усилитель.
1 Нажмите кнопку (OFF).
Устройство выключится.
Кнопка
2 Нажмите кнопку , затем снимите
RESET
панель, потянув ее на себя.
Примечание
При нажатии кнопки RESET выполняется
стирание установок времени и некоторых других
занесенных в память параметров.
Установка часов
Часы данного устройства имеют 24-
Примечания
часовую индикацию.
• Старайтесь не ронять переднюю панель. Не
надавливайте слишком сильно на переднюю
1 Нажмите и удерживайте кнопку
панель и окошко дисплея.
выбора.
• Не подвергайте переднюю панель воздействию
тепла/высокой температуры или влажности.
Отобразится дисплей установок.
Старайтесь не оставлять ее в припаркованной
2 Нажимайте кнопку выбора, пока не
машине или на приборной доске/полочке за
появится индикация “CLOCK-ADJ”.
задним сиденьем.
3 Нажмите кнопку (DSPL).
Начнет мигать индикация часа.
Установка передней панели
4 Поверните регулятор громкости
Прикрепите часть A передней панели к
для установки значения часов и
части B устройства, как показано на
минут.
рисунке, и установите левую сторону на
Чтобы переместиться по знакам,
место до щелчка.
нажмите кнопку (DSPL).
5 Нажмите кнопку выбора.
Установка завершена, и часы начинают
отсчет времени.
Чтобы отобразить часы, нажмите кнопку
(DSPL). Нажмите кнопку (DSPL) еще раз,
чтобы вернуться к предыдущей индикации
дисплея.
A
При использовании пульта дистанционного
управления
B
Для установки значений часа и минут в шаге 4
нажмите кнопку M или m.
Примечание
Не ставьте ничего на внутреннюю поверхность
4
передней панели.
Расположение органов управления и основные операции
Основное устройство
CDX-GT200E
Подробную информацию см. на
Радиоприемник:
указанных страницах.
Aвтоматическая настройки на
радиостанции (нажмите); поиск станций
A Кнопка OFF
вручную (нажмите и удерживайте).
Выключение питания/остановка
источника.
L Кнопка SOURCE
Включение питания, смена источника
B
Регулятор громкости/кнопка выбора
8
(радиоприемник/компакт-диск/AUX).
Настройка громкости (поверните);
выбор элементов настройки (нажмите
M Кнопка BTM 7
и поверните).
Включение функции BTM (нажмите и
удерживайте).
C Кнопка EQ3 (эквалайзер) 8
Выбор типа эквалайзера (XPLOD,
N Кнопка MODE 7
VOCAL, CLUB, JAZZ, NEW AGE,
Выбор радиодиапазона (FM/MW/LW).
ROCK, CUSTOM или OFF).
O Кнопка RESET (расположена под
D Слот для дисков
передней панелью)
4
Вставьте диск (этикеткой вверх),
P Номерные кнопки
начнется воспроизведение.
Компакт-диск:
E Окно дисплея
(3): REP 6
(4): SHUF 6
F Кнопка Z (извлечение)
(6): PAUSE
Извлечение диска.
Для приостановки
G Кнопка SCRL (прокрутка) 6
воспроизведения. Чтобы
Прокрутка индикации дисплея
отменить приостановку, нажмите
H Кнопка DSPL (дисплей)/DIM
кнопку еще раз.
(диммер)
4, 6
Радиоприемник:
Смена индикаций на дисплее
прием хранящихся в памяти
(нажмите); изменение яркости дисплея
радиостанций (нажмите); сохранение
(нажмите и удерживайте).
радиостанций в памяти (нажмите и
1
2
I Кнопки GP*
/ALBM*
+/–
удерживайте).
Пропуска групп/альбомов (нажмите);
Q Кнопка SENS
непрерывный пропуск групп/альбомов
Улучшение качества приема слабого
(нажмите и удерживайте).
сигнала: LOCAL/MONO.
J Кнопка (для снятия передней
R Датчик пульта дистанционного
панели) 4
управления
10
K Кнопки SEEK –/+
S Входное гнездо AUX 9
Компакт-диск:
Для подсоединения переносного
Пропуск композиций (нажмите);
аудиоустройства.
непрерывный пропуск композиций
(нажмите, затем нажмите еще раз
*1 При воспроизведении компакт-диска
примерно через 1 секунду и
ATRAC CD.
удерживайте нажатой); перемещение
*2 При воспроизведении компакт-диска MP3/
WMA.
вперед/назад на одну композицию
(нажмите и удерживайте кнопку).
5
Компакт-диск
Повторное и перетасованное
воспроизведение
Индикация на дисплее
1 Во время воспроизведения
нажимайте кнопку (3) (REP) или (4)
(SHUF), пока на дисплее не
появится нужный параметр.
Для
Выберите
воспроизведения
REP-TRACK композиции
A Обозначение компакт-диска MP3/
неоднократно.
ATRAC CD/WMA
1
B Номер композиции/время с начала
REP-ALBM*
альбома
воспроизведения, название диска/имя
неоднократно.
1
исполнителя, номер альбома/группы*
,
2
REP-GP*
группы
название альбома/группы, название
2
неоднократно.
композиции, текстовая информация*
,
1
часы
SHUF-ALBM*
альбома в случайной
C Источник
последовательности.
*1 Номер альбома/группы отображается только
2
SHUF-GP*
группы в случайной
при смене альбома/группы.
последовательности.
*2 При воспроизведении компакт-диска MP3
отображается тег ID3, при воспроизведении
SHUF-DISC диска в случайной
компакт-диска ATRAC CD — текстовая
последовательности.
информация, созданная в программе
SonicStage и т.д., а при воспроизведении
*1 При воспроизведении компакт-диска MP3/
компакт-диска WMA — тег WMA.
WMA.
*2 При воспроизведении компакт-диска
Чтобы изменить индикации B, нажмите
ATRAC CD.
кнопку (DSPL); чтобы прокрутить
Чтобы вернуться в режим обычного
индикации B, нажмите (SCRL) или
воспроизведения, выберите “REP-OFF”
установите “A.SCRL-ON” (
стр. 9).
или “SHUF-OFF”.
Совет
Отображаемая индикация будет отличаться в
зависимости от типа компакт-диска, формата
записи и параметров. Подробную информацию о
компакт-дисках MP3/WMA см. на
стр. 12; о
компакт-дисках ATRAC CD см. на стр. 13.
6
- 1
- 2
Аннотация для Автомагнитолы Sony CDX-GT200E в формате PDF
Топ 10 инструкций
Другие инструкции
Перейти к контенту
Автомагнитолы Sony
- Размер инструкции: 1.02 Мб
- Формат файла: pdf
Если вы потеряли инструкцию от автомагнитолы Sony CDX-GT200E, можете скачать файл для просмотра на компьютере или печати.
Инструкция для автомагнитолы Sony CDX-GT200E на русском языке. В руководстве описаны возможности и полезные функции, а также правила эксплуатации. Перед использованием внимательно ознакомьтесь с инструкцией.
Чтобы не читать всю инструкцию вы можете выполнить поиск по содержимому внутри инструкции и быстро найти необходимую информацию. Рекомендации по использованию помогут увеличить срок службы автомагнитолы Sony CDX-GT200E. Если у вас появилась проблема, то найдите раздел с описанием неисправностей и способами их решения. В нем указаны типичные поломки и способы их решения.
Хорошее руководство по эксплуатации
Законодательство обязывает продавца передать покупателю, вместе с товаром, руководство по эксплуатации Sony CDX-GT200E. Отсутствие инструкции либо неправильная информация, переданная потребителю, составляют основание для рекламации в связи с несоответствием устройства с договором. В законодательстве допускается предоставлении руководства в другой, чем бумажная форме, что, в последнее время, часто используется, предоставляя графическую или электронную форму инструкции Sony CDX-GT200E или обучающее видео для пользователей. Условием остается четкая и понятная форма.
Что такое руководство?
Слово происходит от латинского «instructio», тоесть привести в порядок. Следовательно в инструкции Sony CDX-GT200E можно найти описание этапов поведения. Цель инструкции заключается в облегчении запуска, использования оборудования либо выполнения определенной деятельности. Инструкция является набором информации о предмете/услуге, подсказкой.
К сожалению немного пользователей находит время для чтения инструкций Sony CDX-GT200E, и хорошая инструкция позволяет не только узнать ряд дополнительных функций приобретенного устройства, но и позволяет избежать возникновения большинства поломок.
Из чего должно состоять идеальное руководство по эксплуатации?
Прежде всего в инструкции Sony CDX-GT200E должна находится:
— информация относительно технических данных устройства Sony CDX-GT200E
— название производителя и год производства оборудования Sony CDX-GT200E
— правила обслуживания, настройки и ухода за оборудованием Sony CDX-GT200E
— знаки безопасности и сертификаты, подтверждающие соответствие стандартам
Почему мы не читаем инструкций?
Как правило из-за нехватки времени и уверенности в отдельных функциональностях приобретенных устройств. К сожалению само подсоединение и запуск Sony CDX-GT200E это слишком мало. Инструкция заключает ряд отдельных указаний, касающихся функциональности, принципов безопасности, способов ухода (даже то, какие средства стоит использовать), возможных поломок Sony CDX-GT200E и способов решения проблем, возникающих во время использования. И наконец то, в инструкции можно найти адресные данные сайта Sony, в случае отсутствия эффективности предлагаемых решений. Сейчас очень большой популярностью пользуются инструкции в форме интересных анимаций или видео материалов, которое лучше, чем брошюра воспринимаются пользователем. Такой вид инструкции позволяет пользователю просмотреть весь фильм, не пропуская спецификацию и сложные технические описания Sony CDX-GT200E, как это часто бывает в случае бумажной версии.
Почему стоит читать инструкции?
Прежде всего здесь мы найдем ответы касательно конструкции, возможностей устройства Sony CDX-GT200E, использования отдельных аксессуаров и ряд информации, позволяющей вполне использовать все функции и упрощения.
После удачной покупки оборудования/устройства стоит посвятить несколько минут для ознакомления с каждой частью инструкции Sony CDX-GT200E. Сейчас их старательно готовят или переводят, чтобы они были не только понятными для пользователя, но и чтобы выполняли свою основную информационно-поддерживающую функцию.
Содержание руководства
Начало работы
Сброс параметров устройства
Перед первым включением устройства или после замены автомобильного аккумулятора, а также после изменения схемы подключения следует переустановить параметры устройства. Снимите переднюю панель и нажмите кнопку RESET с помощью заостренного предмета, например шариковой ручки.
Кнопка
RESET
Примечание
При нажатии кнопки RESET выполняется стирание установок времени и некоторых других занесенных в память параметров.
Установка часов
Часы данного устройства имеют 24- часовую индикацию.
1Нажмите и удерживайте кнопку выбора.
Отобразится дисплей установок.
2Нажимайте кнопку выбора, пока не появится индикация “CLOCK-ADJ”.3Нажмите кнопку (DSPL).
Начнет мигать индикация часа.
4Поверните регулятор громкости для установки значения часов и минут.
Чтобы переместиться по знакам, нажмите кнопку (DSPL).
5Нажмите кнопку выбора.
Установка завершена, и часы начинают отсчет времени.
Чтобы отобразить часы, нажмите кнопку (DSPL). Нажмите кнопку (DSPL) еще раз, чтобы вернуться к предыдущей индикации дисплея.
При использовании пульта дистанционного управления Для установки значений часа и минут в шаге 4 нажмите кнопку M или m.
Снятие передней панели
Во избежание кражи устройства можно снять с него переднюю панель.
Предупреждающий сигнал
Если до поворота ключа зажигания в положение OFF с устройства не была снята передняя панель, то в течение нескольких секунд будет слышен предупредительный звуковой сигнал. Звуковой сигнал будет слышен только в том случае, если используется встроенный усилитель.
1Нажмите кнопку (OFF).
Устройство выключится.
2Нажмите кнопку , затем снимите панель, потянув ее на себя.
Примечания
•Старайтесь не ронять переднюю панель. Не надавливайте слишком сильно на переднюю панель и окошко дисплея.
•Не подвергайте переднюю панель воздействию тепла/высокой температуры или влажности. Старайтесь не оставлять ее в припаркованной машине или на приборной доске/полочке за задним сиденьем.
Установка передней панели
Прикрепите часть A передней панели к части B устройства, как показано на рисунке, и установите левую сторону на место до щелчка.
A
B
|
Примечание |
|
|
4 |
Не ставьте ничего на внутреннюю поверхность |
|
передней панели. |