
Русский
- Bedienungsanleitung Canon PIXMA MP210
- Canon PIXMA MP210 User Manual
- Manual Usuario Canon PIXMA MP210
- Mode d’emploi Canon PIXMA MP210
- Istruzioni Canon PIXMA MP210
- инструкция Canon PIXMA MP210
- Canon PIXMA MP210の取扱説明書
- Handleiding Canon PIXMA MP210
- Manual de uso Canon PIXMA MP210
Вам нужна инструкция? Мы поможем Вам ее найти и сэкономить Ваше время.
- 1 stron
- 1.64 mb
Изделие Canon PIXMA MP210, а также другие, которыми Вы пользуетесь ежедневно, наверняка вы получили в комплекте с инструкцией обслуживания. Из опыта наших пользователей мы знаем, что большинство из Вас не уделили этому особого внимания. Большая часть инструкций, сразу же после покупки попадает в корзину для мусора вместе с коробкой — это ошибка. Ознакомьтесь с информацией, касающейся инструкции Canon PIXMA MP210, которая поможет Вам в будущем сэкономить нервы и избежать головной боли.
Важная подсказка — не забывайте хотя бы раз прочитать инструкцию Canon PIXMA MP210
Если вы не хотите каждый раз читать информационные брошюры, касающиеся, тех или Canon PIXMA MP210 иных изделий, достаточно, прочитать их раз — сразу же после покупки устройства. Вы получите основное знания, касающиеся поддержания изделия Canon PIXMA MP210 в хорошем эксплуатационном состоянии, так, чтобы без проблем достигнуть его планируемого цикла работы. Затем инструкцию можно отложить на полку и вернуться к ней только в случае, если вы не уверены, правильно ли проводится техобслуживание изделия. Правильный уход является необходимым элементом Вашего удовольствия Canon PIXMA MP210.
Раз в году пересмотрите шкафчик, в котором держите инструкции для всех устройств, — выбросите те, которыми вы уже не пользуетесься. Это поможет Вам сохранять порядок в своей домашней базе инструкций обслуживания.
Summary of Contents for Canon PIXMA MP210
Что находится в инструкции Canon PIXMA MP210? Почему стоит ее прочитать?
- Гарантия и подробности, касающиеся техобслуживания изделия
Хорошей идеей будет прикрепить чек к странице инструкции. Если что-то плохое случится во время использования Canon PIXMA MP210, у вас будет комплект документов, необходимый для гарантийного ремонта. В этой части инструкции вы найдете информацию об авторизованных сервисных центрахCanon PIXMA MP210 а также, как самостоятельно правильно ухаживать за оборудованием — так, чтобы не потерять гарантийных прав. - Указания по монтажу и Setup
Не терять нервов и времени на самостоятельную попытку установки и первого запуска изделия. Воспользуйтесь рекомендациями производителя Canon PIXMA MP210 чтобы правильно запустить изделие, без лишнего риска повреждения оборудования. - Информация, касающаяся дополнительных запчастей (входящих в комплект а также являющихся опцией)
Пересматривая эту часть документа вы сможете проверить, доставлен ли ваш Canon PIXMA MP210 с полним комплектом аксессуаров. Вы также сможете узнать, какие дополнительные запчасти или аксессуары для Canon PIXMA MP210 Вы сможете найти и докупить к своему устройству. - Troubleshooting
Самые частые проблемы, касающиеся Canon PIXMA MP210 и методы их решения. Это очень полезная часть руководства по обслуживанию — она позволит Вам сэкономить много времени на поиск решений. 90% проблем с Canon PIXMA MP210 повторяется у многих пользователей. - Требования, касающиеся питания и энергетический класс
Информация, касающаяся количества потребляемой энергии, а также рекомендации, касающиеся установки и питания Canon PIXMA MP210. Прочитайте, чтобы оптимально пользоваться Canon PIXMA MP210 и не использовать большего количества ресурсов, нежели это необходимо для правильной работы изделия. - Специальные функции Canon PIXMA MP210
Здесь вы можешь узнать, как персонализировать изделие Canon PIXMA MP210. Вы узнаете, какие дополнительные функции могут помочь Вам удобно использовать продукт Canon PIXMA MP210 а также, какие функции Вашего устройства оптимальны для выполнения конкретной деятельности.
Как видите в инструкции вы найдете информацию, которая реально поможет Вам в использовании Вашего изделия. Стоит с ней ознакомиться, чтобы избежать разочарований, возникающих из более короткого, нежели предусматривалось, периода исправности изделия Canon PIXMA MP210. Если все же вы не хотите копить инструкции в своем доме, наш сайт поможет Вам в этом — вы должны найти у нас руководство по обслуживанию большинства из своих устройств, а также Canon PIXMA MP210.
Комментарии (0)
-
Страница 1
series Quick S t art Guide QT5-1208-V01 XXXXXXXX © CANON INC. 2007 PRINTED IN VIETNAM The following FINE Cartridges are compatible with this product. QT51208V01 For information on product specific ations, please visit our website at www .usa.canon.com Photo All-in-One[…]
-
Страница 2
Getting Help from Canon Help Us Help Y ou Better Before you cont act Canon, please record the following information. Serial Number (located on the inside of the product): _____________________________________ Model Number (located on the top of the produ ct): __________________________ _____________ Setup CD-ROM number (located on the CD-ROM): ____[…]
-
Страница 3
Photo All-in-One Quick St art Guide series[…]
-
Страница 4
Canon PIXMA MP210 series Photo All-in-One Quick St art Guide. Copyright This manual is copyrighted by Canon U.S.A., Inc. wi th all rights reserved. Under the copyright laws, this manual may not be reproduced in an y form, in whole or in part, without the prior written consent of Canon U.S.A., Inc. © 2007 Canon U.S.A., Inc. Disclaimer Canon U.S.A.,[…]
-
Страница 5
T able of Content s 1 Before Using the Machine ……………………….. 2 Operation Panel…………………….. ……………….. 2 Turning the Machine On and Off ……………….. 4 Handling the Ori ginal Document ………………… 6 Loading Printin g Paper …….. …………………… … 7 Copying ……………………[…]
-
Страница 6
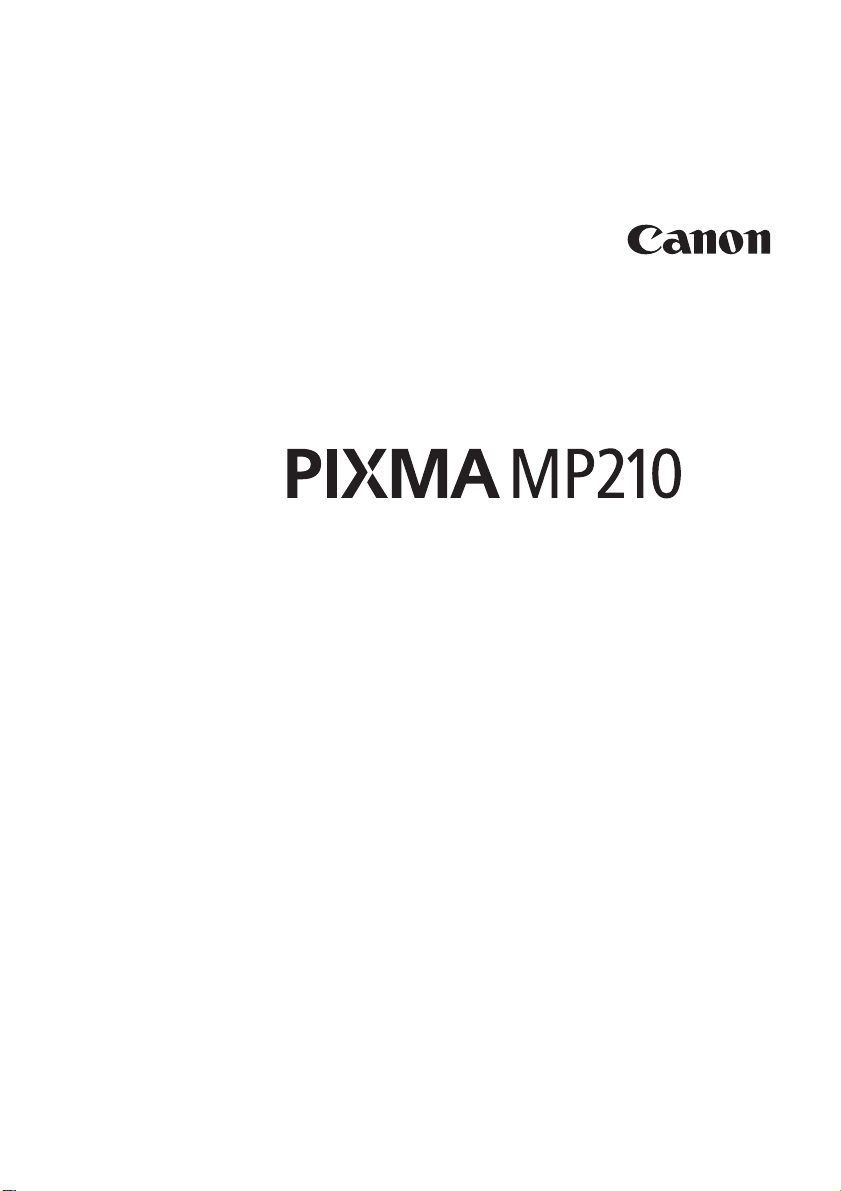
2 Before Using the Machine Before Using the Machine Operation Panel (1) ON/OFF button / Po wer lamp T urns the machine on and off. Lights or flashes green to indicate the power status. Before turning on the machine, make sure the Document Cover is closed. (2) LED (Light Emitting Diode) Displays the number of copies, Maintenance men u selections or […]
-
Страница 7
3 Before Using the Machine (7) Stop/Reset button Cancels operations or a print job in p rogress. (8) Color button* S tarts color copying. Also, finalizes your selection for the menu or setting item. (9) Black button* S tarts black & white copying. Also, finalizes your selection for the menu or setting item. (10) (Maintenance) button Accesses th[…]
-
Страница 8
4 Before Using the Machine T urning the Machine On and Off T urn on the machine before pr inting. T urning on the Machine Before turning on the machine, confirm the following. z The FINE Cartridges a re installed properly . If you are using the machine connected to a computer, confirm also the following. z The machine is connected to your compu[…]
-
Страница 9
5 Before Using the Machine z Screen-saver M ode The LED goes out if the machine is not operated for about five minutes*. Perform a print operation to resto re the display . * Y ou cannot change the wait time before the LED goes out. Note When you wa nt to restore th e display , perform a print operation or press any bu tton except for th e ON/OFF b[…]
-
Страница 10
6 Before Using the Machine Handling the Original Document This section describes how to load t he or iginal document on the Platen Glass. Original Document Requirements The original documents you load on the Platen Gl ass for copying or scanning must meet these requirements: Loading Original Document s Load originals to copy or scan on the […]
-
Страница 11
7 Before Using the Machine Loading Printing Paper This section describes how to load printing paper in the Rear Tray . Using S pecialty Media Canon recommends that you use Canon genuine media to ensure optimal print qua lity . z Photo Quality Media z Glossy Photo Paper z Matte Photo Paper z Photo Paper Plus Double Sided z Photo Paper Plus Gloss[…]
-
Страница 12
8 Before Using the Machine Paper Handling z Recommended Paper and Requirements *1 Paper with a Mode l Number is Canon specialty media. R efer to the instruction manual supplied with the paper for detailed informat ion on the printable side and notes on handling paper . For information on the paper sizes available for each Canon genuine paper , […]
-
Страница 13
9 Before Using the Machine *7 This paper cannot be used in Macintosh ® . z Media T ypes Y ou Cannot Use Do not use the following types of paper . Usi ng such paper will not only produce unsatisfactory results, but can also cause the machine to jam or malfunction. Additionally , when printing on A5 or smaller sized paper , do not use paper thi nner[…]
-
Страница 14
10 Before Using the Machine Loading Paper 1 Flatten the four corners of the paper before loading it. Import ant z If you cu t plain paper to 4″ x 6 » / 101.6 x 152.4 mm, 5 » x 7″ / 1 27.0 x 17 7.8 mm, or 2 .13″ x 3.3 9″ / 54.0 x 86 .0 mm (credit card -size) for a trial p rint, it can caus e paper jams . z Y ou cann[…]
-
Страница 15
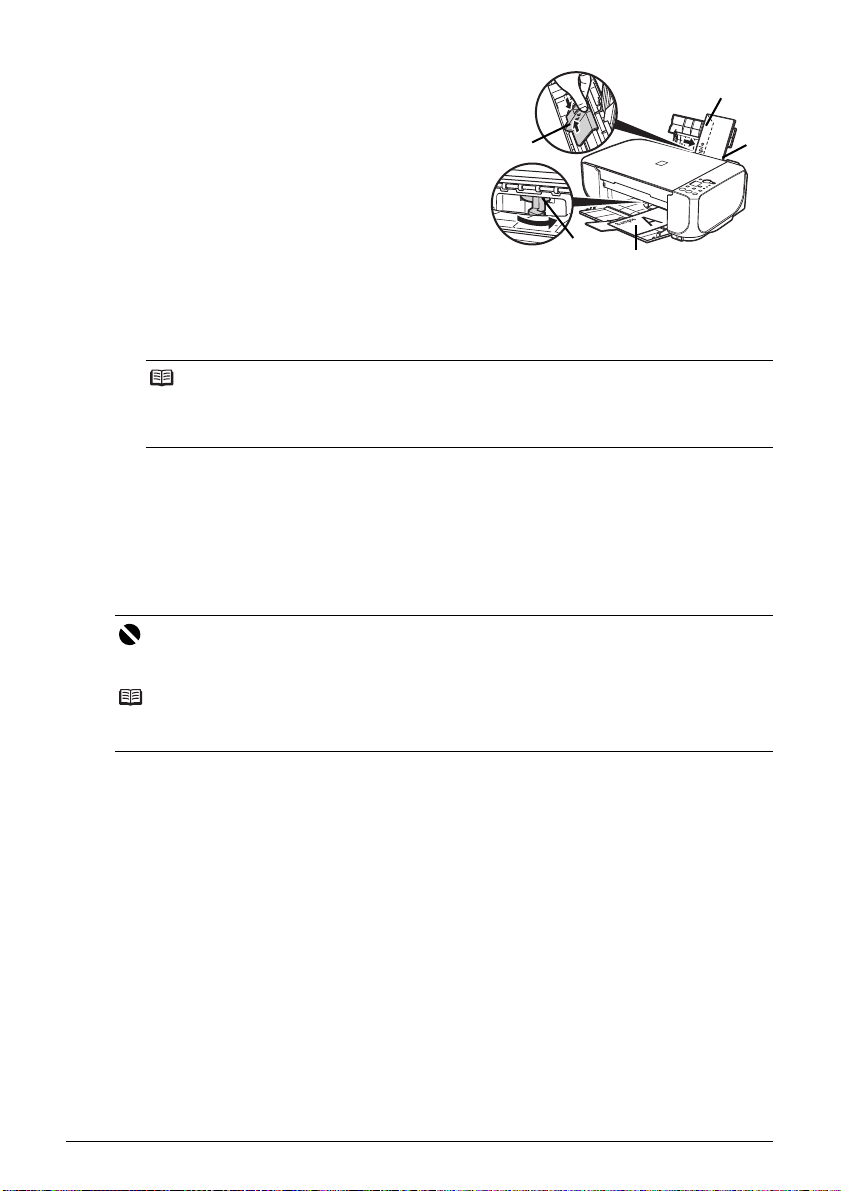
11 Before Using the Machine 2 Prepare to load paper . (1) Open the Paper Support, then pull out the Paper Support Extension. (2) Open the Paper Output Tr ay . (3) Open the Output Tray Extension. (4) Adjust the position of the Paper Thickness Lever . Set it to the right when printing on enve lopes or T -shirt transfers, and left when printing on any[…]
-
Страница 16
12 Before Using the Machine Loading Envelopes Use either European DL or US Comm. Env . #10-sized e nvelope. 1 Prepare the envelopes. z Press down on all four corners and edges of the envelop es to flatten them. z If the envelopes are curled, hold the opposite cor ner s and gently twist them in the opposite direction. z If the flap of an envelop[…]
-
Страница 17
13 Before Using the Machine 2 Load the envelop es. (1) Load the envelope against the right side of the Rear Tray . Load with the address side facing UP and the rear flaps DOWN on the left. Up to 10 envelopes can be loaded at once. (2) Pinch the Paper Guide and slide it against the left side of the envelope. (3) Set the Paper Thickness Lever to the […]
-
Страница 18
14 Before Using the Machine Loading Small-Sized Paper Y ou can use 4″ x 6″ / 10 1.6 x 152.4 mm, 5″ x 7″ / 127.0 x 1 77.8 mm, and C redit card-sized papers. 1 Load the paper . (1) Load the paper against the right side of the Rear Tray with the print side facing UP . (2) Pinch the Paper Guide and slide it against the left side[…]
-
Страница 19
15 Copying Copying Making Copies This section describes the ba sic procedure to make copies. 1 T urn on the machine . See “T urning the Machine On and Off” on page 4. 2 Load paper . See “Loading Printing Paper” on page 7. 3 Load the original on the Platen Glass. See “Loading Original Documents” on page 6. 4 S pecify the copy settings. ([…]
-
Страница 20
16 Copying Changing the Copy Settings Setting The Default Page Size Y ou can switch the size of paper loaded in the Rear Tray between A4 and Letter . 1 Press the Maintenance button repeatedly until d appears. 2 Press the Black button to select A4, or the Color button to select Letter . Using Useful Copy Functions For details, refer to “Fit-to[…]
-
Страница 21
17 Printing from Your Computer Printing from Y our Computer This section describes procedure for basic printing. Printing with Windows 1 T urn on the machine and load the paper in the machine. See “T urning the Machine On and Off” on page 4 and “Loading Printing Pap er” on page 7. 2 Create a document or open a fi le to print using an approp[…]
-
Страница 22
18 Printing from Your Computer Printing with Macintosh 1 T urn on the machine and load the paper in the machine. See “T urning the Machine On and Off” on page 4 and “Loading Printing Paper” o n page 7. 2 Create a document or open a fi le to print using an approp riate application software. 3 Select Page Setup on the application software’ […]
-
Страница 23
19 Scanning Images Scanning Images Y ou can scan images from the machine to a com puter without printing the m and save them in popular image types such as JPEG , TIFF , bitmaps, or PDF . If you a re scanning printed text, you can use the OCR (Optical Character Recognition) software to convert it to text data. Scanning Methods Y ou can select from […]
-
Страница 24
20 Printing Phot ographs Dir ectl y from a Compliant Device Printing Photographs Directly from a Compliant Device Y ou can connect a PictBridge compliant device such as a dig ital camera, camcorder , or mobile phone using a USB cable recommended by the device’s manufacturer , an d print recorded images directly without using a computer . z Connec[…]
-
Страница 25
21 Printing Photographs Di rect ly from a Compliant Device 2 Connect the PictBridge compliant device to the machine. (1) Make sure that the PictBridge compliant device is turned off. (2) Connect the PictBridge compliant device to the machine using a USB cable recommended by the manufacturer of the device. The device turns on automatically . If your[…]
-
Страница 26
22 Printing Phot ographs Direc tl y from a Compliant Device About PictBridge Print Settings Settings on a Pic tBridge Compliant Device This section describes the print settings on a PictBridge compliant device. When operating the device, be sure to follow the instruct ions giv en in the instruction manual of your PictBridge compliant devi ce. z[…]
-
Страница 27
23 Printing Photographs Di rect ly from a Compliant Device z Layout Setting V arious layout options ar e available. z Bordered/Borderless: Y ou can select whether or not to print an image with a border. z N-up: Y ou can use this option when printing on sticker paper , or A4- or Letter-sized paper . S ticker paper: When you select 10 x 15 cm/4″[…]
-
Страница 28
24 Printing Phot ographs Dir ectl y from a Compliant Device Setting on the Machine This section describes the PictBr idge print settings on the machine. Set the print settings to Default on the PictBrid ge compliant device when you want to prin t according to the settings on the machine. z Setting Items and Specifying the Settings *1 Set the it[…]
-
Страница 29
25 Routine Main tenance Routine Maintenance List of Maintenance Codes T o perform maintenance of the machine, pre ss the Maintenance button repeatedly until the desired code is displayed on the LED, then press the B lack or Color button. Maintenance Code Operation See Prints the nozzle check pattern. “Printing the Nozzle Check Pattern” on page […]
-
Страница 30
26 Routine Maintenance When Printing Becomes Fain t or Colors Are Incorrect When printing becomes faint or colors are incorre ct, the print head nozzles on FINE Cartridges are probably clogged. Print the nozzle check pattern to confirm the co ndition of the nozzles and then perform Print Head Cleaning. If print results are not satisfactory , perfor[…]
-
Страница 31
27 Routine Main tenance Printing the Nozzle Check Pattern Print the nozzle check pattern to determine whether the ink ejects properly from the print head nozzles. 1 Make sure that the machine is turned on, then load a she et of A4 or Letter-si zed plain paper in the Rear Tray . 2 Open the Paper Output Tray , then open the Output Tray Extension. Set[…]
-
Страница 32
28 Routine Maintenance Examining the Nozzle Check Pattern Examine the nozzle check pattern, and perform cleaning if necessary . 1 Check the nozzle check pattern you printed. (1) If lines of this pattern are missing, the print head nozzles need cleaning. Example: When lines are missing (Black ink) (2) If these patterns have white streaks, the print […]
-
Страница 33
29 Routine Main tenance Print Head Cleaning Clean the Print Head if lines are missing or if white streaks appear in the printed nozzle check pattern. Cleaning unclogs the nozzle s and restores the print head condition. Note that cleaning the Print Head causes used ink to be absorbed in t he ink absor ber . Cleaning the Pr int Head consumes ink, so […]
-
Страница 34
30 Routine Maintenance Print Head Deep Cleaning If print quality does not impr ove by standard Print Head Cleaning, try Print Head Deep Cleaning, which is a more powerful process. Note that cl eaning the Print Head causes used ink to be absorbed in the ink absorber . Print Head Deep Cleaning consum es more ink than standard Print Head Cleaning, so […]
-
Страница 35
31 Routine Main tenance Aligning the Print Head If ruled lines are printed misaligned or print result s are otherwise unsatisfactory , adjust the print head position. 1 Make sure that the machine is turned on, then load a she et of A4 or Lette r-sized plain paper in the Rear Tray . 2 Open the Paper Output Tray , then open the Output Tray Extension.[…]
-
Страница 36
32 Routine Maintenance (2) Repeat the procedure until you finish selecting the pattern number for column L. (3) Place the Print Head Alignment Sheet face-down on the Platen Glass. When placing the Print Head Alignment Sheet, place the front side down and align the upper left corner of it with the alignment mark as shown in the figure below. (4) Mak[…]
-
Страница 37
33 Routine Main tenance Replacing a FINE Cartridge This section explains the way to confirm the ink status and the procedure to replace FINE Cartridges. When ink runs out or other errors occur , an error code is displayed on the LED to inform you of the error . See “An Error Code Is Displayed on the LED” on page 44 and confirm how to handle it.[…]
-
Страница 38
34 Routine Maintenance z With the Computer Scr een Y ou can confirm the status of each FINE Cartri dge on the printer status monitor (Windows) and Canon IJ Printer Utility (Macintosh). (A) Confirm whether any sy mbols are displayed here. (C) The Ink lamp lights. Ink is low . Y ou can co ntinue printing for a while, but w e recommend you to have a n[…]
-
Страница 39
35 Routine Main tenance Follow the procedure below to open each of th e confirmation screens. 1 Open the printe r properties dialog box. Refer to “Opening the Printer Propert ies Dialog Box Directly f rom Control Panel” in “Opening the Printer Properties Dialog Box (Windows)” of the User ’s Guide on-screen manual. 2 Click Vi ew Printer S […]
-
Страница 40
36 Routine Maintenance Replacing FINE Ca rtridges When FINE Cartridges run out of ink, re place them using the followin g steps. 1 Open the Paper Outpu t T ray . 2 Make sure tha t the machine is turne d on, lift the Scanning Unit (Prin ter Cover), th en pull the Scanning Unit Suppo rt (A) down into place. The FINE Cartridge Holder moves to the […]
-
Страница 41
37 Routine Main tenance 3 Remove the empty FINE Cartridge. (1) Push down the FINE Cartridge. (2) Remove the FINE Cartridge. 4 Prepare the replacem ent FINE cartridge. (1) Unpack a new FINE Cartridge and remove the orange protective tape (A) gently . Caution z Do not hold th e FINE Cartrid ge Holder to st op or move it. z Do not touch t he metallic […]
-
Страница 42
38 Routine Maintenance 5 Install the FINE Cartridge. (1) Insert a new FINE Cartridge all the way into the appropriate slot. The Black FINE Cartridge should be installed into the left slot ( ) and the Color FINE Cartridge should be into the right slot ( ). (2) Push up the FINE Cartridge until it clicks into place. 6 Lift the Scanning Unit (Printer C[…]
-
Страница 43
39 Routine Main tenance Keeping the Best Printing Result s T o avoid drying of the Print Head and cl ogging of the no zzles, note the following. When Y ou T urn Off the Machi ne Follow the procedure below to turn o ff the machine. (1) Press the ON/OFF button to turn off the machine. (2) Confirm that the Power lamp has gone out. This takes a few[…]
-
Страница 44
40 Routine Maintenance Cleaning Y our Machine This section describes the cleaning procedure that is needed to maintain your machine. Cleaning the Exterior of the Machine Be sure to use a soft cloth such as eyeglas ses cleaning cloth and wipe off dirt on the surface with it gently . Smooth out wrinkles on the cloth if necessary b efore cleaning.[…]
-
Страница 45
41 Routine Main tenance Cleaning the Paper Feed Roller ( Roller Cleaning) Clean the paper feed roller if paper is not fed pr operly . Cleaning the paper feed roller will wear the roller , so perform this only when necessary . 1 Make sure that the machine is turne d on, and then remove any paper from the Rear T ray . 2 Clean the paper feed rolle[…]
-
Страница 46
42 Routine Maintenance 2 Open the Paper Output Tray , then open the Output Tray Extension. 3 Fold a single sheet of A4 or Letter-sized plain paper in half widthwise, and then unfold the paper . 4 Load this and only this sheet of paper in the Rear Tray with the open side to the fro nt. Set the Paper Thickness Lever to the left. For details on the Pa[…]
-
Страница 47
43 Troubleshooting T roubleshooting This section describes troubleshooting tips for problems you ma y encounter when using the machine. z “An Error Code Is Displayed on the LED” on page 44 z “LED Cannot Be Seen At All” on page 46 z “Cannot Install the MP Drivers” on page 46 z “Cannot Connect to Computer Properly” on page 47 z “Pri[…]
-
Страница 48
44 Troubleshooting An Error Code Is Displayed on the LED If an error code is displayed on the LED, take the corresponding a ction described below . Alarm Lamp is lit Orange When a printer error occurs, the Alarm lamp is lit orange. The number displayed on the LED indicates the type of error that has occurred. Check the error code displayed on t[…]
-
Страница 49
45 Troubleshooting Power Lamp Flashes Green and Alarm Lamp Flashes Ora nge Alternately The Power and Alarm lamps flash alternately as shown below . Disconnect the USB cable from the machine, turn th e machine off, and then unplug the machine from the power supply . Plug the machine back in and turn the machine back on after leaving it for a whi[…]
-
Страница 50
46 Troubleshooting LED Cannot Be Seen At All Cannot Inst all the MP Drivers Error Code Cause Action E, 2, x E, 3, x E, 4, x An error requiring servicing might have occurred. Make sure that the protective material is removed from the FINE Cartridge Holder , then turn the machine off and unplug the power cord of the machine from the power supply . Af[…]
-
Страница 51
47 Troubleshooting Cannot Connect to Computer Properly Printing Speed Is Slow / USB 2.0 Hi-S peed Connection Does Not W ork Installation does not start automatically when the Setup CD-ROM is inserted into your computer ’s disc drive. (1) Click Sta rt then Computer . In Windows XP , Click Start then My Computer . In Windows 2000, double-click […]
-
Страница 52
48 Troubleshooting “This device can perform fast er” Message Is Displayed Print Result s Not Satisfactory If the print result is not satisfactory , confirm the paper and print quality settings first. z Do the p age size and media type sett ings match the size and ty pe of the loaded p aper? When these settings are incorrect, you cannot obta[…]
-
Страница 53
49 Troubleshooting Printing Does Not S tart/Print ing Is Blurred/Colors Are Wrong/S traight Lines Are Misaligned White Str eaks Cause Action FINE Cartridge is not installed properly / There is no ink left. Remove the FINE Cartridge, then reinstall it. Small dusts may be stuck between the contact points. In this case, the print result may be[…]
-
Страница 54
50 Troubleshooting Printed Paper Curls or Has Ink Blot s Printed Surface Is Scratched/Paper Is Smudge d Cause Action Paper is too thin. When printing data with high color saturation such as photographs or imag es in deep color , we recommend using Photo Paper Pro or other Canon specialty paper . See “Media T ypes Y ou Cannot Use ” on pa[…]
-
Страница 55
51 Troubleshooting Paper is curled. For Plain Paper Turn the p aper over and reload it to print on the other side. Leaving the paper loaded in the Rear Tray for a long time may cause the paper to curl. If this happens, load the paper with the other side facing up. It may resolve the problem. We recommend putting unused paper back into the package a[…]
-
Страница 56
52 Troubleshooting Colors Are Uneven or Str eaked The Print Result Not Sa tisfactory When Copying If these do not resolve the problem, also see “Print Results Not Satisfactory” on page 48. Printing Does Not St art Cause Action Print Head nozzles are clogged. See “When Printing Becomes Faint or Colors Are Incorrect” on page 26 and perfor[…]
-
Страница 57
53 Troubleshooting Paper Does Not Feed Properly The machine is not ready . Check if the Power lamp is lit green. If the Power lamp is off, turn the machine on. While the Power lamp is flashing green, the machine is initializing. Wait until the Power lamp stops flashing and remains lit green. Note When printing large data such as a photo or graphics[…]
-
Страница 58
54 Troubleshooting Paper Jams Cause Action Paper jammed in the Paper Output Slot or the Rear Tray . Remove the paper following the procedure below. (1) Slowly pull the paper out, either from the Rear T ray or from the Paper Output Slot, whichever is easier . z If the paper tears and a piece remains inside the machine, turn the machine off, open the[…]
-
Страница 59
55 Troubleshooting Error Message Appears on the Computer Screen Writing Error/Output E rror/Communication Error Error No.: 300 Is Displayed Cause Action The machine is not ready . Confirm that the Power lamp is lit green. If the Power lamp is off, turn the machine on. While the Power lamp is flashing green, the machine is initializing. Wait[…]
-
Страница 60
56 Troubleshooting Error No.: 1700/1710 Is Displayed Error No.: 2001 Is Displayed Error No.: 2002 Is Displayed Machine is not connected properly . Make sure that the USB cable is securely plugged in to the machine a nd the computer . z If you are using a relay device such as a USB hub, disconnect it, connect the machine directly to the […]
-
Страница 61
57 Troubleshooting Error Message Appears on a PictBridge Compliant Device The following are the possible errors that may occur when print ing directly from a PictBridge compliant device and the countermeasures to clear them. Note z This section describes er rors that are indicated on Canon-bran d PictBridg e compliant de vices. The error messa ges […]
-
Страница 62
58 Troubleshooting Scanning Problems ScanGear W on’t St art Other Scanning T roubles Refer to the Scanning Guide on-screen manual. Cause Action The scanner driver (ScanGear) is not installed. Follow the procedure described in your setup sheet to reinstall the MP Drivers.[…]
-
Страница 63
59 Appendix Appendix How to Use the Document ation Provided Printed Documentatio n Setup Sheet Be sure to read this sheet first. This sheet includes instructions for se tting up your machine and getting it ready for use. Quick St art Guide (This guide) Read this guide when starting to use the mach ine. After following instructions in your setup she[…]
-
Страница 64
60 Appendix Reading the On-screen Manuals For detailed instructions on installing the on-screen manuals, refer to your setup sheet. Y ou can view the on-screen manuals in the following way: T o view the on-scr een manual, double-click the XXX On-screen Manual shortcut icon on the desktop, or click Start > All Programs (or Programs ) > Canon X[…]
-
Страница 65
61 Appendix S pecifications General Specifications Printing resolution (dpi) 4800 (horizontal)* x 1200 (vertical) * Ink dro plets can be placed with a pitch of 1/4800 inch at minimum. Interface USB 2.0 High S peed* * A comp uter that complies with USB 2.0 Hi-Speed st andard is required. Since the USB 2.0 Hi-Speed interface is fully upwardly compati[…]
-
Страница 66
62 Appendix z OmniPage SE: Windows 2000 Professi onal SP2 and SP3 not su pported z MP Navigator EX: QuickTime v6.4 or later is needed (Macintosh only) z Some functions may not be available with Windows Media Center z T o upgrade from Wind ows XP to Windows Vista, first uninstall software bundled with the Canon inkjet printer . Camera Direct Print ([…]
-
Страница 67
63 Appendix S pecifications are subjec t to change without notice. Additional System Requir ements for On-Screen Manuals Browser: Windows HTML Help Viewer Note: Microsoft Internet Explorer 5.0 or later must be installed. The on-screen manual may not be displayed properly depending on your operating system or Internet Explorer version. We recommend […]
-
Страница 68
64 Safety Precautions Safety Precautions Please read the safety warnings and cautions prov ided in this manual to ensure that you use the machine safely . Do not attempt to use the mach ine in any way not describe d in this manual. Wa r n i n g Y ou may cause a n electric sh ock, fire, or damage the mach ine if you i gnore any of th ese safety prec[…]
-
Страница 69
65 Safety Precautions Cleaning the machine Use a damp cloth to clean the machine. Never use flammable solvents such as alcohol, benzene or thinners. If flammable solvents come in contact with electrical components inside the machine, it could cause a fire or electric shock. Always unplug the machine from the power outlet before cleaning the machine[…]
-
Страница 70
66 Safety Precautions Working around the machine Never put your hands or fingers in the machine while it is printing. When moving the machine, carry the machine at both ends. Do not hold the rear side of the machine. Do not place any object on the machine. Do not place metal objects (paper clip s, staples, etc.) or containers of flammable solvents […]
-
Страница 71
67 Safety Precautions Legal Limit ations on Use of Y our Product and Use of Images It may be unlawful to make copies of, scan, print, or use reproductions of the following documents. The list provided is non-exhau stive. When in doub t, check with a legal repr esentative in your jurisdiction. z Paper money z Money orders z Certif icates of deposi t[…]
-
Страница 72
68 Safety Precautions Users in the U.S.A. Regulatory Information FCC Notice (U.S.A. Only) For 120V , 60Hz model Model Number: K10308 This device complies with Part 15 of the FCC Ru les. Operation is subjec t to the following two conditions: (1) This device may not cause harmful in terference, and (2) this device must accept any interference rec[…]
-
Страница 73
69 Safety Precautions This limited warranty shall only apply if the Pr oduct is used in conjun ction with compatible computers, peripheral equipment and software. Ca non USA shall have no re sponsibility for such items except for compatible Canon brand peripheral equipment covered by a separate warranty (“Separate W arranty”). Repairs of such C[…]
-
Страница 74
70 Safety Precautions ORIGINAL PURCHASER OF THE PRODUCT OR THE PERSON FOR WHOM IT WAS PURCHASED AS A GIFT , AND ST A TES YOUR EXCLUSIVE R EMEDY . Canon USA offers a range of customer technical support* options: z Interactive troubleshooting, e-mail technical s upport, the latest driver downloads and a nswers to frequently asked questions ( www.cano[…]
-
Страница 75
71 Safety Precautions Canon U.S.A., Inc. One Canon Pla za Lake Success, NY 1 1042 USA Canon is a registered trademark of Canon Inc. ©2007 Canon U.S.A., Inc. Canon is a register ed trademark of Canon Inc. in the United St ates and may also be a registered trademark in other countries.[…]
-
Страница 76
72 Index Index A Appendix 59 B Before Using the Machine 2 C Canon U.S.A., I nc. Limited Wa rranty — U. S. Only 68 Cleaning exterior 40 inside 41 platen glas s and document co ver 40 protrusion s inside the ma chine 42 roller 41 Copying 15 E Error Code 44 H Handling the Original Docu ment 6 L Legal Limit ations on Use of Your Product a nd Use of Ima[…]
-
Страница 77
73[…]
-
Страница 78
74[…]
-
Страница 79
Getting Help from Canon Help Us Help Y ou Better Before you cont act Canon, please record the following information. Serial Number (located on the inside of the product): _____________________________________ Model Number (located on the top of the produ ct): __________________________ _____________ Setup CD-ROM number (located on the CD-ROM): ____[…]
-
Страница 80
series Quick S t art Guide QT5-1208-V01 XXXXXXXX © CANON INC. 2007 PRINTED IN VIETNAM The following FINE Cartridges are compatible with this product. QT51208V01 For information on product specific ations, please visit our website at www .usa.canon.com Photo All-in-One[…]
Просмотр
Доступно к просмотру 327 страниц. Рекомендуем вам скачать файл инструкции, поскольку онлайн просмотр документа может сильно отличаться от оригинала.
-
Онлайн-руководство
Руководство по My Image Garden
Русский (Russian)
-
Содержание
Прочтите это. . . . . . . . . . . . . . . . . . . . . . . . . . . . . . . . . . . . . . . . . . . . . . . . . . . .   6
Как использовать Онлайн-руководство. . . . . . . . . . . . . . . . . . . . . . . . . . . . . . .   8
Товарные знаки и лицензии. . . . . . . . . . . . . . . . . . . . . . . . . . . . . . . . . . . . . . . .   9
Рекомендации по поиску. . . . . . . . . . . . . . . . . . . . . . . . . . . . . . . . . . . . . . . . . .  10
Общие замечания (My Image Garden). . . . . . . . . . . . . . . . . . . . . . . . . . . . . . .   12
Назначение программы My Image Garden. . . . . . . . . . . . . . . . . . . . . . . . . . . .  14
Возможности приложения My Image Garden. . . . . . . . . . . . . . . . . . . . . . . . . . . . . . . . .   15
Форматы файлов. . . . . . . . . . . . . . . . . . . . . . . . . . . . . . . . . . . . . . . . . . . . . . . . . . . . . . . . . . . . . . . . . .   19
Выбор изображений, PDF-файлов и видеоизображений. . . . . . . . . . . . . . . . . . . . . . . . . . . . . . . . . .   21
Запуск My Image Garden. . . . . . . . . . . . . . . . . . . . . . . . . . . . . . . . . . . . . . . . . . . . . . . . . .  28
Использование функции рекомендации объектов. . . . . . . . . . . . . . . . . . . . .   29
Рекомендованные объекты в программе My Image Garden. . . . . . . . . . . . . . . . . . . . .   30
Регистрация различной информации на фотографиях. . . . . . . . . . . . . . . . . . . . . . . . .  33
Регистрация людей. . . . . . . . . . . . . . . . . . . . . . . . . . . . . . . . . . . . . . . . . . . . . . . . . . . . . . . . . . . . . . . .   37
Регистрация профилей людей. . . . . . . . . . . . . . . . . . . . . . . . . . . . . . . . . . . . . . . . . . . . . . . . . . .   42
Регистрация событий. . . . . . . . . . . . . . . . . . . . . . . . . . . . . . . . . . . . . . . . . . . . . . . . . . . . . . . . . . . . . . .  44
Регистрация рейтингов. . . . . . . . . . . . . . . . . . . . . . . . . . . . . . . . . . . . . . . . . . . . . . . . . . . . . . . . . . . . .   47
Печать. . . . . . . . . . . . . . . . . . . . . . . . . . . . . . . . . . . . . . . . . . . . . . . . . . . . . . . . .  49
Печать фотографий и документов. . . . . . . . . . . . . . . . . . . . . . . . . . . . . . . . . . . . . . . . .   50
Печать этикеток для дисков (CD/DVD/BD). . . . . . . . . . . . . . . . . . . . . . . . . . . . . . . . . . .   53
Печать рекомендованных объектов и изображений из слайд-шоу. . . . . . . . . . . . . . .   57
Создание и печать объектов. . . . . . . . . . . . . . . . . . . . . . . . . . . . . . . . . . . . . . . . . . . . . .   60
Печать фотографий в различных макетах. . . . . . . . . . . . . . . . . . . . . . . . . . . . . . . . . . . . . . . . . . . . . .  63
Печать коллажей. . . . . . . . . . . . . . . . . . . . . . . . . . . . . . . . . . . . . . . . . . . . . . . . . . . . . . . . . . . . . . . . . .   67
Печать открыток. . . . . . . . . . . . . . . . . . . . . . . . . . . . . . . . . . . . . . . . . . . . . . . . . . . . . . . . . . . . . . . . . . .  70
Печать календарей. . . . . . . . . . . . . . . . . . . . . . . . . . . . . . . . . . . . . . . . . . . . . . . . . . . . . . . . . . . . . . . .   73
Печать наклеек. . . . . . . . . . . . . . . . . . . . . . . . . . . . . . . . . . . . . . . . . . . . . . . . . . . . . . . . . . . . . . . . . . . .  77
Печать в кинематографическом макете. . . . . . . . . . . . . . . . . . . . . . . . . . . . . . . . . . . . . . . . . . . . . . . .  80
Печать бумажных моделей. . . . . . . . . . . . . . . . . . . . . . . . . . . . . . . . . . . . . . . . . . . . . . . . . . . . . . . . . .   83
Загрузка и печать высококачественного содержимого. . . . . . . . . . . . . . . . . . . . . . . . .   86
Захват и печать неподвижных изображений из видеоизображений. . . . . . . . . . . . . .   91
Создание изображений из объединенных видеокадров. . . . . . . . . . . . . . . . . . . . . . . . . . . . . . . . . .   96
-
Исправление неподвижных изображений, захваченных из видеоизображений. . . . . . . . . . . . . . .   98
Использование различных режимов. . . . . . . . . . . . . . . . . . . . . . . . . . . . . . .   101
Сканирование фотографий и документов. . . . . . . . . . . . . . . . . . . . . . . . . . . . . . . . . .   102
Удобное сканирование с использованием функции автоматического сканирования. . . . . . . . . .   103
Сканирование фотографий. . . . . . . . . . . . . . . . . . . . . . . . . . . . . . . . . . . . . . . . . . . . . . . . . . . . . . . . .  106
Сканирование документов. . . . . . . . . . . . . . . . . . . . . . . . . . . . . . . . . . . . . . . . . . . . . . . . . . . . . . . . .   109
Сканирование с избранными настройками. . . . . . . . . . . . . . . . . . . . . . . . . . . . . . . . . . . . . . . . . . . .   112
Обрезка отсканированных изображений. . . . . . . . . . . . . . . . . . . . . . . . . . . . . . . . . . . . . . . . . . . . . .   115
Редактирование объектов. . . . . . . . . . . . . . . . . . . . . . . . . . . . . . . . . . . . . . . . . . . . . . .   117
Установка темы и основных людей. . . . . . . . . . . . . . . . . . . . . . . . . . . . . . . . . . . . . . . . . . . . . . . . . .   118
Изменение фона. . . . . . . . . . . . . . . . . . . . . . . . . . . . . . . . . . . . . . . . . . . . . . . . . . . . . . . . . . . . . . . . .   121
Изменение макета. . . . . . . . . . . . . . . . . . . . . . . . . . . . . . . . . . . . . . . . . . . . . . . . . . . . . . . . . . . . . . . .   125
Автоматическое изменение порядка фотографий. . . . . . . . . . . . . . . . . . . . . . . . . . . . . . . . . . . . . .   127
Добавление, удаление или изменение порядка страниц. . . . . . . . . . . . . . . . . . . . . . . . . . . . . . . . .   129
Вставка изображений. . . . . . . . . . . . . . . . . . . . . . . . . . . . . . . . . . . . . . . . . . . . . . . . . . . . . . . . . . . . .   132
Настройка, исправление и улучшение изображений. . . . . . . . . . . . . . . . . . . . . . . . . . . . . . . . . . . .   136
Добавление текста. . . . . . . . . . . . . . . . . . . . . . . . . . . . . . . . . . . . . . . . . . . . . . . . . . . . . . . . . . . . . . . .  139
Добавление и настройка текстовых полей. . . . . . . . . . . . . . . . . . . . . . . . . . . . . . . . . . . . . . . . . . . .   141
Исправление и улучшение фотографий. . . . . . . . . . . . . . . . . . . . . . . . . . . . . . . . . . . .  145
Использование функции автоматического исправления фотографий. . . . . . . . . . . . . . . . . . . . . .   148
Использование функции исправления красных глаз. . . . . . . . . . . . . . . . . . . . . . . . . . . . . . . . . . . .   150
Использование функции повышения яркости лиц. . . . . . . . . . . . . . . . . . . . . . . . . . . . . . . . . . . . . .   153
Использование функции повышения четкости лиц. . . . . . . . . . . . . . . . . . . . . . . . . . . . . . . . . . . . . .  156
Использование цифровой обработки лиц. . . . . . . . . . . . . . . . . . . . . . . . . . . . . . . . . . . . . . . . . . . . .   159
Использование функции устранения пятен. . . . . . . . . . . . . . . . . . . . . . . . . . . . . . . . . . . . . . . . . . . .  162
Настройка изображений. . . . . . . . . . . . . . . . . . . . . . . . . . . . . . . . . . . . . . . . . . . . . . . . . . . . . . . . . . .   165
Обрезка фотографий. . . . . . . . . . . . . . . . . . . . . . . . . . . . . . . . . . . . . . . . . . . . . . . . . . .   168
Улучшение фотографий с помощью специальных фильтров. . . . . . . . . . . . . . . . . .   170
Улучшение с помощью эффекта Рыбий глаз. . . . . . . . . . . . . . . . . . . . . . . . . . . . . . . . . . . . . . . . . .   172
Улучшение с помощью эффекта миниатюры. . . . . . . . . . . . . . . . . . . . . . . . . . . . . . . . . . . . . . . . . .   175
Улучшение с помощью эффекта игрушечной камеры. . . . . . . . . . . . . . . . . . . . . . . . . . . . . . . . . . .   178
Улучшение с помощью мягкого фокуса. . . . . . . . . . . . . . . . . . . . . . . . . . . . . . . . . . . . . . . . . . . . . . .   180
Размытость фона. . . . . . . . . . . . . . . . . . . . . . . . . . . . . . . . . . . . . . . . . . . . . . . . . . . . . . . . . . . . . . . . .  182
Создание и изменение PDF-файлов. . . . . . . . . . . . . . . . . . . . . . . . . . . . . . . . . . . . . . .  186
Задание паролей для PDF-файлов. . . . . . . . . . . . . . . . . . . . . . . . . . . . . . . . . . . . . . . . . . . . . . . . . .   188
Открытие/редактирование PDF-файлов, защищенных паролем. . . . . . . . . . . . . . . . . . . . . . . . . . .  192
- 1
- 2
- 3
- 4
- 327
Скачать
series
Quick Start Guide
QT5-1208-V01
XXXXXXXX
© CANON INC. 2007
PRINTED IN VIETNAM
The following FINE Cartridges are compatible with this product.
Q T 5 1 2 0 8 V 0 1
For information on product specifications, please visit our website at
www.usa.canon.com
Photo All-in-One

Photo All-in-One
Quick Start Guide
series
QT51208V01

Getting Help from Canon
Help Us Help You Better
Before you contact Canon, please record the following information.
Serial Number (located on the inside of the product): _____________________________________
Model Number (located on the top of the product): _______________________________________
Setup CD-ROM number (located on the CD-ROM): ______________________________________
Purchase Date: __________________________________________________________________
Customer Technical Support Sequence*
1.Internet — www.canontechsupport.com
For quick and comprehensive self-help in an intuitively guided interactive troubleshooting
environment, the place to start is our helpful tech support web site. In addition, the latest
driver downloads, answers to frequently asked questions, product information, and “where to
buy” instructions are found here.
2.Email Tech Support — www.canontechsupport.com
For individual attention to a special issue, try emailing our friendly technical support
representatives, specially trained to communicate quick, easy, and logical solutions to your
inquiries within 24 hours.
3.Toll-Free Live Tech Support — (1-800-828-4040)
This option provides live telephone technical support, free of service charges, MondaySaturday (excluding holidays), during your product’s 90 day limited warranty period.
Telephone Device for the Deaf (TDD) support is available at (1-866-251-3752).
4.Extended Service and Support — www.canonesp.com
Canon CarePAK Extended Service Plan is a cost-attractive and easy-to-use extended
service program that provides up to three full years of service and support coverage at a very
attractive price. CarePAK offers toll-free Canon technical support and includes Canon’s
superb InstantExchange product replacement program. For further information about
extending your Canon service and support, call (1-800-385-2155), or visit our Web site at
www.canonesp.com. CarePAK must be purchased during your product’s warranty period.
For more information and updated program specifics, please visit our web site at
www.canontechsupport.com.
* Support program specifics are subject to change without notice.
series
Photo All-in-One
Quick Start Guide

Canon PIXMA MP210 series Photo All-in-One Quick Start Guide.
Copyright
This manual is copyrighted by Canon U.S.A., Inc. with all rights reserved. Under the copyright laws,
this manual may not be reproduced in any form, in whole or in part, without the prior written consent
of Canon U.S.A., Inc.
© 2007 Canon U.S.A., Inc.
Disclaimer
Canon U.S.A., Inc. has reviewed this manual thoroughly in order that it will be an easy-to-use guide
to your Canon PIXMA MP210 series Photo All-in-One. All statements, technical information and
recommendations in this manual and in any guides or related documents are believed reliable, but
the accuracy and completeness thereof are not guaranteed or warranted, and they are not intended
to be, nor should they be understood to be, representation or warranties concerning the products
described.
Specifications are subject to change without notice.
ENERGY STAR
As an
®
STAR
guidelines for energy efficiency.
All information regarding non-Canon products was compiled from publicly available information. No
representation is made regarding the accuracy thereof.
About Consumables
Consumables (ink tanks / FINE Cartridges) are available for 5 years after production has stopped.
Trademarks
z “Microsoft” is a registered trademark of Microsoft Corporation.
z “Windows” is a trademark of Microsoft Corporation, registered in the U.S. and other countries.
z “Windows Vista” is a trademark of Microsoft Corporation.
z “Macintosh” and “Mac” are trademarks of Apple Inc., registered in the U.S. and other countries.
Canon U.S.A., Inc.
One Canon Plaza
Lake Success, NY 11042
®
Partner, Canon Inc. has determined that this product meets the ENERGY

Table of Contents
Before Using the Machine ………………………..2
Operation Panel……………………………………….2
Turning the Machine On and Off ………………..4
Handling the Original Document…………………6
Loading Printing Paper ……………………………..7
Copying …………………………………………………15
Making Copies………………………………………. 15
Changing the Copy Settings…………………….16
Using Useful Copy Functions …………………..16
Printing from Your Computer………………….17
Printing with Windows……………………………..17
Printing with Macintosh……………………………18
Scanning Images …………………………………… 19
Scanning Methods………………………………….19
Printing Photographs Directly from
a Compliant Device ………………………….. 20
Printing Photographs Directly from
a Compliant Device………………………………… 20
About PictBridge Print Settings…………………22
Routine Maintenance ……………………………..25
List of Maintenance Codes………………………25
When Printing Becomes Faint or Colors
Are Incorrect ………………………………………….26
Printing the Nozzle Check Pattern…………….27
Examining the Nozzle Check Pattern ……….. 28
Print Head Cleaning………………………………..29
Print Head Deep Cleaning……………………….30
Aligning the Print Head……………………………31
Replacing a FINE Cartridge……………………..33
Keeping the Best Printing Results ……………. 39
Cleaning Your Machine …………………………..40
Troubleshooting …………………………………….43
An Error Code Is Displayed on the LED……. 44
LED Cannot Be Seen At All……………………..46
Cannot Install the MP Drivers…………………..46
Cannot Connect to Computer Properly……… 47
Print Results Not Satisfactory…………………..48
The Print Result Not Satisfactory When
Copying…………………………………………………52
Printing Does Not Start……………………………52
Paper Does Not Feed Properly…………………53
Paper Jams……………………………………………54
Error Message Appears on the Computer
Screen ………………………………………………….55
Error Message Appears on a PictBridge
Compliant Device……………………………………57
Scanning Problems…………………………………58
Appendix ……………………………………………….59
How to Use the Documentation Provided….. 59
Reading the On-screen Manuals………………60
Specifications…………………………………………61
Safety Precautions………………………………… 64
Legal Limitations on Use of Your Product
and Use of Images …………………………………67
Users in the U.S.A………………………………….68
Index…………………………………………………….. 72
1
Before Using the Machine
Operation Panel
(1) (2)
(3)
(4)
(13)
(12)
(11)
(10)
(8)(9)
(1) ON/OFF button / Power lamp
Turns the machine on and off. Lights or flashes green to indicate the power status. Before
turning on the machine, make sure the Document Cover is closed.
Note
Power Lamp and Alarm Lamp
You can check the status of the machine by the Power and Alarm lamps.
z Power lamp Off: The power is off.
z Power lamp lit green: The machine is ready to print.
z Power lamp flashing green: The machine is initializing or shutting down.
z Alarm lamp lit orange: An error has occurred and the machine is not ready to print.
For details, see “An Error Code Is Displayed on the LED” on page 44.
z Power lamp flashing green once and Alarm lamp flashing orange once alternately:
An error that requires contacting your Canon Service representative may have occurred.
For details, see “Power Lamp Flashes Green and Alarm Lamp Flashes Orange Alternately”
on page 45.
(5)
(6)
(7)
(2) LED (Light Emitting Diode)
Displays the number of copies, Maintenance menu selections or the operational status.
(3) [+] button
Increases the number of copies.
(4) Alarm lamp
Lights or flashes orange when an error, such as paper-out or ink-out, occurs.
(5) Black/Color Ink lamps
Lights or flashes to show the ink status.
(6) SCAN button
Opens the MP Navigator EX to scan a document to your computer according to the
settings selected. To use this button, the machine must be connected to a computer. For
details, refer to the Scanning Guide on-screen manual.
2 Before Using the Machine

(7) Stop/Reset button
Cancels operations or a print job in progress.
(8) Color button*
Starts color copying. Also, finalizes your selection for the menu or setting item.
(9) Black button*
Starts black & white copying. Also, finalizes your selection for the menu or setting item.
(10) (Maintenance) button
Accesses the Maintenance menu.
(11) Fit to Page button / Fit-to-Page lamp
Enables/disables the Fit-to-Page copying. Lights when Fit-to-Page copying is enabled.
(12) Paper button
Switches the page size and media type for copying.
For information on how to switch the page size between A4 and Letter, see “Setting The
Default Page Size” on page 16.
(13) Paper lamp
Displays the selected page size and media type for copying.
* In the software applications or manuals, the Black and Color buttons are collectively called
the “Start” or “OK” button.
3Before Using the Machine
Turning the Machine On and Off
Turn on the machine before printing.
Turning on the Machine
Before turning on the machine, confirm the following.
z The FINE Cartridges are installed properly.
If you are using the machine connected to a computer, confirm also the following.
z The machine is connected to your computer (or a compatible device).
z The MP Drivers are installed.
Note
If preparatory operations above are not complete, follow your setup sheet to complete them.
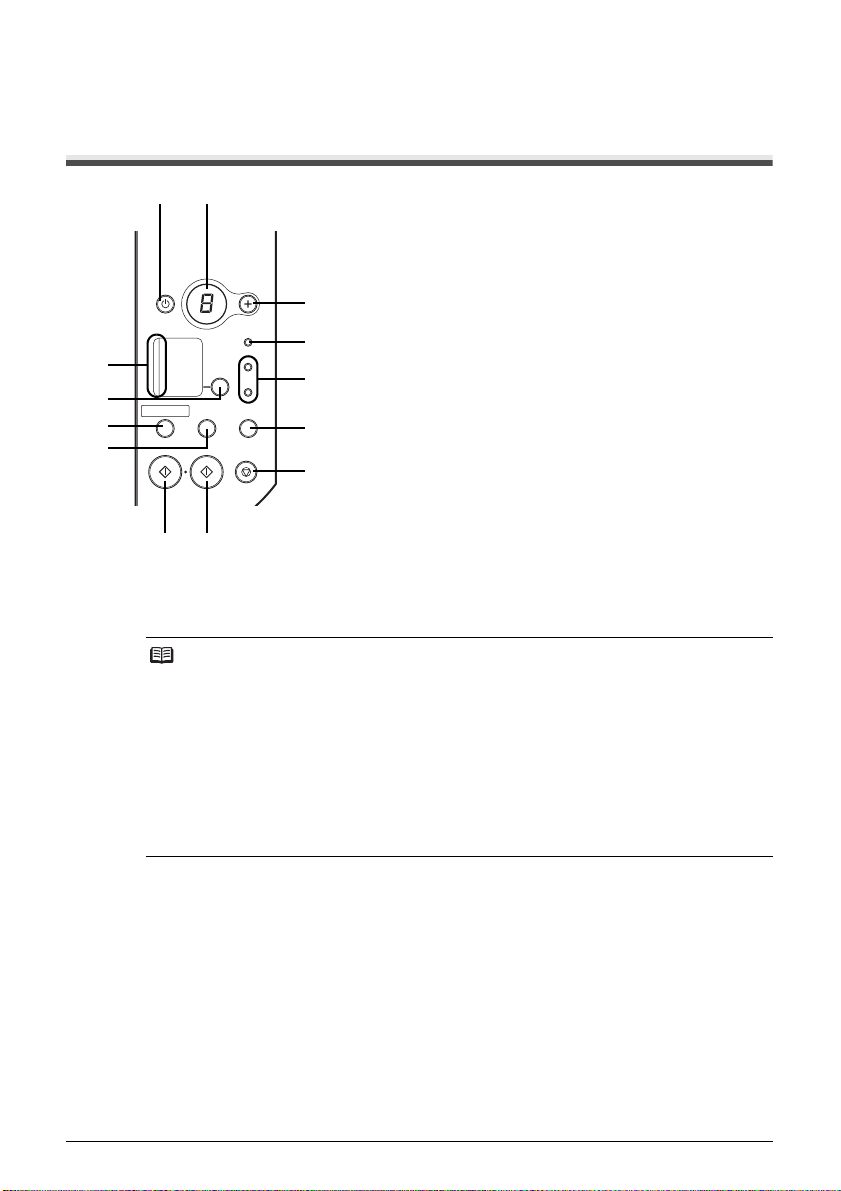
1 Press the ON/OFF button to turn on the
machine.
The Power lamp flashes and then remains lit
green.
Important
If the Alarm lamp begins to flash orange, see “An
Error Code Is Displayed on the LED” on page 44.
2 If you are using the machine connected to a
computer, turn on your computer.
Turning off the Machine
1 To turn off the machine, press the ON/OFF
button.
When the Power lamp stops flashing, the machine
is turned off.
Important
About the Power Plug
When removing the power plug after turing off the
machine, be sure to confirm that the Power lamp is
not lit. If the power plug is removed from the wall outlet
with the Power lamp still lit or flashing green, the
machine may become unable to print.
See “Keeping the Best Printing Results” on page 39.
4 Before Using the Machine

z Screen-saver Mode
The LED goes out if the machine is not operated for about five minutes*.
Perform a print operation to restore the display.
* You cannot change the wait time before the LED goes out.
Note
When you want to restore the display, perform a print operation or press any button except for the
ON/OFF button. When you press the ON/OFF button while the machine is in Screen-saver mode,
the machine turns off.
5Before Using the Machine
Handling the Original Document
This section describes how to load the original document on the Platen Glass.
Original Document Requirements
The original documents you load on the Platen Glass for copying or scanning must meet these
requirements:
Document type
Size (W x L) Max. 8.5 x 11.7 inches / 216 x 297 mm
Thickness Max. 0.6 inches / 15 mm
z
Paper documents
z
Photographs
z
Books
Loading Original Documents
Load originals to copy or scan on the Platen Glass.
Note
Make sure any glue, ink, correction fluid, or the like on the original document is completely dry
before loading it on the Platen Glass.
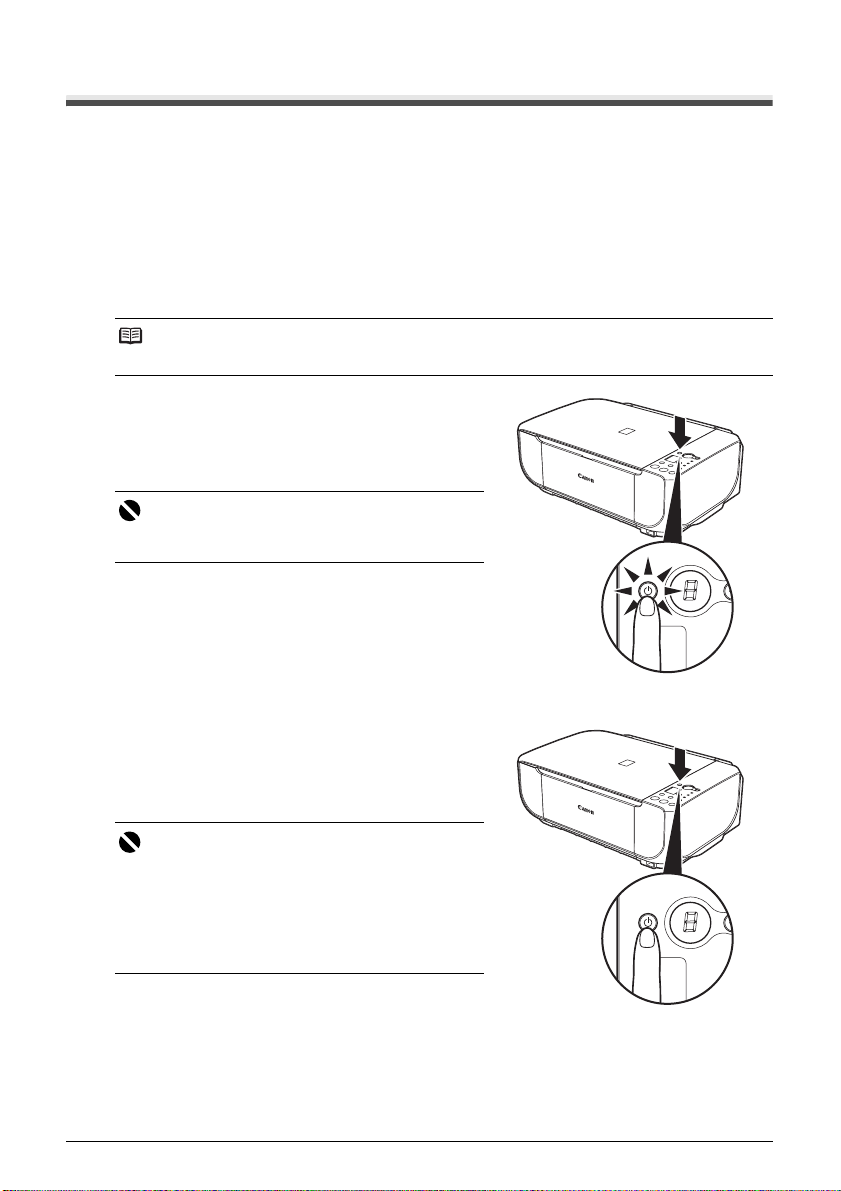
1 Load the original document on the Platen
Glass.
(1) Lift the Document Cover.
(2) Load the original with the side to be copied/
scanned facing down on the Platen Glass.
Place the original in landscape orientation and
align the upper corner of it with the alignment
mark as shown in the figure on the right.
(2)
Important
z Do not place any objects weighing more than 4.4 lb / 2 kg on the Platen Glass.
z Do not press or put weight on the original with pressure exceeding 4.4 lb / 2 kg.
Doing so may cause the scanner to malfunction or the Platen Glass to break.
Note
The machine cannot scan the shaded area in the figure below.
(A)
(1)
(A) 0.04 inches / 1 mm
2 Gently close the Document Cover.
6 Before Using the Machine
Loading Printing Paper
This section describes how to load printing paper in the Rear Tray.
Using Specialty Media
Canon recommends that you use Canon genuine media to ensure optimal print quality.
z Photo Quality Media
z Glossy Photo Paper
z Matte Photo Paper
z Photo Paper Plus Double Sided
z Photo Paper Plus Glossy
z Photo Paper Plus Semi-gloss
z Photo Paper Pro
z Photo Stickers
z Media Suited for Business
Documents
z High Resolution Paper
7Before Using the Machine
Paper Handling
z Recommended Paper and Requirements
Media Type
Plain Paper
Envelopes
High Resolution
Paper
*3
*4
*4
*1
Model
Paper
Support Load
Limit
Paper
Output Tray
Load Limit
Paper
Thickness
*2
Lever
Printer Driver
Setting for Media
Typ e
— 100 sheets 50 sheets Left Plain Paper
— 10 envelopes 1 envelope Right Envelope
HR-101N 80 sheets 50 sheets Left High Resolution
Paper
Super White Paper SW-201 80 sheets 50 sheets Left Plain Paper
Glossy Photo
*5
Paper
Glossy Photo Paper
“Everyday Use”
Matte Photo Paper MP-101 Left Matte Photo Paper
Photo Paper Glossy GP-502 Left Glossy Photo Paper
Photo Paper Plus
Semi-gloss
*5
Photo Paper Pro
Photo Paper Plus
*5
Glossy
Photo Paper Plus
Double Sided
GP-401 A4, Letter, 5″ x
7″ / 127.0 x
GP-501 Left Glossy Photo Paper
*5
177.8 mm and
8″ x 10″ /
203.2 x 254.0
mm: 10 sheets
4″ x 6″ / 101.6
SG-101,
SG-201
*5
PR-101 Left Photo Paper Pro
PP-101 Left Photo Paper Plus
PP-101D 1 sheet Left Photo Paper Plus
*4*7
x 152.4 mm,
Wide and
Credit card: 20
sheets
*6
Left Glossy Photo Paper
Left Photo Paper Plus
Glossy
Glossy
Double Sided
Photo Stickers PS-101 1 sheet Left Photo Paper Plus
Glossy
*4
T-Shirt Transfers
TR-301 1 sheet Right T-Shirt Transfers
*1 Paper with a Model Number is Canon specialty media. Refer to the instruction manual
supplied with the paper for detailed information on the printable side and notes on handling
paper. For information on the paper sizes available for each Canon genuine paper, visit our
website. You may not be able to purchase some Canon genuine papers depending on the
country or region of purchase. Paper is not sold in the US by Model Number. Purchase paper
by name.
*2 If the corners or edges of the paper are smudged, try to print with the Paper Thickness Lever
set to the right. It may improve print quality.
Reset the Paper Thickness Lever to the left when you finish printing.
For details on the Paper Thickness Lever, refer to “Inside” in “Main Components” of the User’s
Guide on-screen manual.
*3 Proper feeding of paper may not be possible at the maximum capacity depending on the type
of paper or environmental conditions (either very high or low temperature and humidity). In
such cases, reduce the sheets of paper you load at a time to around half (around 0.2 inches /
5 mm in paper stack height).
*4 Available only when printing from your computer.
*5 When loading paper in stacks, the print side may be marked as it is fed in or sheets may be
stuck to one another causing them not to be fed properly. In this case, load one sheet at a
time.
*6 We recommend that you remove the previously printed sheet from the Paper Output Tray
before continuously printing to avoid blurs and discoloration.
8 Before Using the Machine

*7 This paper cannot be used in Macintosh®.
Important
z Put unused paper back into the package, and store them avoiding heat, humidity, and direct
sunlight.
z Do not touch the printed surface nor stack the printed sheets until the ink is fixed.
z If you select “Photo Paper” when copying, use the following paper types for best printing results:
GP-401, GP-501, GP-502, PP-101, SG-201.
Note
For a detailed description of printing media types, refer to “Printing Media” in the User’s Guide onscreen manual.
z Media Types You Cannot Use
Do not use the following types of paper. Using such paper will not only produce unsatisfactory
results, but can also cause the machine to jam or malfunction. Additionally, when printing on A5
or smaller sized paper, do not use paper thinner than a post card, including plain paper or
notepad paper cut to a small size.
z Folded, curled, or wrinkled paper
z Damp paper
z Paper that is too thin (weighing less than 17 lb / 64 gsm)
z Paper that is too thick (plain paper, except for Canon genuine paper, weighing more than 28
lb / 105 gsm)
z Picture postcards
z Postcards affixed with photos or stickers
z Any type of paper with holes
z Paper that is not rectangular
z Paper bound with staples or glue
z Paper with adhesives
z Paper decorated with glitter, etc.
9Before Using the Machine
Loading Paper
Important
z If you cut plain paper to 4″ x 6″ / 101.6 x 152.4 mm, 5″ x 7″ / 127.0 x 177.8 mm, or 2.13″ x 3.39″
/ 54.0 x 86.0 mm (credit card-size) for a trial print, it can cause paper jams.
z You cannot print on postcards affixed with photos or stickers.
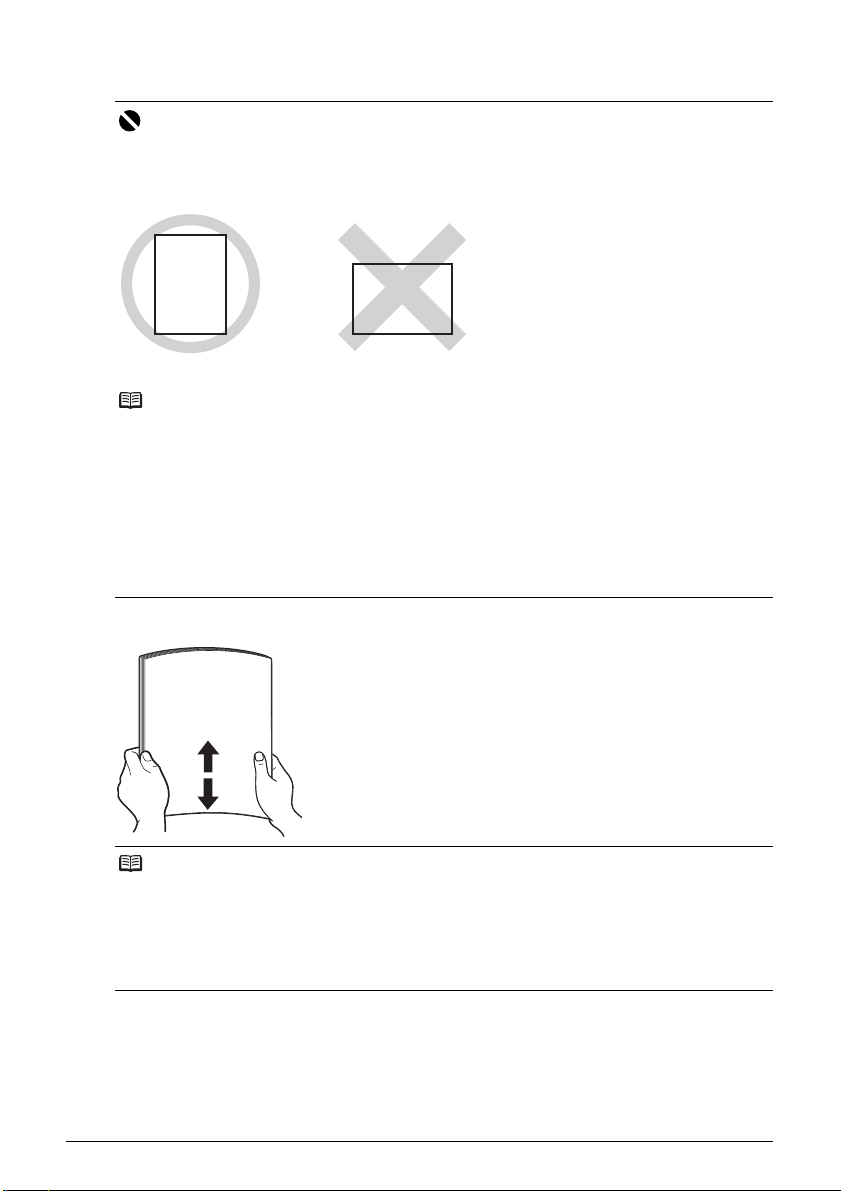
z Always load paper in portrait orientation (A). Loading paper in landscape orientation (B) can
cause the paper to be jammed.
(A) (B)
Note
z We recommend using genuine Canon photo media when printing photographs. For details on
the specialty media Canon provides for use with its various printers, see “Using Specialty
Media” on page 7.
When Printing on Plain Paper
z You can use general copy paper or Canon’s Super White Paper. When printing on both sides,
we recommend Canon’s Super White Paper Double-Sided.
Paper size:
– Standard sizes: A4, B5, A5, Letter, and Legal
– Non-standard sizes: 2.13 x 3.39 inches to 8.5 x 23 inches / 54.0 x 86.0 mm to 215.9 x 584.2
mm
Paper weight: 17 to 28 lb / 64 to 105 gsm (non-Canon genuine plain paper)
1 Flatten the four corners of the paper before loading it.
Note
z Align the edges of paper neatly before loading. Loading paper without aligning the edges may
cause paper jams.
z If paper is curled, hold the opposing curled corners and gently bend them in the opposite
direction until the paper becomes completely flat. See “Paper is curled.” on page 51.
z To avoid curling, handle paper as follows.
– Put unused paper back into the package and keep them on a level surface.
– Take out only the necessary number of sheets from the package, just before printing.
10 Before Using the Machine

2 Prepare to load paper.
(1) Open the Paper Support, then pull out the
Paper Support Extension.
(2) Open the Paper Output Tray.
(3) Open the Output Tray Extension.
(4) Adjust the position of the Paper Thickness
Lever.
Set it to the right when printing on envelopes
or T-shirt transfers, and left when printing on
any other type of paper. See “Paper Handling”
on page 8.
Note
If the corners or edges of the paper are smudged, try to print with the Paper Thickness Lever
set to the right. It may improve print quality.
Reset the Paper Thickness Lever to the left when you finish printing.
For details on the Paper Thickness Lever, refer to “Inside” in “Main Components” of the User’s
Guide on-screen manual.
(4)
(3)
(1)
(2)
3 Load the paper.
(1) Load the paper in the Rear Tray with the print
side facing UP.
(2) Align the paper stack against the right side of
the Rear Tray.
(3) Pinch the Paper Guide and slide it against the
left side of the paper stack.
(A)
(3)
* Do not load higher than the Load Limit
Mark (A).
(1)
4 Specify the page size and media type settings according to the loaded paper.
Note
z When performing copy direct printing without using a computer, select the size and type of the
loaded paper using the Operation Panel.
For details on settings, see “Making Copies” on page 15.
z When using the machine connected to a computer, select the size and type of the loaded paper
in Page Size (or Paper Size) and Media Type in the printer driver.
For details on printer driver settings, see “Printing with Windows” on page 17 or “Printing with
Macintosh” on page 18.
(2)
11Before Using the Machine
Loading Envelopes
Use either European DL or US Comm. Env. #10-sized envelope.
Important
z You need to print from the computer to print on envelopes.
z Do not use the following envelopes:
– Envelopes with a double flap (or sticker flaps)
– Envelopes with an embossed or treated surface
– Envelopes with pressure seals
– Envelopes whose gummed flaps are already moistened and adhesive
1 Prepare the envelopes.
z Press down on all four corners and edges of the envelopes to flatten them.
z If the envelopes are curled, hold the opposite corners and gently twist them in the opposite
direction.
z If the flap of an envelope is curled, flatten it.
z If the leading edge of an envelope is puffed up or curled, use a pen to press the envelope
flat and sharpen the crease.
Press the envelope flat, working from the middle to the edge.
* The above illustrations show a side view of the leading edge of the envelope.
Important
The envelopes may jam in the machine if they are not flat or the edges are not aligned.
Make sure that no curl or puff exceeds 0.1 inches / 3 mm.
12 Before Using the Machine
2 Load the envelopes.
(1) Load the envelope against the right side of the
Rear Tray.
Load with the address side facing UP and the
rear flaps DOWN on the left.
Up to 10 envelopes can be loaded at once.
(2) Pinch the Paper Guide and slide it against the
left side of the envelope.
(3) Set the Paper Thickness Lever to the right.
(2)
(3)
(A)
(A) Printing orientation
(B) Make sure the flaps are folded.
Note
Reset the Paper Thickness Lever to the left when you finish printing. For details on the Paper
Thickness Lever, refer to “Inside” in “Main Components” of the User’s Guide on-screen
manual.
3 Specify the settings in the printer driver.
(1) Select Envelope in Media Type.
(2) Select the size for envelopes.
In Windows
In Macintosh, select DL Envelope or #10 Envelope in Paper Size.
(3) Select Landscape in Orientation.
Important
Be sure to set the printer driver setting properly. If you do not, the address will be printed in the
wrong direction.
Note
For details on printer driver settings, see “Printing with Windows” on page 17 or “Printing with
Macintosh” on page 18.
®
, select DL Env. or Comm. Env. #10 in Page Size.
(B)
(1)
13Before Using the Machine
Loading Small-Sized Paper
You can use 4″ x 6″ / 101.6 x 152.4 mm, 5″ x 7″ / 127.0 x 177.8 mm, and Credit card-sized papers.
1 Load the paper.
(1) Load the paper against the right side of the
Rear Tray with the print side facing UP.
(2) Pinch the Paper Guide and slide it against the
left side of the paper stack.
(2)
2 Specify the page size and media type settings according to the loaded paper.
Note
z When performing copy direct printing without using a computer, select the size and type of the
loaded paper using the Operation Panel.
For details on settings, see “Making Copies” on page 15.
z When using the machine connected to a computer, select the size and type of the loaded paper
in Page Size (or Paper Size) and Media Type in the printer driver.
For details on printer driver settings, see “Printing with Windows” on page 17 or “Printing with
Macintosh” on page 18.
(1)
14 Before Using the Machine
Copying
Making Copies
This section describes the basic procedure to make copies.
1 Turn on the machine.
See “Turning the Machine On and Off” on page 4.
2 Load paper.
See “Loading Printing Paper” on page 7.
3 Load the original on the Platen Glass.
See “Loading Original Documents” on page 6.
4 Specify the copy settings.
(1) Press the + button repeatedly to specify the number of copies (max. 20 copies).
Note
By pressing the + button repeatedly, F will be displayed on the LED. The number of copies will
be set as 20.
(2) Press the Paper button repeatedly to specify the page size and media type.
The Paper lamp indicates the selected page size and media type.
A4 or Letter Plain Paper / A4 or Letter Photo Paper / 4″ x 6″ Photo Paper
5 Press the Color button for color copying, or the Black button for black & white
copying.
15Copying
Changing the Copy Settings
Setting The Default Page Size
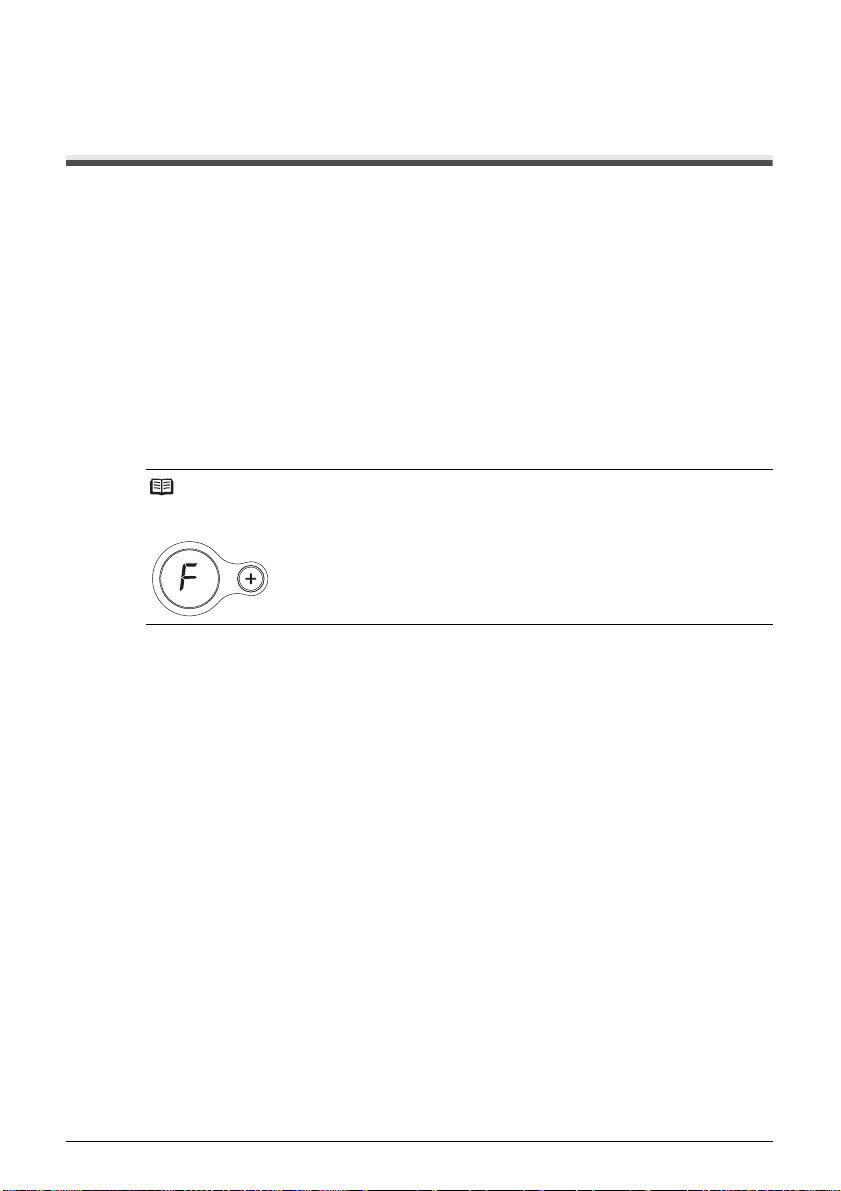
You can switch the size of paper loaded in the Rear Tray between A4 and Letter.
1 Press the Maintenance button repeatedly until d appears.
2 Press the Black button to select A4, or the Color button to select Letter.
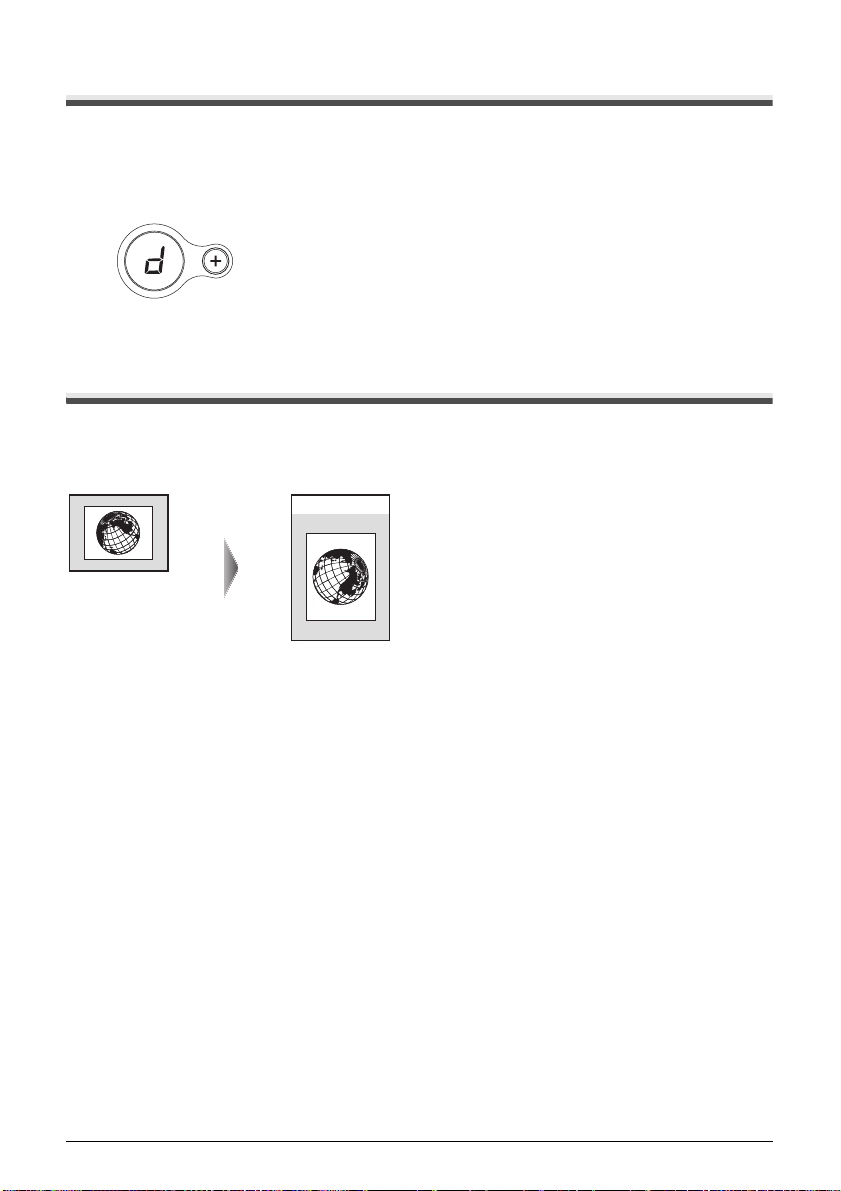
Using Useful Copy Functions
For details, refer to “Fit-to-Page Copying (MP210 series)” in “Making Copies” of the User’s Guide onscreen manual.
Fit-to-Page Copying
16 Copying
Printing from Your Computer
This section describes procedure for basic printing.
Printing with Windows
Note
Depending on your application program, operations may differ. For details, refer to the instruction manual
of your application.
The steps described in this section are for printing in Windows Vista™ operating system (hereafter
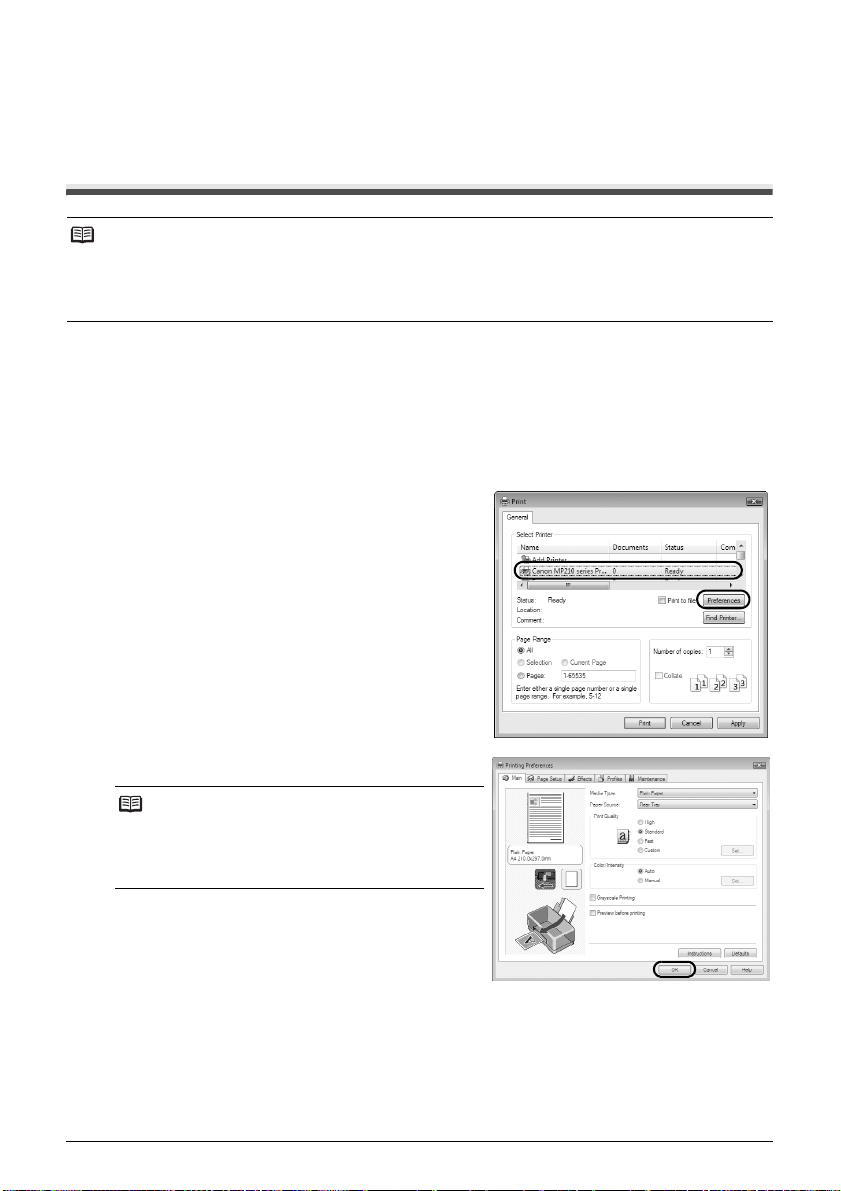
referred to as “Windows Vista”).
1
Turn on the machine and load the paper in the machine.
See “Turning the Machine On and Off” on page 4 and “Loading Printing Paper” on page 7.
2 Create a document or open a file to print using an appropriate application software.
3 Select Print on the application software’s File menu.
4 Make sure that Canon XXX Printer (where
“XXX” is your machine’s name) is selected in
Select Printer, and click Preferences (or
Properties).
5 Specify the required settings and click OK.
Note
For details on the printer driver functions, click Help or
Instructions to view the online help or the PC Printing
Guide on-screen manual. Instructions is only
displayed when the on-screen manuals are installed.
6 Click Print (or OK).
17Printing from Your Computer
Printing with Macintosh
Note
Depending on your application program, operations may differ. For details, refer to the instruction manual
of your application.
The steps described in this section are for printing in Mac® OS X v.10.4.x.
1
Turn on the machine and load the paper in the machine.
See “Turning the Machine On and Off” on page 4 and “Loading Printing Paper” on page 7.
2 Create a document or open a file to print using an appropriate application software.
3 Select Page Setup on the application
software’s File menu.
4 Make sure that your machine’s name is
selected in Format for.
5 Select the page size of the loaded paper in
Paper Size.
6 Click OK.
7 Select Print on the application software’s File
menu.
8 Select Quality & Media in the pop-up menu.
9 Specify the required settings.
Note
For details on the printer driver functions, click to
view the PC Printing Guide on-screen manual. If the
on-screen manuals are not installed, the PC Printing
Guide on-screen manual is not displayed even if is
clicked.
10 Click Print.
18 Printing from Your Computer

Scanning Images
You can scan images from the machine to a computer without printing them and save them in
popular image types such as JPEG, TIFF, bitmaps, or PDF. If you are scanning printed text, you can
use the OCR (Optical Character Recognition) software to convert it to text data.
Scanning Methods
You can select from the various scanning methods.
z If You Want to Edit or Print the Scanned Images
MP Navigator EX enables you to edit the scanned images, such as optimizing or trimming.
You can also start application software from MP Navigator EX to edit or print the scanned
images.
For detailed operations of MP Navigator EX, refer to the Scanning Guide on-screen manual.
You can also use the Operation Panel to open MP Navigator EX as well as open it using the
computer.
See “Opening MP Navigator EX using the Operation Panel” on page 19.
z If You Want to Scan Originals with Advanced Settings
ScanGear enables you to scan originals with advanced settings such as the resolution.
For detailed operations of ScanGear, refer to the Scanning Guide on-screen manual.
Besides the above-mentioned methods, you can use a TWAIN- or WIA- (Windows Vista and
Windows XP only) compliant application software and the Control Panel (Windows Vista and
Windows XP only) to scan originals with this machine. For detailed operations, refer to the Scanning
Guide on-screen manual.
Opening MP Navigator EX using the Operation Panel
1 Turn on the machine.
See “Turning the Machine On and Off” on page 4.
2 Load the original document on the Platen Glass.
See “Handling the Original Document” on page 6.
3 Press the SCAN button.
19Scanning Images

Printing Photographs Directly from a
Compliant Device
You can connect a PictBridge compliant device such as a digital camera, camcorder, or mobile
phone using a USB cable recommended by the device’s manufacturer, and print recorded images
directly without using a computer.
z Connectable Devices
PictBridge is an industry standard enabling a range of digital photo solutions, including the direct
printing of photos from a digital still camera, camcorder or mobile phone* without the need to use
a computer. A device can be connected to this machine for direct printing regardless of the
manufacturer or the model as long as it complies with the PictBridge standard.
* PictBridge compliant digital still cameras, digital camcorders, and camera-equipped mobile
phones are hereafter collectively referred to as “PictBridge compliant device”.
A device with this mark is PictBridge compliant.
z Printable Image Data Format
This machine prints images taken with a DCF (Design rule for Camera File system) ver. 1.0/2.0compatible digital camera (Exif ver. 2.2/2.21 compliant), as well as PNG files.
Printing Photographs Directly from a Compliant
Device
To connect a PictBridge compliant device to this machine, use a USB cable recommended by the
device’s manufacturer.
Caution
Do not connect any equipment other than PictBridge compliant devices to the Direct Print Port of the
machine. If you do so, electric shock, fire, or damage to the machine could result.
Important
Never disconnect the USB cable during printing unless when explicitly allowed to by the PictBridge
compliant device. When disconnecting the USB cable between the PictBridge compliant device and
machine, follow the instructions given in the device’s instruction manual.
Note
When printing photos with the PictBridge compliant device connected to the machine, we recommend the
use of the AC adapter supplied with the device. If you are using the device battery, be sure to charge it
fully.
1 Prepare for printing.
(1) Turn on the machine.
See “Turning the Machine On and Off” on page 4.
(2) Load paper.
See “Loading Printing Paper” on page 7.
20 Printing Photographs Directly from a Compliant Device
Loading…